- Practice -1. Installing Windows Server 2022. Windows System Administration

Содержание
- 2. Task: Installing and Configuring Windows Server: Set up a virtualized environment using Hyper-V or VirtualBox Install
- 3. Technical requirements for Windows Server 2022 Technical requirements To complete the hands-on lab for this assignment
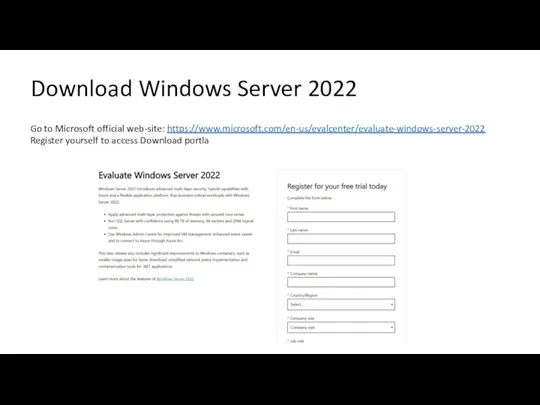
- 4. Download Windows Server 2022 Go to Microsoft official web-site: https://www.microsoft.com/en-us/evalcenter/evaluate-windows-server-2022 Register yourself to access Download portla
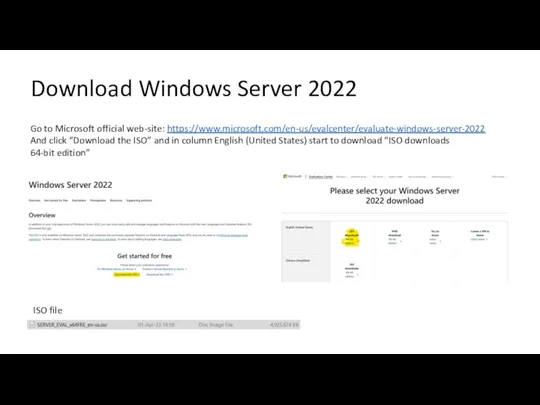
- 5. Download Windows Server 2022 Go to Microsoft official web-site: https://www.microsoft.com/en-us/evalcenter/evaluate-windows-server-2022 And click “Download the ISO” and
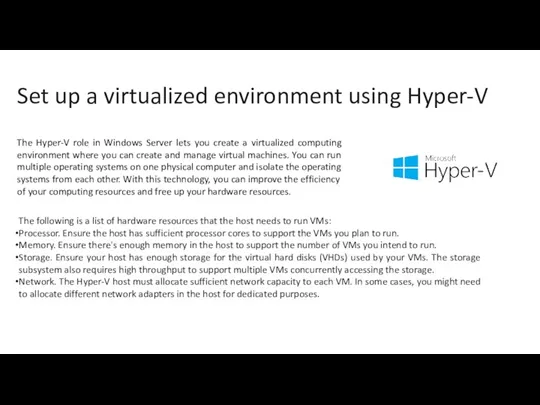
- 6. Set up a virtualized environment using Hyper-V The Hyper-V role in Windows Server lets you create
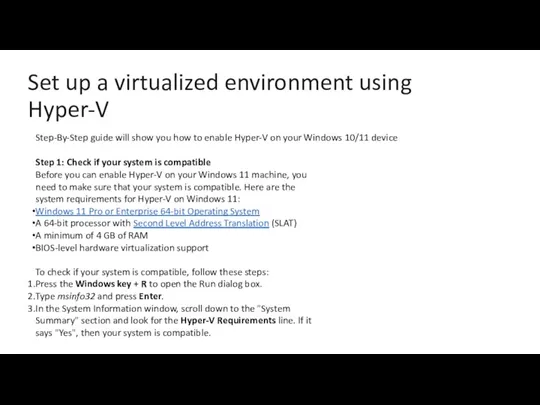
- 7. Set up a virtualized environment using Hyper-V Step-By-Step guide will show you how to enable Hyper-V
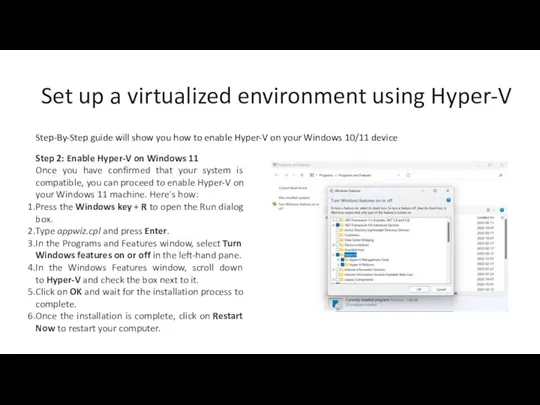
- 8. Set up a virtualized environment using Hyper-V Step-By-Step guide will show you how to enable Hyper-V
- 9. Set up a virtualized environment using Hyper-V Step-By-Step guide will show you how to enable Hyper-V
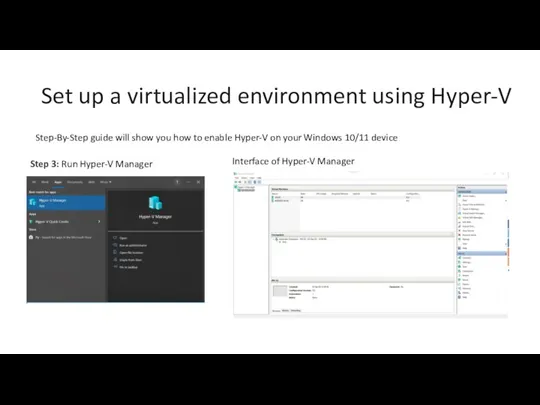
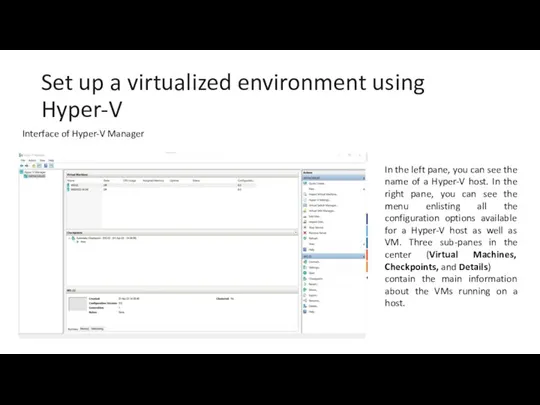
- 10. Set up a virtualized environment using Hyper-V Interface of Hyper-V Manager In the left pane, you
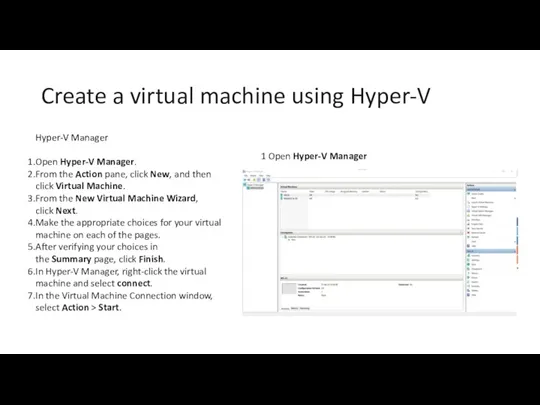
- 11. Create a virtual machine using Hyper-V Hyper-V Manager Open Hyper-V Manager. From the Action pane, click
- 12. Create a virtual machine using Hyper-V Hyper-V Manager 2 From the Action pane, click New, and
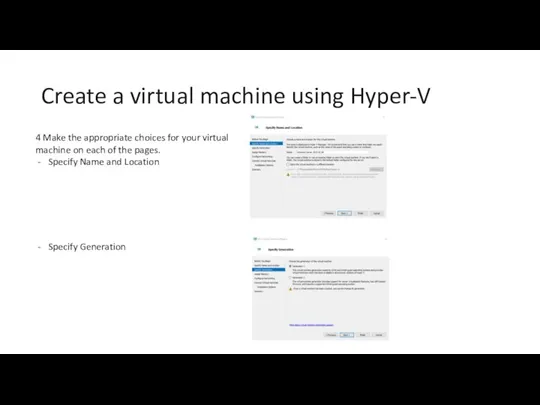
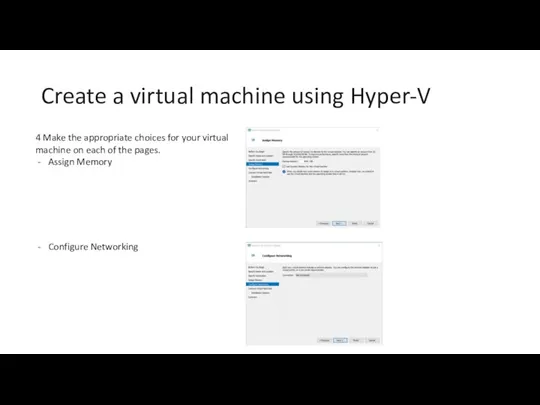
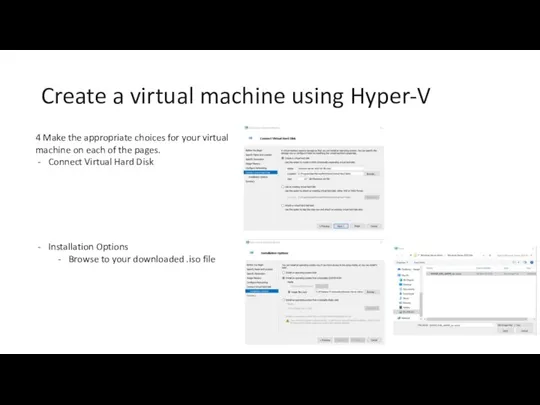
- 13. Create a virtual machine using Hyper-V 4 Make the appropriate choices for your virtual machine on
- 14. Create a virtual machine using Hyper-V 4 Make the appropriate choices for your virtual machine on
- 15. Create a virtual machine using Hyper-V 4 Make the appropriate choices for your virtual machine on
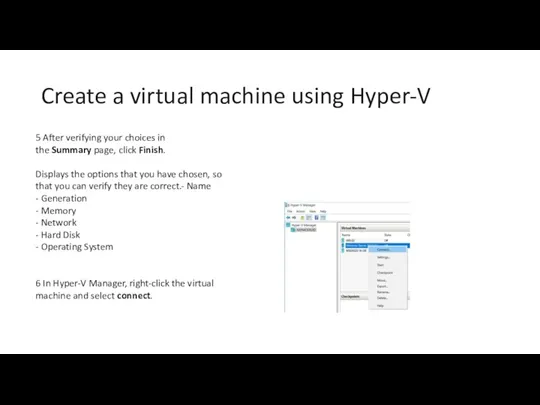
- 16. Create a virtual machine using Hyper-V 5 After verifying your choices in the Summary page, click
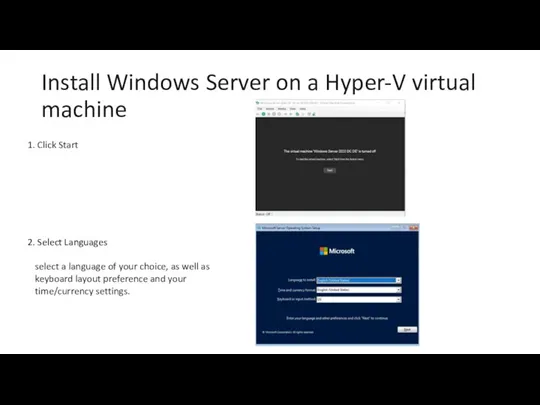
- 17. Install Windows Server on a Hyper-V virtual machine Click Start Select Languages select a language of
- 18. Install Windows Server on a Hyper-V virtual machine 3. Click Install Now button This initiate the
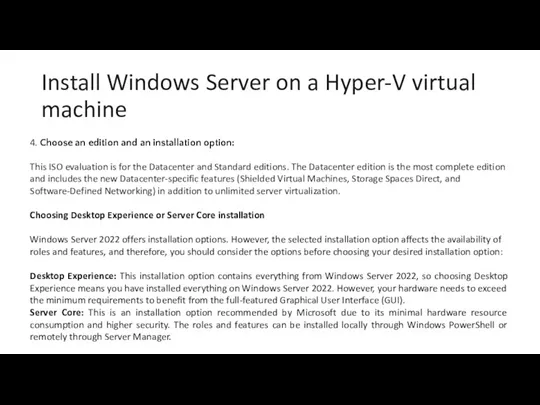
- 19. Install Windows Server on a Hyper-V virtual machine 4. Choose an edition and an installation option:
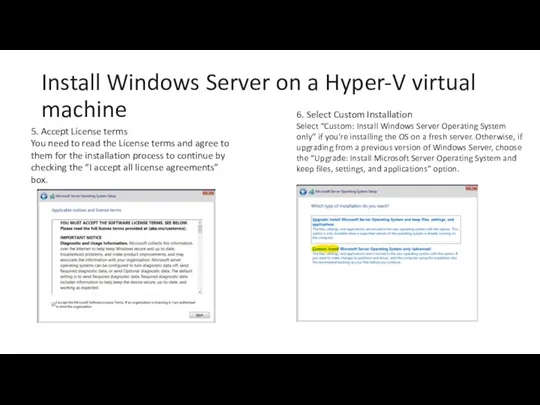
- 20. Install Windows Server on a Hyper-V virtual machine 5. Accept License terms You need to read
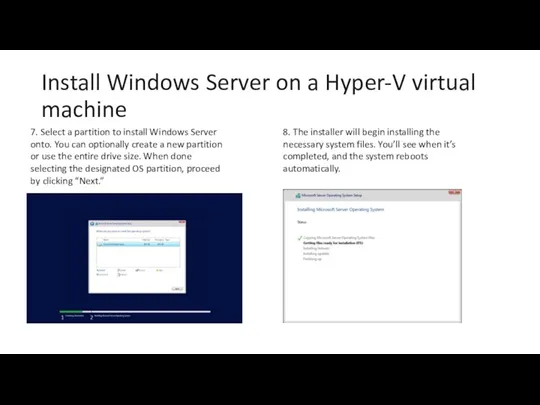
- 21. Install Windows Server on a Hyper-V virtual machine 7. Select a partition to install Windows Server
- 22. Install Windows Server on a Hyper-V virtual machine 9. After a successful installation, the system should
- 23. Install Windows Server on a Hyper-V virtual machine 11. The login screen will appear when you
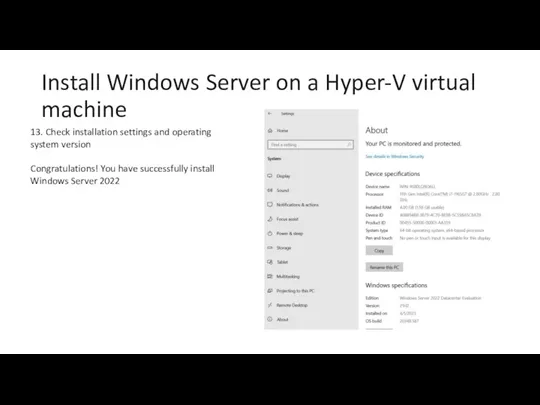
- 24. Install Windows Server on a Hyper-V virtual machine 13. Check installation settings and operating system version
- 25. Set up a virtualized environment using Oracle VirtualBox VirtualBox is open-source and cross-platform virtualization software. The
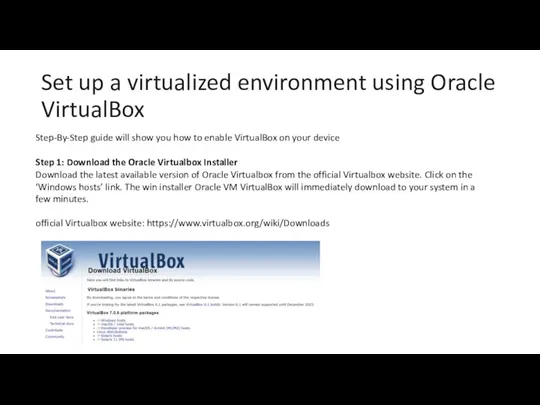
- 26. Set up a virtualized environment using Oracle VirtualBox Step-By-Step guide will show you how to enable
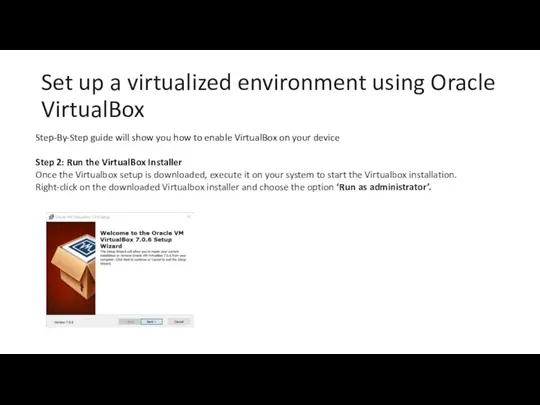
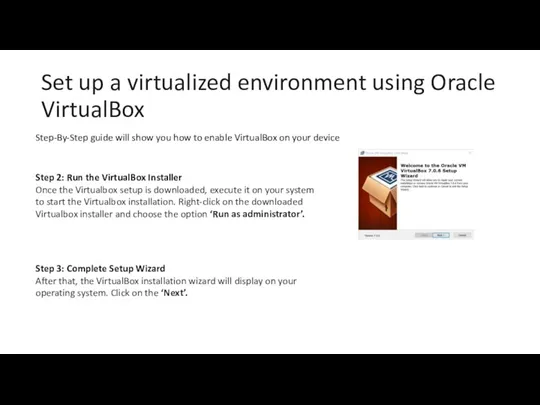
- 27. Set up a virtualized environment using Oracle VirtualBox Step-By-Step guide will show you how to enable
- 28. Set up a virtualized environment using Oracle VirtualBox Step-By-Step guide will show you how to enable
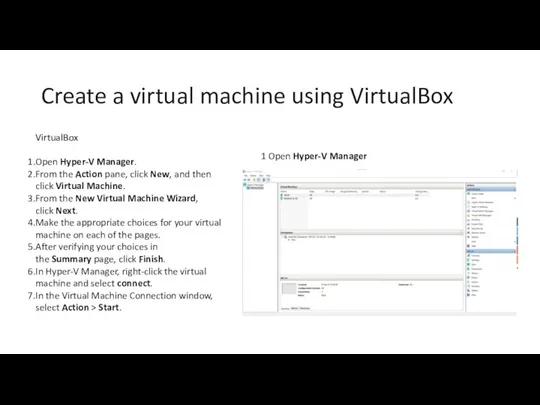
- 29. Create a virtual machine using VirtualBox VirtualBox Open Hyper-V Manager. From the Action pane, click New,
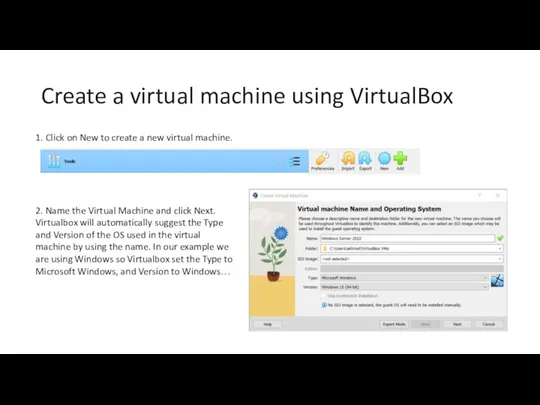
- 30. Create a virtual machine using VirtualBox 1. Click on New to create a new virtual machine.
- 31. Create a virtual machine using VirtualBox 3. Select your downloaded .iso file 4. Skip Unattended Installation
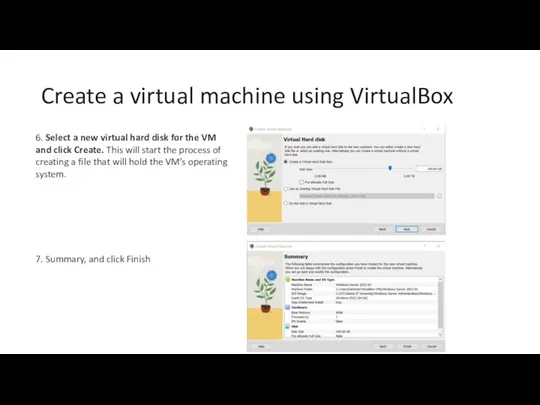
- 32. Create a virtual machine using VirtualBox 6. Select a new virtual hard disk for the VM
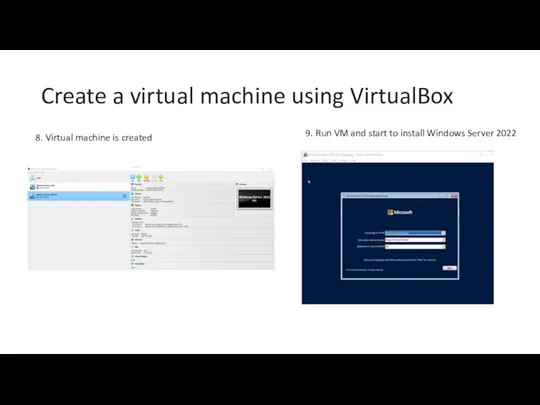
- 33. Create a virtual machine using VirtualBox 8. Virtual machine is created 9. Run VM and start
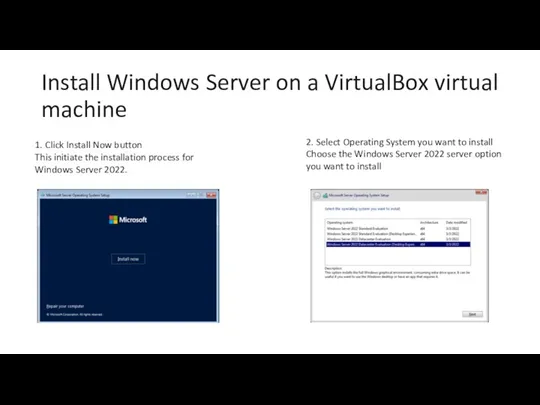
- 34. Install Windows Server on a VirtualBox virtual machine 1. Click Install Now button This initiate the
- 35. Install Windows Server on a VirtualBox virtual machine 3. Accept License terms You need to read
- 36. Install Windows Server on a VirtualBox virtual machine 5. Select a partition to install Windows Server
- 37. Install Windows Server on a VirtualBox virtual machine 7. After a successful installation, the system should
- 38. Install Windows Server on a VirtualBox virtual machine 9. The login screen will appear when you
- 39. Install Windows Server on a VirtualBox virtual machine 11. Check installation settings and operating system version
- 40. Practice-1 exercise Performing an initial Windows Server configuration This exercises will teach you how to perform
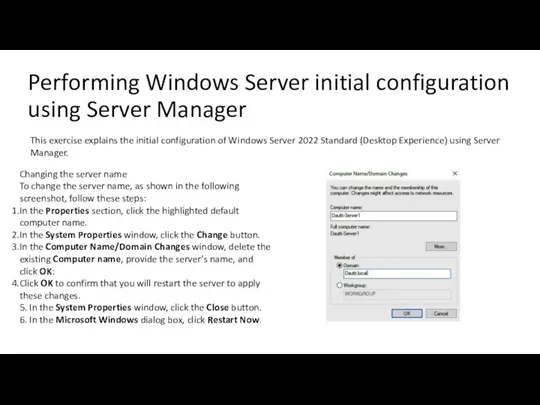
- 41. Performing Windows Server initial configuration using Server Manager This exercise explains the initial configuration of Windows
- 42. Performing Windows Server initial configuration using Server Manager Joining the server to a domain In the
- 43. Performing Windows Server initial configuration using Server Manager Enabling Remote Desktop In the System Properties dialog
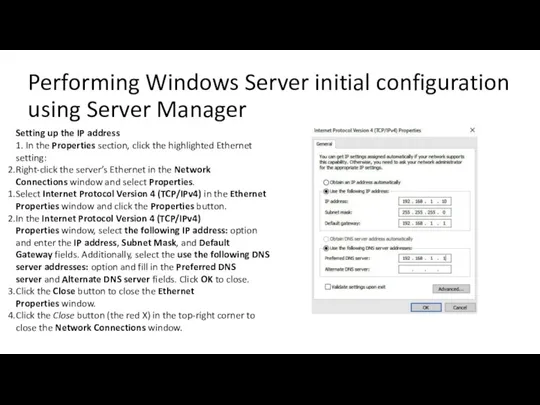
- 44. Performing Windows Server initial configuration using Server Manager Setting up the IP address 1. In the
- 45. Performing Windows Server initial configuration using Server Manager Checking for updates In the Properties section, click
- 46. Performing Windows Server initial configuration using Server Manager Turning off IE enhanced security In the Properties
- 47. Performing Windows Server initial configuration using Server Manager Changing the time zone In the Properties section,
- 49. Скачать презентацию
Task:
Installing and Configuring Windows Server:
Set up a virtualized environment using Hyper-V or
Task:
Installing and Configuring Windows Server:
Set up a virtualized environment using Hyper-V or
Technical requirements for Windows Server 2022
Technical requirements
To complete the hands-on lab for this
Technical requirements for Windows Server 2022
Technical requirements
To complete the hands-on lab for this
Download Windows Server 2022
Go to Microsoft official web-site: https://www.microsoft.com/en-us/evalcenter/evaluate-windows-server-2022
Register yourself to access Download
Download Windows Server 2022
Go to Microsoft official web-site: https://www.microsoft.com/en-us/evalcenter/evaluate-windows-server-2022
Register yourself to access Download
Download Windows Server 2022
Go to Microsoft official web-site: https://www.microsoft.com/en-us/evalcenter/evaluate-windows-server-2022
And click “Download the ISO”
Download Windows Server 2022
Go to Microsoft official web-site: https://www.microsoft.com/en-us/evalcenter/evaluate-windows-server-2022
And click “Download the ISO”
Set up a virtualized environment using Hyper-V
The Hyper-V role in Windows Server lets
Set up a virtualized environment using Hyper-V
The Hyper-V role in Windows Server lets
Set up a virtualized environment using Hyper-V
Step-By-Step guide will show you how to
Set up a virtualized environment using Hyper-V
Step-By-Step guide will show you how to
Set up a virtualized environment using Hyper-V
Step-By-Step guide will show you how to
Set up a virtualized environment using Hyper-V
Step-By-Step guide will show you how to
Set up a virtualized environment using Hyper-V
Step-By-Step guide will show you how to
Set up a virtualized environment using Hyper-V
Step-By-Step guide will show you how to
Set up a virtualized environment using Hyper-V
Interface of Hyper-V Manager
In the left pane,
Set up a virtualized environment using Hyper-V
Interface of Hyper-V Manager
In the left pane,
Create a virtual machine using Hyper-V
Hyper-V Manager
Open Hyper-V Manager.
From the Action pane, click New, and then click Virtual
Create a virtual machine using Hyper-V
Hyper-V Manager
Open Hyper-V Manager.
From the Action pane, click New, and then click Virtual
Create a virtual machine using Hyper-V
Hyper-V Manager
2 From the Action pane, click New, and then click Virtual
Create a virtual machine using Hyper-V
Hyper-V Manager
2 From the Action pane, click New, and then click Virtual
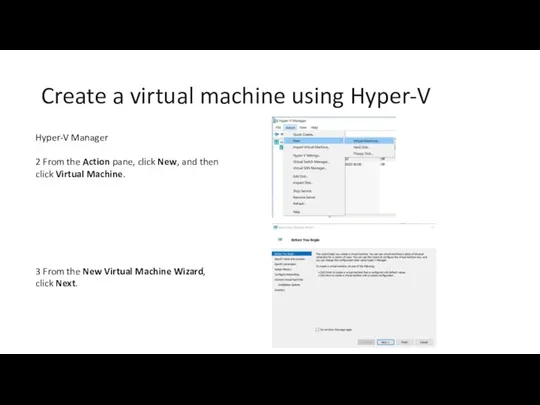
Create a virtual machine using Hyper-V
4 Make the appropriate choices for your virtual
Create a virtual machine using Hyper-V
4 Make the appropriate choices for your virtual
Create a virtual machine using Hyper-V
4 Make the appropriate choices for your virtual
Create a virtual machine using Hyper-V
4 Make the appropriate choices for your virtual
Create a virtual machine using Hyper-V
4 Make the appropriate choices for your virtual
Create a virtual machine using Hyper-V
4 Make the appropriate choices for your virtual
Create a virtual machine using Hyper-V
5 After verifying your choices in the Summary page, click Finish.
Displays
Create a virtual machine using Hyper-V
5 After verifying your choices in the Summary page, click Finish.
Displays
Install Windows Server on a Hyper-V virtual machine
Click Start
Select Languages
select a
Install Windows Server on a Hyper-V virtual machine
Click Start
Select Languages
select a
Install Windows Server on a Hyper-V virtual machine
3. Click Install Now button
This initiate
Install Windows Server on a Hyper-V virtual machine
3. Click Install Now button
This initiate

Install Windows Server on a Hyper-V virtual machine
4. Choose an edition and an
Install Windows Server on a Hyper-V virtual machine
4. Choose an edition and an
Install Windows Server on a Hyper-V virtual machine
5. Accept License terms
You need to
Install Windows Server on a Hyper-V virtual machine
5. Accept License terms
You need to
Install Windows Server on a Hyper-V virtual machine
7. Select a partition to install
Install Windows Server on a Hyper-V virtual machine
7. Select a partition to install
Install Windows Server on a Hyper-V virtual machine
9. After a successful installation, the
Install Windows Server on a Hyper-V virtual machine
9. After a successful installation, the

Install Windows Server on a Hyper-V virtual machine
11. The login screen will appear
Install Windows Server on a Hyper-V virtual machine
11. The login screen will appear

Install Windows Server on a Hyper-V virtual machine
13. Check installation settings and operating
Install Windows Server on a Hyper-V virtual machine
13. Check installation settings and operating
Set up a virtualized environment using Oracle VirtualBox
VirtualBox is open-source and cross-platform virtualization
Set up a virtualized environment using Oracle VirtualBox
VirtualBox is open-source and cross-platform virtualization
Set up a virtualized environment using Oracle VirtualBox
Step-By-Step guide will show you how
Set up a virtualized environment using Oracle VirtualBox
Step-By-Step guide will show you how
Set up a virtualized environment using Oracle VirtualBox
Step-By-Step guide will show you how
Set up a virtualized environment using Oracle VirtualBox
Step-By-Step guide will show you how
Set up a virtualized environment using Oracle VirtualBox
Step-By-Step guide will show you how
Set up a virtualized environment using Oracle VirtualBox
Step-By-Step guide will show you how
Create a virtual machine using VirtualBox
VirtualBox
Open Hyper-V Manager.
From the Action pane, click New, and then click Virtual Machine.
From
Create a virtual machine using VirtualBox
VirtualBox
Open Hyper-V Manager.
From the Action pane, click New, and then click Virtual Machine.
From
Create a virtual machine using VirtualBox
1. Click on New to create a new
Create a virtual machine using VirtualBox
1. Click on New to create a new
Create a virtual machine using VirtualBox
3. Select your downloaded .iso file
4. Skip Unattended
Create a virtual machine using VirtualBox
3. Select your downloaded .iso file
4. Skip Unattended

Create a virtual machine using VirtualBox
6. Select a new virtual hard disk for
Create a virtual machine using VirtualBox
6. Select a new virtual hard disk for
Create a virtual machine using VirtualBox
8. Virtual machine is created
9. Run VM
Create a virtual machine using VirtualBox
8. Virtual machine is created
9. Run VM
Install Windows Server on a VirtualBox virtual machine
1. Click Install Now button
This initiate
Install Windows Server on a VirtualBox virtual machine
1. Click Install Now button
This initiate
Install Windows Server on a VirtualBox virtual machine
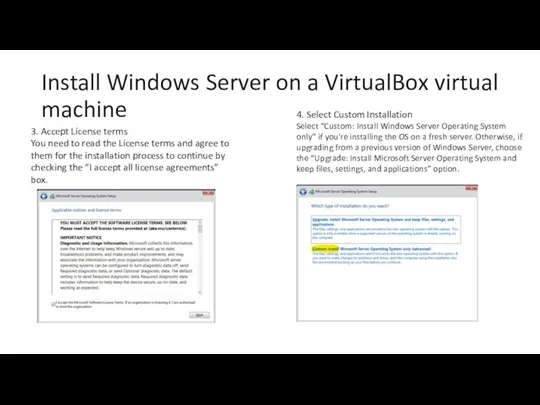
3. Accept License terms
You need to
Install Windows Server on a VirtualBox virtual machine
3. Accept License terms
You need to
Install Windows Server on a VirtualBox virtual machine
5. Select a partition to install
Install Windows Server on a VirtualBox virtual machine
5. Select a partition to install

Install Windows Server on a VirtualBox virtual machine
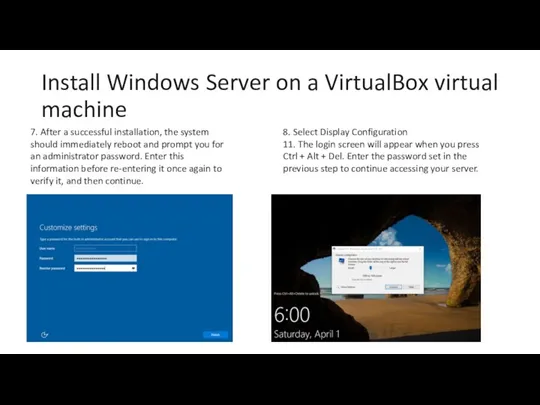
7. After a successful installation, the
Install Windows Server on a VirtualBox virtual machine
7. After a successful installation, the
Install Windows Server on a VirtualBox virtual machine
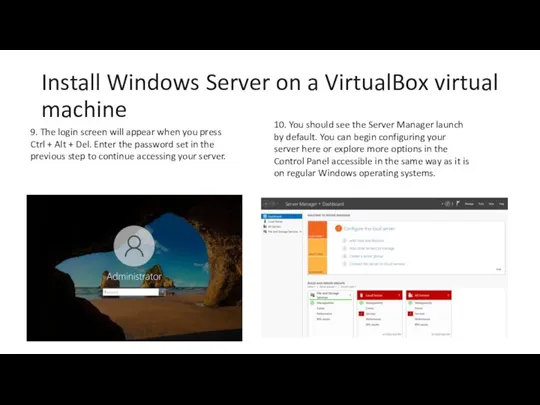
9. The login screen will appear
Install Windows Server on a VirtualBox virtual machine
9. The login screen will appear
Install Windows Server on a VirtualBox virtual machine
11. Check installation settings and operating
Install Windows Server on a VirtualBox virtual machine
11. Check installation settings and operating

Practice-1 exercise
Performing an initial Windows Server configuration
This exercises will teach you how to
Practice-1 exercise
Performing an initial Windows Server configuration
This exercises will teach you how to
Performing Windows Server initial configuration using Server Manager
This exercise explains the initial configuration
Performing Windows Server initial configuration using Server Manager
This exercise explains the initial configuration
Performing Windows Server initial configuration using Server Manager
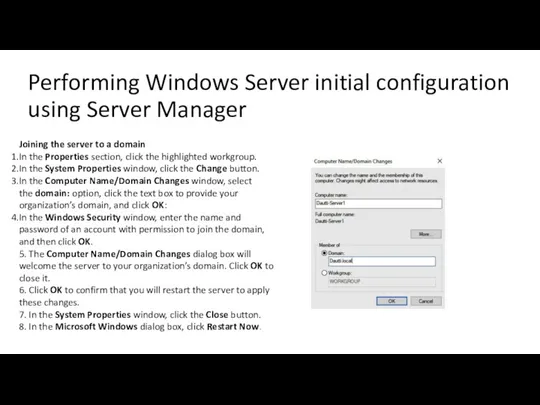
Joining the server to a domain
In
Performing Windows Server initial configuration using Server Manager
Joining the server to a domain
In
Performing Windows Server initial configuration using Server Manager
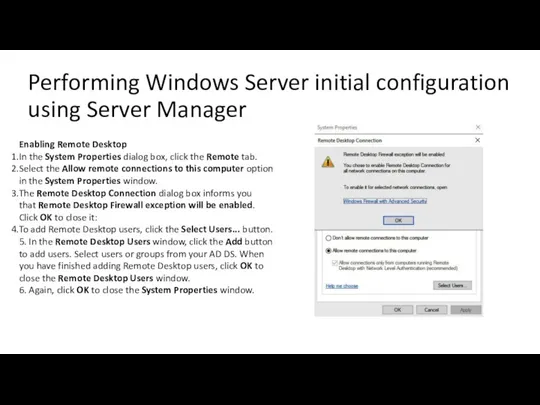
Enabling Remote Desktop
In the System Properties dialog box,
Performing Windows Server initial configuration using Server Manager
Enabling Remote Desktop
In the System Properties dialog box,
Performing Windows Server initial configuration using Server Manager
Setting up the IP address
1. In
Performing Windows Server initial configuration using Server Manager
Setting up the IP address
1. In
Performing Windows Server initial configuration using Server Manager
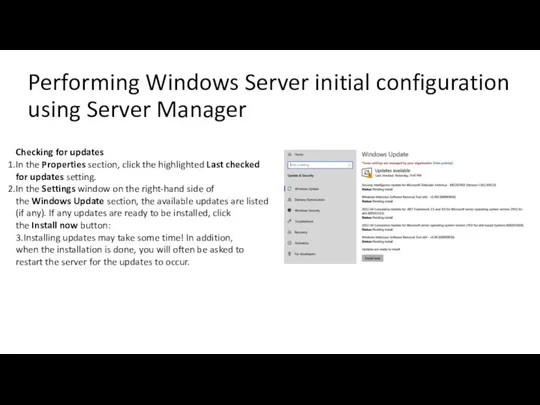
Checking for updates
In the Properties section, click the
Performing Windows Server initial configuration using Server Manager
Checking for updates
In the Properties section, click the
Performing Windows Server initial configuration using Server Manager
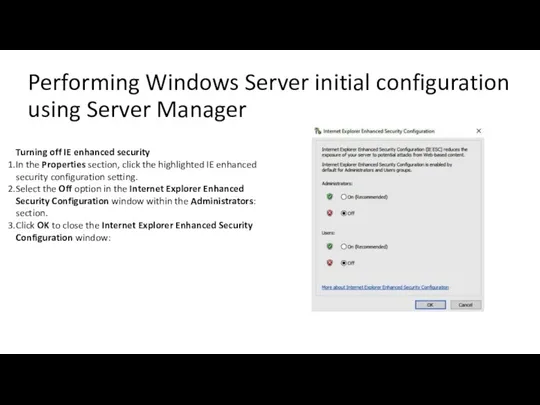
Turning off IE enhanced security
In the Properties section,
Performing Windows Server initial configuration using Server Manager
Turning off IE enhanced security
In the Properties section,
Performing Windows Server initial configuration using Server Manager
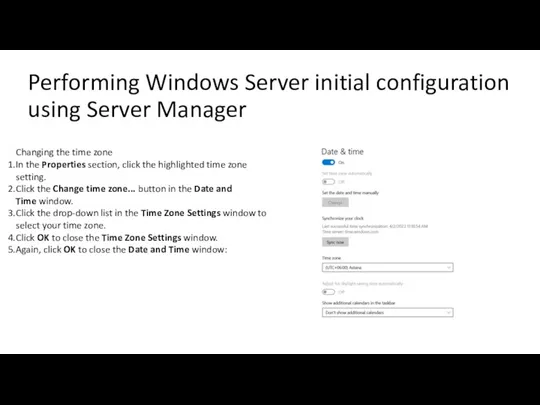
Changing the time zone
In the Properties section, click
Performing Windows Server initial configuration using Server Manager
Changing the time zone
In the Properties section, click
 Электрондық үкімет
 Chapter 5. 2FA and Brute. Force attacking
 Среда программы Scratch
 Понятие информация. Виды информации. Основные информационные
 Стратегический анализ
 Мультимедия и области его применения
 Основы HTML
 7 класс, урок Устройства ввода-вывода
 Язык HTML. Начальные сведения
 9 класс. Язык разметки гипертекста. …, … Теги для изменения параметров шрифта. Атрибут FACE для изменения типа шрифта Атрибуты BGCOLOR – фон, ТЕХТ – цвет шрифта. Тэги для разметки списков. Тег для создания разделительные по
 Масиви в мові Java
 Компьютерная Графика-Основные понятия
 Исполнитель Чертёжник. Система команд исполнителя Чертёжник
 Радио
Радио Одномерные массивы. Алгоритмы обработки массивов. Сортировка. Лекции 7-9 по алгоритмизации и программированию
 Клавиатура компьютера. Основные приемы работы. Виды клавиш и их основное назначение
 Дистанционный урок по информатике 10 марта 3 класс
 Гражданская журналистика и блоги
 Class and Object. Java Core
 Создание графических объектов в текстовом процессоре Writer
 Функции и функциональные блоки
 Слепая подпись
 Вставка объектов в документ
 Урок и презентация по теме Решение алгоритмических задач
 Обчислювальний кластер фірми Фібрейн”
 Геймификация – применение игровых механик в неигровых процессах
 Презентация к уроку информатики Оформление текста в среде Turbo Pascal
 Ringoo Online