- MVP UI2FUX for DEV

Содержание
- 2. Green = all transition animations Red = if the item was clicked Blue = same as
- 3. Screen 1. Login screen/Sign up screen Once the sign-up button is clicked, it will fade out
- 4. Screen 2.Home screen (News Feed) Loads recent trip posts from user’s followers. Display date of trip
- 5. Screen 3 Expanded View of Full Trip Transportation Click on itinerary->will open full itinerary on new
- 6. Screen 4 My Itineraries Click on icon->will open new screen “My itineraries.” Click on “Remove”->trash can
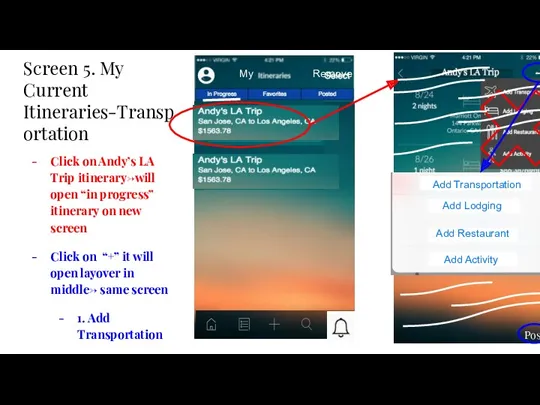
- 7. Post Post trip? Add Transportation Add Lodging Add Restaurant Add Activity Screen 5. My Current Itineraries-Transportation
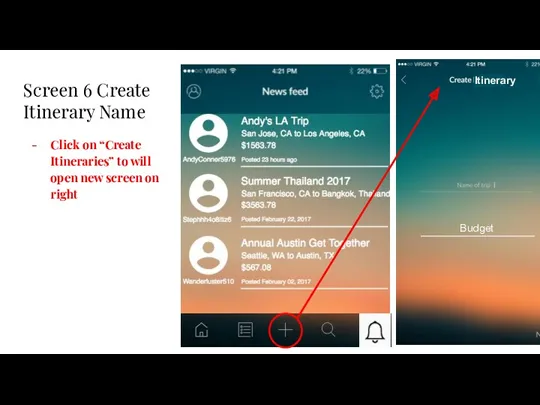
- 8. Itinerary Budget Screen 6 Create Itinerary Name Click on “Create Itineraries” to will open new screen
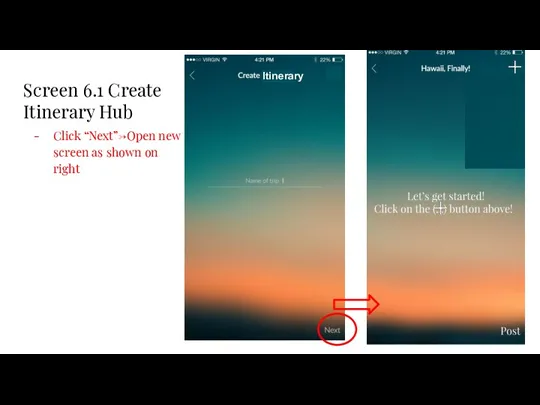
- 9. Itinerary Screen 6.1 Create Itinerary Hub Click “Next”->Open new screen as shown on right
- 10. Screen 6.2 Create Itinerary Choose Transportation Click on “Plus icon”->opens same screen with overlay Click on
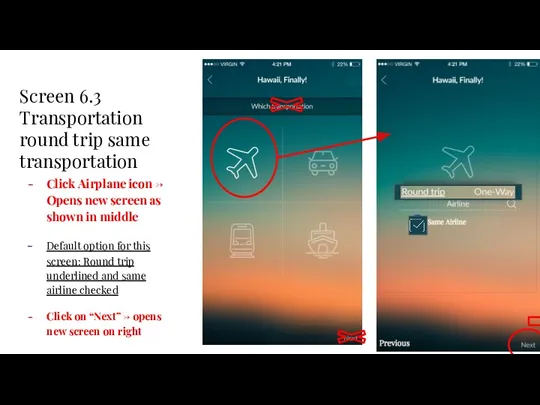
- 11. Round Trip v Screen 6.3 Transportation round trip same transportation Click Airplane icon -> Opens new
- 12. Screen 6.4 Create Itinerary Date Click on “Next”->opens new screen as shown on second screen Replace
- 13. Screen 6.5 Transportation cost input Click on “Next” ->new screen as shown on middle screen The
- 14. Screen 6.6 Add transportation round trip different airlines -Uncheck “same airline”->same screen it displays another search
- 15. Screen 6.7 Calendar input Replace “What Dates” with “Select Date Range” Click on “Select Date Range”->same
- 16. Screen 6.8 cost of transportation input round trip Click on “Next” ->new screen as shown on
- 17. -Once done entering numbers; -User clicks “Done” -> number pad slides down and disappears. -User clicks
- 18. Screen 7. Add data for car transportation Click on “Next” ->new screen as shown on right
- 19. Screen 7. Add data for car transportation Click on “Next” ->new screen as shown on right
- 20. Screen 8 Add Transit round trip Click on “Next” ->new screen as shown on right screen
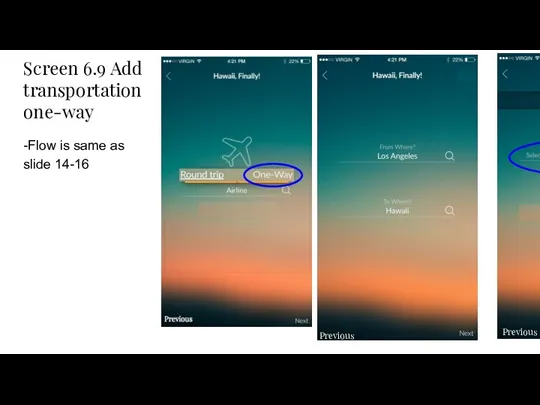
- 21. Screen 8.1 Add transit one way Click on One-way -> word will underline; fade out: “Which
- 22. Screen 9. Add Transportation (ship) round trip Click on “Round trip”-> word will underline User clicks
- 23. Screen 9.1 Add Transportation (ship) one-way cont’d Click on One-way -> word will underline; fade out:
- 24. Screen 10. Add Housing Replace “Which Housing” to “Which Lodging” -Google API for Hotel, motel, inn,
- 25. 11. Add Restaurant -API from Google -Instead of date slider; user can only choose one date
- 26. Screen 12 Add activity Add Average Cost Per Person line (automatically calculates) Add Average Cost Per
- 27. Screen 13. Favorites feed Click on “Andy’s LA Trip” to expand to the next screen. Clicking
- 28. Screen 13.1 Favorites add to own Have divider lines like the pop-up menu on the bottom
- 29. Screen 14. Explore (slide function and display) Search bar for finding people by name and username
- 30. Screen 14.1 Explore People (expanded) When clicked it expands to the user’s profile where you can
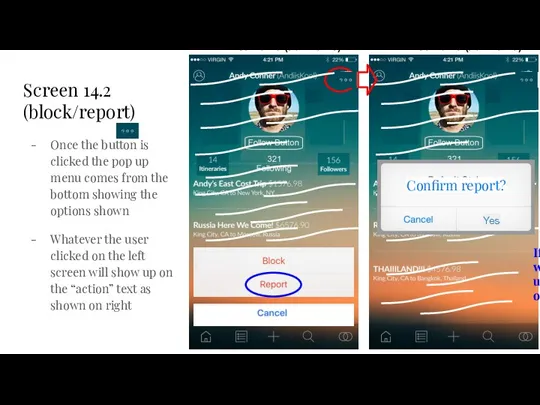
- 31. Username (Full Name) Username (Full Name) Screen 14.2 (block/report) Once the button is clicked the pop
- 32. Screen 14.3 Explore People (expanded 2.0) Click on trip -> content changes to full view of
- 33. Screen 14.4 Followers/Following Itineraries (default) it shown on the left picture. If you click followers on
- 34. 14.5 Explore Locations Search bar for finding people by location When they search locations and they
- 35. Screen 15. Notifications When the social icon is clicked at any time, will show most recent
- 36. Screen 16. My profile This is the user’s own profile page. (get here by clicking on
- 37. 17. Settings Anytime anyone hits the settings button / Facebook invite
- 38. 17.2 Change Password Submit Submit
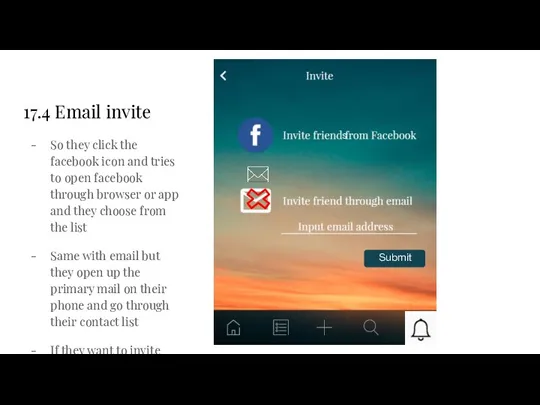
- 39. 17.4 Email invite So they click the facebook icon and tries to open facebook through browser
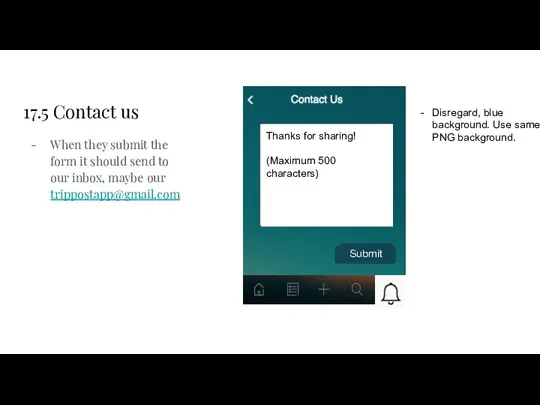
- 40. 17.5 Contact us When they submit the form it should send to our inbox, maybe our
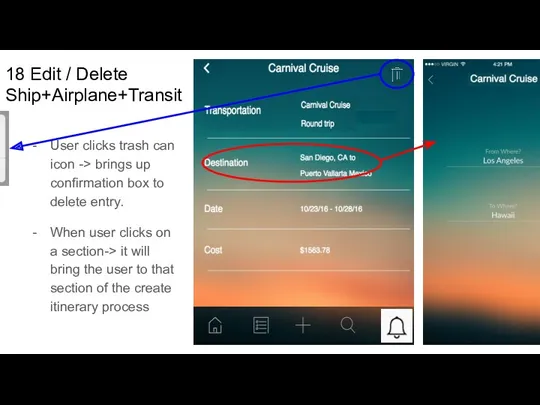
- 41. 18 Edit / Delete Ship+Airplane+Transit User clicks trash can icon -> brings up confirmation box to
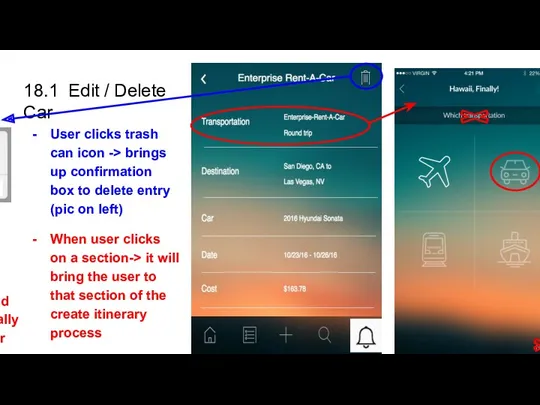
- 42. 18.1 Edit / Delete Car User clicks trash can icon -> brings up confirmation box to
- 43. 18.2 Edit / Delete Lodging User clicks trash can icon -> brings up confirmation box to
- 45. Скачать презентацию
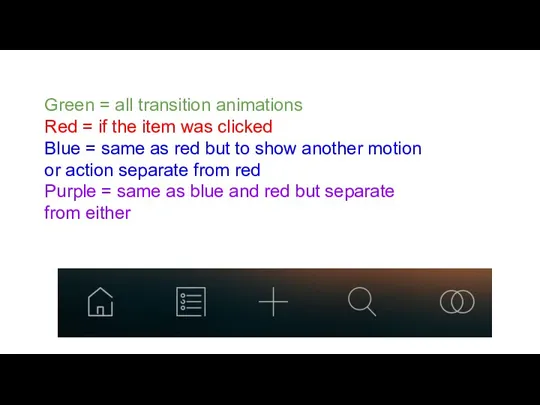
Green = all transition animations
Red = if the item was
Green = all transition animations
Red = if the item was
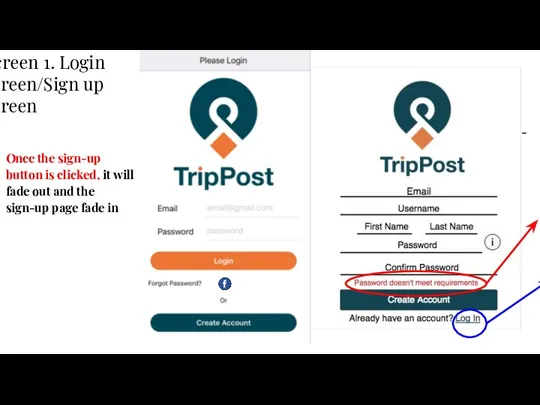
Screen 1. Login screen/Sign up screen
Once the sign-up button is clicked,
Once the sign-up button is clicked,
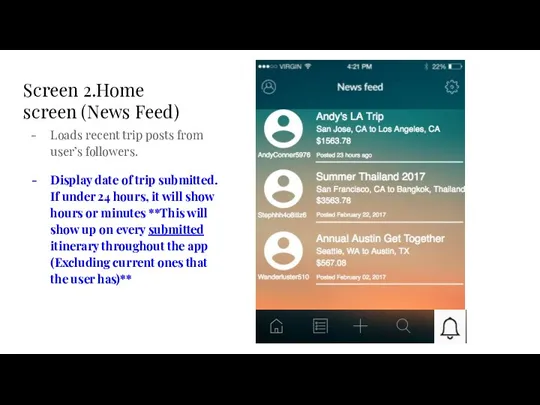
Screen 2.Home screen (News Feed)
Loads recent trip posts from user’s followers.
Display
Screen 2.Home screen (News Feed)
Loads recent trip posts from user’s followers.
Display
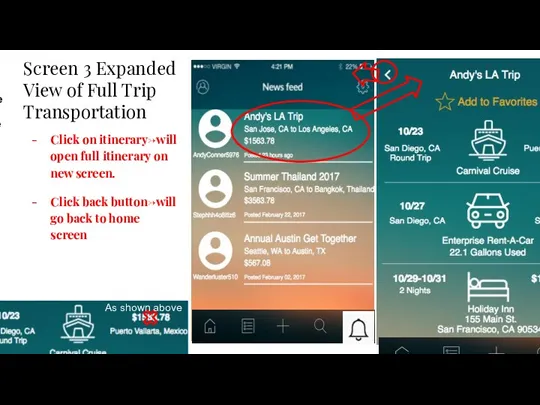
Screen 3 Expanded View of Full Trip Transportation
Click on itinerary->will open
Screen 3 Expanded View of Full Trip Transportation
Click on itinerary->will open
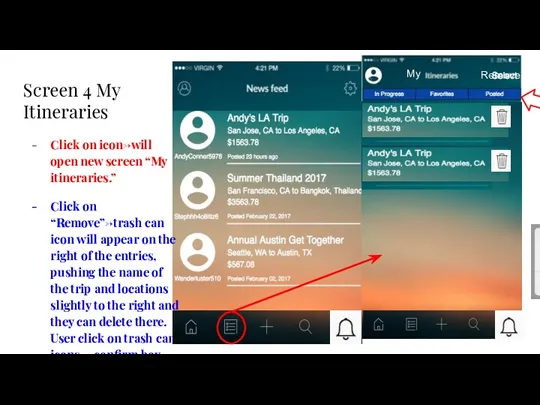
Screen 4 My Itineraries
Click on icon->will open new screen “My itineraries.”
Screen 4 My Itineraries
Click on icon->will open new screen “My itineraries.”
Post
Post trip?
Add Transportation
Add Lodging
Add Restaurant
Add Activity
Screen 5. My Current Itineraries-Transportation
Click
Post
Post trip?
Add Transportation
Add Lodging
Add Restaurant
Add Activity
Screen 5. My Current Itineraries-Transportation
Click
Itinerary
Budget
Screen 6 Create Itinerary Name
Click on “Create Itineraries” to will
Itinerary
Budget
Screen 6 Create Itinerary Name
Click on “Create Itineraries” to will
Itinerary
Screen 6.1 Create Itinerary Hub
Click “Next”->Open new screen as shown on
Itinerary
Screen 6.1 Create Itinerary Hub
Click “Next”->Open new screen as shown on
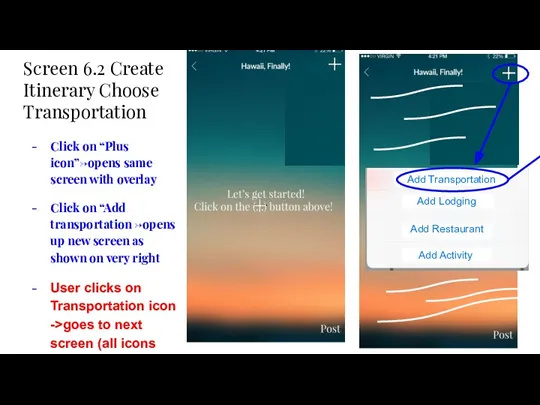
Screen 6.2 Create Itinerary Choose Transportation
Click on “Plus icon”->opens same screen
Screen 6.2 Create Itinerary Choose Transportation
Click on “Plus icon”->opens same screen
Round Trip
v
Screen 6.3 Transportation round trip same transportation
Click Airplane icon ->
Round Trip
v
Screen 6.3 Transportation round trip same transportation
Click Airplane icon ->
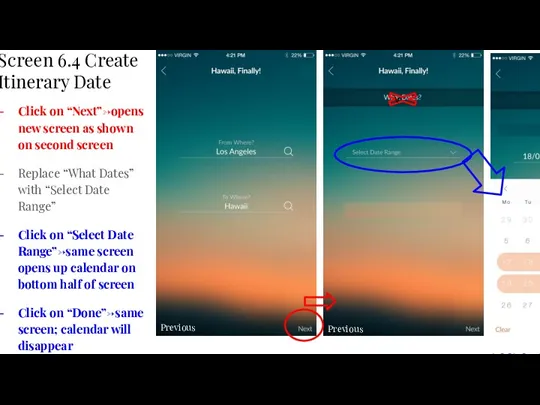
Screen 6.4 Create Itinerary Date
Click on “Next”->opens new screen as shown
Screen 6.4 Create Itinerary Date
Click on “Next”->opens new screen as shown
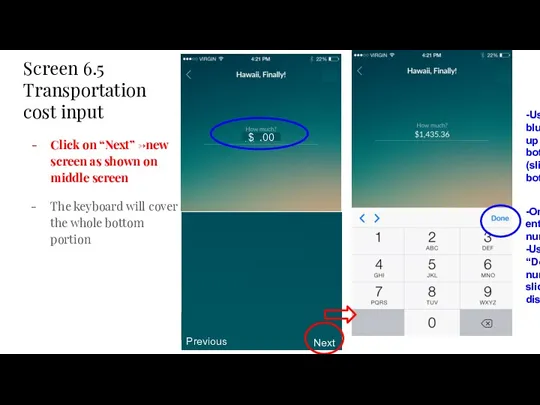
Screen 6.5 Transportation cost input
Click on “Next” ->new screen as shown
Screen 6.5 Transportation cost input
Click on “Next” ->new screen as shown
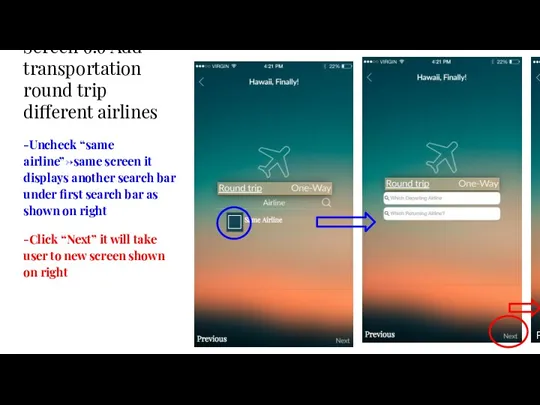
Screen 6.6 Add transportation round trip different airlines
-Uncheck “same airline”->same screen
Screen 6.6 Add transportation round trip different airlines
-Uncheck “same airline”->same screen
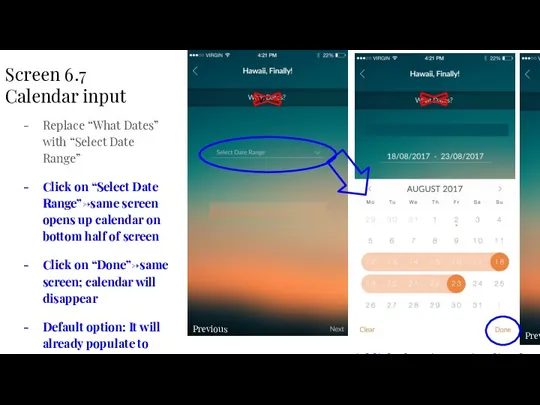
Screen 6.7 Calendar input
Replace “What Dates” with “Select Date Range”
Click on
Screen 6.7 Calendar input
Replace “What Dates” with “Select Date Range”
Click on
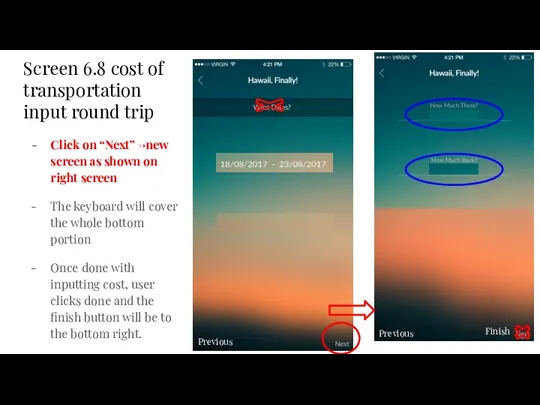
Screen 6.8 cost of transportation input round trip
Click on “Next” ->new
Screen 6.8 cost of transportation input round trip
Click on “Next” ->new
-Once done entering numbers;
-User clicks “Done” -> number pad slides down
-Once done entering numbers;
-User clicks “Done” -> number pad slides down
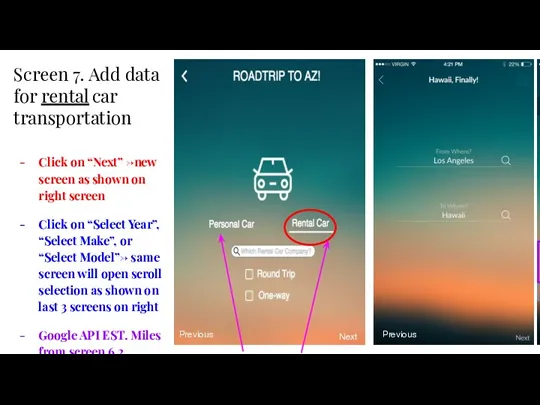
Screen 7. Add data for car transportation
Click on “Next” ->new screen
Screen 7. Add data for car transportation
Click on “Next” ->new screen
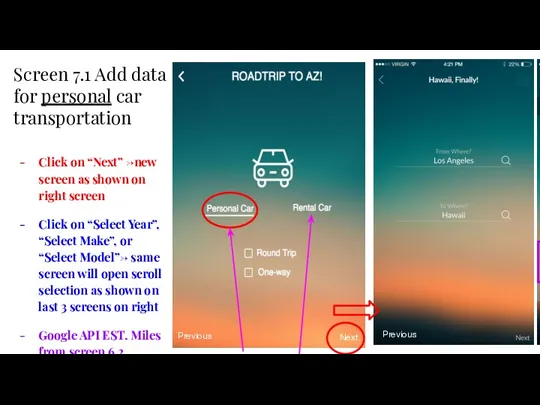
Screen 7. Add data for car transportation
Click on “Next” ->new screen
Screen 7. Add data for car transportation
Click on “Next” ->new screen
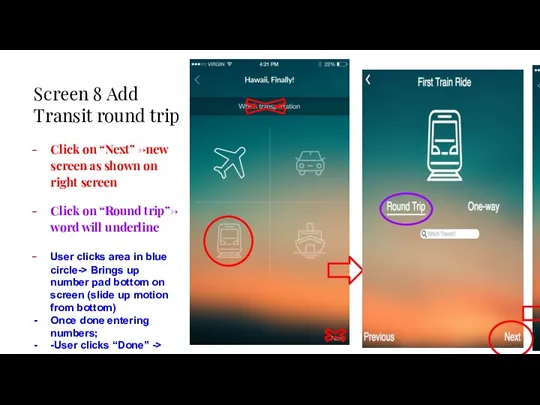
Screen 8 Add Transit round trip
Click on “Next” ->new screen as
Screen 8 Add Transit round trip
Click on “Next” ->new screen as
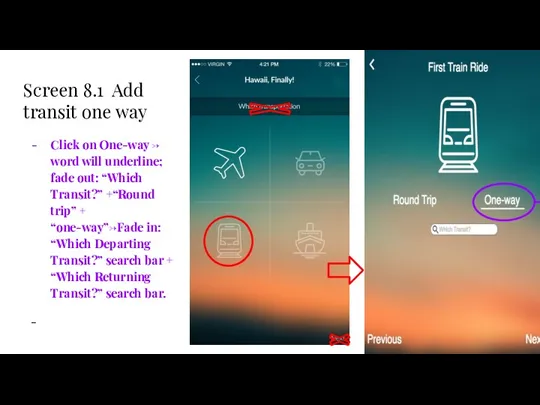
Screen 8.1 Add transit one way
Click on One-way -> word will
Screen 8.1 Add transit one way
Click on One-way -> word will
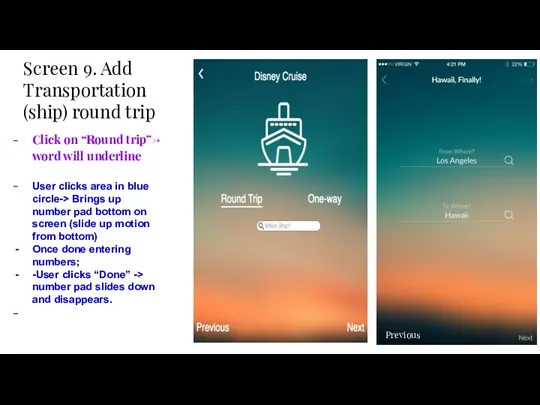
Screen 9. Add Transportation (ship) round trip
Click on “Round trip”-> word
Screen 9. Add Transportation (ship) round trip
Click on “Round trip”-> word

Screen 9.1 Add Transportation (ship) one-way cont’d
Click on One-way -> word
Screen 9.1 Add Transportation (ship) one-way cont’d
Click on One-way -> word
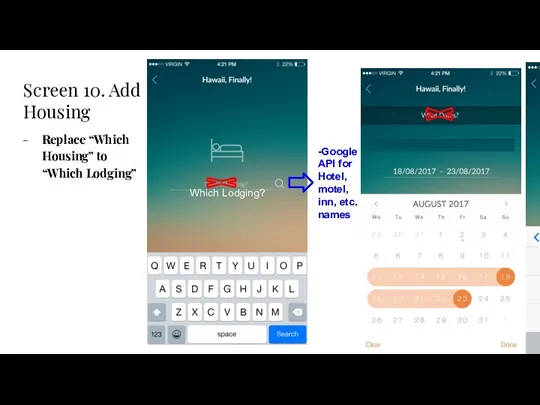
Screen 10. Add Housing
Replace “Which Housing” to “Which Lodging”
-Google API
Screen 10. Add Housing
Replace “Which Housing” to “Which Lodging”
-Google API
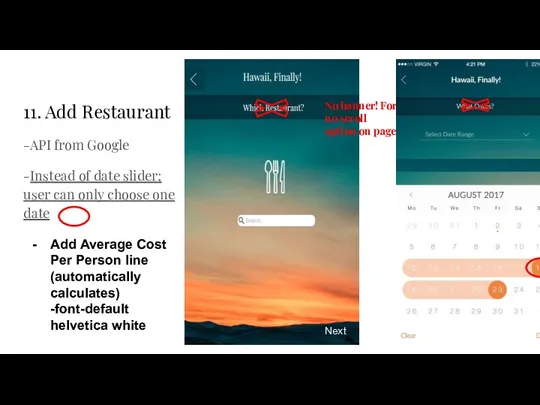
11. Add Restaurant
-API from Google
-Instead of date slider; user
11. Add Restaurant
-API from Google
-Instead of date slider; user
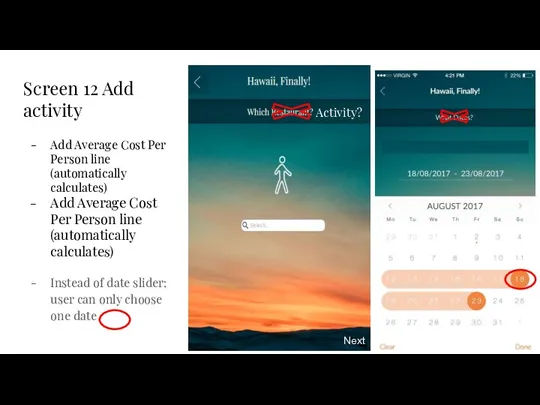
Screen 12 Add activity
Add Average Cost Per Person line (automatically calculates)
Add
Screen 12 Add activity
Add Average Cost Per Person line (automatically calculates)
Add
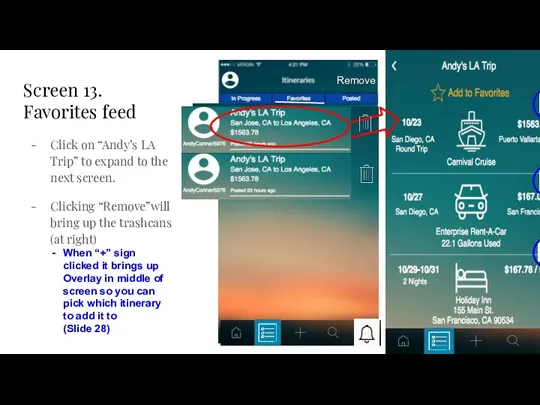
Screen 13. Favorites feed
Click on “Andy’s LA Trip” to expand to
Screen 13. Favorites feed
Click on “Andy’s LA Trip” to expand to
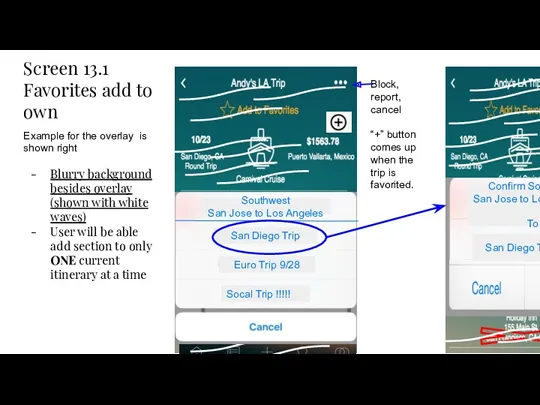
Screen 13.1 Favorites add to own
Have divider lines like the pop-up
Screen 13.1 Favorites add to own
Have divider lines like the pop-up
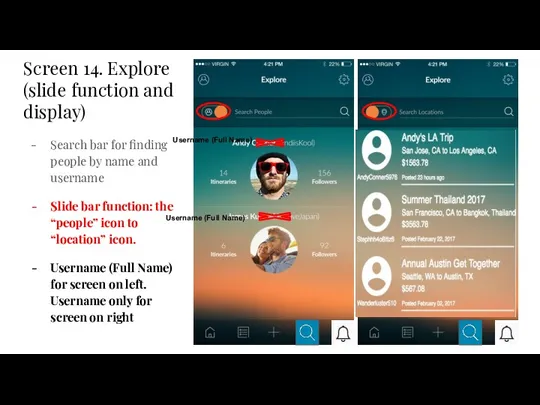
Screen 14. Explore (slide function and display)
Search bar for finding people
Screen 14. Explore (slide function and display)
Search bar for finding people
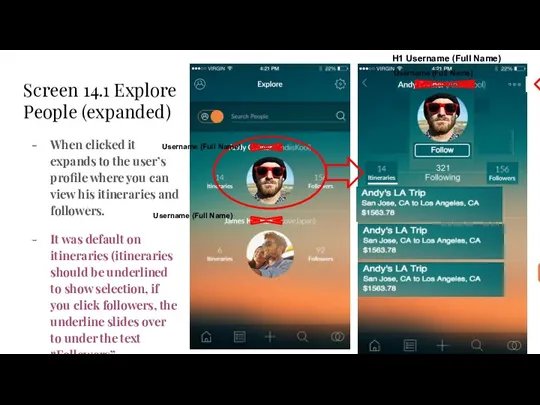
Screen 14.1 Explore People (expanded)
When clicked it expands to the user’s
Screen 14.1 Explore People (expanded)
When clicked it expands to the user’s
Username (Full Name)
Username (Full Name)
Screen 14.2 (block/report)
Once the button is clicked
Username (Full Name)
Username (Full Name)
Screen 14.2 (block/report)
Once the button is clicked
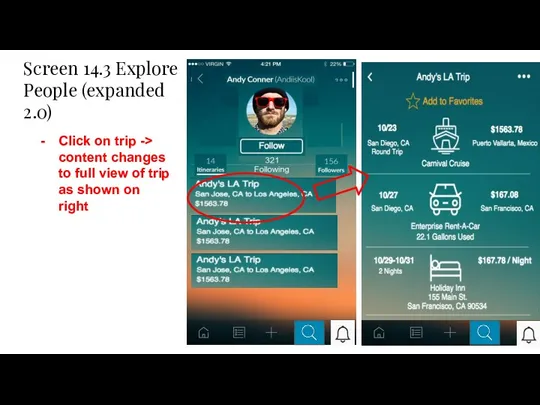
Screen 14.3 Explore People (expanded 2.0)
Click on trip -> content changes
Screen 14.3 Explore People (expanded 2.0)
Click on trip -> content changes
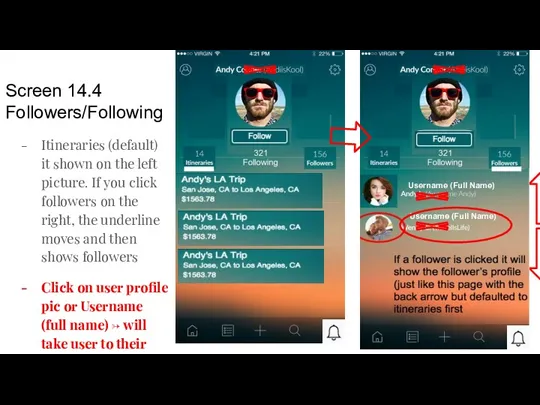
Screen 14.4 Followers/Following
Itineraries (default) it shown on the left picture. If
Screen 14.4 Followers/Following
Itineraries (default) it shown on the left picture. If
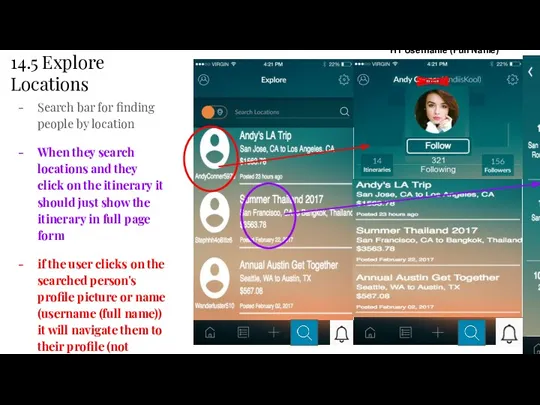
14.5 Explore Locations
Search bar for finding people by location
When they search
14.5 Explore Locations
Search bar for finding people by location
When they search
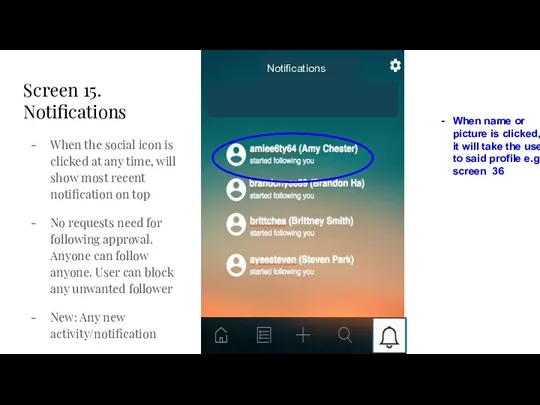
Screen 15. Notifications
When the social icon is clicked at any time,
Screen 15. Notifications
When the social icon is clicked at any time,
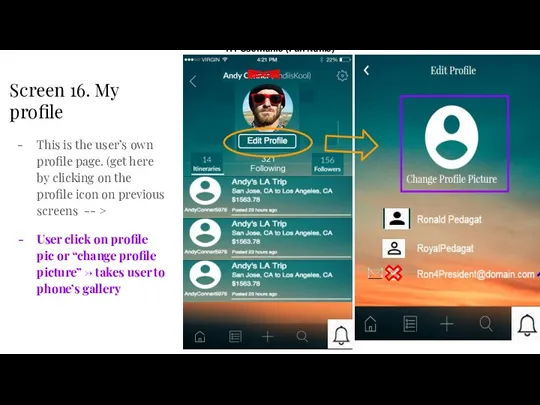
Screen 16. My profile
This is the user’s own profile page.
Screen 16. My profile
This is the user’s own profile page.
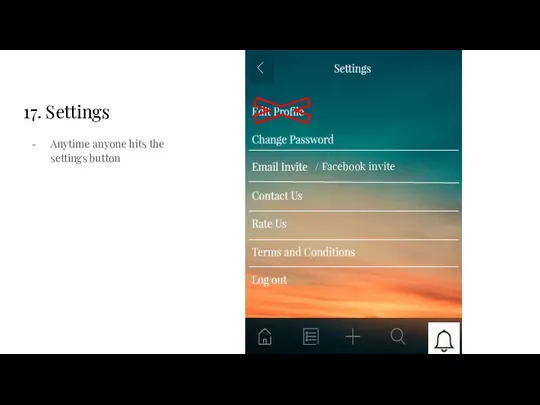
17. Settings
Anytime anyone hits the settings button
/ Facebook invite
17. Settings
Anytime anyone hits the settings button
/ Facebook invite
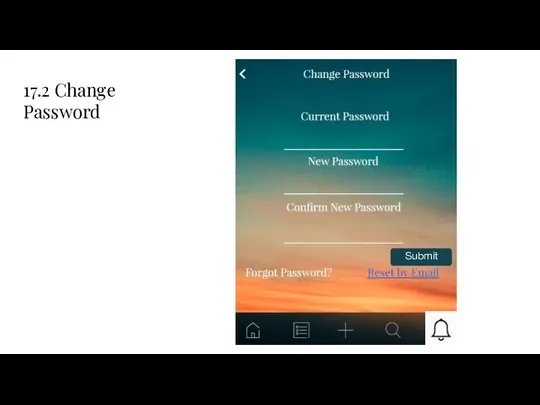
17.2 Change Password
Submit
Submit
17.2 Change Password
Submit
Submit
17.4 Email invite
So they click the facebook icon and tries
17.4 Email invite
So they click the facebook icon and tries
17.5 Contact us
When they submit the form it should send to
17.5 Contact us
When they submit the form it should send to
18 Edit / Delete Ship+Airplane+Transit
User clicks trash can icon -> brings
18 Edit / Delete Ship+Airplane+Transit
User clicks trash can icon -> brings
18.1 Edit / Delete
Car
User clicks trash can icon -> brings up
18.1 Edit / Delete
Car
User clicks trash can icon -> brings up
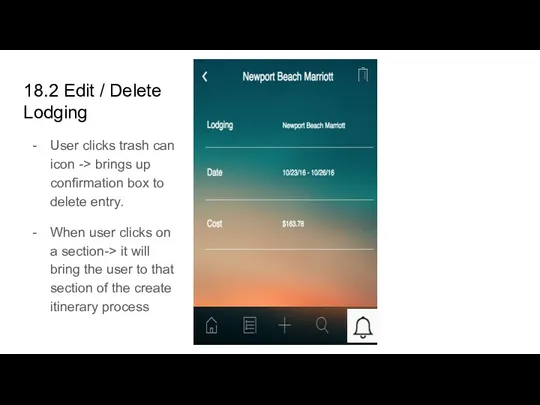
18.2 Edit / Delete
Lodging
User clicks trash can icon ->
18.2 Edit / Delete
Lodging
User clicks trash can icon ->
 СУБД Access. Создание базы данных
 Основы С++. Синтаксис, ввод и вывод
 Виды циклов в языке С++
 Разработка системных приложений. Основные понятия. Процессы
 База данных туристического агентства
 Программа VirtualBox
 Редактор формул Microsoft Equation 3.0
 Adobe Photoshop бағдарламасы
 Решение задач. Преобразование логических выражений.
 Урок по теме Знакомство графическим редактором KolourPaint
 Бирикс 24. Социальный интранет в облаке
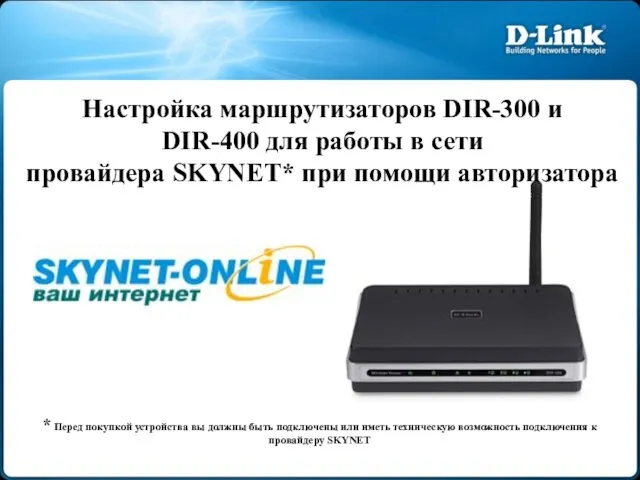 Настройка маршрутизаторов DIR-300 и DIR-400 для работы в сети провайдера SKYNET* при помощи авторизатора
 Экстремальное программирование
 Программирование (Python). §17-22
 Технология клиент-сервер
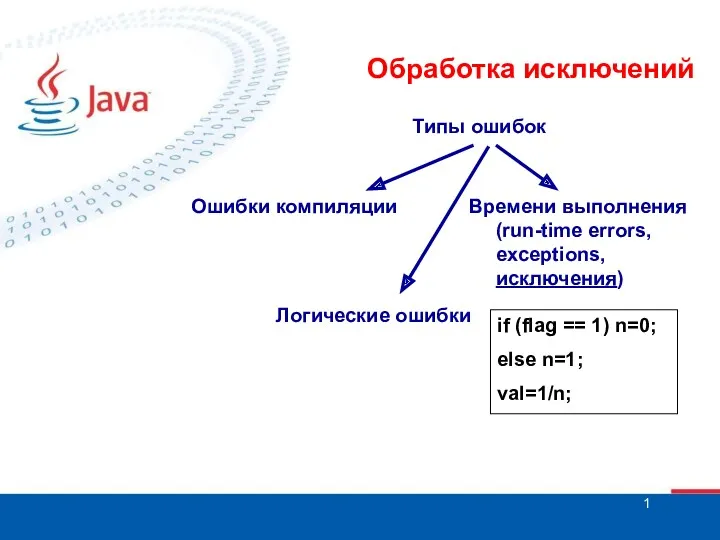 Обработка исключений
 Как попасть на обучение
 Безопасность сети. Средства обеспечения безопасности сети
 CIS 5512 - Operating Systems. Synchronization and Deadlock
 Разработка информационной системы Лабораторный журнал химика
 Информация и знания. Восприятие и представление информации
 Шаблоны
 Файловые системы. Операции с файлами
 Продукционная модель знаний в языке CLIPS. Факты и правила
 Introduction to relational databases
 Обработка информации. Разнообразие задач обработки информации
 Тема урока: Основные понятия баз данных
 Введение в структурированный язык запросов