- AP-GS1002 WEB. Setup Guide Eng

Содержание
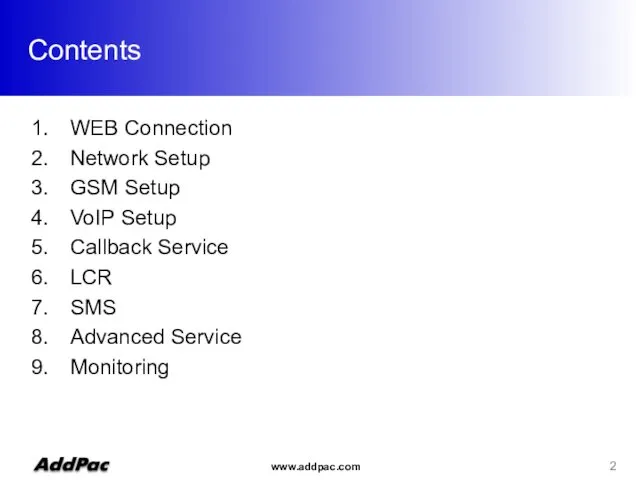
- 2. WEB Connection Network Setup GSM Setup VoIP Setup Callback Service LCR SMS Advanced Service Monitoring Contents
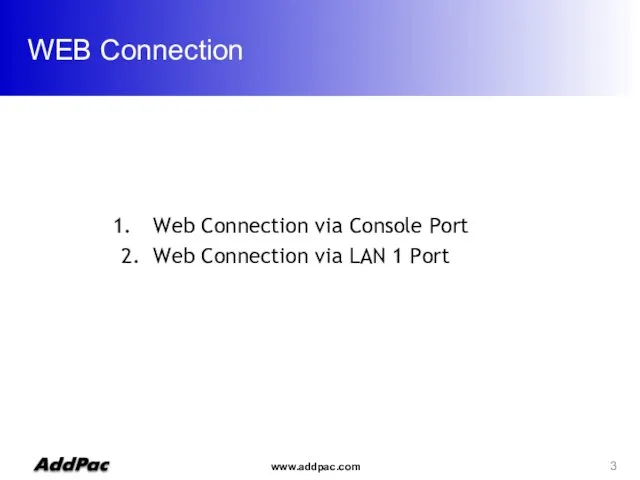
- 3. WEB Connection Web Connection via Console Port 2. Web Connection via LAN 1 Port
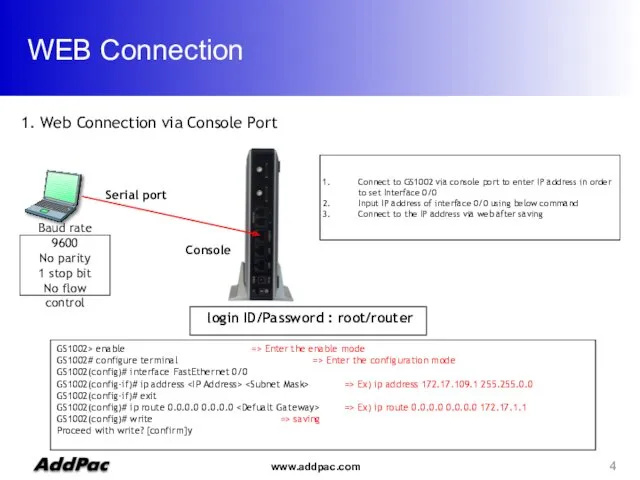
- 4. WEB Connection Serial port Console Baud rate 9600 No parity 1 stop bit No flow control
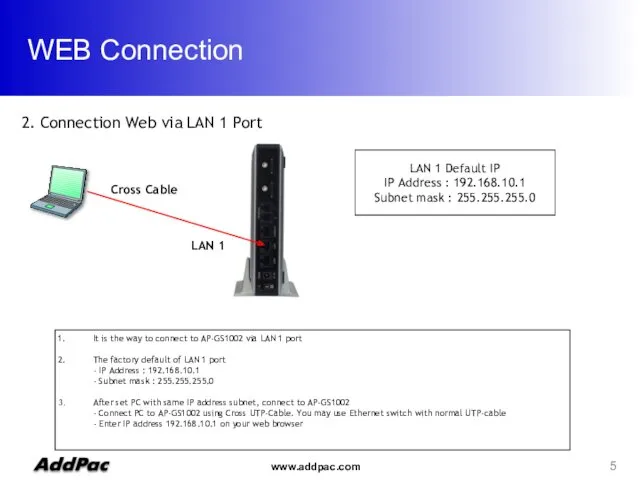
- 5. WEB Connection Cross Cable LAN 1 LAN 1 Default IP IP Address : 192.168.10.1 Subnet mask
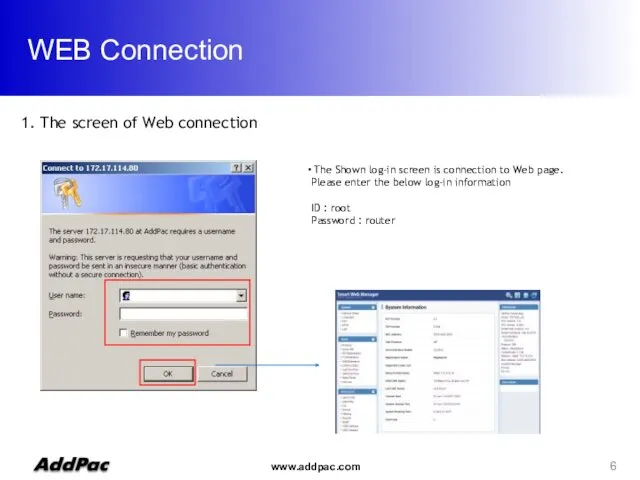
- 6. WEB Connection 1. The screen of Web connection The Shown log-in screen is connection to Web
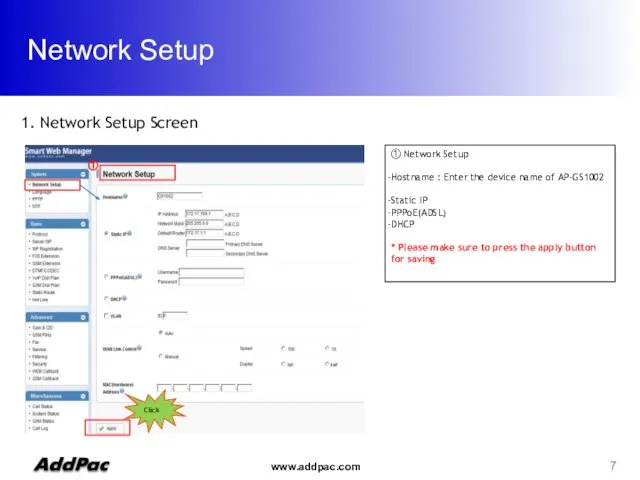
- 7. Network Setup 1. Network Setup Screen ① ① Network Setup Hostname : Enter the device name
- 8. GSM Setup GSM Extension FXS Extension GSM Dial Plan / Prefix
- 9. GSM Setup > GSM Extension GSM Extension Configuration : Register GSM SIM Number : Other party’s
- 10. GSM Setup > GSM Extension Port Information It displays the information of AP-GS1002 SLOT. You can
- 11. GSM Setup > FXS Extension 2. FXS Extension -1 ② ① ① The each port information
- 12. GSM Setup > FXS Extension 1. FXS Extension -2 (Example) ② ① ① Set the number
- 13. GSM Setup > FXS Extension ※Digit Structure※ - 9T : All number started with 9 as
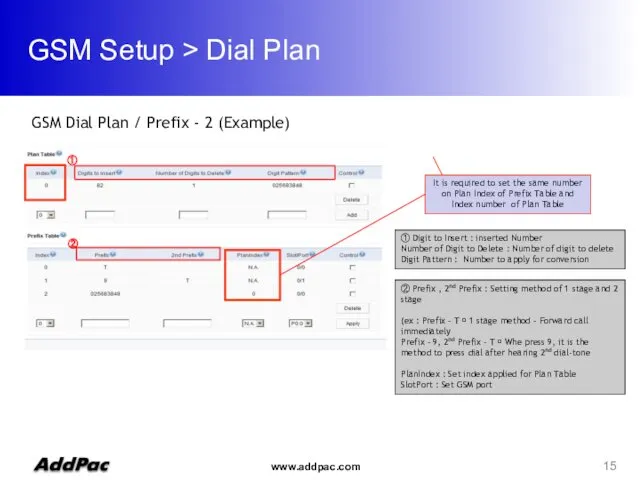
- 14. GSM Setup > Dial Plan GSM Dial Plan / Prefix -1 ② ① Dial Plan /
- 15. GSM Setup > Dial Plan ① Digit to Insert : inserted Number Number of Digit to
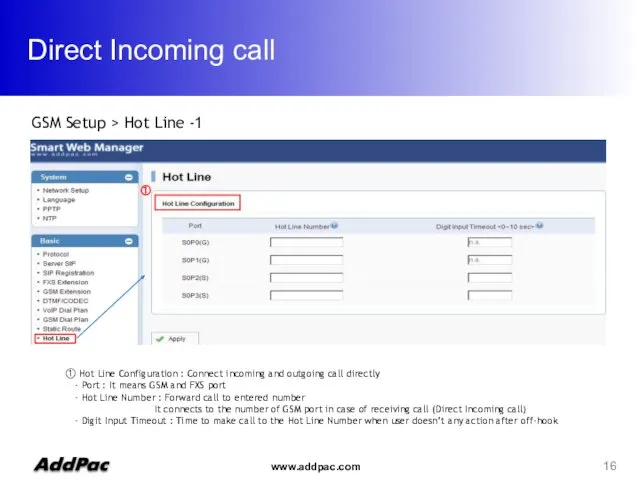
- 16. Direct Incoming call GSM Setup > Hot Line -1 ① Hot Line Configuration : Connect incoming
- 17. VoIP Setup Server SIP SIP Registration DTMF/CODEC VoIP Dial Plan Static Route
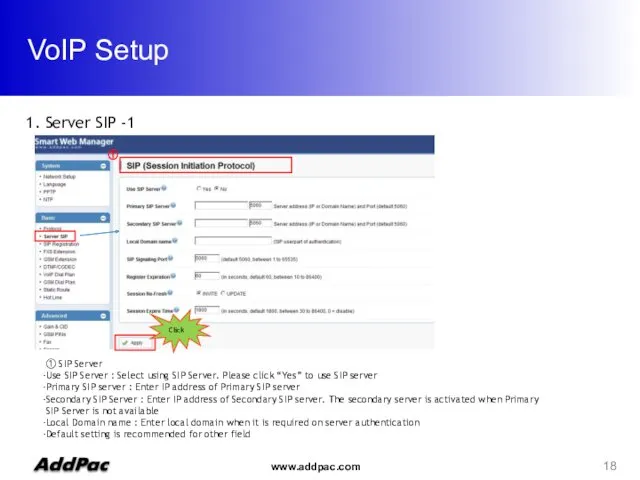
- 18. VoIP Setup 1. Server SIP -1 ① Click ① SIP Server Use SIP Server : Select
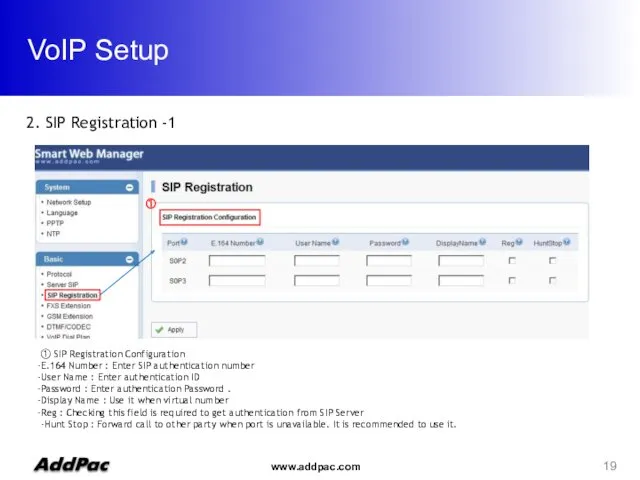
- 19. VoIP Setup 2. SIP Registration -1 ① ① SIP Registration Configuration E.164 Number : Enter SIP
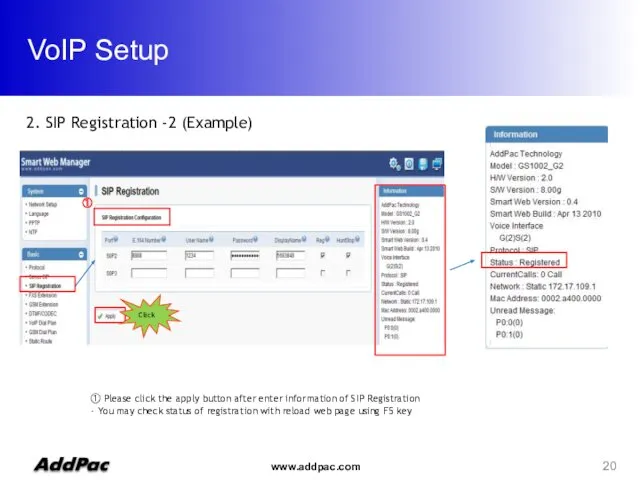
- 20. VoIP Setup 2. SIP Registration -2 (Example) ① Click ① Please click the apply button after
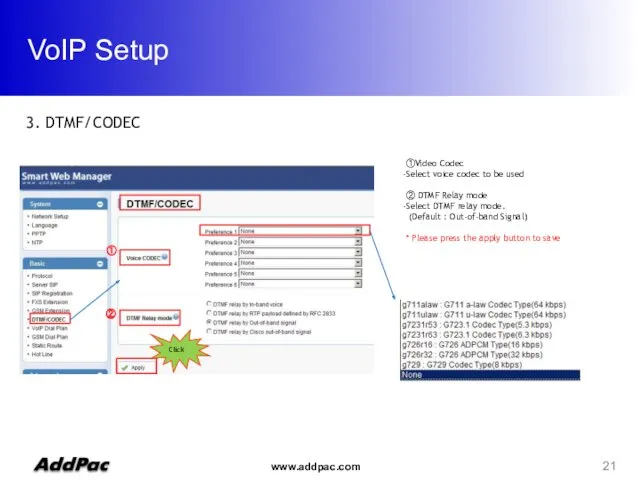
- 21. VoIP Setup 3. DTMF/CODEC ① Click ①Video Codec Select voice codec to be used ② DTMF
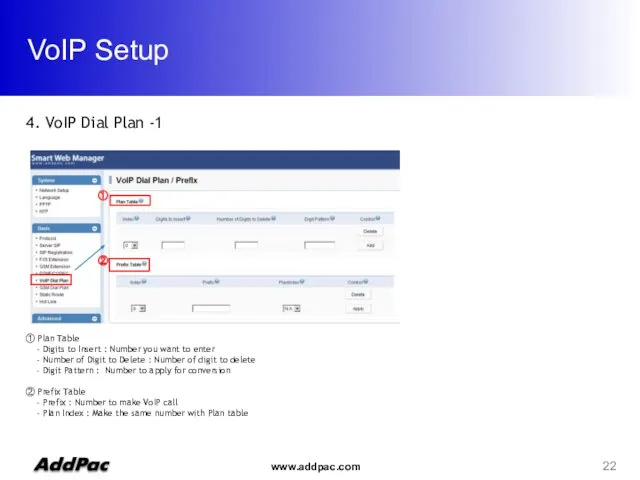
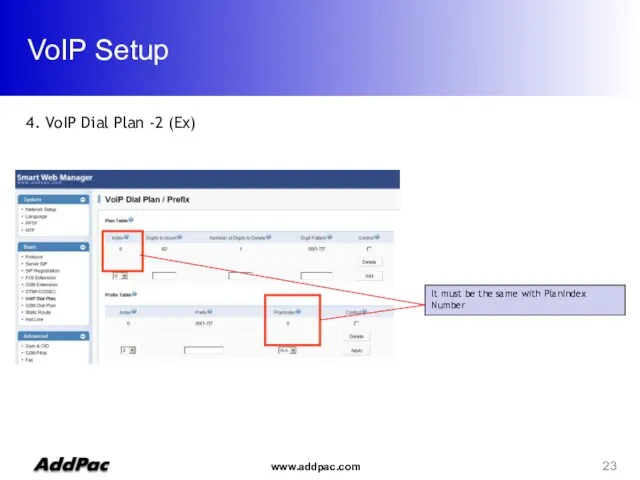
- 22. VoIP Setup 4. VoIP Dial Plan -1 ① ② ① Plan Table - Digits to Insert
- 23. VoIP Setup 4. VoIP Dial Plan -2 (Ex) It must be the same with PlanIndex Number
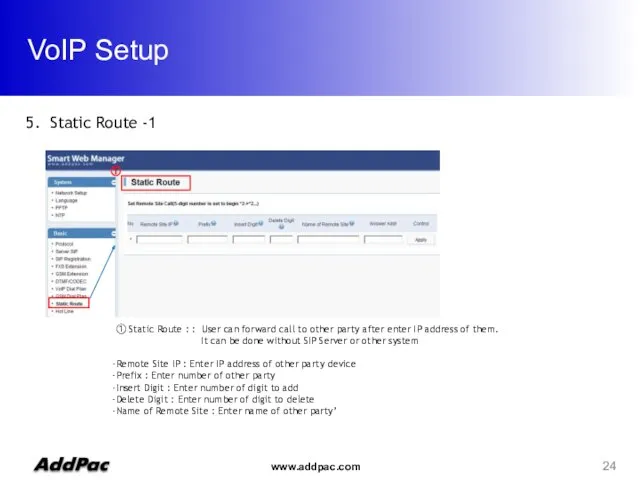
- 24. VoIP Setup 5. Static Route -1 ① ① Static Route : : User can forward call
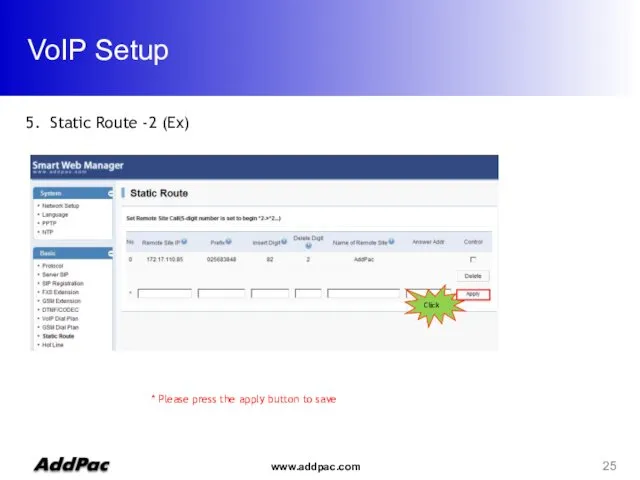
- 25. VoIP Setup 5. Static Route -2 (Ex) * Please press the apply button to save Click
- 26. Callback Service WEB Callback Service GSM Callback Service
- 27. Callback Service WEB Callback Service : AP-GS1002 makes call between receiver and sender remotely via Web
- 28. Callback Service Source number(1000) Destination number(2000) GSM Callback Service : The mobile user listed on the
- 29. Callback Service > WEB Callback ② ① ① Calling Number White List : Enter number of
- 30. Callback Service > WEB Callback 1. WEB Callback Service -2 (Ex) DialPattern must be the same
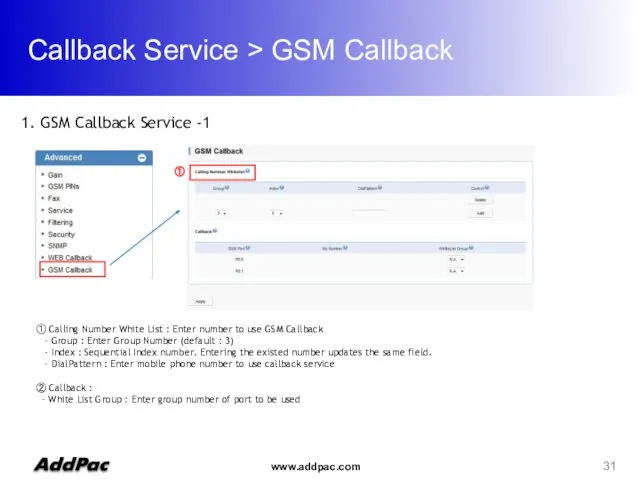
- 31. Callback Service > GSM Callback 1. GSM Callback Service -1 ① ① Calling Number White List
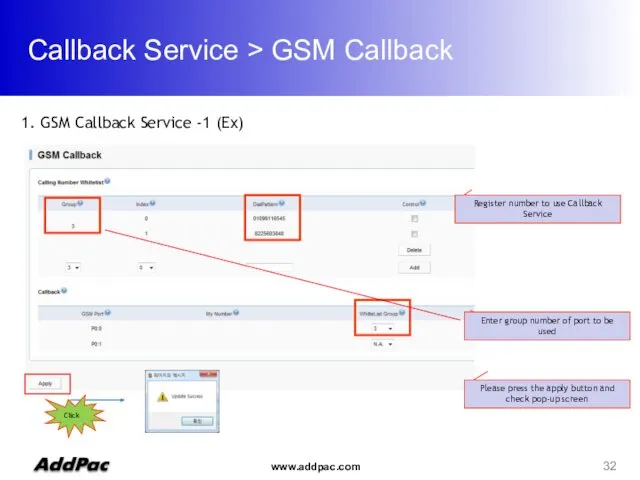
- 32. Callback Service > GSM Callback 1. GSM Callback Service -1 (Ex) Enter group number of port
- 33. LCR(Least Cost Routing) 1. LCR(Least Cost Routing) Black List & White List : The function to
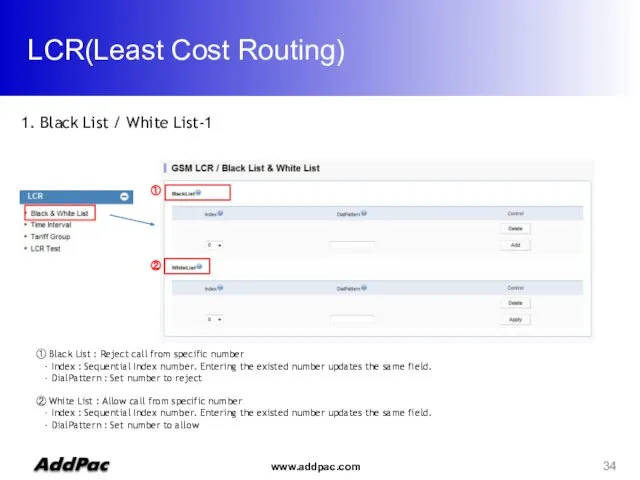
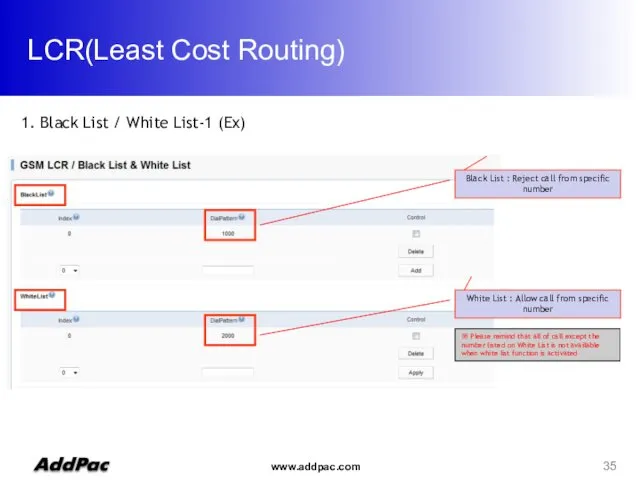
- 34. LCR(Least Cost Routing) 1. Black List / White List-1 ① ② ① Black List : Reject
- 35. LCR(Least Cost Routing) Black List : Reject call from specific number White List : Allow call
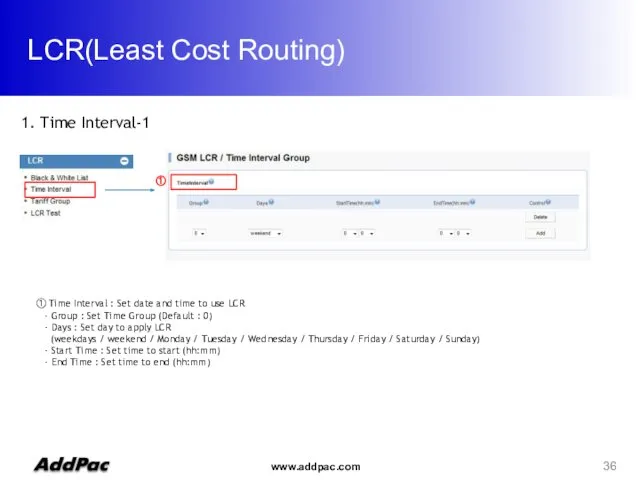
- 36. LCR(Least Cost Routing) 1. Time Interval-1 ① Time Interval : Set date and time to use
- 37. LCR(Least Cost Routing) 1. Time Interval-2(Ex) Group 0 : Available time is Monday to Friday, 9AM
- 38. LCR(Least Cost Routing) 1. Tariff Group-1 ① Tariff Group : Set Time Group and toll-free limitaion
- 39. LCR(Least Cost Routing) 1. Tariff Group-2 (Ex) Restore Call Limit - Type : monthly or daily
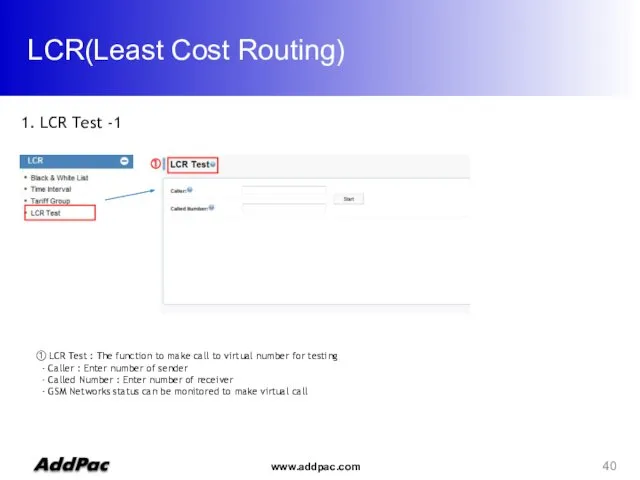
- 40. LCR(Least Cost Routing) 1. LCR Test -1 ① LCR Test : The function to make call
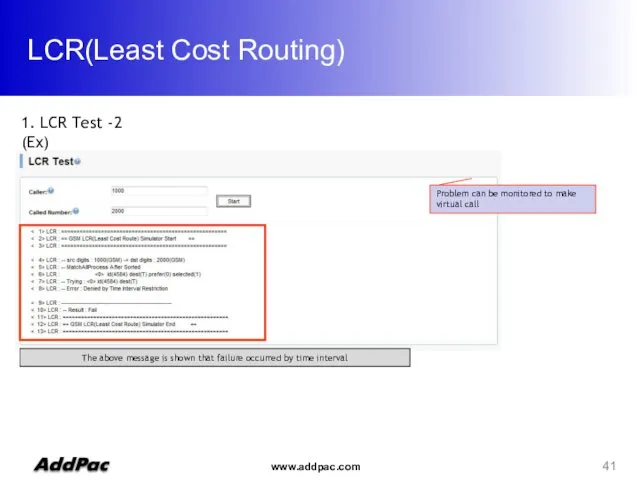
- 41. LCR(Least Cost Routing) 1. LCR Test -2 (Ex) Problem can be monitored to make virtual call
- 42. SMS ① ② 받은 메시지들이 저장됩니다. 보낸 메시지들이 저장됩니다. ※ The number of message can be
- 43. SMS ① ② 메시지를 보낼 수 있습니다. 실패한 메시지들이 저장됩니다. ※ SMS Support Language : Korean,
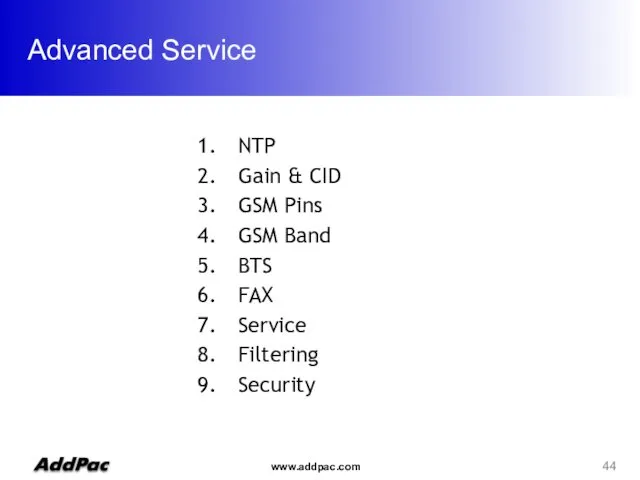
- 44. Advanced Service NTP Gain & CID GSM Pins GSM Band BTS FAX Service Filtering Security
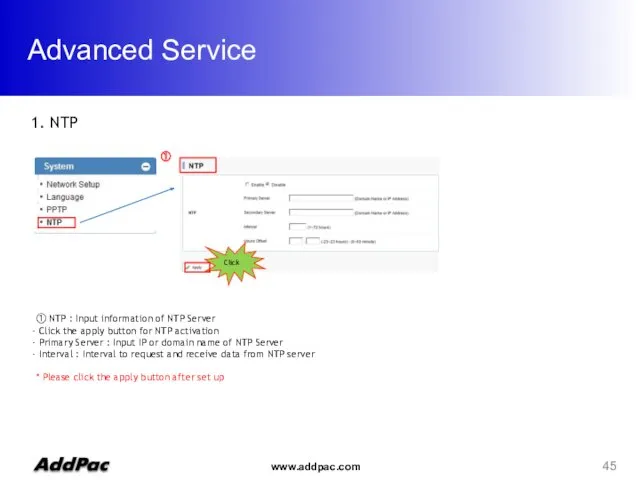
- 45. Advanced Service 1. NTP ① ① NTP : Input information of NTP Server Click the apply
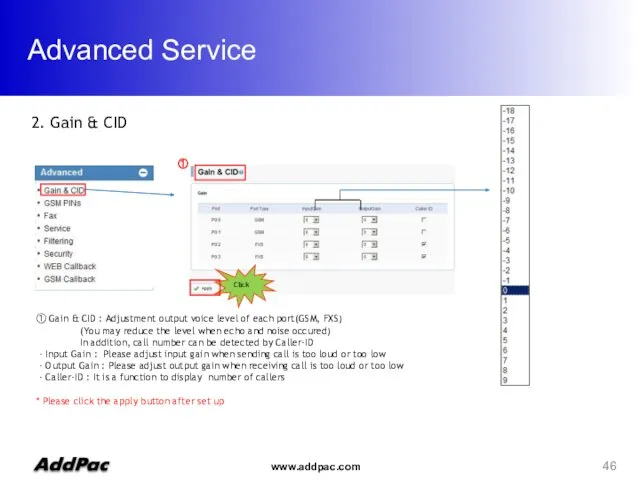
- 46. Advanced Service Click ① ① Gain & CID : Adjustment output voice level of each port(GSM,
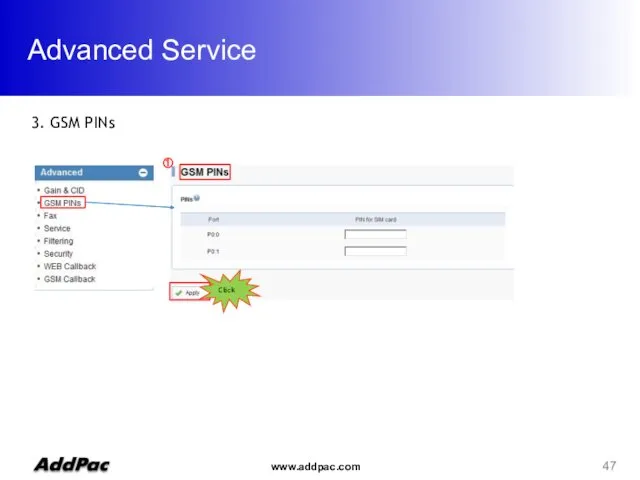
- 47. Advanced Service Click ① 3. GSM PINs
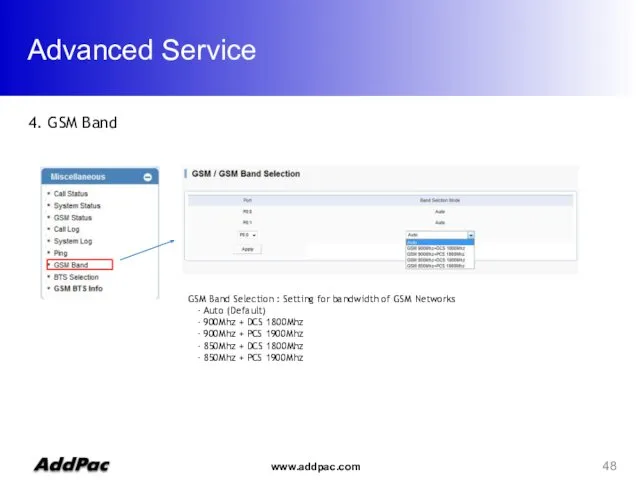
- 48. Advanced Service 4. GSM Band GSM Band Selection : Setting for bandwidth of GSM Networks -
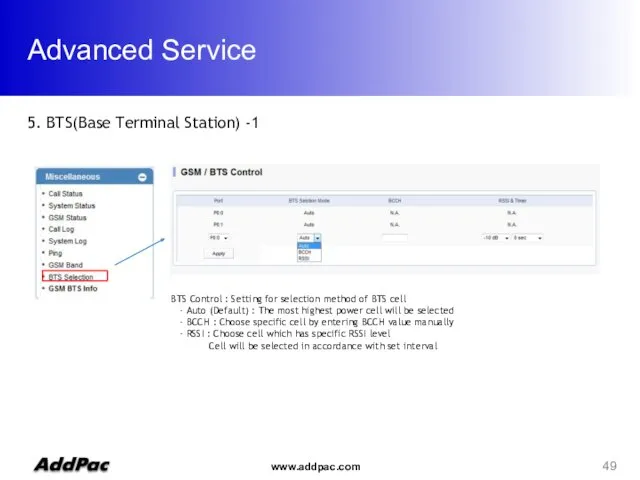
- 49. Advanced Service 5. BTS(Base Terminal Station) -1 BTS Control : Setting for selection method of BTS
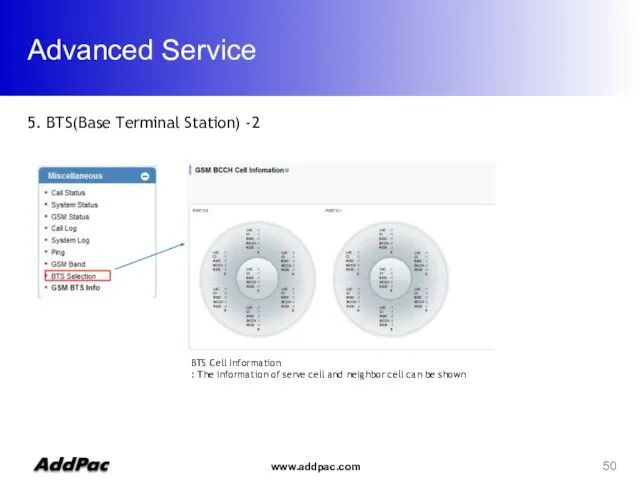
- 50. Advanced Service 5. BTS(Base Terminal Station) -2 BTS Cell Information : The information of serve cell
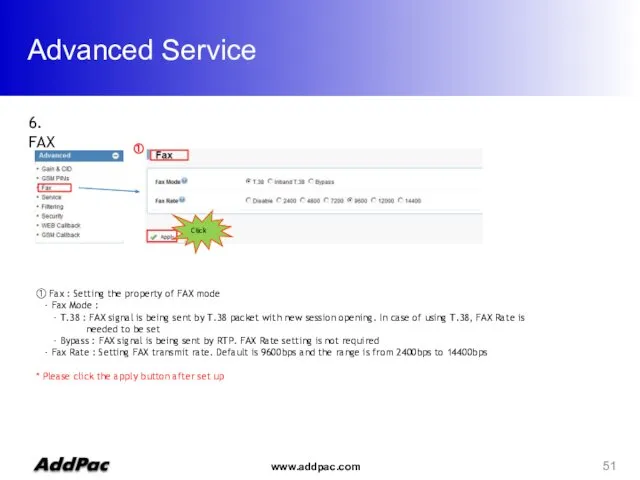
- 51. Advanced Service ① Click ① Fax : Setting the property of FAX mode - Fax Mode
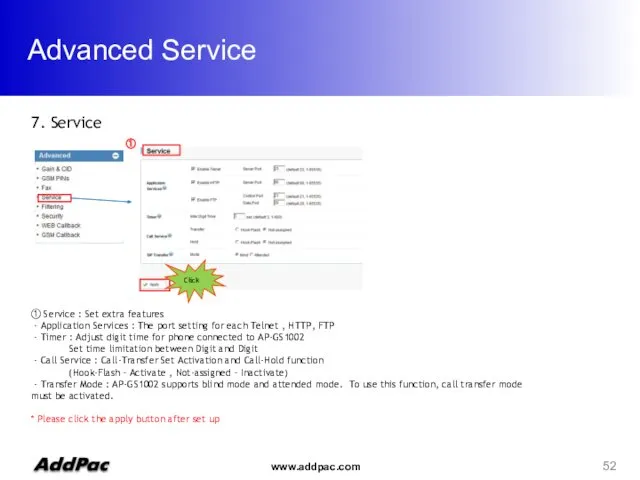
- 52. Advanced Service ① ① Service : Set extra features - Application Services : The port setting
- 53. Advanced Service ① ① Filter : Setting IP address authorized by administrator for connection - FTP
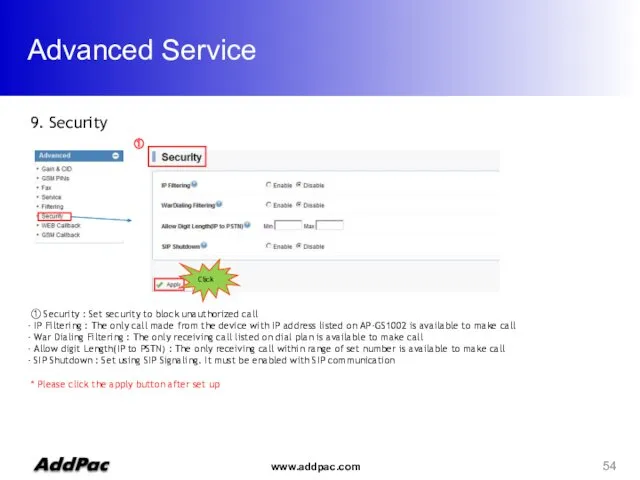
- 54. Advanced Service ① Click ① Security : Set security to block unauthorized call IP Filtering :
- 55. Monitoring Call Status System Status GSM Status Call Log / System Log Ping
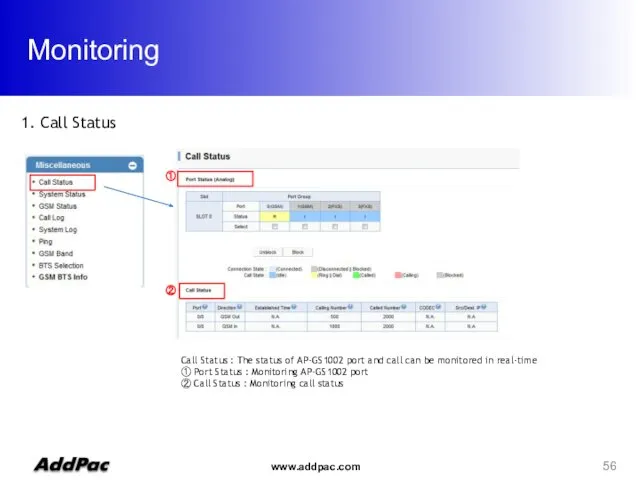
- 56. Monitoring ② ① Call Status : The status of AP-GS1002 port and call can be monitored
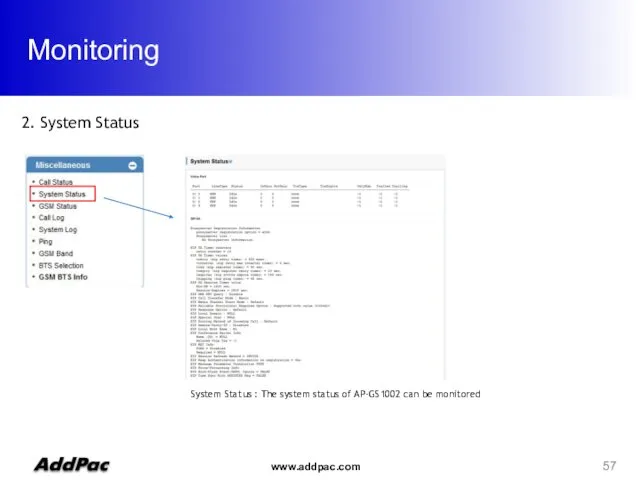
- 57. Monitoring 2. System Status System Status : The system status of AP-GS1002 can be monitored
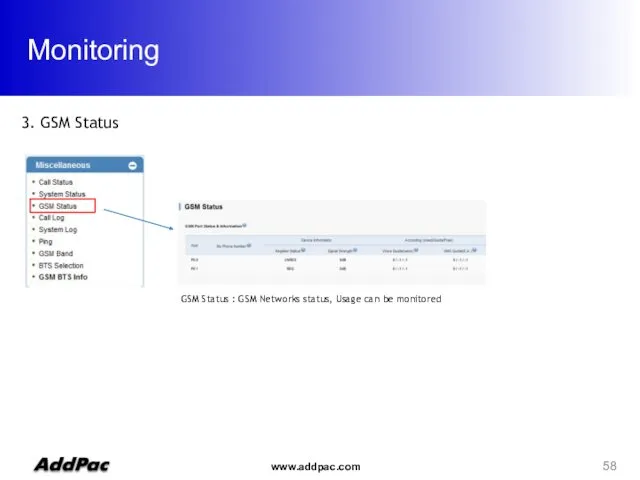
- 58. Monitoring 3. GSM Status GSM Status : GSM Networks status, Usage can be monitored
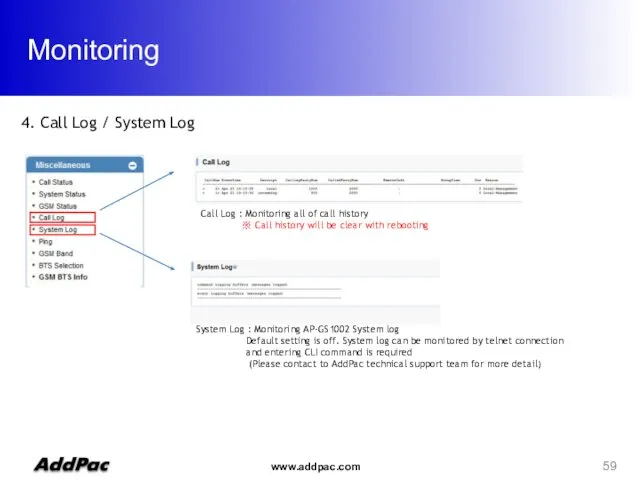
- 59. Monitoring 4. Call Log / System Log Call Log : Monitoring all of call history ※
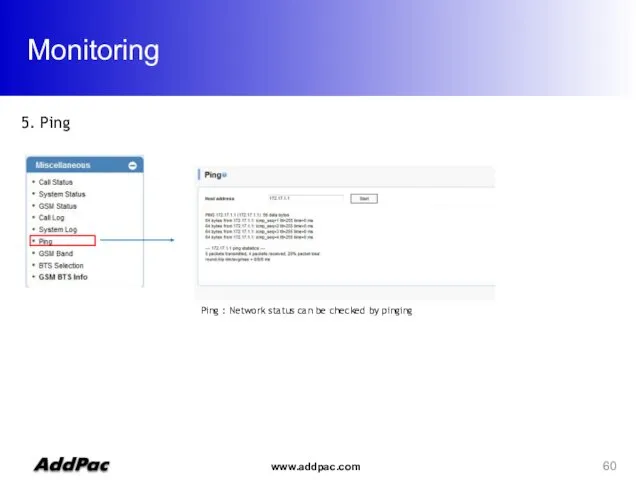
- 60. Monitoring 5. Ping Ping : Network status can be checked by pinging
- 62. Скачать презентацию
WEB Connection
Network Setup
GSM Setup
VoIP Setup
Callback Service
LCR
SMS
Advanced Service
Monitoring
Contents
WEB Connection
Network Setup
GSM Setup
VoIP Setup
Callback Service
LCR
SMS
Advanced Service
Monitoring
Contents
WEB Connection
Web Connection via Console Port
2. Web Connection via LAN 1 Port
WEB Connection
Web Connection via Console Port
2. Web Connection via LAN 1 Port
WEB Connection
Serial port
Console
Baud rate 9600
No parity
1 stop bit
No flow control
WEB Connection
Serial port
Console
Baud rate 9600
No parity
1 stop bit
No flow control
WEB Connection
Cross Cable
LAN 1
LAN 1 Default IP
IP Address : 192.168.10.1
Subnet
WEB Connection
Cross Cable
LAN 1
LAN 1 Default IP
IP Address : 192.168.10.1
Subnet
WEB Connection
1. The screen of Web connection
The Shown log-in
WEB Connection
1. The screen of Web connection
The Shown log-in
Network Setup
1. Network Setup Screen
①
① Network Setup
Hostname : Enter the device
Network Setup
1. Network Setup Screen
①
① Network Setup
Hostname : Enter the device

GSM Setup
GSM Extension
FXS Extension
GSM Dial Plan / Prefix
GSM Setup
GSM Extension
FXS Extension
GSM Dial Plan / Prefix
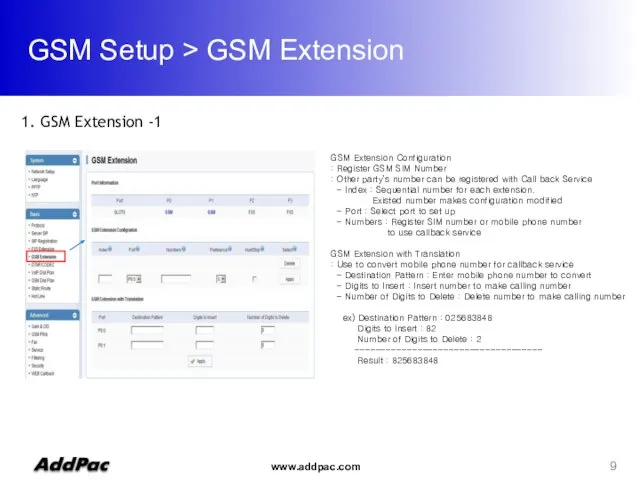
GSM Setup > GSM Extension
GSM Extension Configuration
: Register GSM SIM Number
GSM Setup > GSM Extension
GSM Extension Configuration
: Register GSM SIM Number
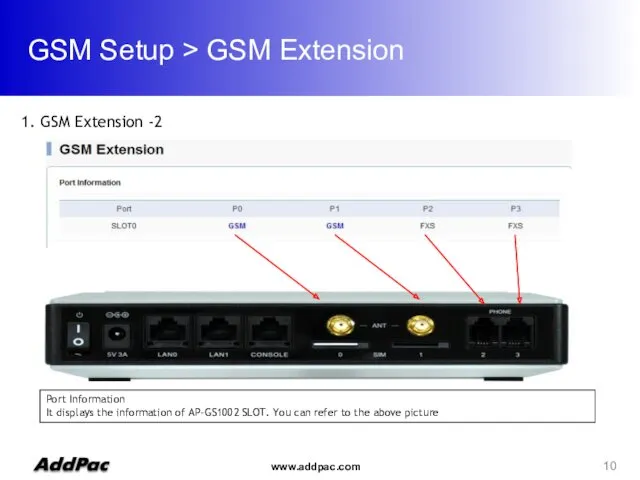
GSM Setup > GSM Extension
Port Information
It displays the information of AP-GS1002
GSM Setup > GSM Extension
Port Information
It displays the information of AP-GS1002
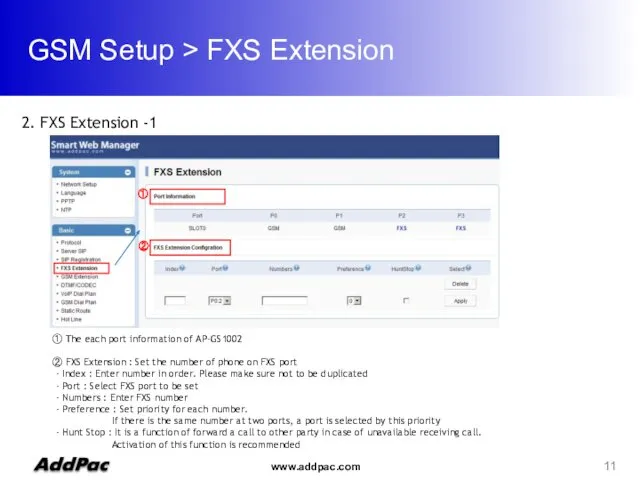
GSM Setup > FXS Extension
2. FXS Extension -1
②
①
① The each port
GSM Setup > FXS Extension
2. FXS Extension -1
②
①
① The each port
GSM Setup > FXS Extension
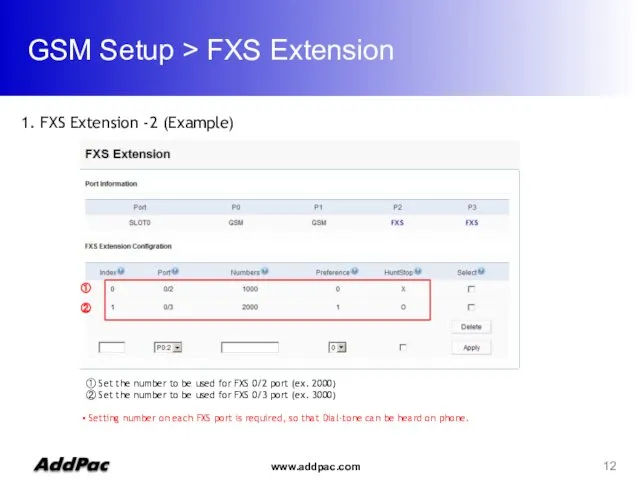
1. FXS Extension -2 (Example)
②
①
① Set the
GSM Setup > FXS Extension
1. FXS Extension -2 (Example)
②
①
① Set the
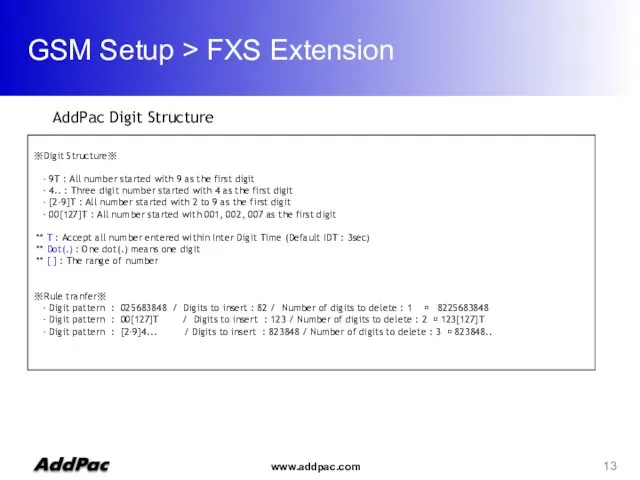
GSM Setup > FXS Extension
※Digit Structure※
- 9T : All number
GSM Setup > FXS Extension
※Digit Structure※
- 9T : All number
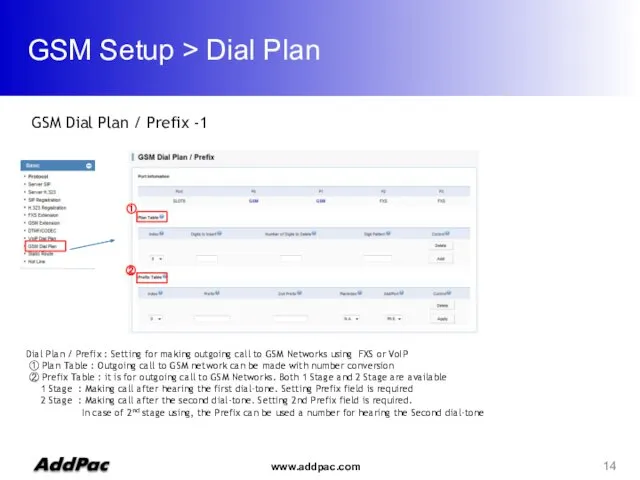
GSM Setup > Dial Plan
GSM Dial Plan / Prefix -1
②
①
Dial Plan
GSM Setup > Dial Plan
GSM Dial Plan / Prefix -1
②
①
Dial Plan
GSM Setup > Dial Plan
① Digit to Insert : inserted Number
Number
GSM Setup > Dial Plan
① Digit to Insert : inserted Number
Number
Direct Incoming call
GSM Setup > Hot Line -1
① Hot Line Configuration
Direct Incoming call
GSM Setup > Hot Line -1
① Hot Line Configuration
VoIP Setup
Server SIP
SIP Registration
DTMF/CODEC
VoIP Dial Plan
Static Route
VoIP Setup
Server SIP
SIP Registration
DTMF/CODEC
VoIP Dial Plan
Static Route
VoIP Setup
1. Server SIP -1
①
Click
① SIP Server
Use SIP Server : Select
VoIP Setup
1. Server SIP -1
①
Click
① SIP Server
Use SIP Server : Select
VoIP Setup
2. SIP Registration -1
①
① SIP Registration Configuration
E.164 Number : Enter
VoIP Setup
2. SIP Registration -1
①
① SIP Registration Configuration
E.164 Number : Enter
VoIP Setup
2. SIP Registration -2 (Example)
①
Click
① Please click the apply button
VoIP Setup
2. SIP Registration -2 (Example)
①
Click
① Please click the apply button
VoIP Setup
3. DTMF/CODEC
①
Click
①Video Codec
Select voice codec to be used
② DTMF Relay
VoIP Setup
3. DTMF/CODEC
①
Click
①Video Codec
Select voice codec to be used
② DTMF Relay
VoIP Setup
4. VoIP Dial Plan -1
①
②
① Plan Table
- Digits to
VoIP Setup
4. VoIP Dial Plan -1
①
②
① Plan Table
- Digits to
VoIP Setup
4. VoIP Dial Plan -2 (Ex)
It must be the same
VoIP Setup
4. VoIP Dial Plan -2 (Ex)
It must be the same
VoIP Setup
5. Static Route -1
①
① Static Route : : User can
VoIP Setup
5. Static Route -1
①
① Static Route : : User can
VoIP Setup
5. Static Route -2 (Ex)
* Please press the apply button
VoIP Setup
5. Static Route -2 (Ex)
* Please press the apply button
Callback Service
WEB Callback Service
GSM Callback Service
Callback Service
WEB Callback Service
GSM Callback Service
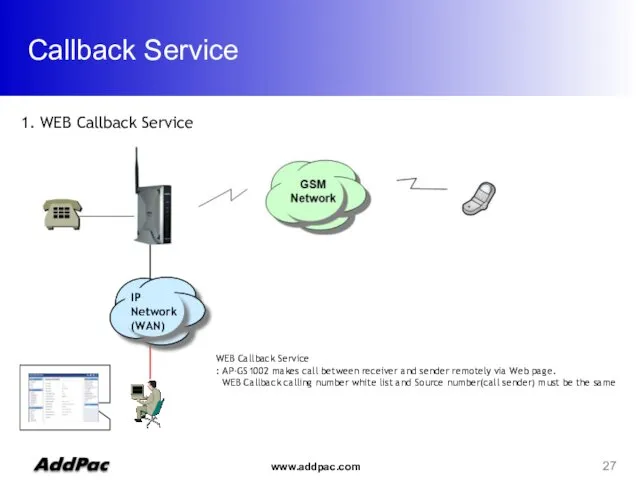
Callback Service
WEB Callback Service
: AP-GS1002 makes call between receiver and sender
Callback Service
WEB Callback Service
: AP-GS1002 makes call between receiver and sender
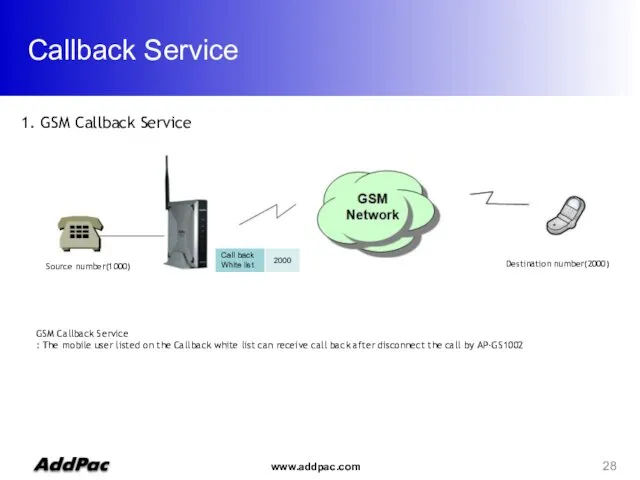
Callback Service
Source number(1000)
Destination number(2000)
GSM Callback Service
: The mobile user listed on
Callback Service
Source number(1000)
Destination number(2000)
GSM Callback Service
: The mobile user listed on
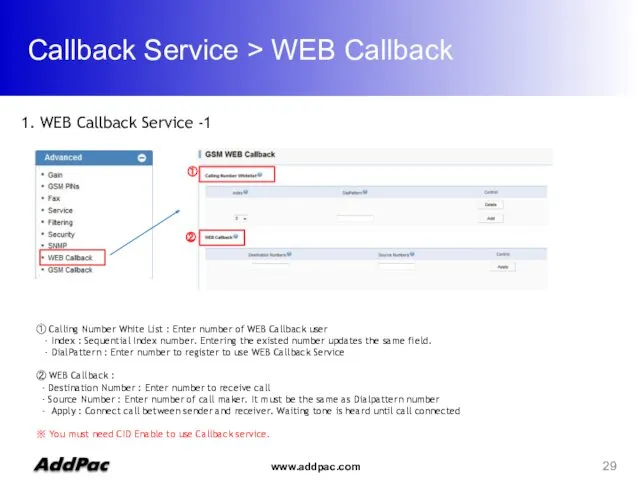
Callback Service > WEB Callback
②
①
① Calling Number White List : Enter
Callback Service > WEB Callback
②
①
① Calling Number White List : Enter
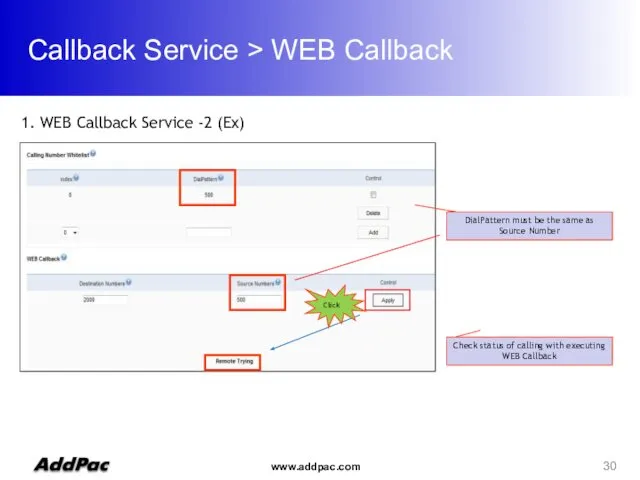
Callback Service > WEB Callback
1. WEB Callback Service -2 (Ex)
DialPattern must
Callback Service > WEB Callback
1. WEB Callback Service -2 (Ex)
DialPattern must
Callback Service > GSM Callback
1. GSM Callback Service -1
①
① Calling Number
Callback Service > GSM Callback
1. GSM Callback Service -1
①
① Calling Number
Callback Service > GSM Callback
1. GSM Callback Service -1 (Ex)
Enter group
Callback Service > GSM Callback
1. GSM Callback Service -1 (Ex)
Enter group
LCR(Least Cost Routing)
1. LCR(Least Cost Routing)
Black List & White List
: The
LCR(Least Cost Routing)
1. LCR(Least Cost Routing)
Black List & White List
: The
LCR(Least Cost Routing)
1. Black List / White List-1
①
②
① Black List :
LCR(Least Cost Routing)
1. Black List / White List-1
①
②
① Black List :
LCR(Least Cost Routing)
Black List : Reject call from specific number
White List
LCR(Least Cost Routing)
Black List : Reject call from specific number
White List
LCR(Least Cost Routing)
1. Time Interval-1
① Time Interval : Set date and
LCR(Least Cost Routing)
1. Time Interval-1
① Time Interval : Set date and
LCR(Least Cost Routing)
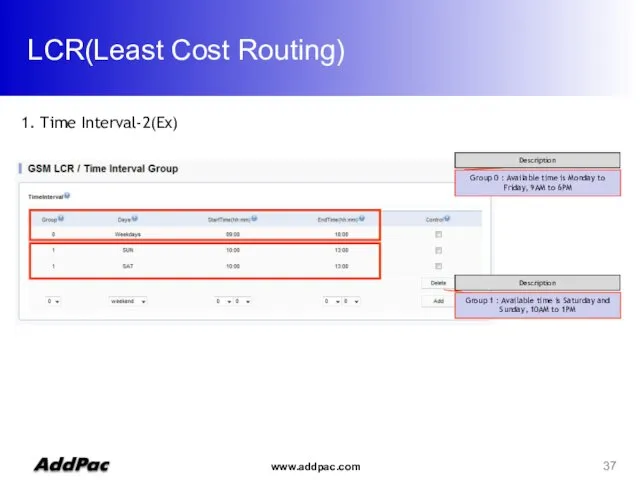
1. Time Interval-2(Ex)
Group 0 : Available time is Monday
LCR(Least Cost Routing)
1. Time Interval-2(Ex)
Group 0 : Available time is Monday
LCR(Least Cost Routing)
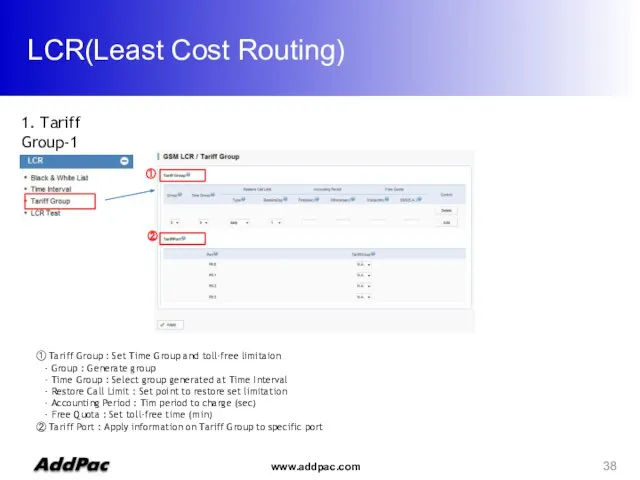
1. Tariff Group-1
① Tariff Group : Set Time Group
LCR(Least Cost Routing)
1. Tariff Group-1
① Tariff Group : Set Time Group

LCR(Least Cost Routing)
1. Tariff Group-2 (Ex)
Restore Call Limit
- Type
LCR(Least Cost Routing)
1. Tariff Group-2 (Ex)
Restore Call Limit
- Type
LCR(Least Cost Routing)
1. LCR Test -1
① LCR Test : The function
LCR(Least Cost Routing)
1. LCR Test -1
① LCR Test : The function
LCR(Least Cost Routing)
1. LCR Test -2 (Ex)
Problem can be monitored to
LCR(Least Cost Routing)
1. LCR Test -2 (Ex)
Problem can be monitored to
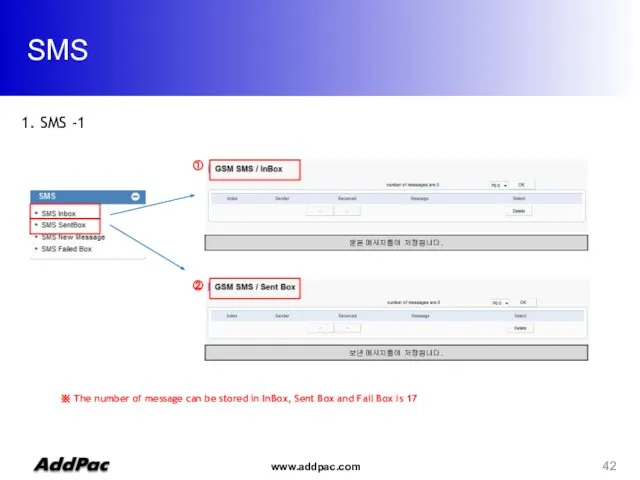
SMS
①
②
받은 메시지들이 저장됩니다.
보낸 메시지들이 저장됩니다.
※ The number of message can be
SMS
①
②
받은 메시지들이 저장됩니다.
보낸 메시지들이 저장됩니다.
※ The number of message can be
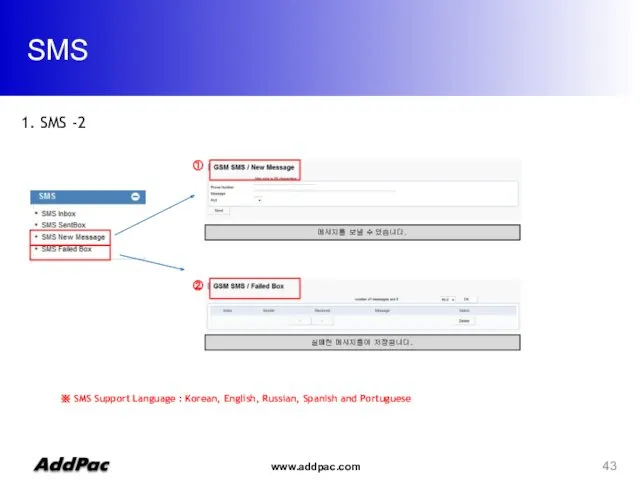
SMS
①
②
메시지를 보낼 수 있습니다.
실패한 메시지들이 저장됩니다.
※ SMS Support Language : Korean,
SMS
①
②
메시지를 보낼 수 있습니다.
실패한 메시지들이 저장됩니다.
※ SMS Support Language : Korean,
Advanced Service
NTP
Gain & CID
GSM Pins
GSM Band
BTS
FAX
Service
Filtering
Security
Advanced Service
NTP
Gain & CID
GSM Pins
GSM Band
BTS
FAX
Service
Filtering
Security
Advanced Service
1. NTP
①
① NTP : Input information of NTP Server
Advanced Service
1. NTP
①
① NTP : Input information of NTP Server
Advanced Service
Click
①
① Gain & CID : Adjustment output voice level of
Advanced Service
Click
①
① Gain & CID : Adjustment output voice level of
Advanced Service
Click
①
3. GSM PINs
Advanced Service
Click
①
3. GSM PINs
Advanced Service
4. GSM Band
GSM Band Selection : Setting for bandwidth of
Advanced Service
4. GSM Band
GSM Band Selection : Setting for bandwidth of
Advanced Service
5. BTS(Base Terminal Station) -1
BTS Control : Setting for selection
Advanced Service
5. BTS(Base Terminal Station) -1
BTS Control : Setting for selection
Advanced Service
5. BTS(Base Terminal Station) -2
BTS Cell Information
: The information of
Advanced Service
5. BTS(Base Terminal Station) -2
BTS Cell Information
: The information of
Advanced Service
①
Click
① Fax : Setting the property of FAX mode
Advanced Service
①
Click
① Fax : Setting the property of FAX mode
Advanced Service
①
① Service : Set extra features
- Application Services :
Advanced Service
①
① Service : Set extra features
- Application Services :

Advanced Service
①
① Filter : Setting IP address authorized by administrator for
Advanced Service
①
① Filter : Setting IP address authorized by administrator for
Advanced Service
①
Click
① Security : Set security to block unauthorized call
IP
Advanced Service
①
Click
① Security : Set security to block unauthorized call
IP
Monitoring
Call Status
System Status
GSM Status
Call Log / System Log
Ping
Monitoring
Call Status
System Status
GSM Status
Call Log / System Log
Ping
Monitoring
②
①
Call Status : The status of AP-GS1002 port and call can
Monitoring
②
①
Call Status : The status of AP-GS1002 port and call can
Monitoring
2. System Status
System Status : The system status of AP-GS1002 can
Monitoring
2. System Status
System Status : The system status of AP-GS1002 can
Monitoring
3. GSM Status
GSM Status : GSM Networks status, Usage can be
Monitoring
3. GSM Status
GSM Status : GSM Networks status, Usage can be
Monitoring
4. Call Log / System Log
Call Log : Monitoring all of
Monitoring
4. Call Log / System Log
Call Log : Monitoring all of
Monitoring
5. Ping
Ping : Network status can be checked by pinging
Monitoring
5. Ping
Ping : Network status can be checked by pinging
 Этапы создания сайта
 Оператор ветвления
 Структура книги. Библиотечный урок
 Типы алгоритмов (3)
 Сети и системы телекоммуникаций. Протокол TCP
 Памятка об информационной безопасности в виртуальном пространстве
 Основы научных исследований. Реферирование научной статьи
 Создание квеста Прошагай город
 Путешествие в страну информатики
 Развитие языков программирования. Программное обеспечение (ПО)
 Инструкция по работе с официальным сайтом муниципальногообразования г. Ижевск
 Фирма 1С. Изменения в функционале сервиса
 Serialization in .Net. 2023
 Введение в информатику
 Компьютерные технологии. Matlab
 Информационное общество и информационная культура
 Основные конструкции языка VHDL
 Пресс-служба МВД
 Комплексный подход к защите информации. (Лекция 2)
 Campaign Asset Placement on V.com Pages
 Методы защиты средств вычислительной техники. (Лекция 6)
 Отчёт ДОД Путешествие в компьютерную страну
 Презентация к уроку по теме Деловая графика.
 Основы образования поверхностей. Сети. Команды построения 3D объектов. (Лекция 7)
 Моделирование. Модели и моделирование
 Файловые архивы. Общение в Интернете
 Буктрейлер. Классификация буктрейлеров
 Морской бой. Описание программы