- Washing Machine. Model:N09. Service Manual

Содержание
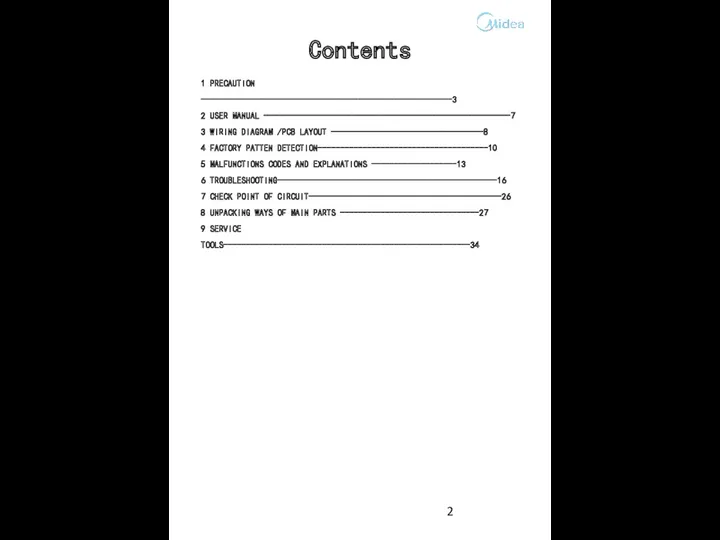
- 2. Contents 1 PRECAUTION --------------------------------------------------------3 2 USER MANUAL -------------------------------------------------------7 3 WIRING DIAGRAM /PCB LAYOUT ----------------------------------8 4 FACTORY
- 3. When performing troubleshooting and part replacement during servicing, note the following safety precautions: 1.1 Safety Precautions
- 4. 1.3 CAUTIONS FOR SAFETY Please observe the following notes for safety. The symbols indicate as follows.
- 5. 1 PRECAUTION
- 6. 1 PRECAUTION
- 7. 2 USER MANUAL NOTE: Please check the user manual about the installation,operation,and spec etc.
- 8. 3 WIRING DIAGRAM/PCB LAYOUT 3.1 During the failure diagnosing and changing components, please do it as
- 9. 3 WIRING DIAGRAM/PCB LAYOUT 3.3 PCB Layout 1 Control of doorlock 2 Heater 3 Water level
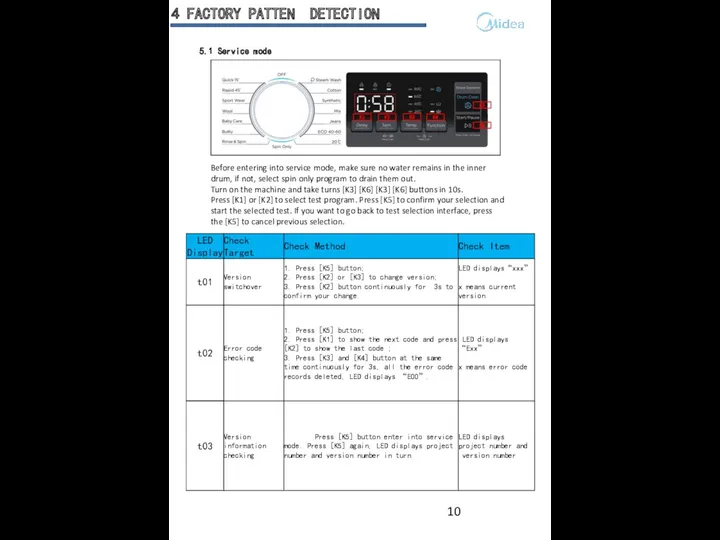
- 10. 4 FACTORY PATTEN DETECTION 5.1 Service mode Before entering into service mode, make sure no water
- 11. 4 FACTORY PATTEN DETECTION 5.1 Service mode
- 12. 4 FACTORY PATTEN DETECTION 5.1 Service mode
- 13. 5. MALFUNCTION CODES AND EXPLANATIONS
- 14. 5. MALFUNCTION CODES AND EXPLANATIONS
- 15. 5. MALFUNCTION CODES AND EXPLANATIONS
- 16. 6 TROUBLESHOOTING Fault tree 1. Maintenance non-heating malfunction Change the PCB Whether the connection is correct
- 17. 2. Door non-locked & its maintenance Whether the inner wire between the PCB and the door
- 18. 3. No water inlet or water inlet overtime No water inlet or water inlet overtime Y
- 19. 4. Over heating circuit open circuit Change the NTC Over heating N Y Y Whether NTC
- 20. 5. Maintenance of non-drain or drain exceed the setting time Whether the pump is blocked Non-drain
- 21. 6. Water inlet overflow malfunction maintenance whether the inlet valve is well Change the PCB Whether
- 22. Whether the inner wire connection is correct Change the PCB Whether the belt is installed correctly
- 23. 8. Maintenance water inflow and drain off water at the same time Whether the washer is
- 24. Malfunction and solution 6 TROUBLESHOOTING
- 25. 6 TROUBLESHOOTING
- 26. Before repairing, use multimeter to judge circuit stand of fail 7 CHECK POINT OF CIRCUIT
- 27. UNPACKING WAYS OF MAIN PARTS 1. Undo the back cover 2. Undo top cover 3. Undo
- 28. 8 UNPACKING WAYS OF MAIN PARTS
- 29. 8 UNPACKING WAYS OF MAIN PARTS
- 30. 8 UNPACKING WAYS OF MAIN PARTS
- 31. 8 UNPACKING WAYS OF MAIN PARTS
- 32. 8 UNPACKING WAYS OF MAIN PARTS
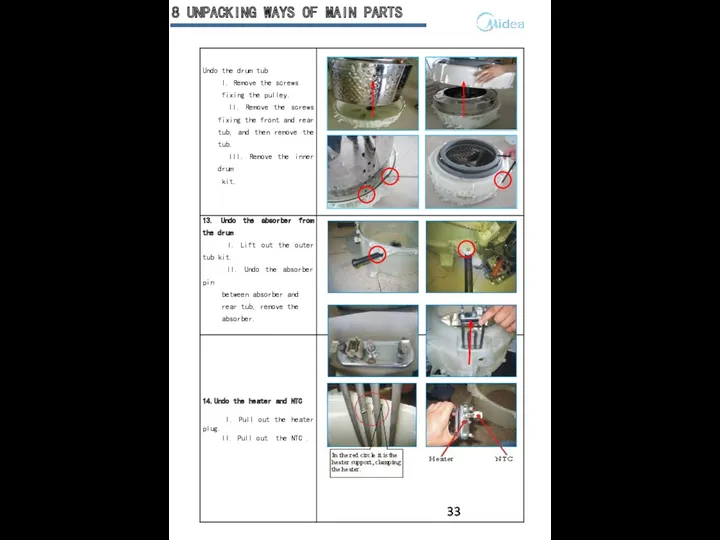
- 33. 8 UNPACKING WAYS OF MAIN PARTS
- 34. 9 SERVICE TOOLS
- 36. Скачать презентацию
Contents
1 PRECAUTION --------------------------------------------------------3
2 USER MANUAL -------------------------------------------------------7
3 WIRING DIAGRAM /PCB LAYOUT ----------------------------------8
4
Contents
1 PRECAUTION --------------------------------------------------------3
2 USER MANUAL -------------------------------------------------------7
3 WIRING DIAGRAM /PCB LAYOUT ----------------------------------8
4
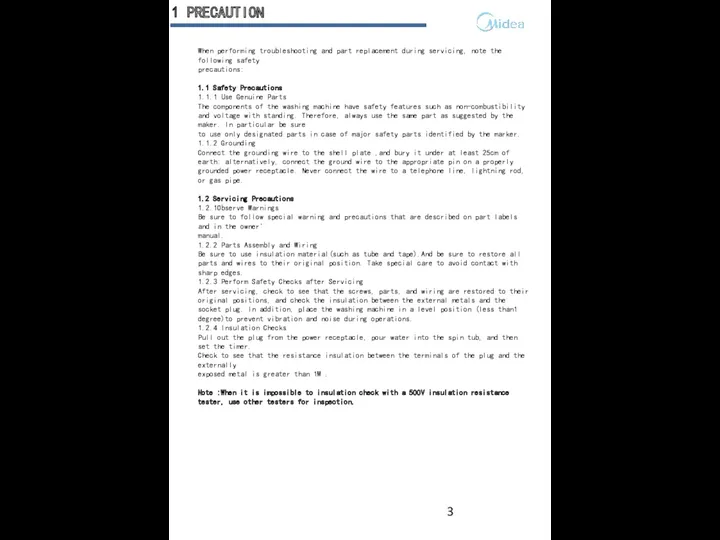
When performing troubleshooting and part replacement during servicing, note the following
When performing troubleshooting and part replacement during servicing, note the following
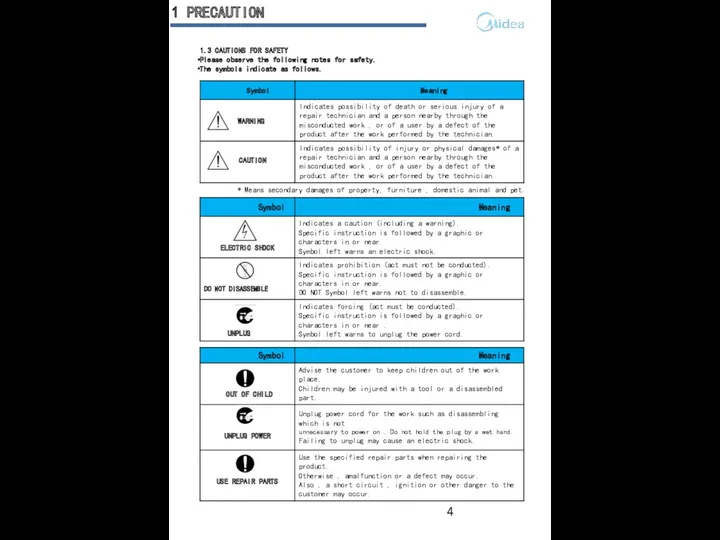
1.3 CAUTIONS FOR SAFETY
Please observe the following notes for safety.
The symbols
1.3 CAUTIONS FOR SAFETY
Please observe the following notes for safety.
The symbols
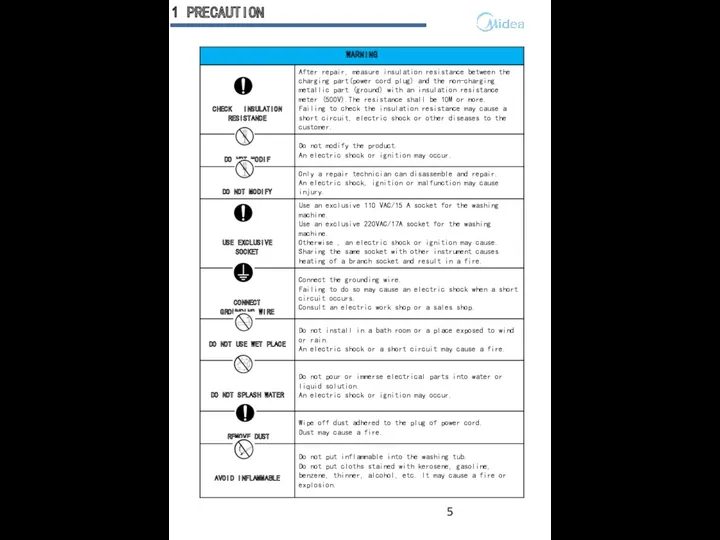
1 PRECAUTION
1 PRECAUTION
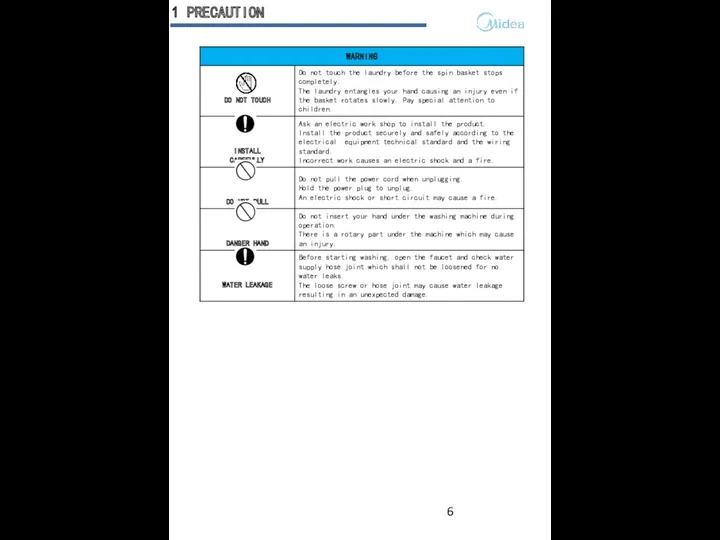
1 PRECAUTION
1 PRECAUTION
2 USER MANUAL
NOTE:
Please check the user manual about the installation,operation,and spec
2 USER MANUAL
NOTE:
Please check the user manual about the installation,operation,and spec
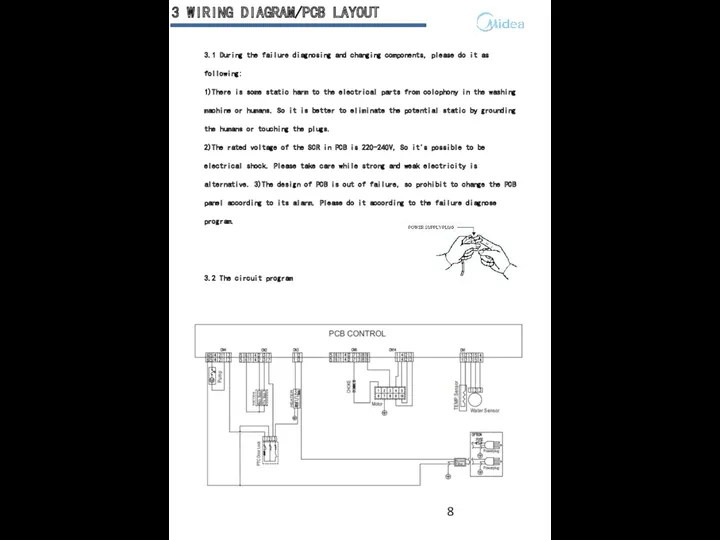
3 WIRING DIAGRAM/PCB LAYOUT
3.1 During the failure diagnosing and changing components,
3 WIRING DIAGRAM/PCB LAYOUT
3.1 During the failure diagnosing and changing components,
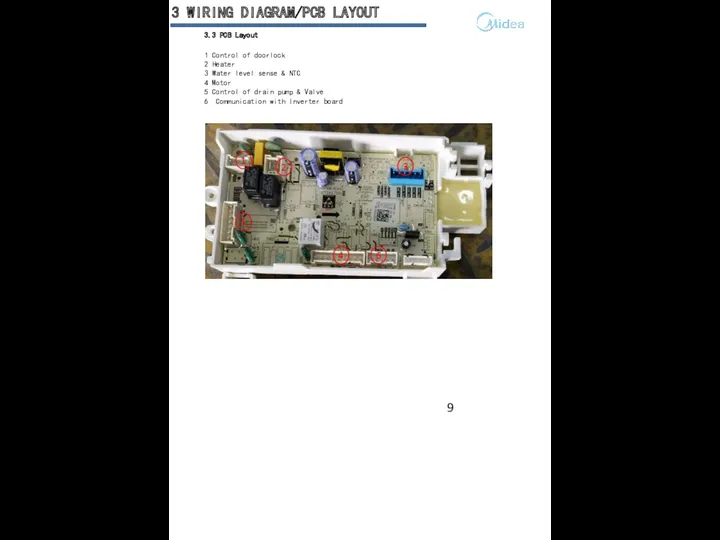
3 WIRING DIAGRAM/PCB LAYOUT
3.3 PCB Layout
1 Control of doorlock
2 Heater
3 Water
3 WIRING DIAGRAM/PCB LAYOUT
3.3 PCB Layout
1 Control of doorlock
2 Heater
3 Water
4 FACTORY PATTEN DETECTION
5.1 Service mode
Before entering into service mode,
4 FACTORY PATTEN DETECTION
5.1 Service mode
Before entering into service mode,
4 FACTORY PATTEN DETECTION
5.1 Service mode
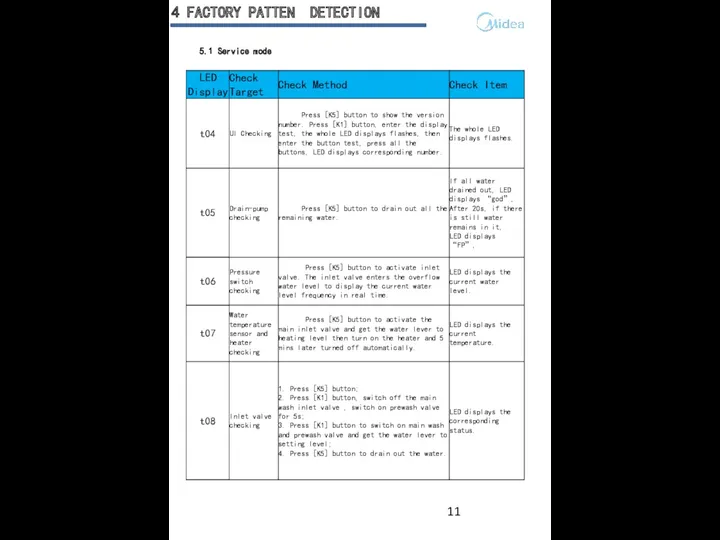
4 FACTORY PATTEN DETECTION
5.1 Service mode
4 FACTORY PATTEN DETECTION
5.1 Service mode
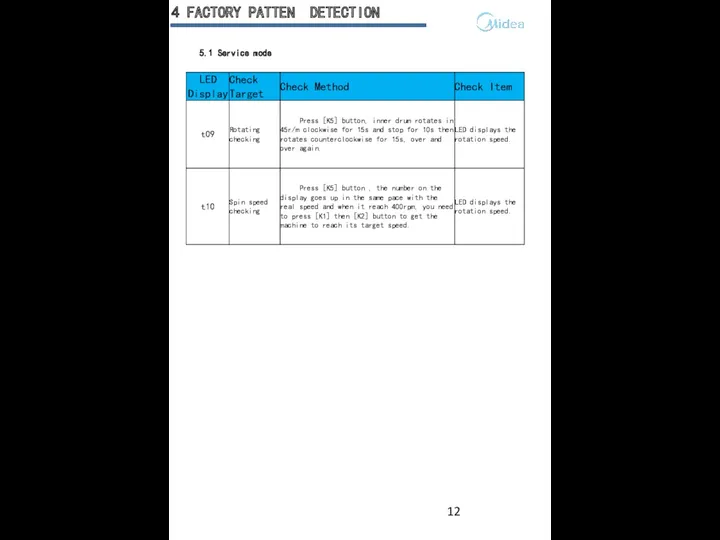
4 FACTORY PATTEN DETECTION
5.1 Service mode
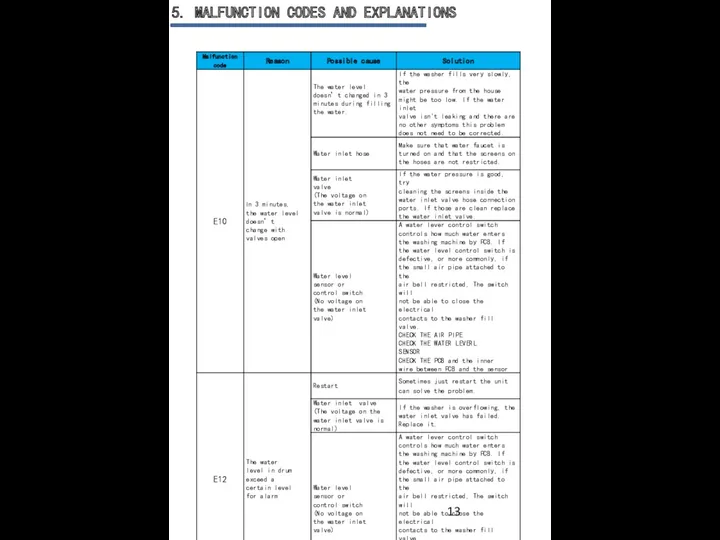
5. MALFUNCTION CODES AND EXPLANATIONS
5. MALFUNCTION CODES AND EXPLANATIONS
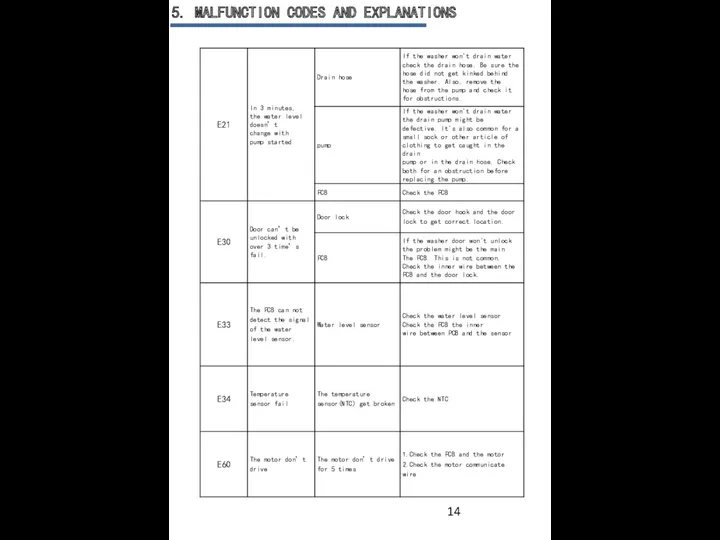
5. MALFUNCTION CODES AND EXPLANATIONS
5. MALFUNCTION CODES AND EXPLANATIONS
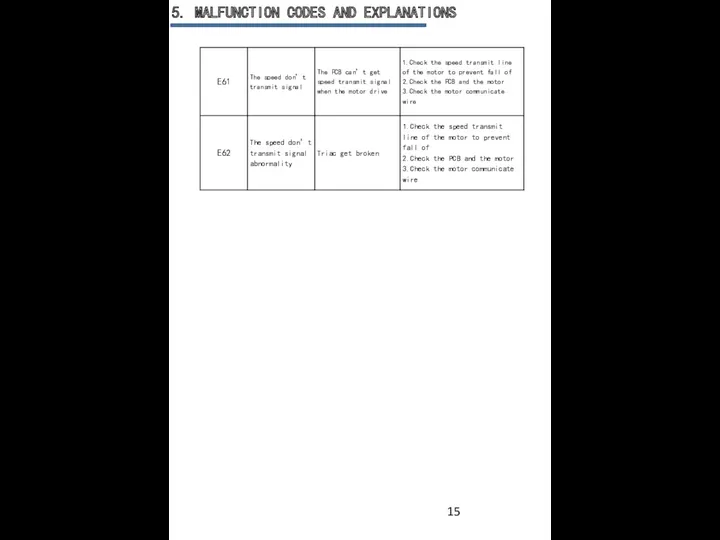
5. MALFUNCTION CODES AND EXPLANATIONS
5. MALFUNCTION CODES AND EXPLANATIONS
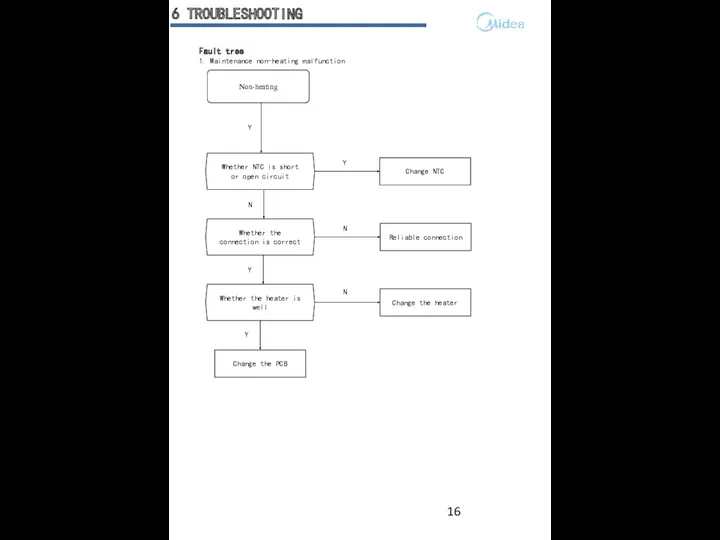
6 TROUBLESHOOTING
Fault tree
1. Maintenance non-heating malfunction
Change the PCB
Whether the connection is
6 TROUBLESHOOTING
Fault tree
1. Maintenance non-heating malfunction
Change the PCB
Whether the connection is

2. Door non-locked & its maintenance
Whether the inner wire between the
2. Door non-locked & its maintenance
Whether the inner wire between the
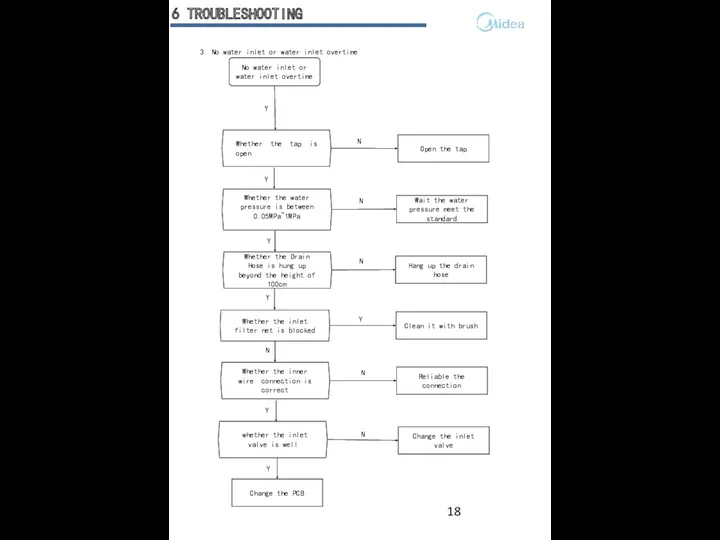
3. No water inlet or water inlet overtime
No water inlet or
3. No water inlet or water inlet overtime
No water inlet or
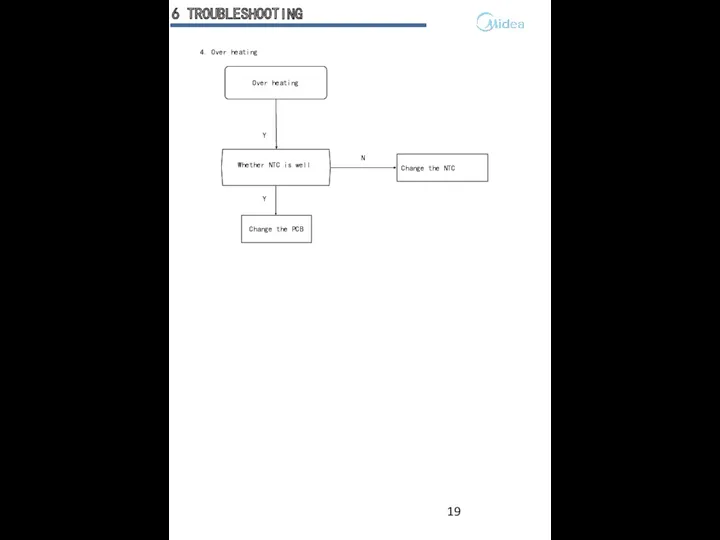
4. Over heating
circuit open
circuit
Change the NTC
Over heating
N
Y
Y
Whether NTC is well
6
4. Over heating
circuit open
circuit
Change the NTC
Over heating
N
Y
Y
Whether NTC is well
6
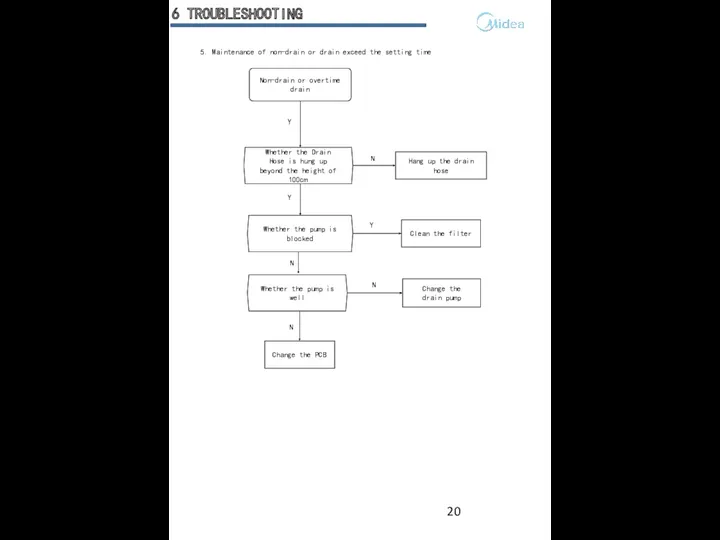
5. Maintenance of non-drain or drain exceed the setting time
Whether the
5. Maintenance of non-drain or drain exceed the setting time
Whether the
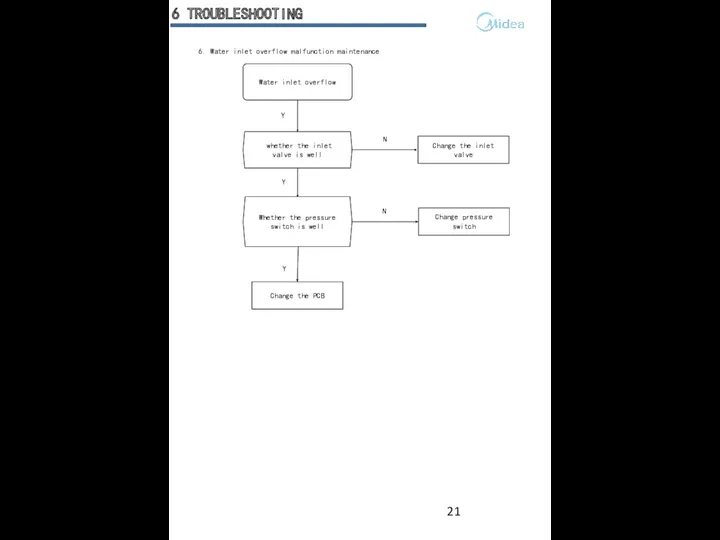
6. Water inlet overflow malfunction maintenance
whether the inlet valve is
6. Water inlet overflow malfunction maintenance
whether the inlet valve is
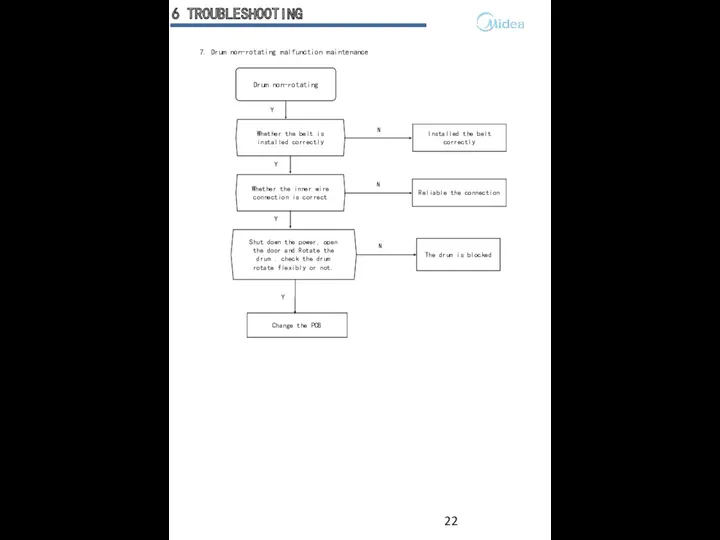
Whether the inner wire connection is correct
Change the PCB
Whether the belt
Whether the inner wire connection is correct
Change the PCB
Whether the belt
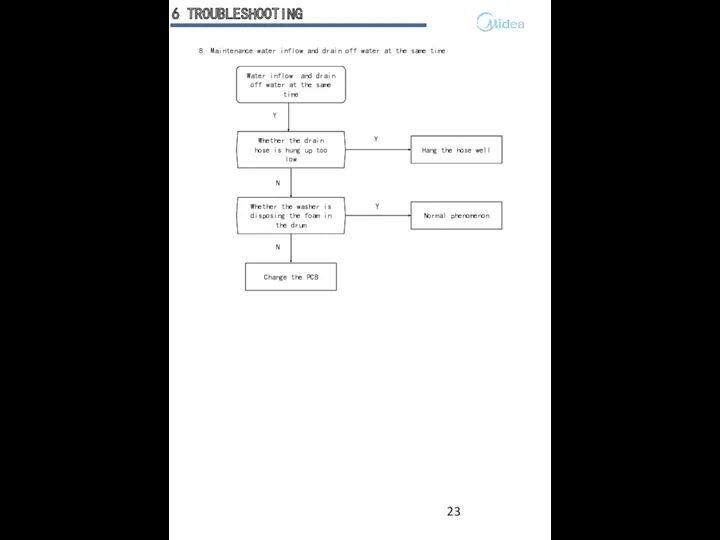
8. Maintenance water inflow and drain off water at the same
8. Maintenance water inflow and drain off water at the same

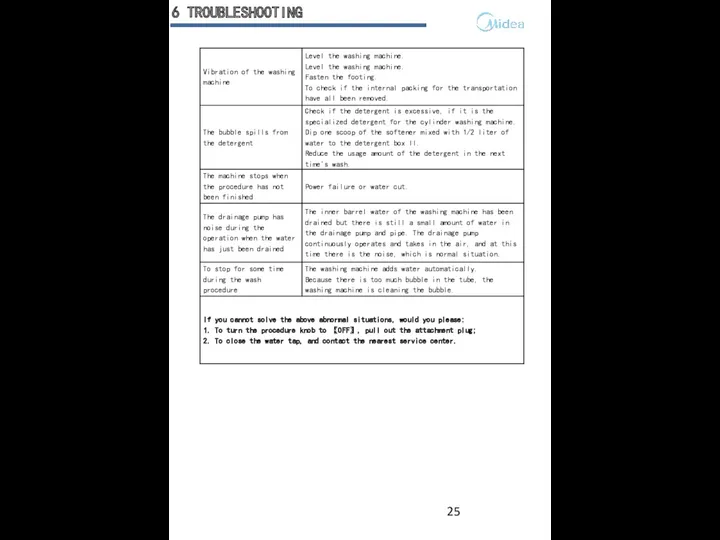
Malfunction and solution
6 TROUBLESHOOTING
Malfunction and solution
6 TROUBLESHOOTING
6 TROUBLESHOOTING
6 TROUBLESHOOTING
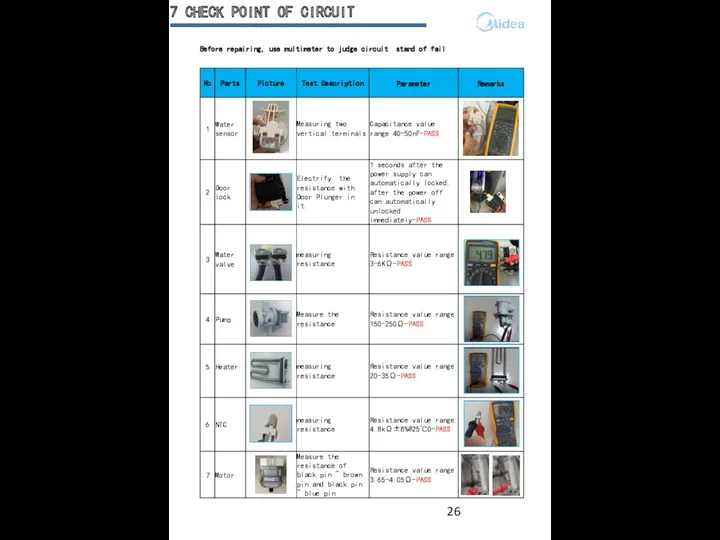
Before repairing, use multimeter to judge circuit stand of fail
7
Before repairing, use multimeter to judge circuit stand of fail
7

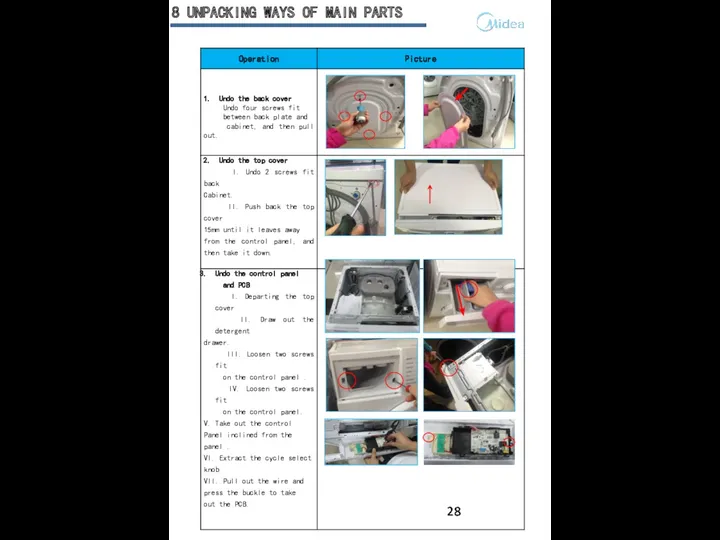
UNPACKING WAYS OF MAIN PARTS
1. Undo the back cover
2. Undo top
UNPACKING WAYS OF MAIN PARTS
1. Undo the back cover
2. Undo top
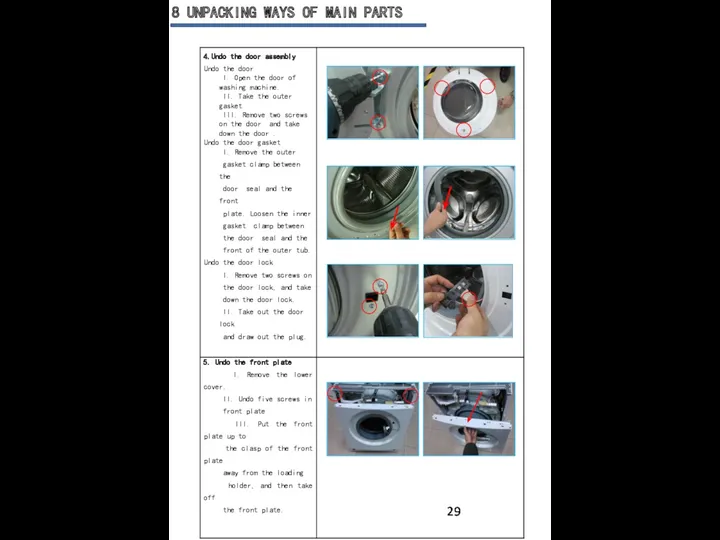
8 UNPACKING WAYS OF MAIN PARTS
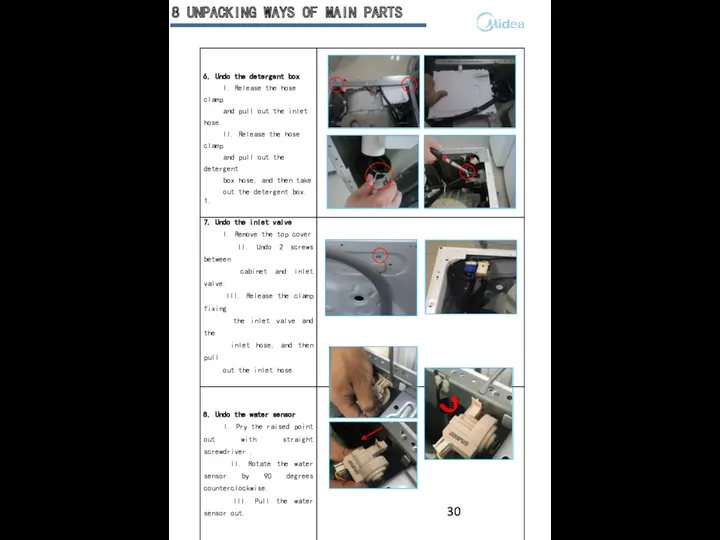
8 UNPACKING WAYS OF MAIN PARTS
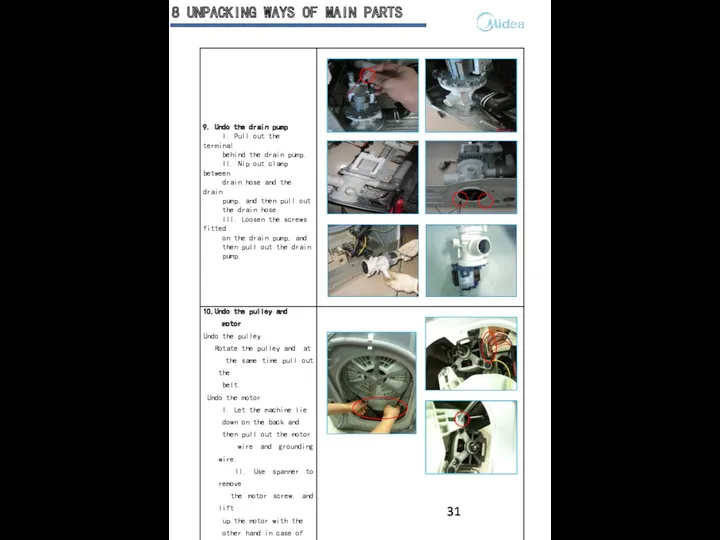
8 UNPACKING WAYS OF MAIN PARTS
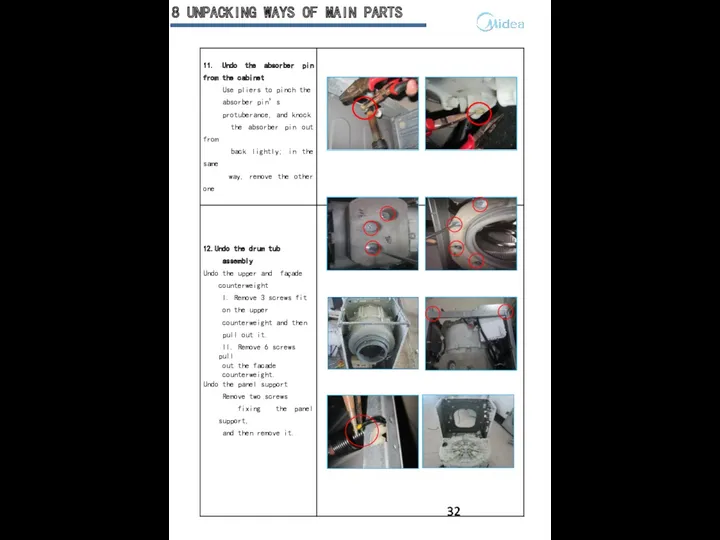
8 UNPACKING WAYS OF MAIN PARTS
8 UNPACKING WAYS OF MAIN PARTS
8 UNPACKING WAYS OF MAIN PARTS
8 UNPACKING WAYS OF MAIN PARTS
8 UNPACKING WAYS OF MAIN PARTS
8 UNPACKING WAYS OF MAIN PARTS
8 UNPACKING WAYS OF MAIN PARTS
8 UNPACKING WAYS OF MAIN PARTS
8 UNPACKING WAYS OF MAIN PARTS
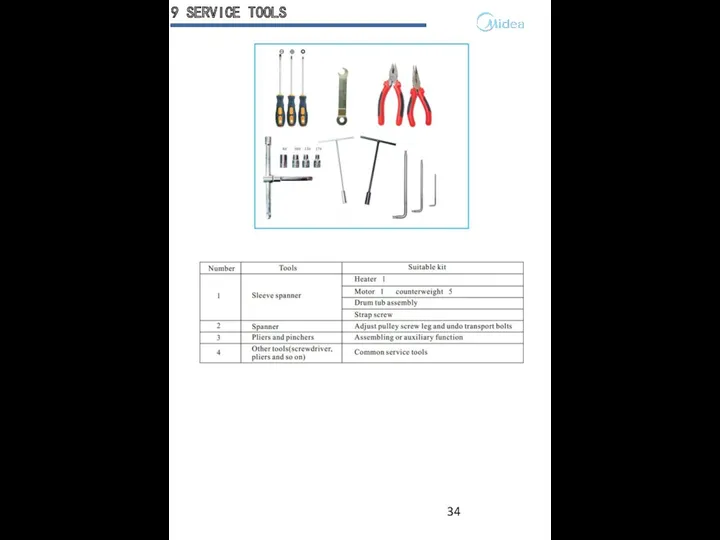
9 SERVICE TOOLS
9 SERVICE TOOLS
 Презентация Лепим пингвина Диск
 Архиватор WinRAR
 Химические свойства кислот с точки зрения теории электролитической диссоциации
 Медицинская статистика. Абсолютные и относительные величины
 Підйомно-транспортні машини
 Крупнопанельные здания. Крупноблочные здания
 Проблемы космической промышленности
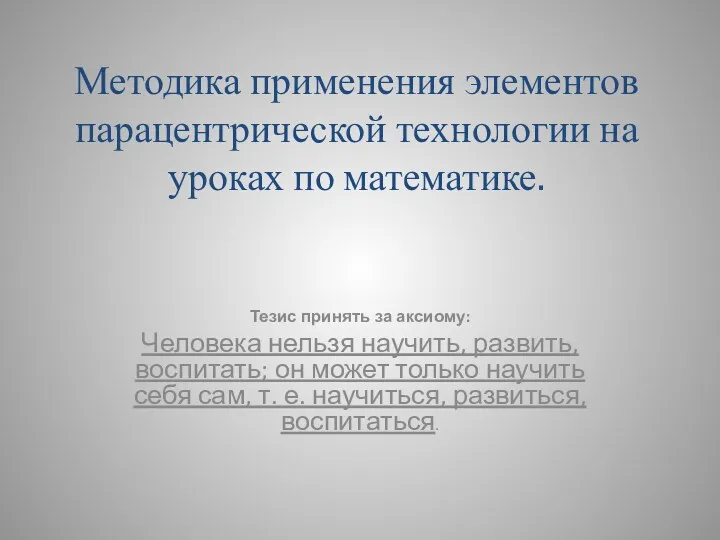 Методика применения элементов парацентрической технологии на уроках по математике.
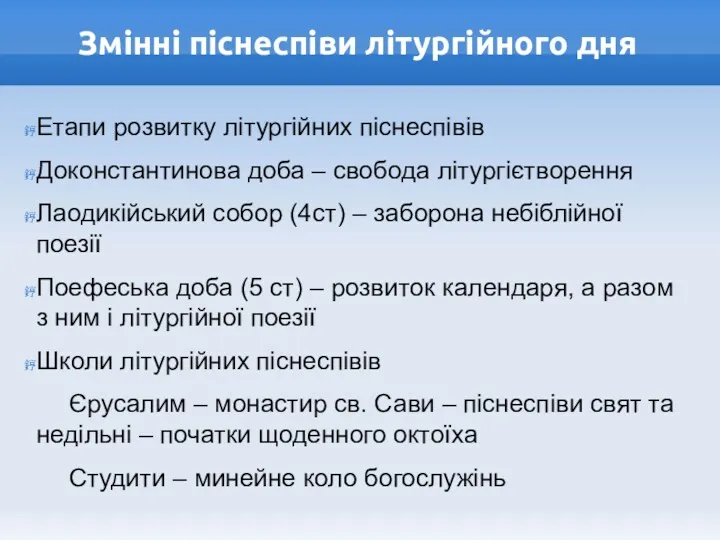 Змінні піснеспіви літургійного дня
 Земля в космическом пространстве. Строение Земли
 Основы композиции в конструктивных искусствах
 Человеческий капитал и человеческий потенциал
 Классный час Самые полезные продукты
 Может ли настроение быть шоколадным?
 Интересный и полезный досуг для детей и подростков
 Неправильные глаголы 2
 Здоровый образ жизни и профилактика неинфекционных заболеваний
 Су ресурстарын тазарту әдістері
 Презентация Сравнительная характеристика галогенов
 Игровая презентация Репка Часть 2
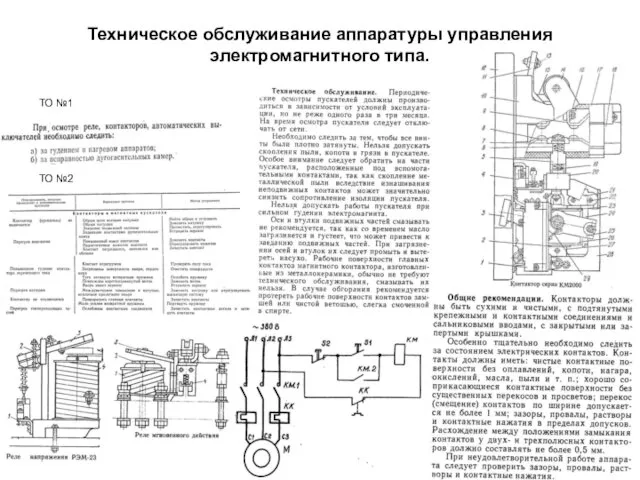 Техническое обслуживание аппаратуры управления электромагнитного типа. Судовые нагревательные приборы. (Билет 27)
 Интерактивная игра. Фильмы. Знаменитости
 Zhiry. Липидтердің классификациясы
 Под чистым снегом Рождества
 Did you hear about…?
 Основні пристрої на дільничних станціях. Локомотивне та вагонне господарства
 презентация к внеклассному мероприятию Моя семья - мое богатство
 Дифференциальные уравнения движения идеальной жидкости. Уравнение Бернулли для элементарной струйки идеальной жидкости