- Web Telex Release System

Содержание
- 2. Version History
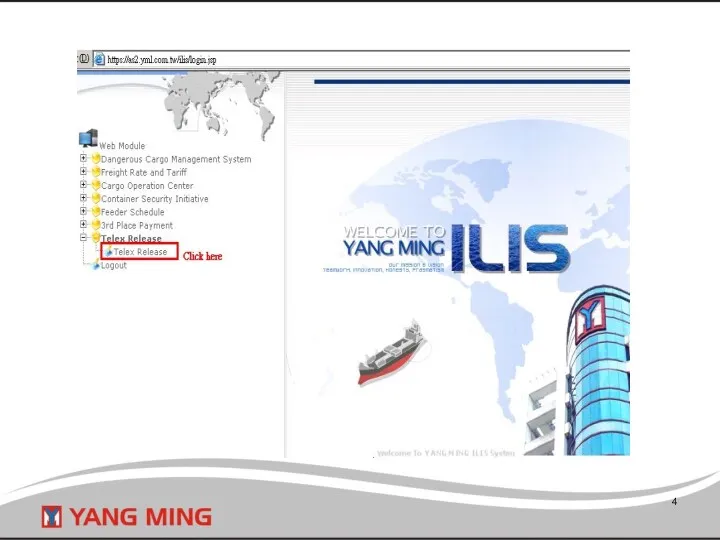
- 3. https://as2.yangming.com/ilis/index_v2.htm (User name and password are the same as ILIS system.)
- 5. Web Telex Release System
- 6. If you want to log in Telex Release system, you must be: 1. ILIS user. (with
- 7. User role authority…………………………………………………………P.8-11 Introduce the function program on Workspace………………P.12-24 Q & A for the function program
- 8. User role authority
- 9. According to working procedure, there are mainly three kinds of users role related with export/import agents
- 10. The chief assignment of the role ICBS => a. The role is to set and manage
- 11. Telex Release menu related to Administrator\ Local Manager\Normal user are as follows.
- 12. Introduce the function on workspace
- 13. Workspace New Release Pending Release Release Query Global Query Resend Email Clarify Cargo Status
- 14. This program is full function program that create one telex release B/L or several ones with
- 15. In addition, there is the function related to Sending Email on New Release. Email function: Providing
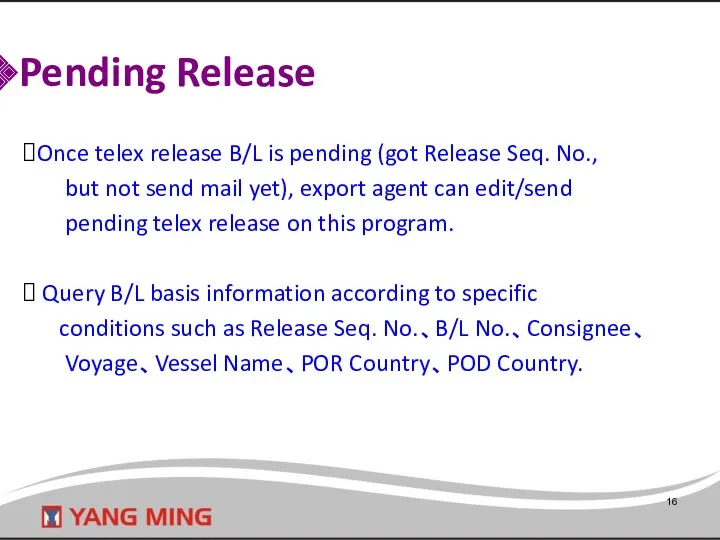
- 16. Pending Release Once telex release B/L is pending (got Release Seq. No., but not send mail
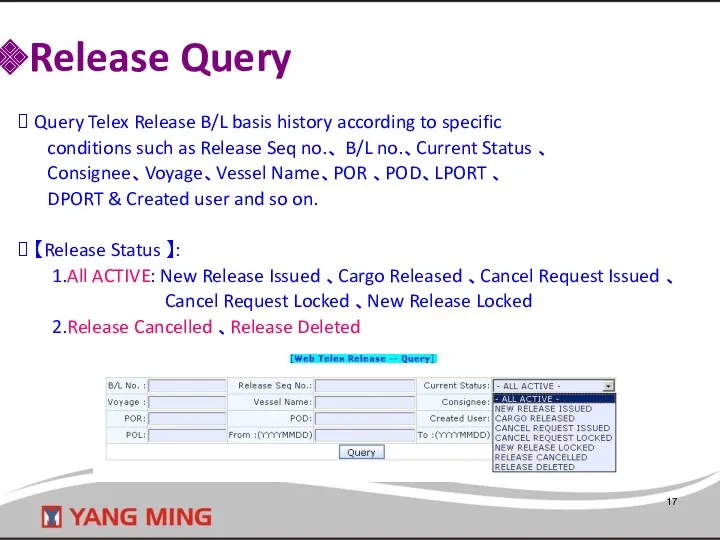
- 17. Release Query Query Telex Release B/L basis history according to specific conditions such as Release Seq
- 18. Providing the function program of 【Delete New】、 【Lock】、【Un-Lock】、【Request Cancel】、 【Confirm Cancel】、 【 Reject Cancel】、 【Confirm Release
- 19. Action-Status Correspondence Chart
- 21. Action Instruction Confirm Release: Import agent can access this function to give the release confirmation to
- 22. Query Telex Release B/L basis history according to specific conditions such as Release Seq no.、 B/L
- 23. Resend Email Providing the query conditions such as B/L No.、 Release Seq. No、Action、Mail Subject. Providing the
- 24. Clarify Cargo Status Providing the query conditions such as B/L No.、Confirm Status、Date Once export agent send
- 25. Q & A for the function program on Workspace
- 26. 1. How to create new Telex Release? 2. How to create several New Telex Release with
- 27. 1. After receiving “Withdraw Telex Release” auto mail, what should import agent follow up? 2. After
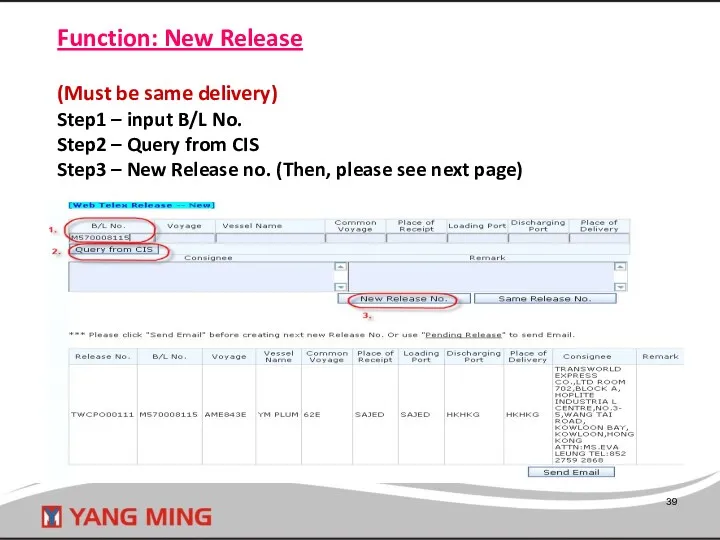
- 28. Export agent=> How to create New Telex Release?
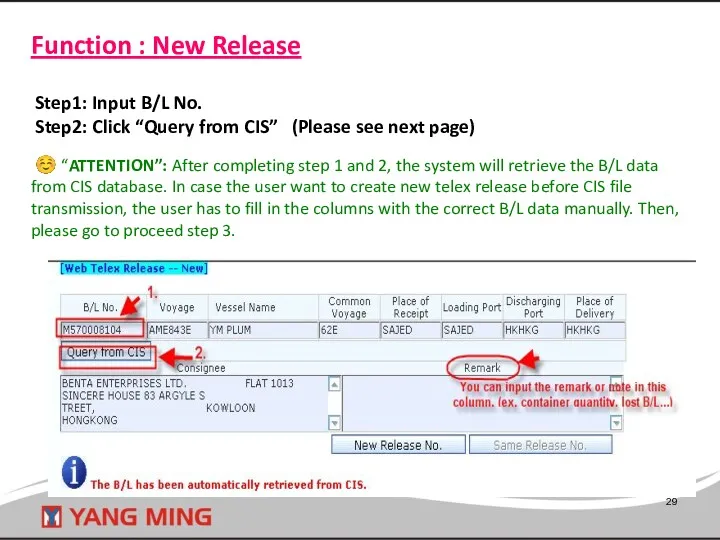
- 29. Function : New Release Step1: Input B/L No. Step2: Click “Query from CIS” (Please see next
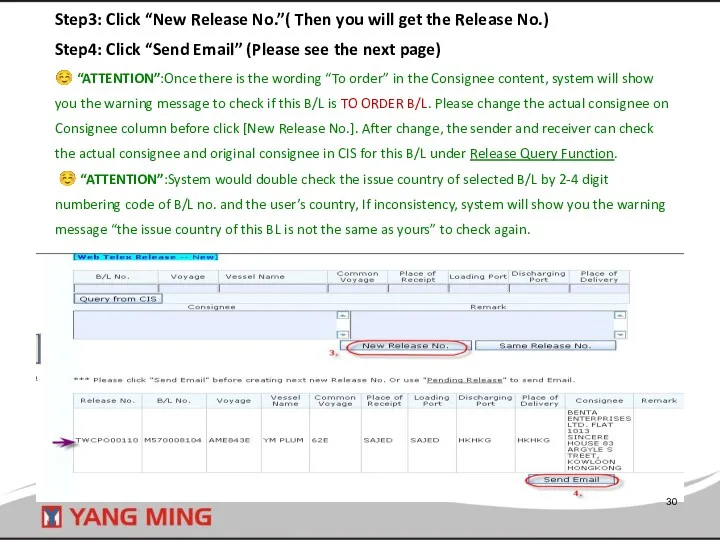
- 30. Step3: Click “New Release No.”( Then you will get the Release No.) Step4: Click “Send Email”
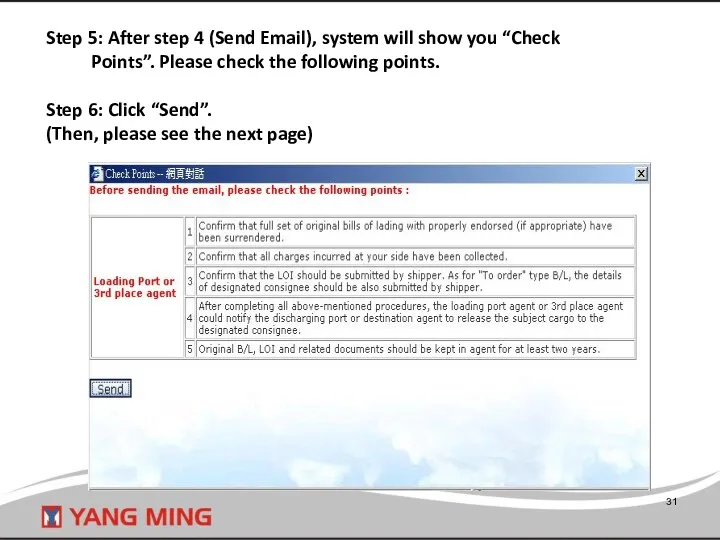
- 31. Step 5: After step 4 (Send Email), system will show you “Check Points”. Please check the
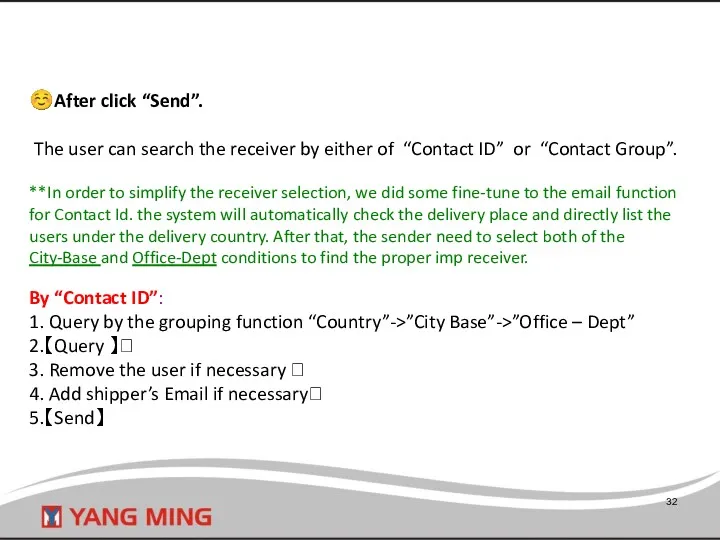
- 32. ☺After click “Send”. The user can search the receiver by either of “Contact ID” or “Contact
- 33. Free text which is named "Shipper's Email”: Users can input shipper's Email in this free text,
- 34. [Special note 1] If the delivery place is USXXX, the email receiver will be automatically assigned
- 35. [Special note 2 ] If the email address format is incorrect and the mail can't be
- 36. [Special note 2 ] Besides, Users can click B/L no. under [Resend] function (copy 1) to
- 37. By Contact Group (Please edit “New Group” first) ? 1. Select【 Group name 】 ? 2.【
- 38. Export agent=> How to create several New Telex Release with the same Release Seq. no.?
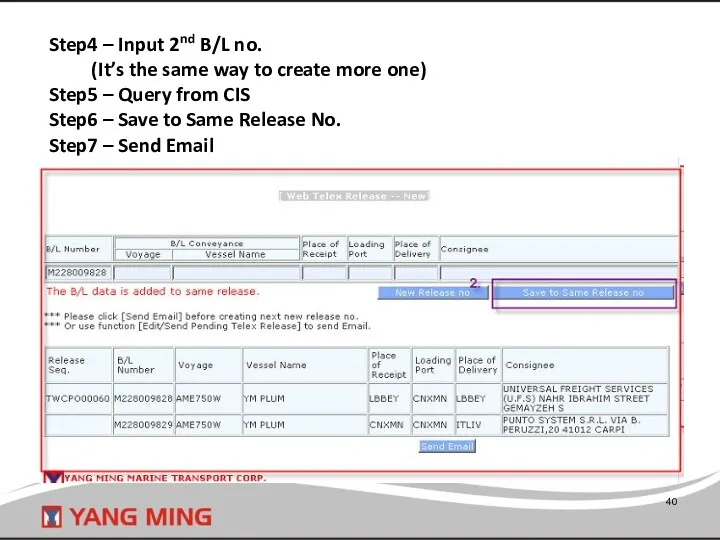
- 39. Function: New Release (Must be same delivery) Step1 – input B/L No. Step2 – Query from
- 40. Step4 – Input 2nd B/L no. (It’s the same way to create more one) Step5 –
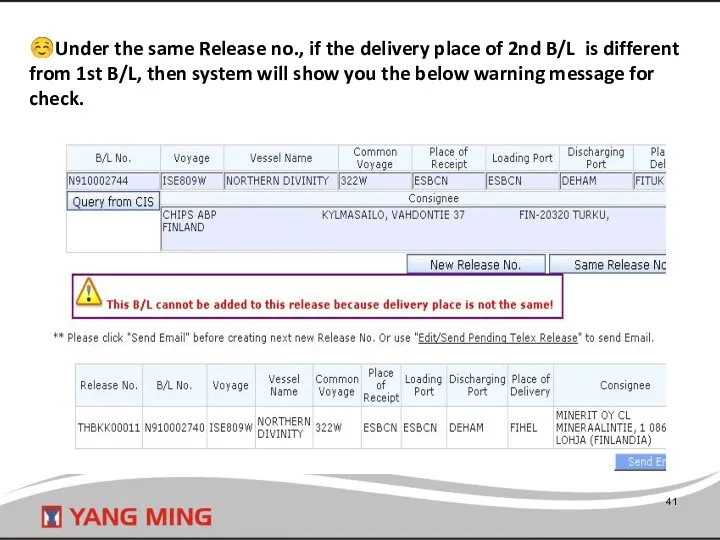
- 41. ☺Under the same Release no., if the delivery place of 2nd B/L is different from 1st
- 42. Export agent=> How to do “send email” on Pending Release?
- 43. Function: Pending Release [Special notice] Only the original created user or local manager is allowed to
- 44. Export agent=> How to withdraw Telex Release? (Condition: After got the Release No. but not Send
- 45. Function: Pending Release ☺ [Attention] Only the original created user or local manager is allowed to
- 46. Export agent=> How to withdraw Telex Release? (Condition: After got Release Seq No. and sent Email
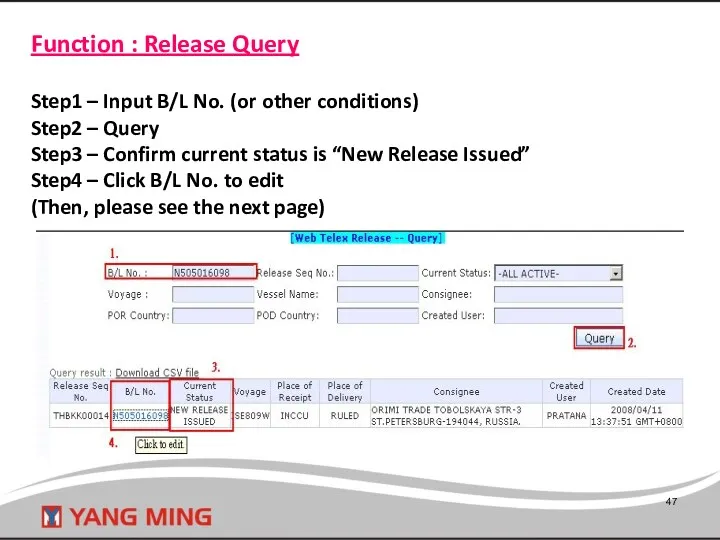
- 47. Function : Release Query Step1 – Input B/L No. (or other conditions) Step2 – Query Step3
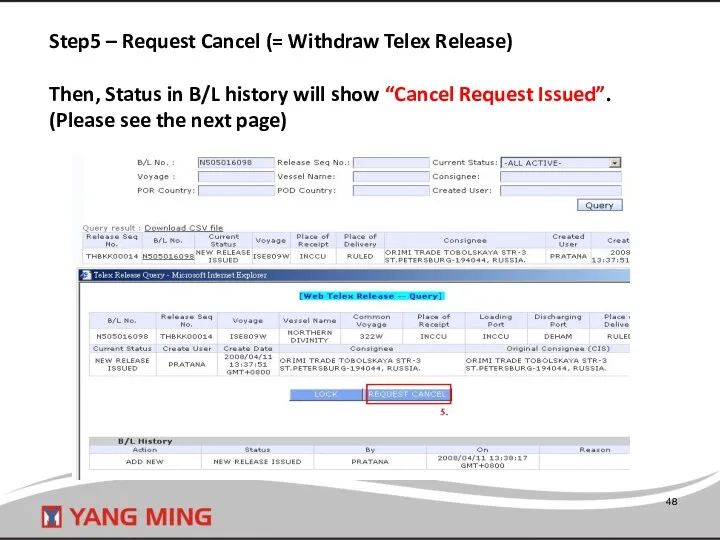
- 48. Step5 – Request Cancel (= Withdraw Telex Release) Then, Status in B/L history will show “Cancel
- 49. ☺ After doing “Request Cancel” (status: Cancel Request Issued), in case export agent would like to
- 50. [Special notice] After import agent click “Confirm cancel” to approve the withdrawal, export agent will receive
- 51. Export agent=> If import agent don’t receive the New Telex Release auto mail, how to resend
- 52. Function: “Resend Email” Step1 - Input B/L# or Release Seq. No. (or other conditions) Step2 -
- 53. Resend to Original Receiver only Step5 – Tick Original Receiver Step6 – Add to Resend List
- 54. ☺Resend to New Receiver, together with Original Receiver Step5 – Tick Receiver (Original Receiver) Step6 –
- 55. [Special Note] If the Date column (highlight in red) is blank under Resend Email function, it
- 56. Export agent=> If container status reported as “FC”(Full to consignee), how to send the clarification mail
- 57. Function: “New Release” Step1: Input B/L No. Step2: Click “Query from CIS” Step3: Click [Cargo tracking]
- 58. Step4 : Click [Email To Import Agent] Step5 : Tick Receiver Step6 : Click “Add to
- 59. [Special notice] After export agent click “send”, import agent will receive the auto mail named “***CLARIFICATION***TELEX
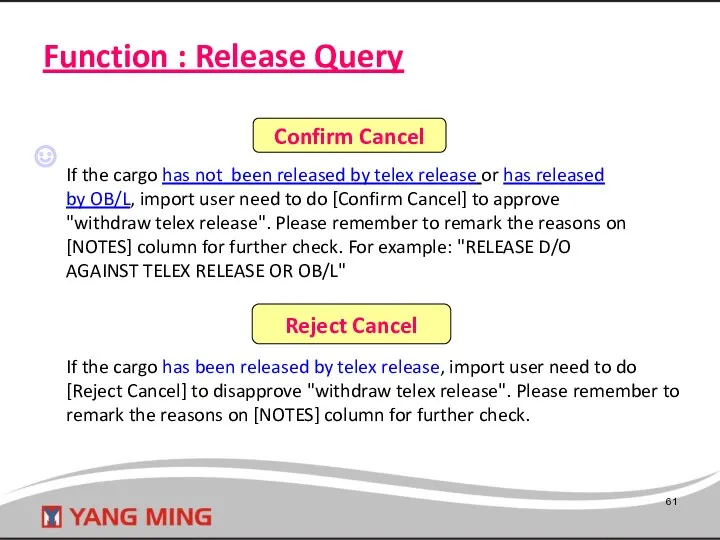
- 60. Import agent=> After receiving “Withdraw Telex Release” auto mail, what should import agent follow up?
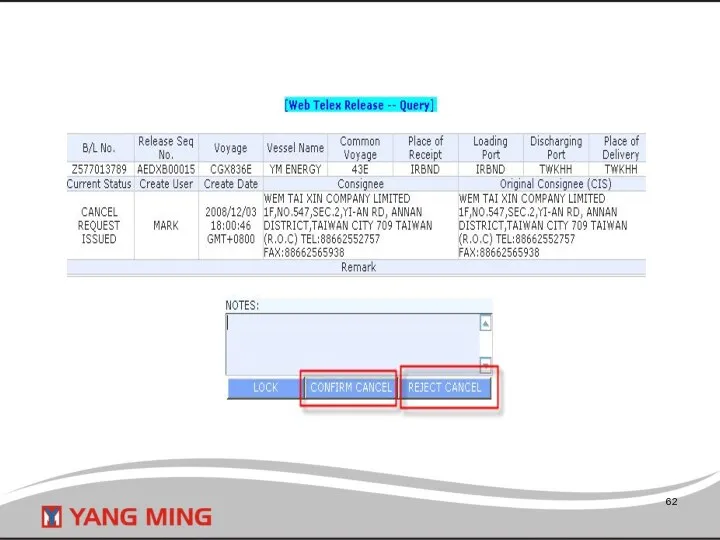
- 61. Function : Release Query If the cargo has not been released by telex release or has
- 63. Import agent=> After import agent received New Telex Release auto mail, how to give the confirmation
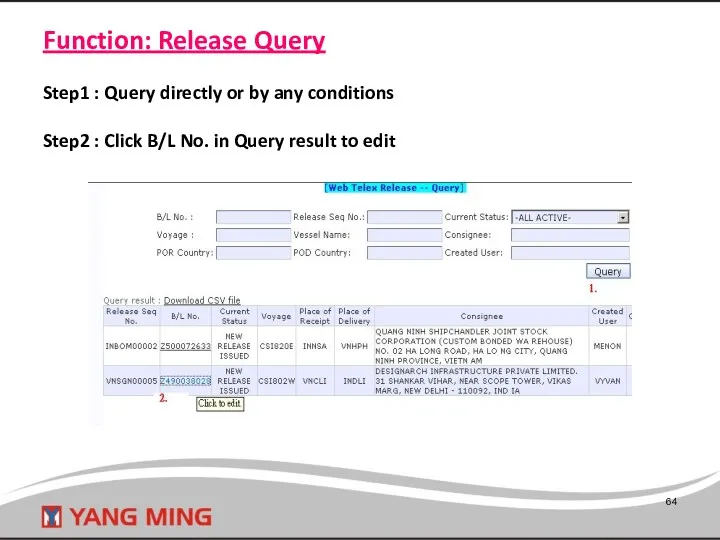
- 64. Function: Release Query Step1 : Query directly or by any conditions Step2 : Click B/L No.
- 65. Step3 : a. If confirm ok, import agent can click "confirm release“ (The timing to do
- 66. Import agent=> After import agent received “Clarification” auto mail, what should import agent follow up?
- 67. Function: “Clarify Cargo Status” Step1 – Input B/L No. Step2 – Query Step3 – Confirm if
- 68. [Special notice] After import agent confirm status [ This shipment has been released to _______.] and
- 69. The Function Program On Address Book
- 70. ☺New Group: **For saving your time, you can group the receivers into several groups. It will
- 71. ☺Group Editing: **This is full function program that you can edit/delete the existing Group List.
- 72. The Function Program On User Maintenance (Authority: Local manager and ICBS)
- 73. ☺New user Administrator (ICBS) and Local manager are allowed to add new user here. Step 1:
- 74. ☺User Editing Administrator (ICBS) and Local manager are allowed to edit the Email Address/Active/Role of the
- 75. Auto mail form
- 76. New Telex Release
- 77. Resend Email
- 78. Confirm Release
- 79. Request Cancel
- 80. Confirm Cancel
- 81. Reject Cancel
- 82. LOCK
- 83. UN-LOCK
- 84. ***CLARIFICATION*** TELEX RELEASE REQUEST
- 85. ***SHIPMENT IS NOT RELEASED*** TELEX RELEASE REQUEST
- 86. ***SHIPMENT IS RELEASED*** TELEX RELEASE REQUEST
- 87. Functions of Telex Release Fee ICBS 2015/05
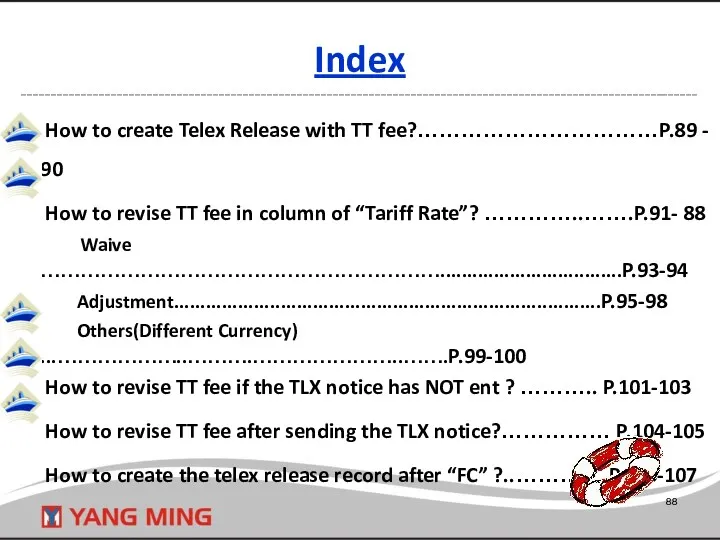
- 88. How to create Telex Release with TT fee?……………………………P.89 - 90 How to revise TT fee in
- 89. How to create Telex Release with TT fee ?
- 90. Create Telex Release with TT fee in “New Release” page Input B/L number, and click [Query
- 91. How to revise TT fee in column of “Tariff Rate”?
- 92. [Edit Rate] in “New Release” page Input B/L number, and click [Query from CIS]. The CIS
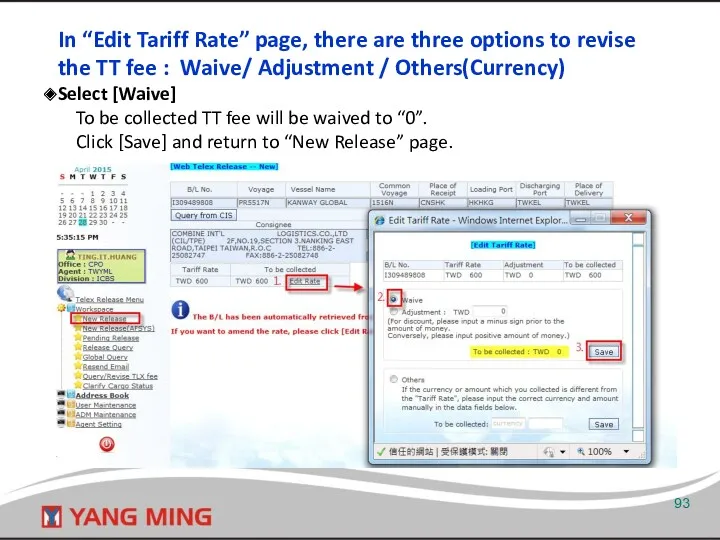
- 93. In “Edit Tariff Rate” page, there are three options to revise the TT fee : Waive/
- 94. After the tariff rate is waived, please click [New Release No.] to create New Telex release
- 95. Select [Adjustment] Key in the discount amount with a minus sign, then click [Save] and return
- 96. After the tariff rate is discounted, please click [New Release No.] to create New Telex release
- 97. Select [Adjustment] Key in the extra amount, then click [Save] and return to “New Release” page.
- 98. After the tariff rate is adjusted, please click [New Release No.] to create New Telex release
- 99. Select [Others]- Different Currency If the currency or amount which actually collected is different from the
- 100. After the currency or amount is corrected, please click [New Release No.] to create New Telex
- 101. How to revise TT fee if the TLX notice has NOT been sent ?
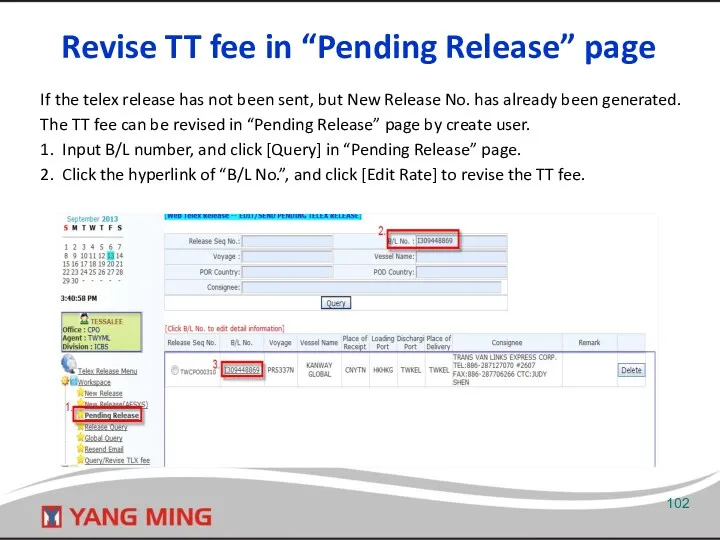
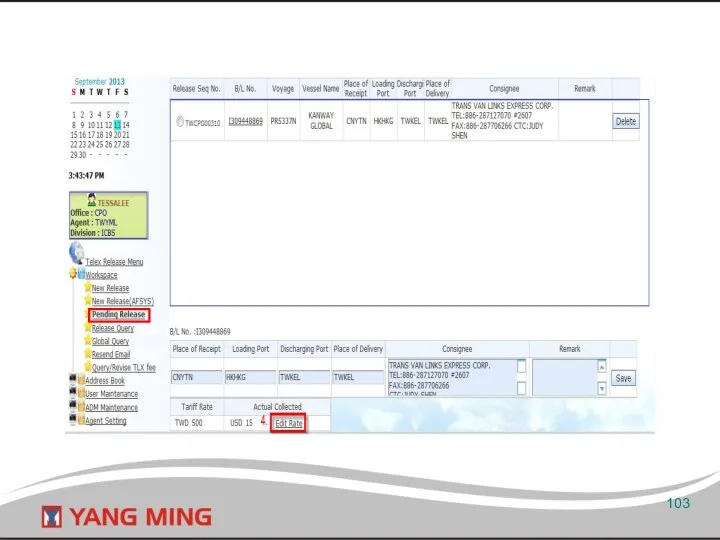
- 102. Revise TT fee in “Pending Release” page If the telex release has not been sent, but
- 104. How to revise TT fee after sending the TLX notice?
- 105. Revise TT fee in “Query/Revise TLX fee” page If the telex release notice has been sent,
- 106. How to create the telex release record after “FC” ?
- 107. If the container movement “FC” has been filed correctly, in order to complete telex release procedure,
- 109. Скачать презентацию
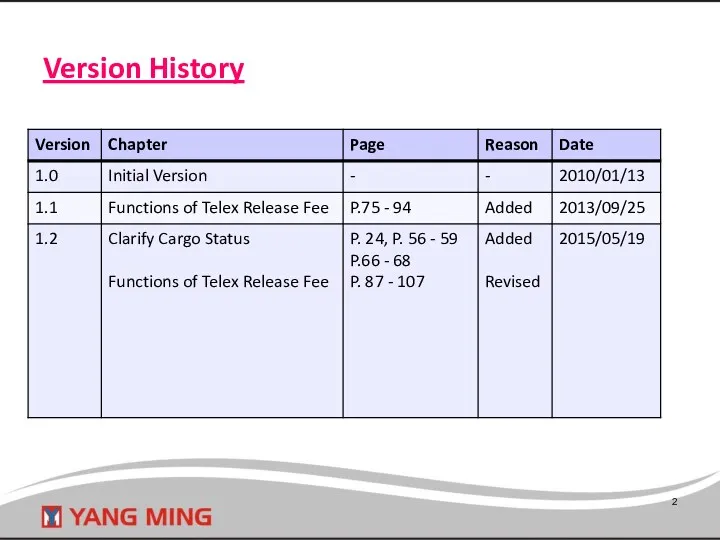
Version History
Version History

https://as2.yangming.com/ilis/index_v2.htm
(User name and password are the same as ILIS system.)
https://as2.yangming.com/ilis/index_v2.htm
(User name and password are the same as ILIS system.)
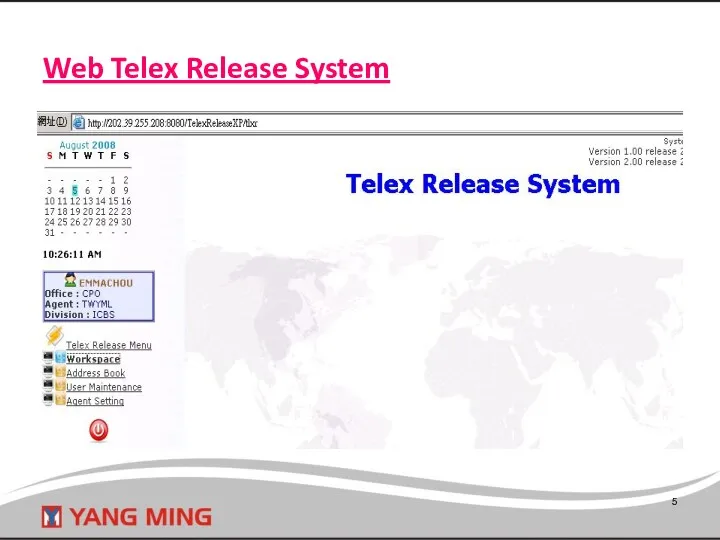
Web Telex Release System
Web Telex Release System
If you want to log in Telex Release system, you must
If you want to log in Telex Release system, you must
User role authority…………………………………………………………P.8-11
Introduce the function program on Workspace………………P.12-24
Q
User role authority…………………………………………………………P.8-11
Introduce the function program on Workspace………………P.12-24
Q
User role authority
User role authority
According to working procedure, there are mainly three kinds of users
According to working procedure, there are mainly three kinds of users
The chief assignment of the role
ICBS =>
a.
The chief assignment of the role
ICBS =>
a.
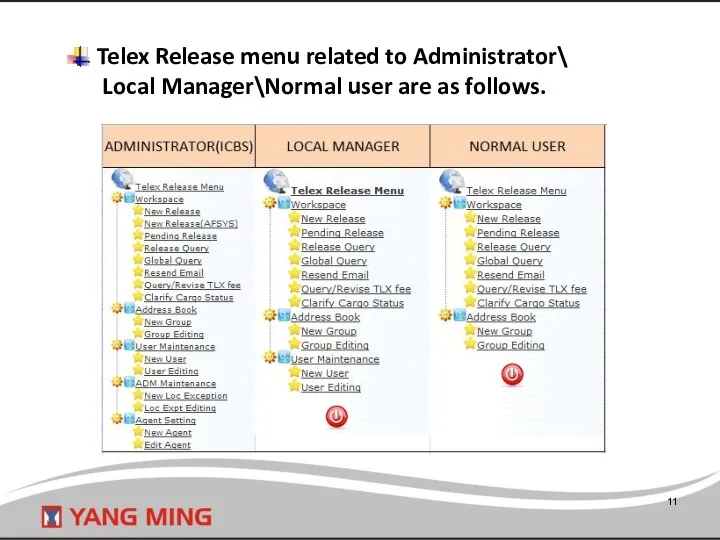
Telex Release menu related to Administrator\
Local Manager\Normal user are as
Telex Release menu related to Administrator\ Local Manager\Normal user are as
Introduce the function on workspace
Introduce the function on workspace
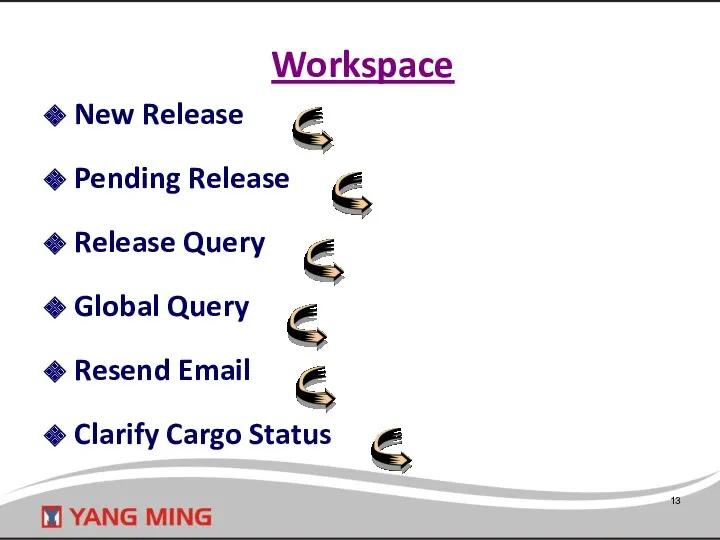
Workspace
New Release
Pending Release
Release Query
Global
Workspace
New Release
Pending Release
Release Query
Global
This program is full function program that create one telex
This program is full function program that create one telex

In addition, there is the function related to Sending Email on
In addition, there is the function related to Sending Email on
Pending Release
Once telex release B/L is pending (got Release Seq. No.,
Pending Release
Once telex release B/L is pending (got Release Seq. No.,
Release Query
Query Telex Release B/L basis history according to specific
Release Query
Query Telex Release B/L basis history according to specific
Providing the function program of 【Delete New】、
【Lock】、【Un-Lock】、【Request Cancel】、
Providing the function program of 【Delete New】、
【Lock】、【Un-Lock】、【Request Cancel】、
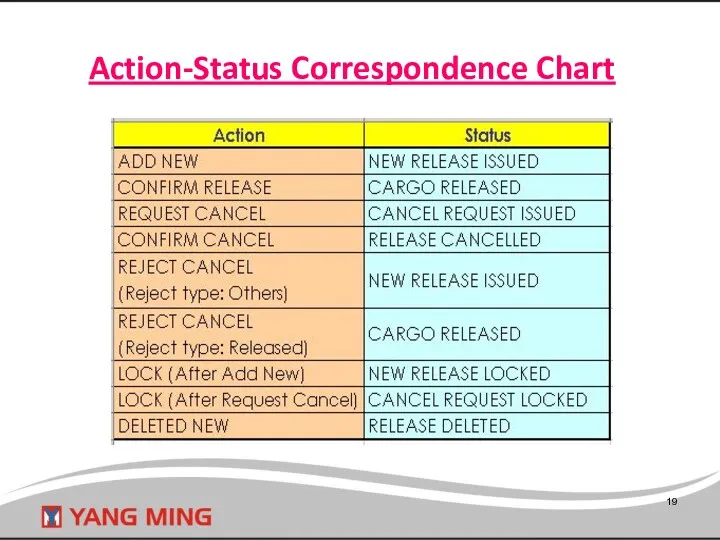
Action-Status Correspondence Chart
Action-Status Correspondence Chart
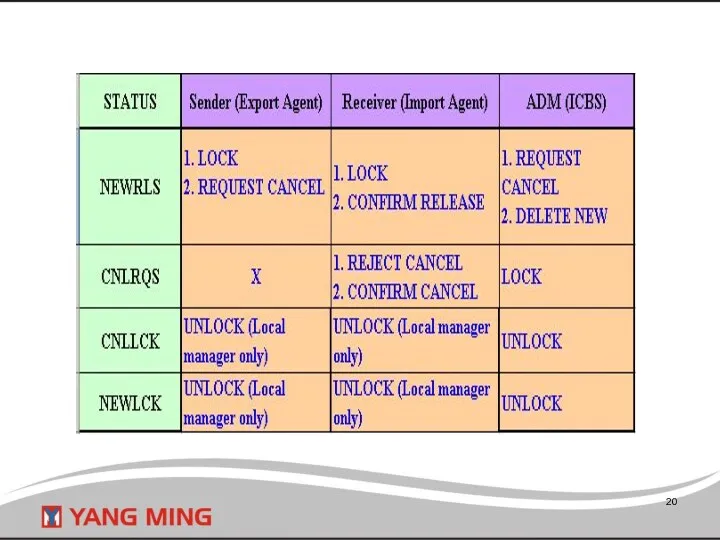
Action Instruction
Confirm Release:
Import agent can access this function to give
Action Instruction
Confirm Release:
Import agent can access this function to give
Query Telex Release B/L basis history according to specific conditions such
Query Telex Release B/L basis history according to specific conditions such
Resend Email
Providing the query conditions such as B/L No.、
Release Seq.
Resend Email
Providing the query conditions such as B/L No.、
Release Seq.
Clarify Cargo Status
Providing the query conditions such as B/L No.、Confirm Status、Date
Once
Clarify Cargo Status
Providing the query conditions such as B/L No.、Confirm Status、Date
Once
Q & A for the function program on Workspace
Q & A for the function program on Workspace
1. How to create new Telex Release?
2. How to create
1. How to create new Telex Release?
2. How to create
1. After receiving “Withdraw Telex Release” auto mail, what should import
1. After receiving “Withdraw Telex Release” auto mail, what should import
Export agent=>
How to create New Telex Release?
Export agent=>
How to create New Telex Release?
Function : New Release
Step1: Input B/L No.
Step2: Click “Query
Function : New Release Step1: Input B/L No. Step2: Click “Query
Step3: Click “New Release No.”( Then you will get the Release
Step3: Click “New Release No.”( Then you will get the Release
Step 5: After step 4 (Send Email), system will show you
Step 5: After step 4 (Send Email), system will show you
☺After click “Send”. The user can search the receiver by either
☺After click “Send”. The user can search the receiver by either
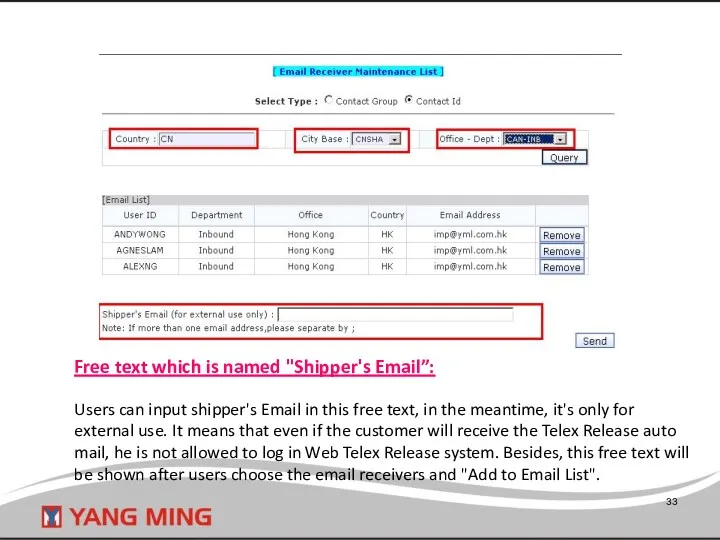
Free text which is named "Shipper's Email”:
Users can input shipper's Email in
Free text which is named "Shipper's Email”:
Users can input shipper's Email in
![[Special note 1] If the delivery place is USXXX, the](/_ipx/f_webp&q_80&fit_contain&s_1440x1080/imagesDir/jpg/24838/slide-33.jpg)
[Special note 1]
If the delivery place is USXXX, the email
[Special note 1]
If the delivery place is USXXX, the email
![[Special note 2 ] If the email address format is](/_ipx/f_webp&q_80&fit_contain&s_1440x1080/imagesDir/jpg/24838/slide-34.jpg)
[Special note 2 ]
If the email address format is incorrect and
[Special note 2 ]
If the email address format is incorrect and
![[Special note 2 ] Besides, Users can click B/L no.](/_ipx/f_webp&q_80&fit_contain&s_1440x1080/imagesDir/jpg/24838/slide-35.jpg)
[Special note 2 ]
Besides, Users can click B/L no. under [Resend]
[Special note 2 ]
Besides, Users can click B/L no. under [Resend]
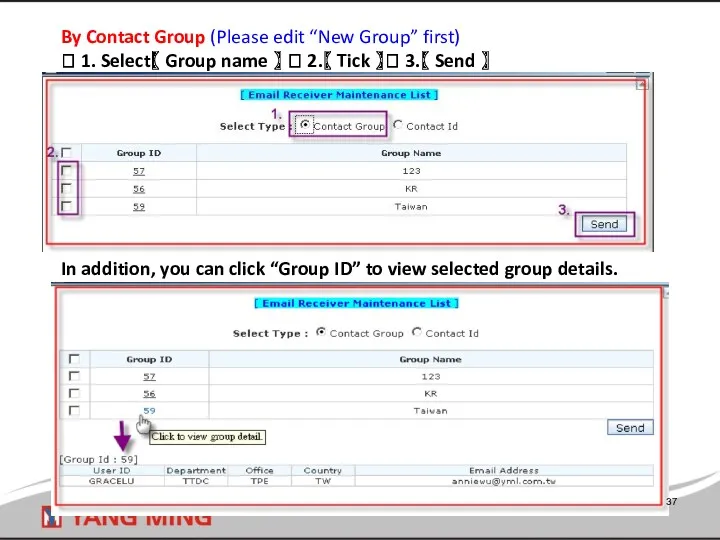
By Contact Group (Please edit “New Group” first)
? 1. Select【
By Contact Group (Please edit “New Group” first) ? 1. Select【
Export agent=>
How to create several New Telex Release with the
Export agent=>
How to create several New Telex Release with the
Function: New Release
(Must be same delivery)
Step1 – input B/L No.
Step2
Function: New Release (Must be same delivery) Step1 – input B/L No. Step2
Step4 – Input 2nd B/L no. (It’s the same way to
Step4 – Input 2nd B/L no. (It’s the same way to
☺Under the same Release no., if the delivery place of 2nd
☺Under the same Release no., if the delivery place of 2nd
Export agent=>
How to do “send email” on Pending Release?
Export agent=>
How to do “send email” on Pending Release?
![Function: Pending Release [Special notice] Only the original created user](/_ipx/f_webp&q_80&fit_contain&s_1440x1080/imagesDir/jpg/24838/slide-42.jpg)
Function: Pending Release
[Special notice] Only the original created user or
Function: Pending Release [Special notice] Only the original created user or
Export agent=>
How to withdraw Telex Release? (Condition: After got the
Export agent=>
How to withdraw Telex Release? (Condition: After got the
![Function: Pending Release ☺ [Attention] Only the original created user](/_ipx/f_webp&q_80&fit_contain&s_1440x1080/imagesDir/jpg/24838/slide-44.jpg)
Function: Pending Release
☺ [Attention] Only the original created user or local
Function: Pending Release ☺ [Attention] Only the original created user or local
Export agent=>
How to withdraw Telex Release?
(Condition: After got Release
Export agent=>
How to withdraw Telex Release?
(Condition: After got Release
Function : Release Query
Step1 – Input B/L No. (or other conditions)
Step2
Function : Release Query Step1 – Input B/L No. (or other conditions) Step2
Step5 – Request Cancel (= Withdraw Telex Release)
Then, Status in B/L
Step5 – Request Cancel (= Withdraw Telex Release) Then, Status in B/L
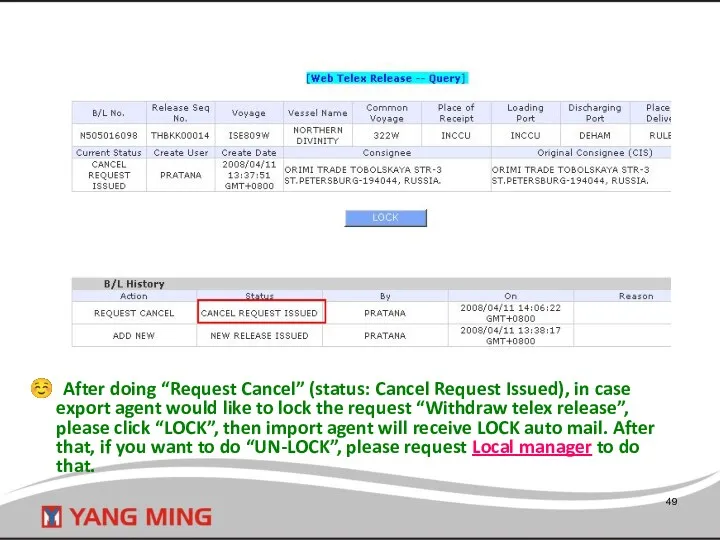
☺ After doing “Request Cancel” (status: Cancel Request Issued), in case
☺ After doing “Request Cancel” (status: Cancel Request Issued), in case
![[Special notice] After import agent click “Confirm cancel” to approve](/_ipx/f_webp&q_80&fit_contain&s_1440x1080/imagesDir/jpg/24838/slide-49.jpg)
[Special notice]
After import agent click “Confirm cancel” to approve the withdrawal,
[Special notice]
After import agent click “Confirm cancel” to approve the withdrawal,
Export agent=>
If import agent don’t receive the New Telex Release
Export agent=>
If import agent don’t receive the New Telex Release
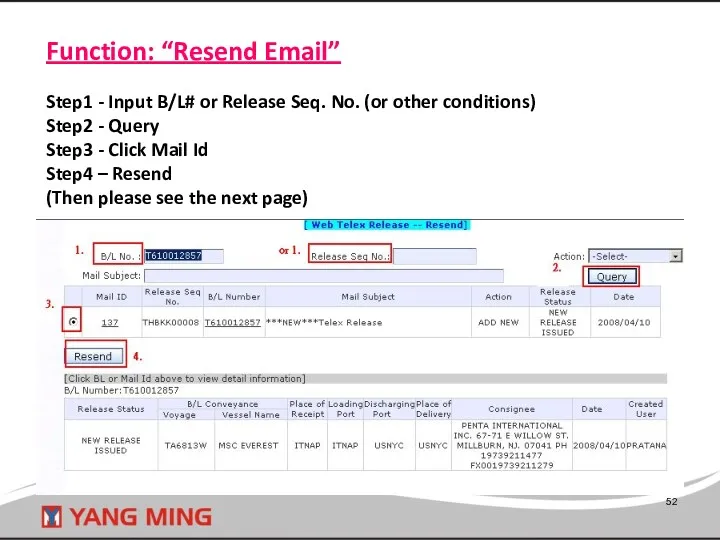
Function: “Resend Email”
Step1 - Input B/L# or Release Seq. No. (or
Function: “Resend Email” Step1 - Input B/L# or Release Seq. No. (or
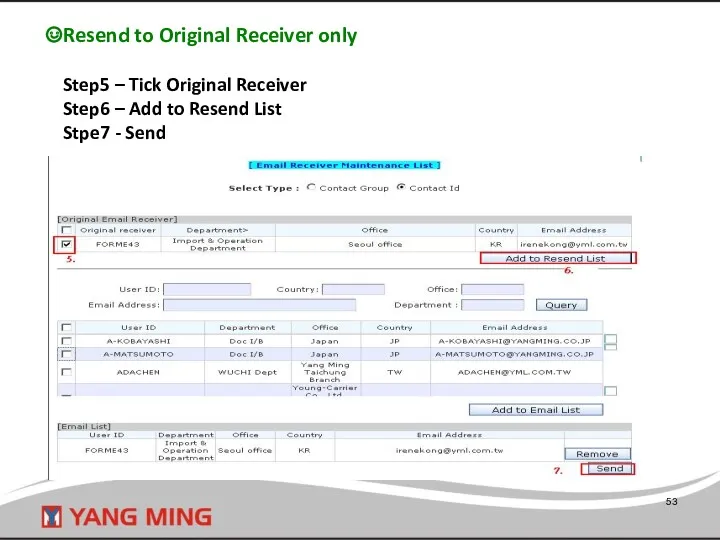
Resend to Original Receiver only
Step5 – Tick Original Receiver
Step6 –
Resend to Original Receiver only Step5 – Tick Original Receiver Step6 –
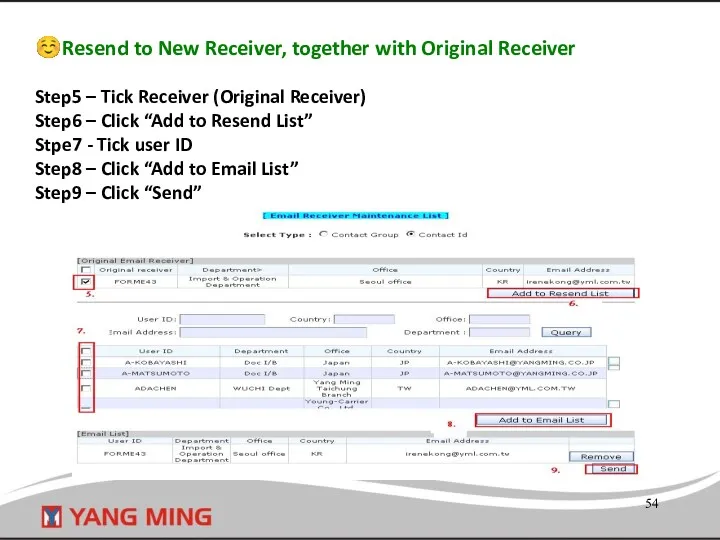
☺Resend to New Receiver, together with Original Receiver
Step5 – Tick Receiver
☺Resend to New Receiver, together with Original Receiver Step5 – Tick Receiver
![[Special Note] If the Date column (highlight in red) is](/_ipx/f_webp&q_80&fit_contain&s_1440x1080/imagesDir/jpg/24838/slide-54.jpg)
[Special Note]
If the Date column (highlight in red) is blank under
[Special Note]
If the Date column (highlight in red) is blank under
Export agent=>
If container status reported as “FC”(Full to consignee), how to
Export agent=> If container status reported as “FC”(Full to consignee), how to
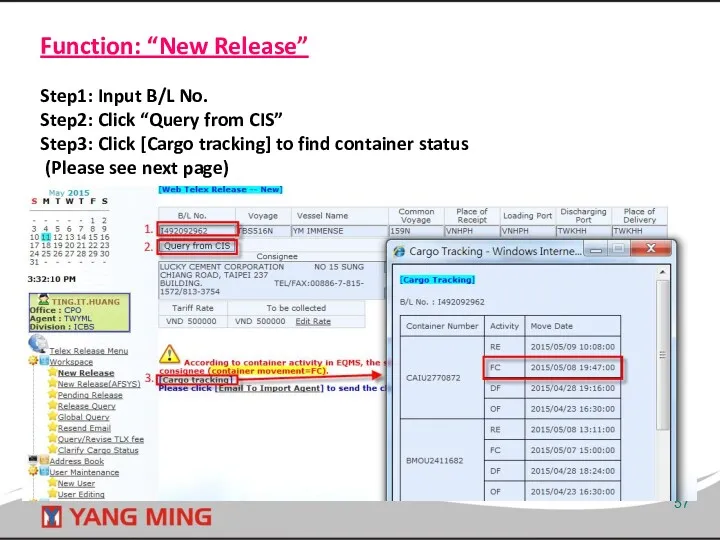
Function: “New Release”
Step1: Input B/L No.
Step2: Click “Query from CIS”
Step3: Click
Function: “New Release” Step1: Input B/L No. Step2: Click “Query from CIS” Step3: Click
![Step4 : Click [Email To Import Agent] Step5 : Tick](/_ipx/f_webp&q_80&fit_contain&s_1440x1080/imagesDir/jpg/24838/slide-57.jpg)
Step4 : Click [Email To Import Agent]
Step5 : Tick Receiver
Step6
Step4 : Click [Email To Import Agent] Step5 : Tick Receiver Step6
![[Special notice] After export agent click “send”, import agent will](/_ipx/f_webp&q_80&fit_contain&s_1440x1080/imagesDir/jpg/24838/slide-58.jpg)
[Special notice]
After export agent click “send”, import agent will receive the
[Special notice]
After export agent click “send”, import agent will receive the
Import agent=>
After receiving “Withdraw Telex Release” auto mail, what should import
Import agent=> After receiving “Withdraw Telex Release” auto mail, what should import
Function : Release Query
If the cargo has not been released
Function : Release Query
If the cargo has not been released
Import agent=>
After import agent received New Telex Release auto mail,
Import agent=>
After import agent received New Telex Release auto mail,
Function: Release Query
Step1 : Query directly or by any conditions
Step2 :
Function: Release Query Step1 : Query directly or by any conditions Step2 :
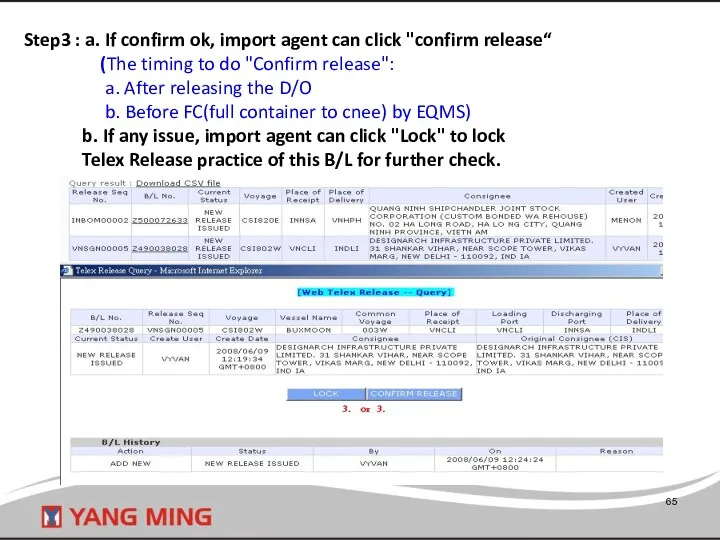
Step3 : a. If confirm ok, import agent can click "confirm
Step3 : a. If confirm ok, import agent can click "confirm
Import agent=>
After import agent received “Clarification” auto mail, what should
Import agent=>
After import agent received “Clarification” auto mail, what should
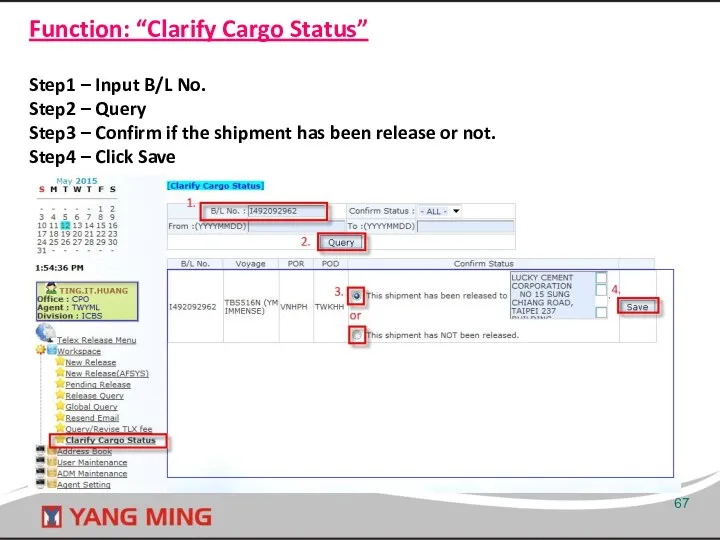
Function: “Clarify Cargo Status”
Step1 – Input B/L No.
Step2 – Query
Step3
Function: “Clarify Cargo Status” Step1 – Input B/L No. Step2 – Query Step3
![[Special notice] After import agent confirm status [ This shipment](/_ipx/f_webp&q_80&fit_contain&s_1440x1080/imagesDir/jpg/24838/slide-67.jpg)
[Special notice]
After import agent confirm status [ This shipment has been
[Special notice]
After import agent confirm status [ This shipment has been
The Function Program On Address Book
The Function Program On Address Book
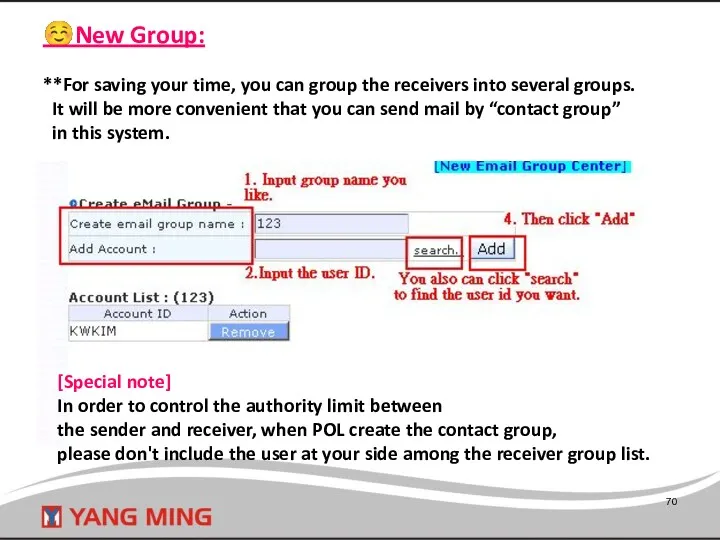
☺New Group:
**For saving your time, you can group the receivers into
☺New Group: **For saving your time, you can group the receivers into
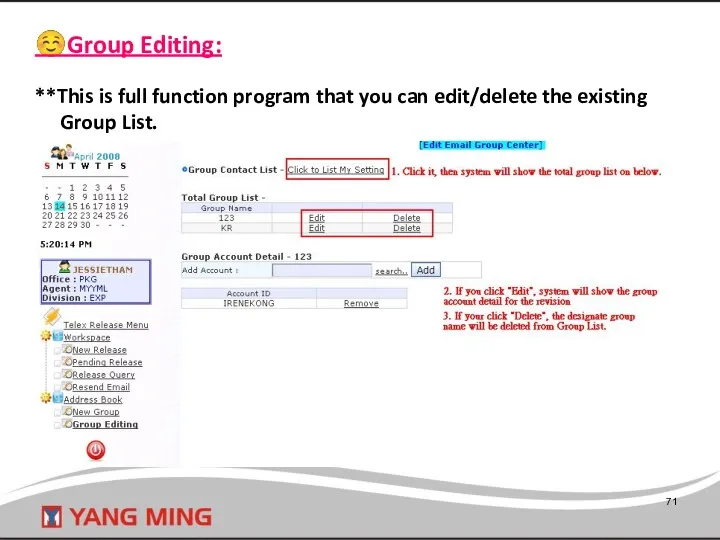
☺Group Editing:
**This is full function program that you can edit/delete the
☺Group Editing: **This is full function program that you can edit/delete the
The Function Program On User Maintenance
(Authority: Local manager and ICBS)
The Function Program On User Maintenance
(Authority: Local manager and ICBS)
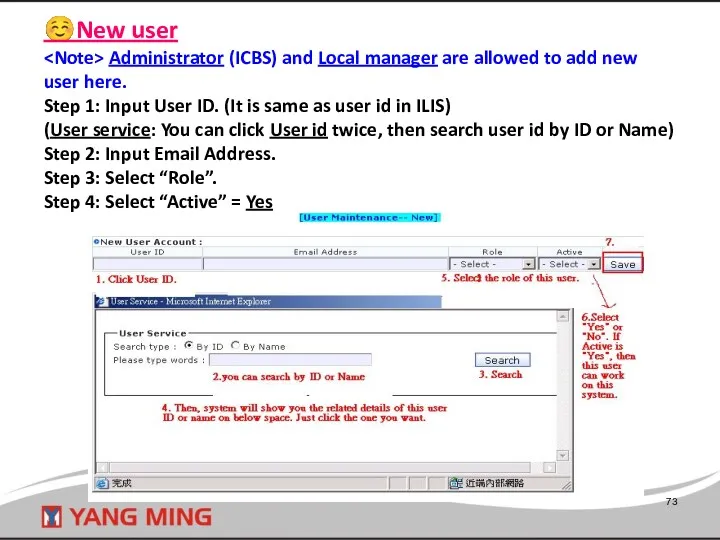
☺New user
Administrator (ICBS) and Local manager are allowed to add
☺New user
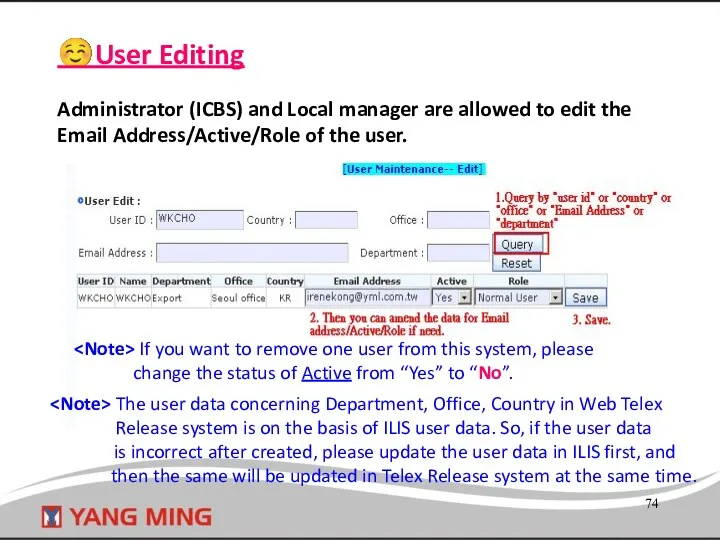
☺User Editing
Administrator (ICBS) and Local manager are allowed to edit the
☺User Editing Administrator (ICBS) and Local manager are allowed to edit the
Auto mail form
Auto mail form

New Telex Release
New Telex Release

Resend Email
Resend Email
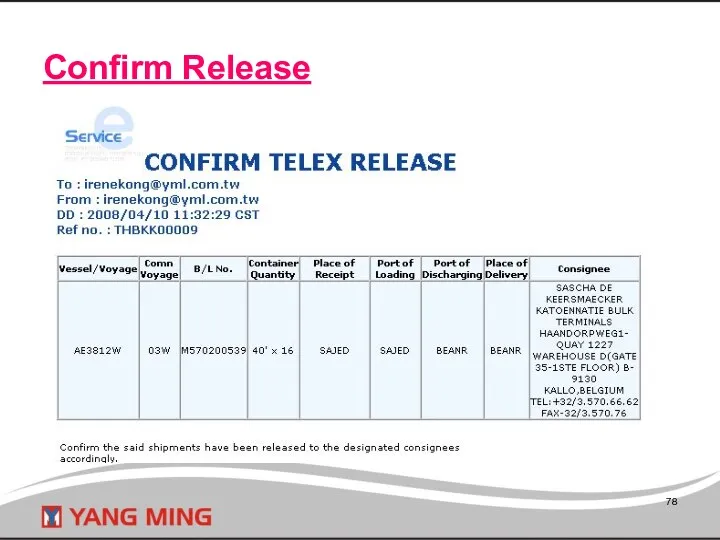
Confirm Release
Confirm Release
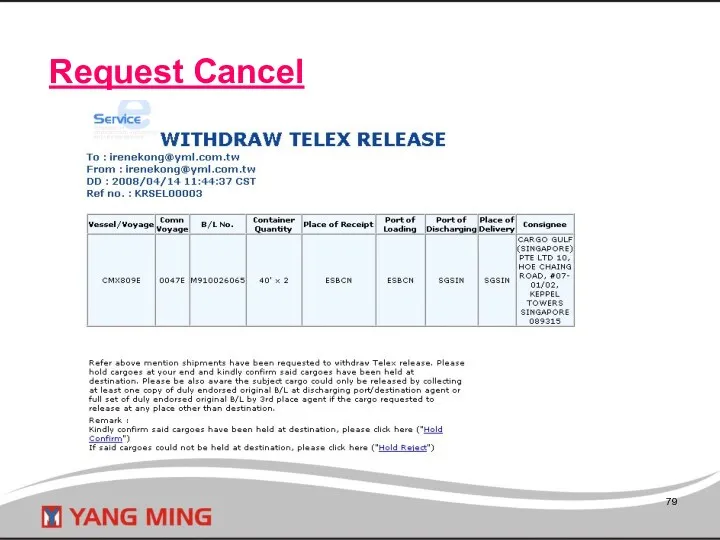
Request Cancel
Request Cancel
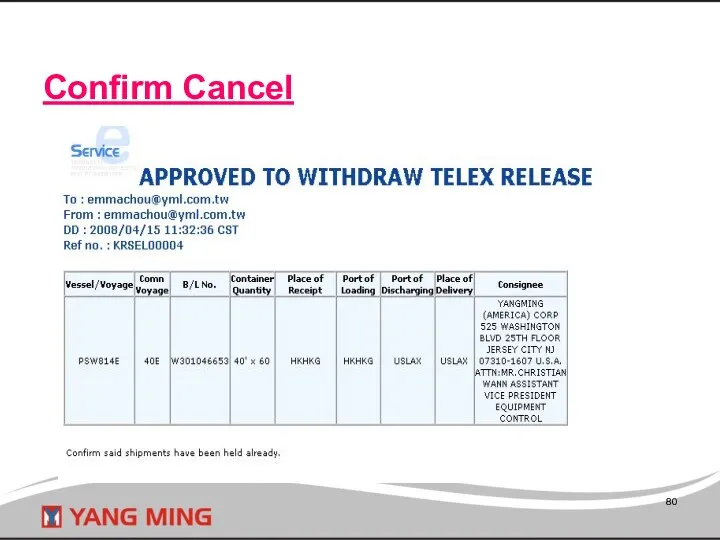
Confirm Cancel
Confirm Cancel
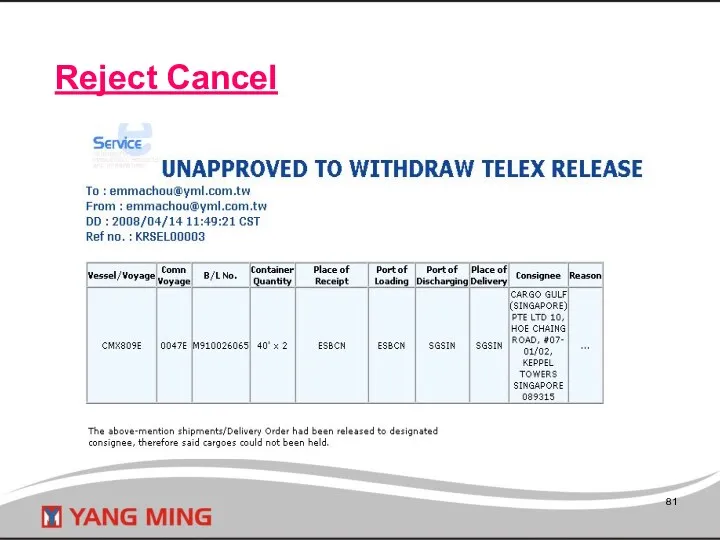
Reject Cancel
Reject Cancel
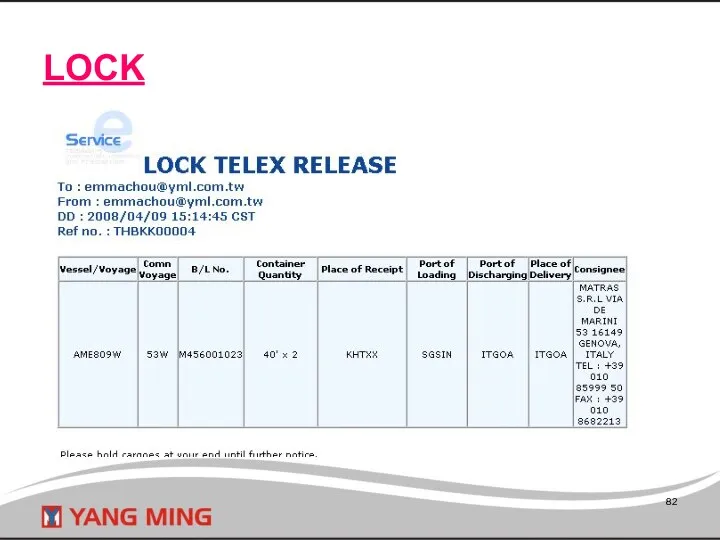
LOCK
LOCK
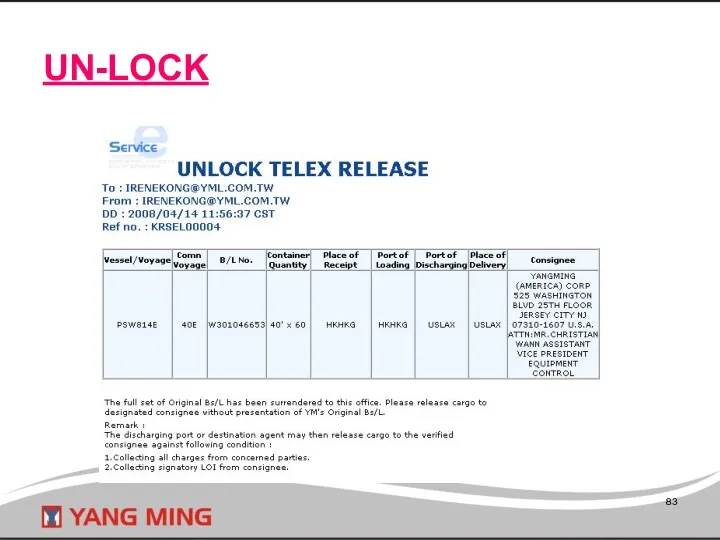
UN-LOCK
UN-LOCK
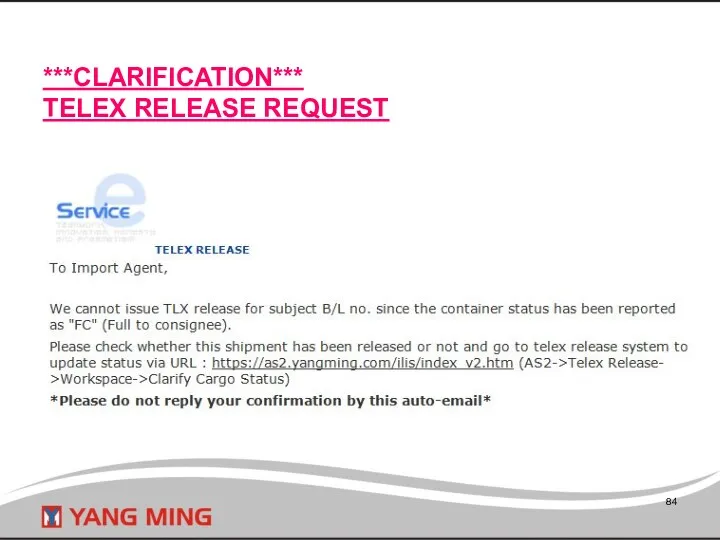
***CLARIFICATION***
TELEX RELEASE REQUEST
***CLARIFICATION***
TELEX RELEASE REQUEST
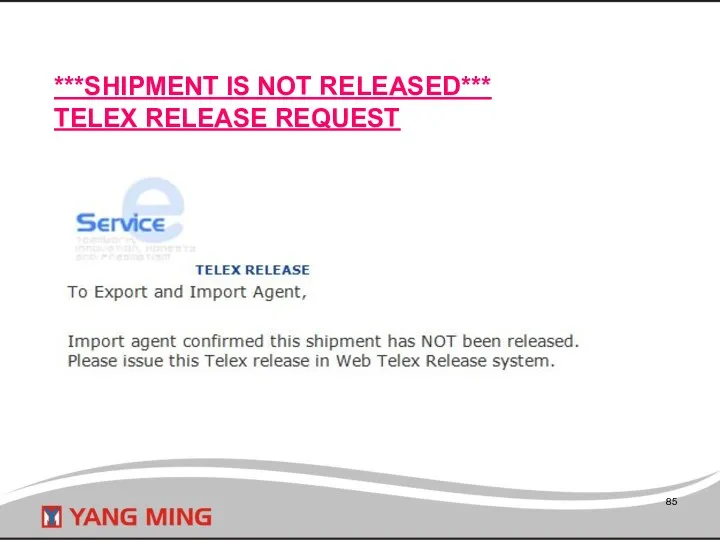
***SHIPMENT IS NOT RELEASED***
TELEX RELEASE REQUEST
***SHIPMENT IS NOT RELEASED***
TELEX RELEASE REQUEST
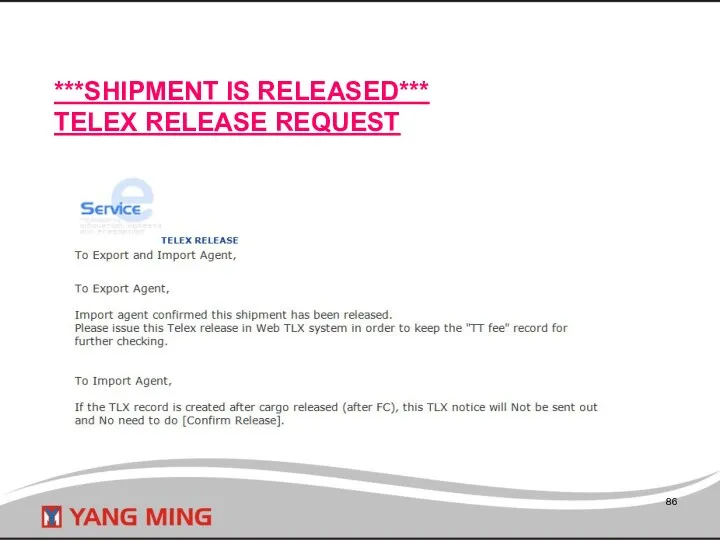
***SHIPMENT IS RELEASED***
TELEX RELEASE REQUEST
***SHIPMENT IS RELEASED***
TELEX RELEASE REQUEST
Functions of Telex Release Fee
ICBS
2015/05
Functions of Telex Release Fee
ICBS
2015/05
How to create Telex Release with TT fee?……………………………P.89 - 90
How to create Telex Release with TT fee?……………………………P.89 - 90
How to create Telex Release
with TT fee ?
< Telex
How to create Telex Release with TT fee ? < Telex

Create Telex Release with TT fee in “New Release” page
Input B/L
Create Telex Release with TT fee in “New Release” page
Input B/L
How to revise TT fee
in column of “Tariff Rate”?
<
How to revise TT fee in column of “Tariff Rate”? <
![[Edit Rate] in “New Release” page Input B/L number, and](/_ipx/f_webp&q_80&fit_contain&s_1440x1080/imagesDir/jpg/24838/slide-91.jpg)
[Edit Rate] in “New Release” page
Input B/L number, and click [Query
[Edit Rate] in “New Release” page
Input B/L number, and click [Query
In “Edit Tariff Rate” page, there are three options to revise
In “Edit Tariff Rate” page, there are three options to revise
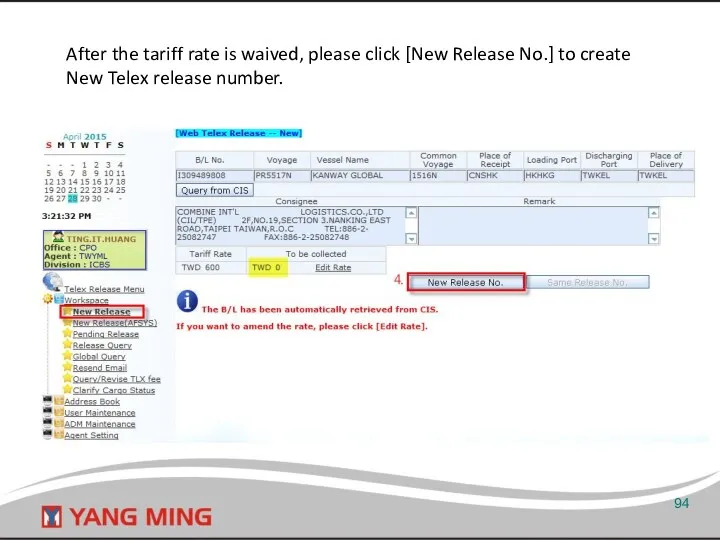
After the tariff rate is waived, please click [New Release No.]
After the tariff rate is waived, please click [New Release No.]
![Select [Adjustment] Key in the discount amount with a minus](/_ipx/f_webp&q_80&fit_contain&s_1440x1080/imagesDir/jpg/24838/slide-94.jpg)
Select [Adjustment]
Key in the discount amount with a minus
Select [Adjustment]
Key in the discount amount with a minus
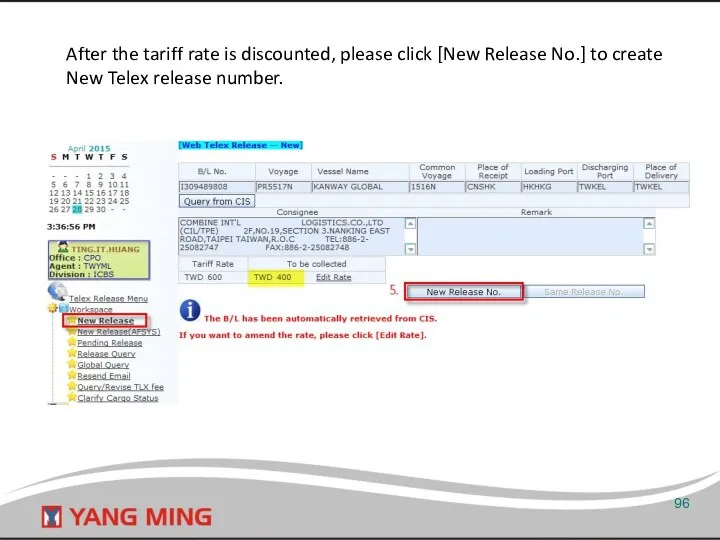
After the tariff rate is discounted, please click [New Release No.]
After the tariff rate is discounted, please click [New Release No.]
![Select [Adjustment] Key in the extra amount, then click [Save] and return to “New Release” page.](/_ipx/f_webp&q_80&fit_contain&s_1440x1080/imagesDir/jpg/24838/slide-96.jpg)
Select [Adjustment]
Key in the extra amount, then click [Save]
Select [Adjustment]
Key in the extra amount, then click [Save]
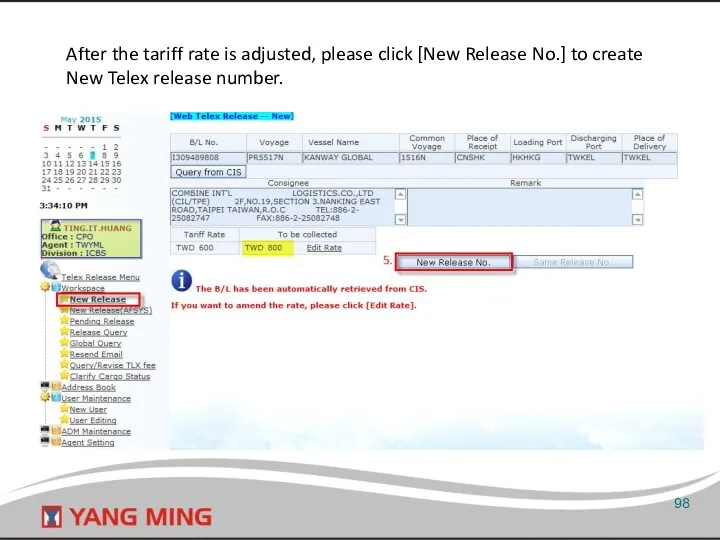
After the tariff rate is adjusted, please click [New Release No.]
After the tariff rate is adjusted, please click [New Release No.]
![Select [Others]- Different Currency If the currency or amount which](/_ipx/f_webp&q_80&fit_contain&s_1440x1080/imagesDir/jpg/24838/slide-98.jpg)
Select [Others]- Different Currency
If the currency or amount which actually
Select [Others]- Different Currency
If the currency or amount which actually
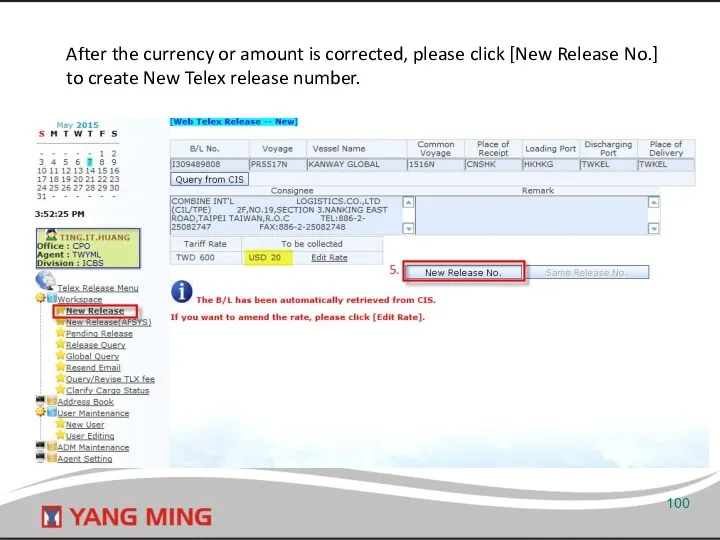
After the currency or amount is corrected, please click [New Release
After the currency or amount is corrected, please click [New Release
How to revise TT fee
if the TLX notice has NOT
How to revise TT fee if the TLX notice has NOT
Revise TT fee in “Pending Release” page
If the telex release has
Revise TT fee in “Pending Release” page
If the telex release has
How to revise TT fee
after sending the TLX notice?
<
How to revise TT fee after sending the TLX notice? <
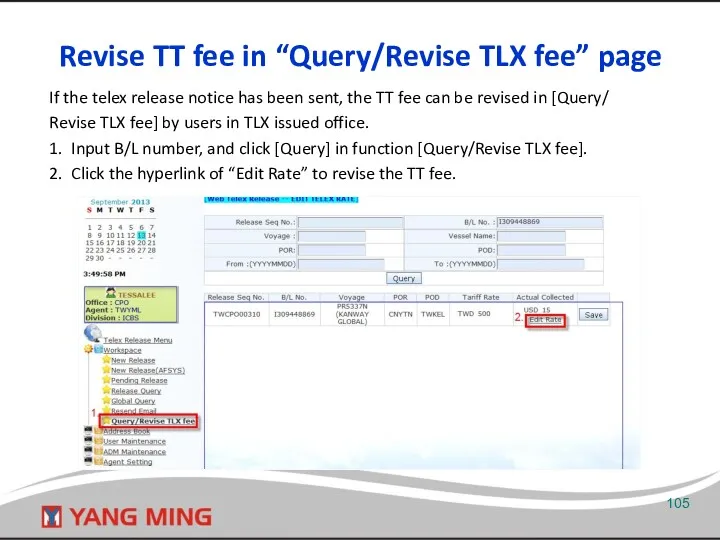
Revise TT fee in “Query/Revise TLX fee” page
If the telex
Revise TT fee in “Query/Revise TLX fee” page
If the telex
How to create the telex release record
after “FC” ?
< Telex
How to create the telex release record after “FC” ? < Telex

If the container movement “FC” has been filed correctly, in order
If the container movement “FC” has been filed correctly, in order
 Литературная фантазия о маленьком принце
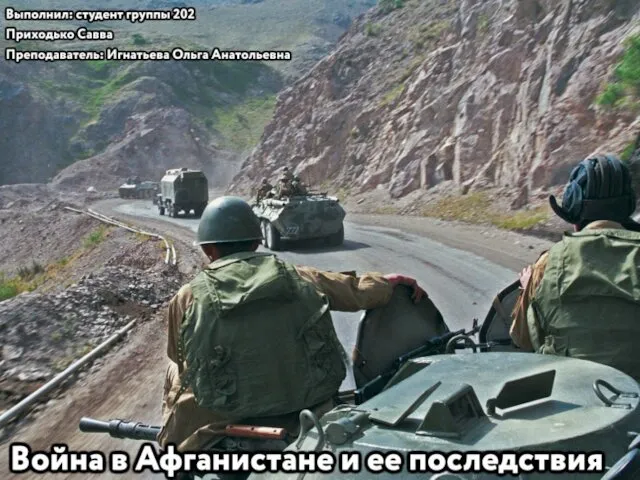 Война в Афганистане и её последствия
 Инструктаж по технике безопасности
 Обобщение опыта
 Оңтүстік Қазақстан облысында ауыл шаруашылығы
 Көмірдің физикалық қасиеттерін зерттеу әдістері
 Введение в платформу Java
 Товароведение и экспертиза средств производства
 Урок-игра Углеводороды
 Владимирская областная общественная организация ассоциация родителей детей-инвалидов Свет
 Всемирная Таможенная Организация
 Развитие мелкой моторики у детей дошкольного возраста
 кружева
 Базовая станция Соник Дуо
 Презентации к урокам по предмету Духовное краеведение Подмосковья
 Иммуноллогия, основы транспортологий иммунитета
 Теории происхождения государства
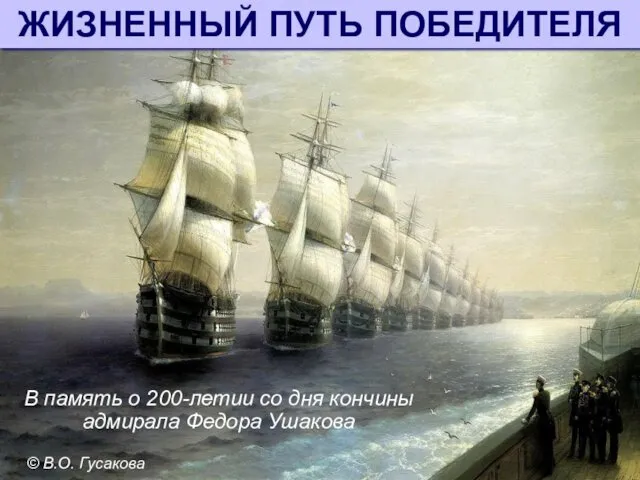 Жизненный путь победителя. В память о 200-летии со дня кончины адмирала Федора Ушакова
 Флотационный метод обогащения
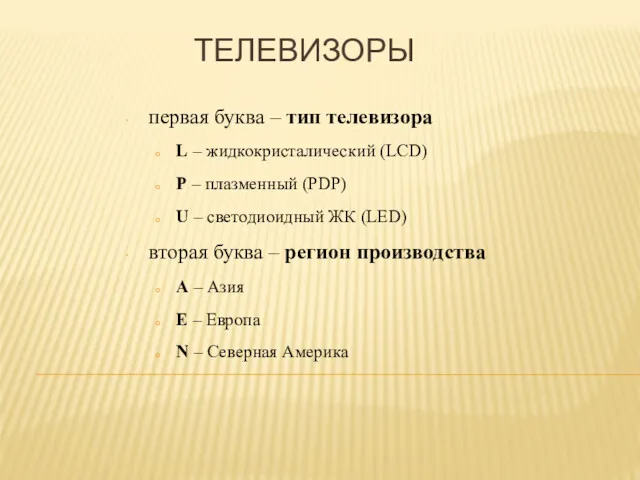 Samsung - Расшифровка моделей
 Возможности высокопольной МРТ в нейровизуализации нарушений мозгового кровообращения. Сосудистая патология
 Империя Карла Великого
 Внеклассное мероприятие Спорт в жизни человека
 Аналитический обзор современных жанров журналистики. На примере классического сайта Педсовет и онлайн-медиа Мел
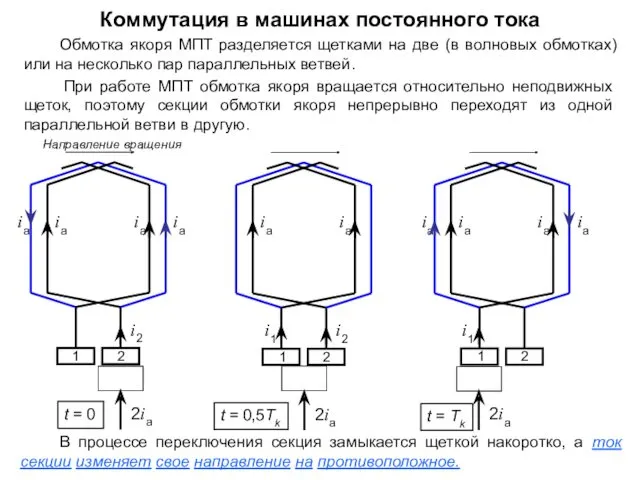 Коммутация в машинах постоянного тока
 Развитие системы образования в России в XVIII в.
 Дисперсные системы
 Теоретические аспекты проектного обучения