- Monitor panel

Содержание
- 2. 1. Gauge panel 2. Warning lamp 3. Multi display LCD 4. Switch panel 5. Main menu
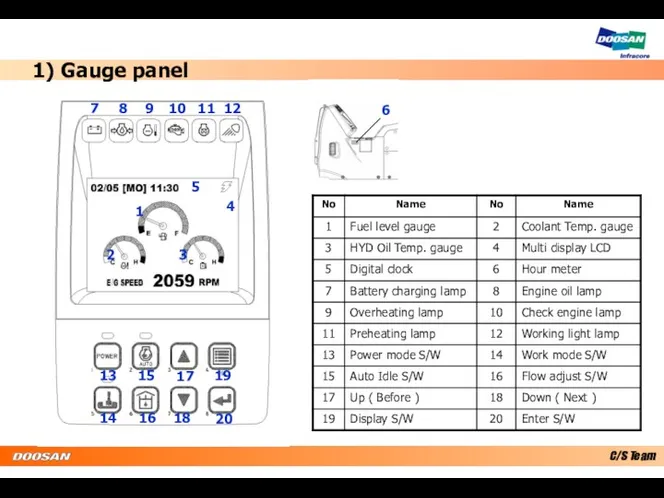
- 3. 1) Gauge panel 1 2 3 4 5 6 7 8 9 10 11 12 13
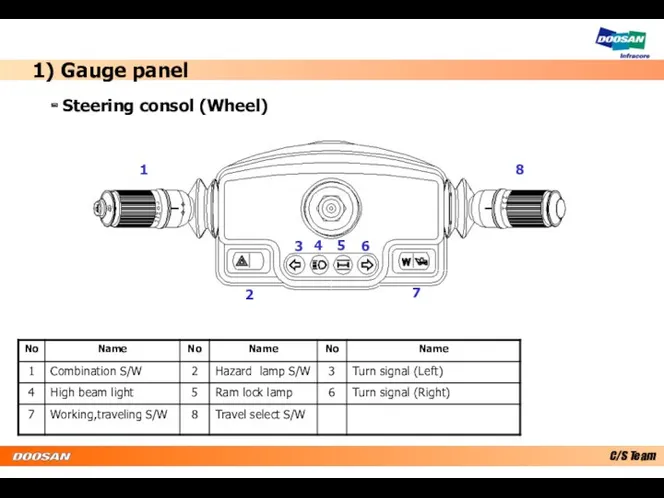
- 4. 1) Gauge panel - Steering consol (Wheel) 1 2 3 4 5 6 7 8
- 5. Display fuel level 1) Green zone : Normal fuel level condition 2) Red zone : Need
- 6. Display hydraulic oil temperature 1) Green zone : Normal HYD oil temp. 2) Red zone :
- 7. Display total working hour Blinking time is every 4 sec. - Hour meter 1) Gauge panel
- 8. 2) Warning lamp (1) Battery charging system has problem, this light is “on” (Below 13V, Above
- 9. 2) Warning lamp (2) Overheat coolant, the light is “on” with buzzer * When overheating, engine
- 10. 2) Warning lamp (3) Complete preheat, the light is “on” - Preheating is Key “On” position.
- 11. 3) Multi display LCD panel (1) Display information as below 1) Engine R.P.M 2) Battery charge
- 12. 3) Multi display LCD panel (2) Normal charging condition is 26~30 volt. - Display communication condition
- 13. 3) Multi display LCD panel (3) - Warning lamp Display warning information on top of left
- 14. 3) Multi display LCD panel (4) - Indicate lamp Display below switch condition (Green sign) 1)
- 15. 4) Switch panel (1) - Switch panel 1) Power mode select switch 2) Auto Idle switch
- 16. 4) Switch panel (2) - Power/Work mode switch Power mode - On : Power mode -
- 17. - Auto idle switch - On : Working auto idle - Off : Not working auto
- 18. - Flow control switch Adjusting flow for attachment as below For breaker For crusher 4) Switch
- 19. - Main menu - Move cursor to up or previous screen - Move cursor to down
- 20. 5) Main menu (1) - Main menu Press for 3 sec, change screen to main menu,
- 21. 5) Main menu (2) - Language setting Press , set your language through and . Press
- 22. 5) Main menu (3) - Clock setting Press , set your local time through and .
- 23. 5) Main menu (4) - Filter & oil information Press , check used time through .
- 24. Press , set LCD bright through . Press for 1 sec to escape. 5) Main menu
- 25. 5) Main menu (6) - Setting password Key in four-figure number password within 10 minutes, First
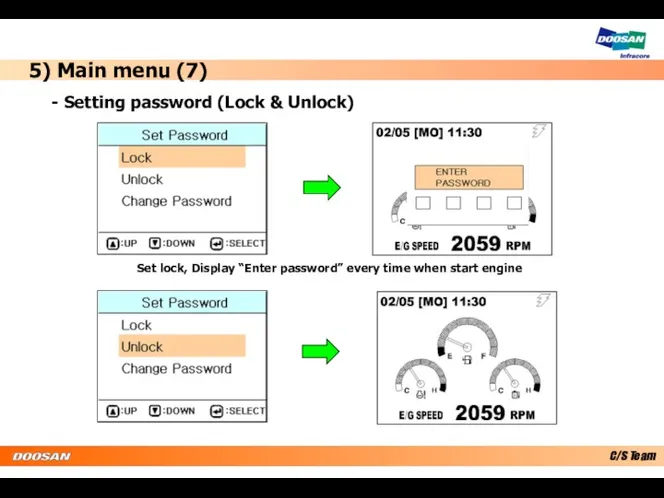
- 26. 5) Main menu (7) - Setting password (Lock & Unlock) Set lock, Display “Enter password” every
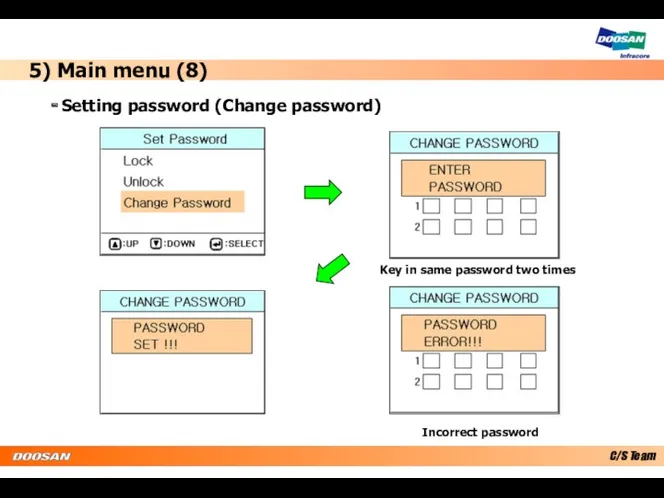
- 27. 5) Main menu (8) - Setting password (Change password) Key in same password two times Incorrect
- 28. Press and for 3 sec, change screen to special menu, press again, change screen to normal
- 29. 6) Special menu (2) - Machine Information I) Analog Input State Analog Input State is Input
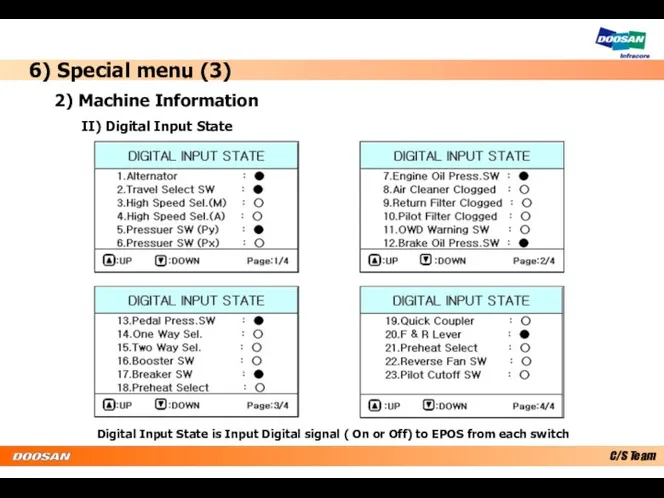
- 30. 6) Special menu (3) 2) Machine Information II) Digital Input State Digital Input State is Input
- 31. 6) Special menu (4) - Machine Information III) Digital Output State Digital Output State is output
- 32. 6) Special menu (5) - Failure Information
- 33. 6) Special menu (6) - Failure Information I) Realtime Fail II) Failure Log
- 34. 6) Special menu (7) - Failure Information III) Delete Fail Log
- 35. 6) Special menu (8) - Operating Hours
- 36. 6) Special menu (9) - Operating Hours I) Operating Hours
- 38. Скачать презентацию

1. Gauge panel
2. Warning lamp
3. Multi display LCD
4. Switch panel
5.
1. Gauge panel
2. Warning lamp
3. Multi display LCD
4. Switch panel
5.
1) Gauge panel
1
2
3
4
5
6
7
8
9
10
11
12
13
14
15
16
17
18
19
20
1) Gauge panel
1
2
3
4
5
6
7
8
9
10
11
12
13
14
15
16
17
18
19
20
1) Gauge panel
- Steering consol (Wheel)
1
2
3
4
5
6
7
8
1) Gauge panel
- Steering consol (Wheel)
1
2
3
4
5
6
7
8
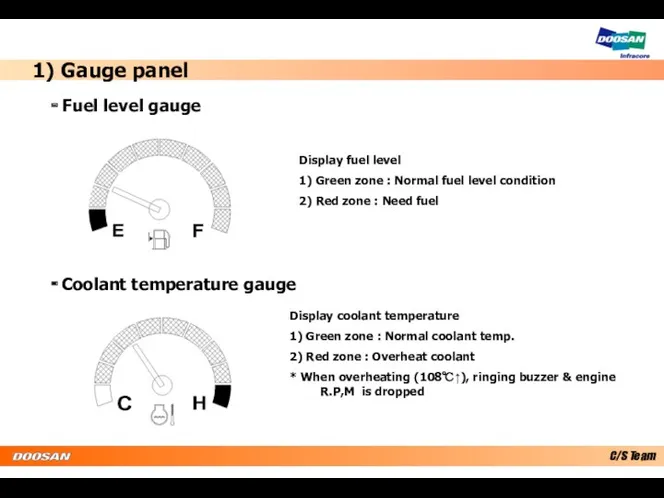
Display fuel level
1) Green zone : Normal fuel level condition
2) Red
Display fuel level
1) Green zone : Normal fuel level condition
2) Red
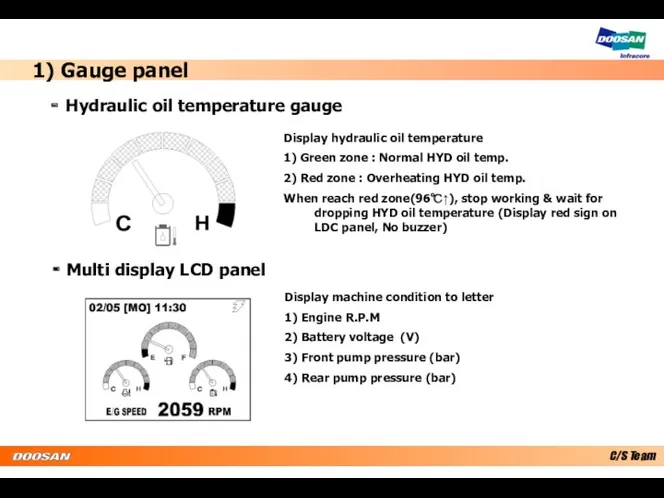
Display hydraulic oil temperature
1) Green zone : Normal HYD oil temp.
Display hydraulic oil temperature
1) Green zone : Normal HYD oil temp.

Display total working hour
Blinking time is every 4 sec.
- Hour
Display total working hour
Blinking time is every 4 sec.
- Hour
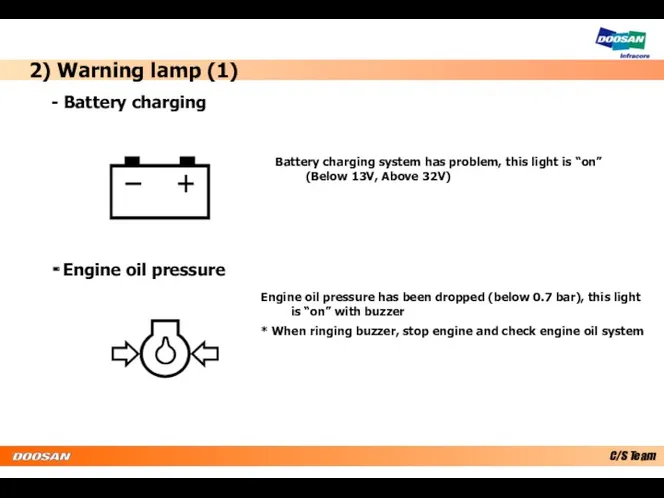
2) Warning lamp (1)
Battery charging system has problem, this light is
2) Warning lamp (1)
Battery charging system has problem, this light is
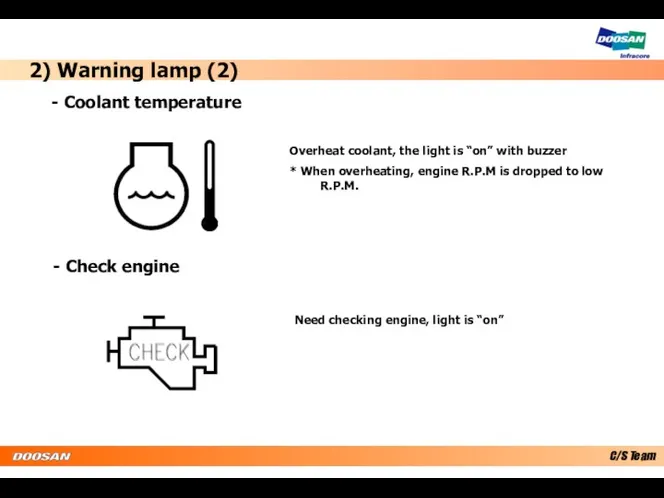
2) Warning lamp (2)
Overheat coolant, the light is “on” with buzzer
*
2) Warning lamp (2)
Overheat coolant, the light is “on” with buzzer
*
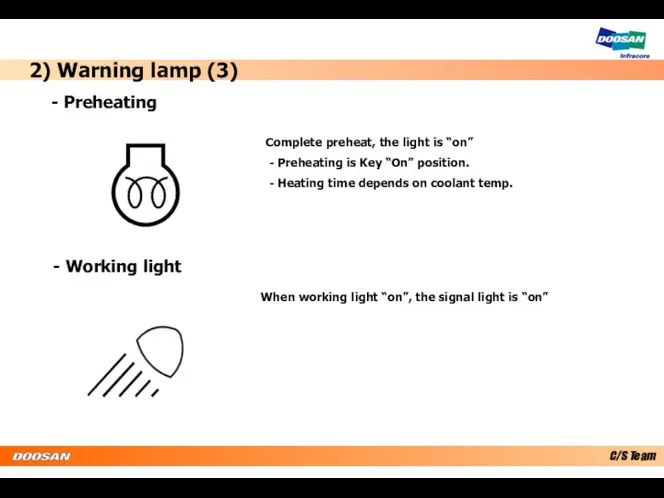
2) Warning lamp (3)
Complete preheat, the light is “on”
- Preheating
2) Warning lamp (3)
Complete preheat, the light is “on”
- Preheating
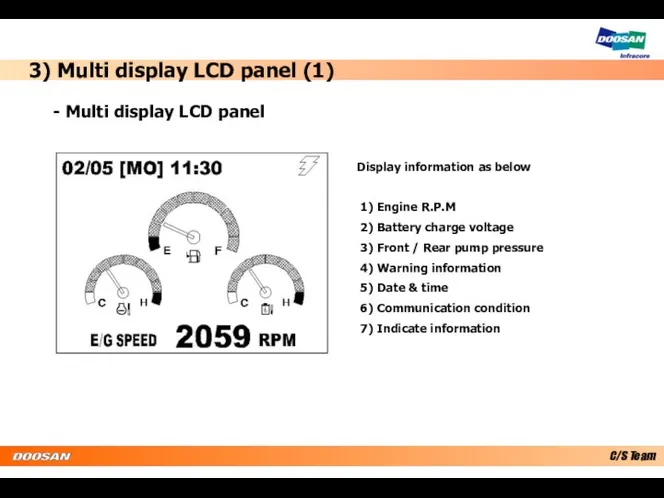
3) Multi display LCD panel (1)
Display information as below
1) Engine
3) Multi display LCD panel (1)
Display information as below
1) Engine
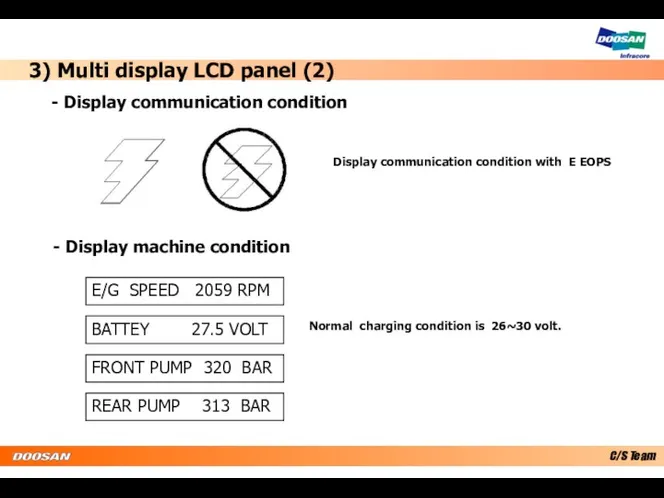
3) Multi display LCD panel (2)
Normal charging condition is 26~30 volt.
-
3) Multi display LCD panel (2)
Normal charging condition is 26~30 volt.
-
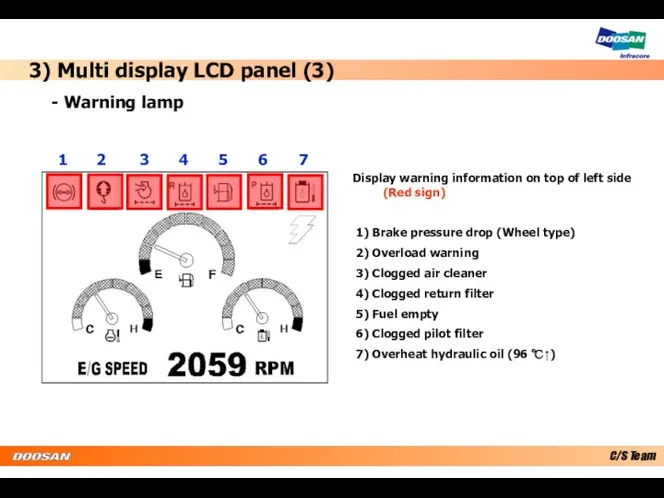
3) Multi display LCD panel (3)
- Warning lamp
Display warning information on
3) Multi display LCD panel (3)
- Warning lamp
Display warning information on
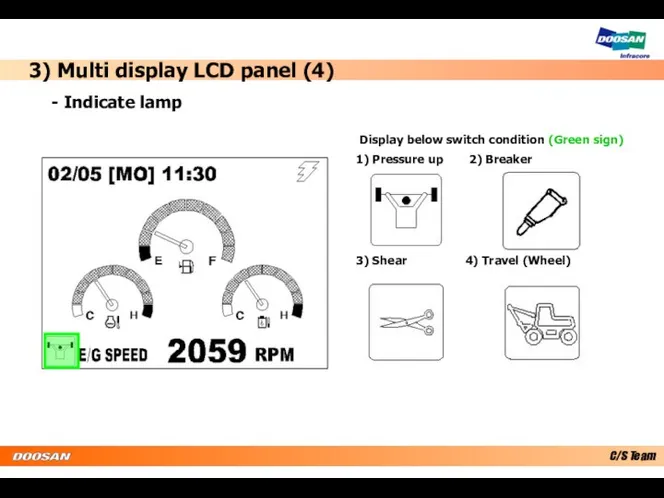
3) Multi display LCD panel (4)
- Indicate lamp
Display below switch
3) Multi display LCD panel (4)
- Indicate lamp
Display below switch

4) Switch panel (1)
- Switch panel
1) Power mode select
4) Switch panel (1)
- Switch panel
1) Power mode select
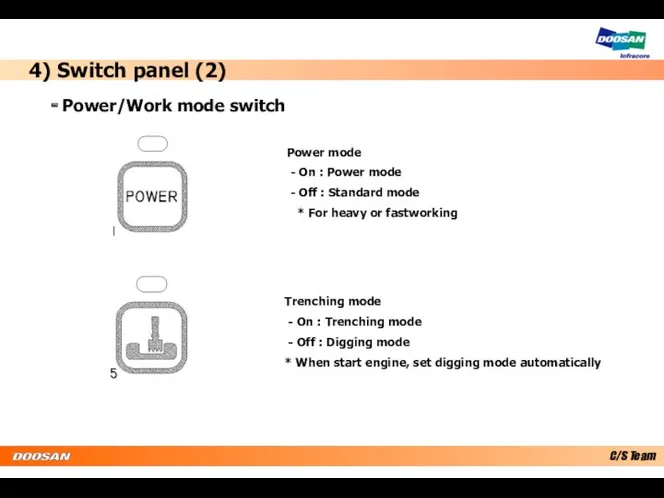
4) Switch panel (2)
- Power/Work mode switch
Power mode
-
4) Switch panel (2)
- Power/Work mode switch
Power mode
-
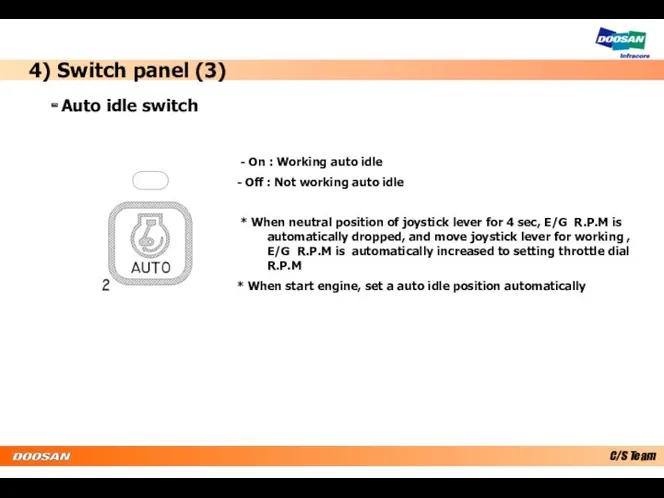
- Auto idle switch
- On : Working auto idle
- Auto idle switch
- On : Working auto idle
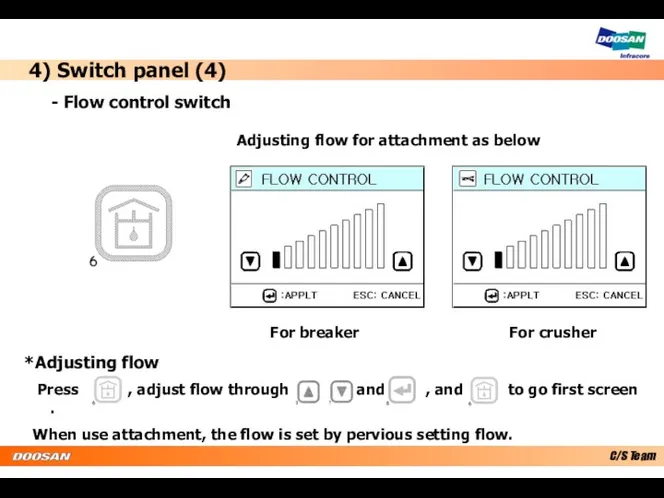
- Flow control switch
Adjusting flow for attachment as below
For
- Flow control switch
Adjusting flow for attachment as below
For

- Main menu
- Move cursor to up
or previous screen
- Main menu
- Move cursor to up
or previous screen
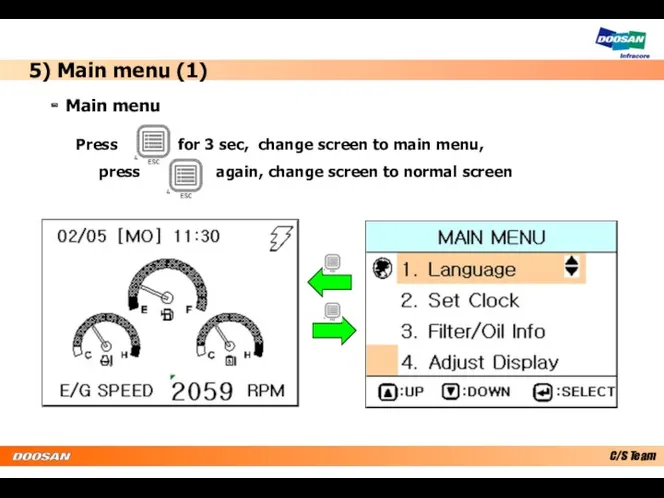
5) Main menu (1)
- Main menu
Press for 3 sec,
5) Main menu (1)
- Main menu
Press for 3 sec,
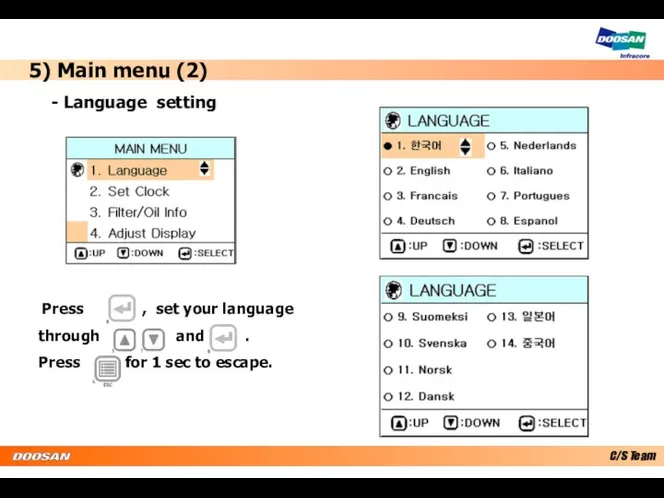
5) Main menu (2)
- Language setting
Press , set your language
5) Main menu (2)
- Language setting
Press , set your language
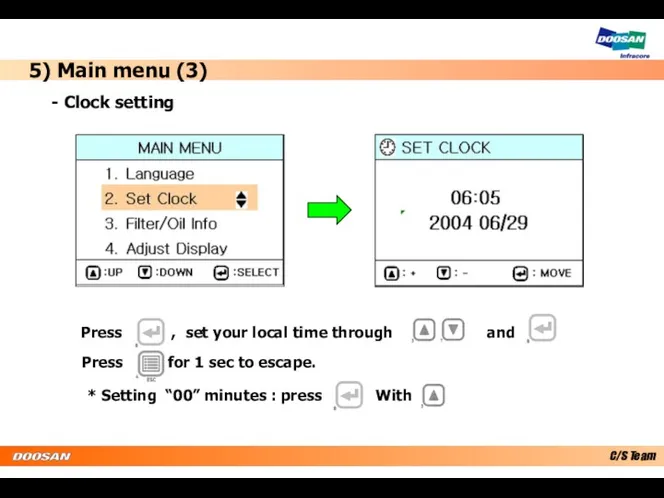
5) Main menu (3)
- Clock setting
Press , set your local
5) Main menu (3)
- Clock setting
Press , set your local
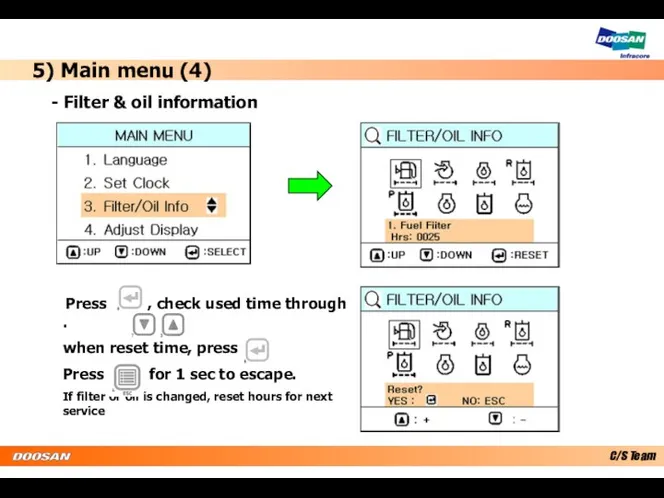
5) Main menu (4)
- Filter & oil information
Press ,
5) Main menu (4)
- Filter & oil information
Press ,
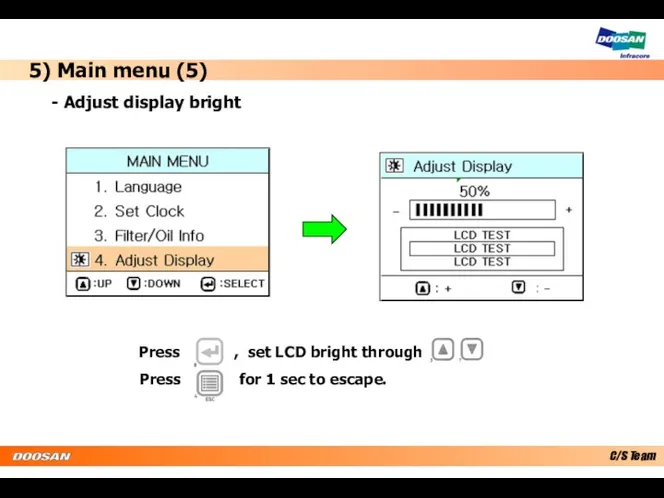
Press , set LCD bright through .
Press for
Press , set LCD bright through .
Press for
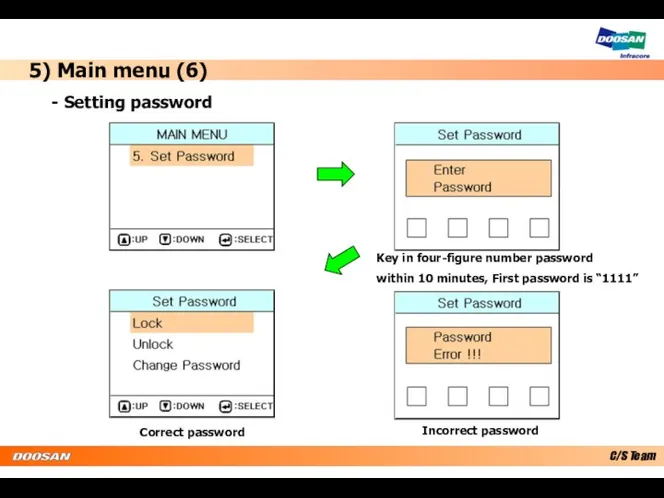
5) Main menu (6)
- Setting password
Key in four-figure number password
5) Main menu (6)
- Setting password
Key in four-figure number password
5) Main menu (7)
- Setting password (Lock & Unlock)
Set lock, Display
5) Main menu (7)
- Setting password (Lock & Unlock)
Set lock, Display
5) Main menu (8)
- Setting password (Change password)
Key in same password
5) Main menu (8)
- Setting password (Change password)
Key in same password
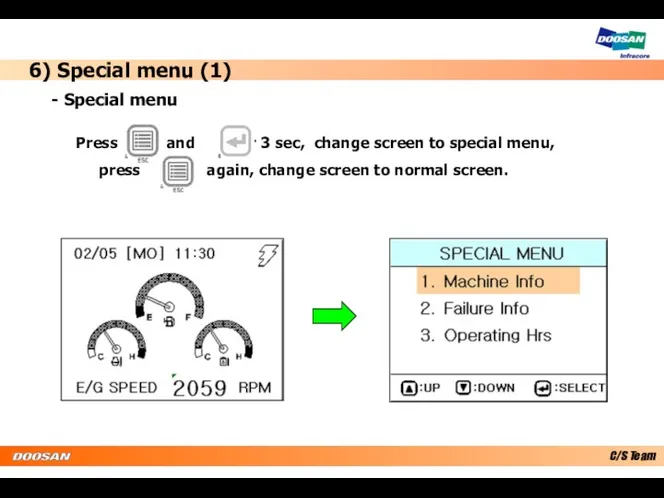
Press and for 3 sec, change screen to special menu,
Press and for 3 sec, change screen to special menu,
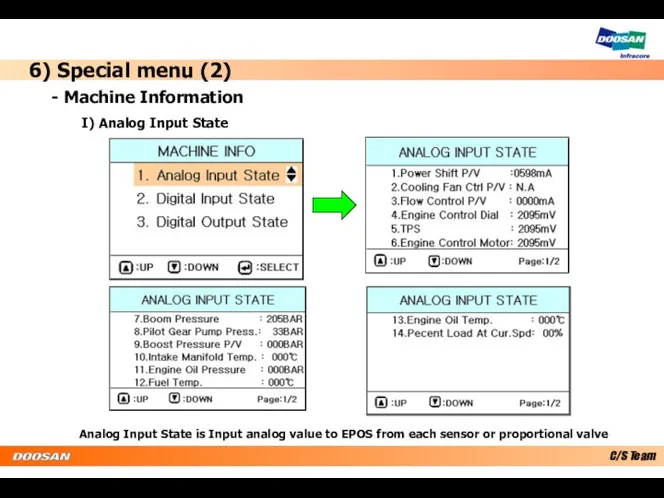
6) Special menu (2)
- Machine Information
I) Analog Input State
Analog Input State
6) Special menu (2)
- Machine Information
I) Analog Input State
Analog Input State
6) Special menu (3)
2) Machine Information
II) Digital Input State
Digital Input
6) Special menu (3)
2) Machine Information
II) Digital Input State
Digital Input
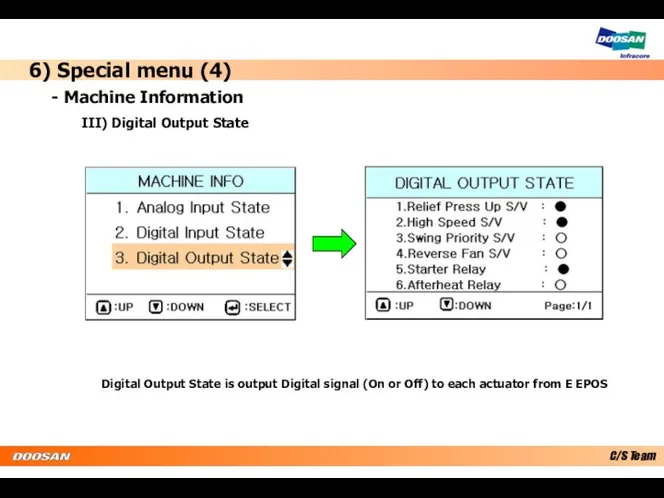
6) Special menu (4)
- Machine Information
III) Digital Output State
Digital Output State
6) Special menu (4)
- Machine Information
III) Digital Output State
Digital Output State
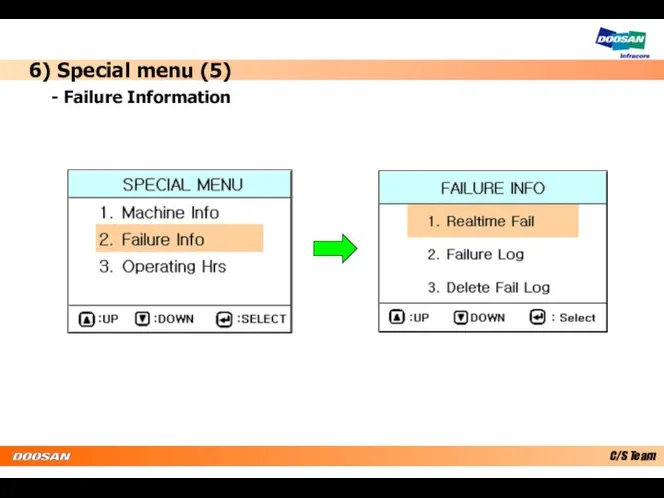
6) Special menu (5)
- Failure Information
6) Special menu (5)
- Failure Information

6) Special menu (6)
- Failure Information
I) Realtime Fail
II) Failure Log
6) Special menu (6)
- Failure Information
I) Realtime Fail
II) Failure Log

6) Special menu (7)
- Failure Information
III) Delete Fail Log
6) Special menu (7)
- Failure Information
III) Delete Fail Log
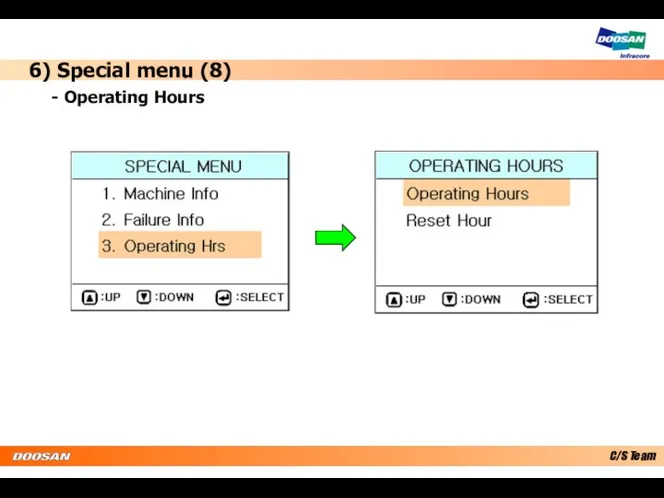
6) Special menu (8)
- Operating Hours
6) Special menu (8)
- Operating Hours
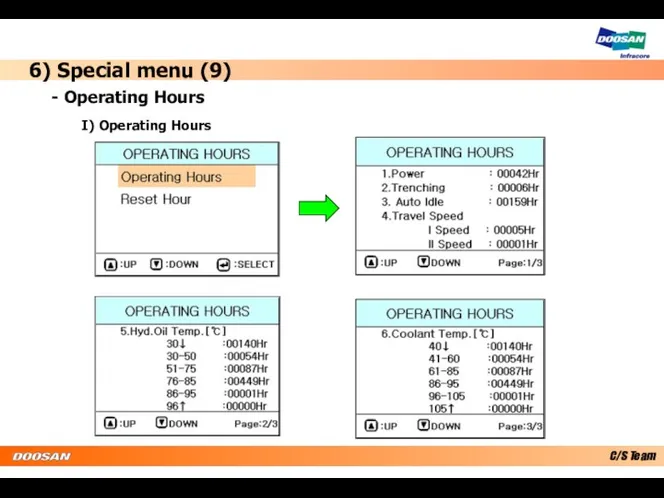
6) Special menu (9)
- Operating Hours
I) Operating Hours
6) Special menu (9)
- Operating Hours
I) Operating Hours
 Линейные антенные решетки
 Энергия электрического поля. Тема 6
 Элементы гемодинамики
 Метрология. Допуски и посадки шпоночных и шлицевых соединений
 Динамика механической системы
 тепловые явления в юрте
 Силовий трансформатор ЧС-4
 Особливості будови систем та механізмів автомобіля ГАЗ-66
 Введение. Общие сведения о машинах и механизмах
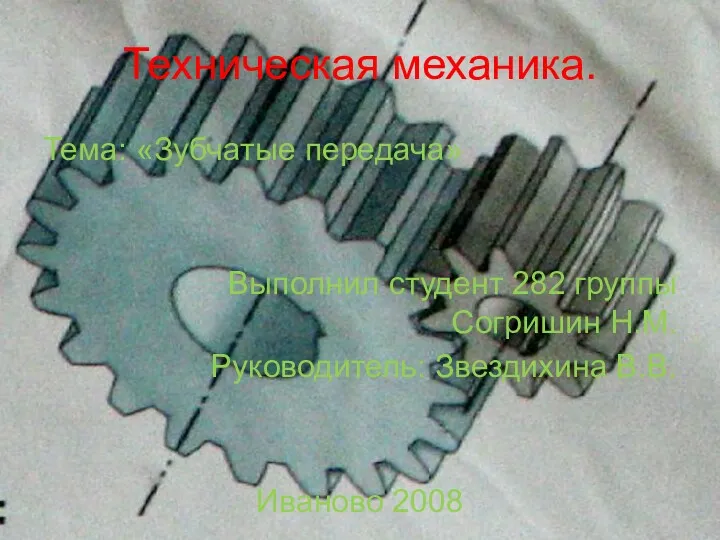 Зубчатые передачи
 Теоретическая механика. Статика абсолютно твердого тела
 Diesel and petrol power
 Буксирное устройство судна и его техническая эксплуатация
 Пневмотранспорт, виды и применение. Достоинства и недостатки. Тема 14
 Методическая разработка для урока по теме Поперечность световых волн.
 Разборка и сборка тормозных колодок автобуса ЛИАЗ-5256
 Блок - разновидность простого механизма
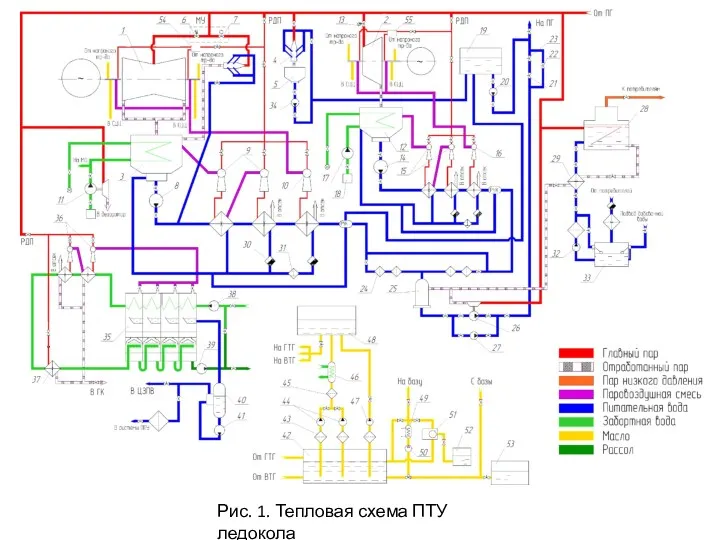 Системы ПТУ 2
 Гидродинамика. Поток жидкости и его основные понятия
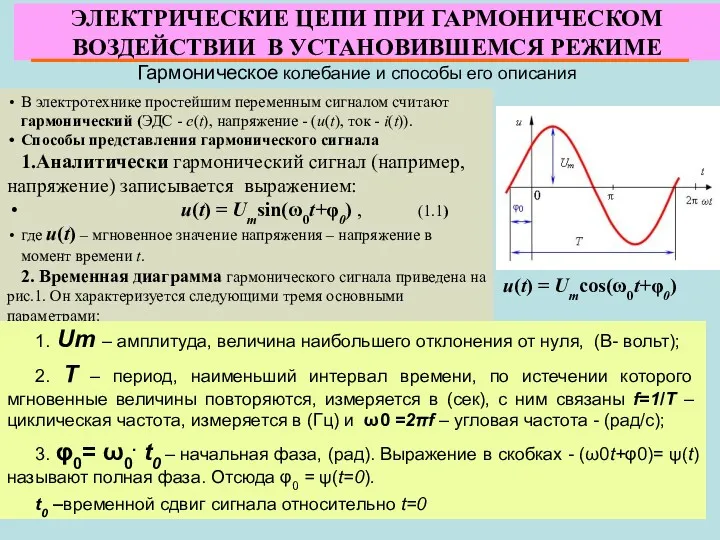 Электрические цепи при гармоническом воздействии в установившемся режиме
 Уравнение Менделеева - Клапейрона
 Урок по физике в 7классе на тему Плотность вещества. Решение задач
 Tiristor GTO
 Электротехника. Резонанс в электрических цепях. (Лекция 9)
 Измерение параметров инфракрасного и терагерцового излучения ч.2 Схемы измерения параметров
 Спектры. Виды спектров
 Инструментальные методы анализа
 Реализация проблемного метода обучения на уроках физики с помощью интерактивных компьютерных моделей