- Aptis installation guide

Содержание
- 2. Step 1: SecureClient System’s requirements
- 3. Go to the link: https://britishcouncil.btlsurpass.co.uk/secureassess/secureclient_installer.htm Click on: “Click here to download the SecureClient Installer” This download
- 4. Potential issues: Installation (System Requirements, Firewalls and Proxy Settings, Bandwidth) Downloading components to take off-line Uploading
- 5. ` Confirm system specs available with local IT administrator SecureClient currently is not supported by the
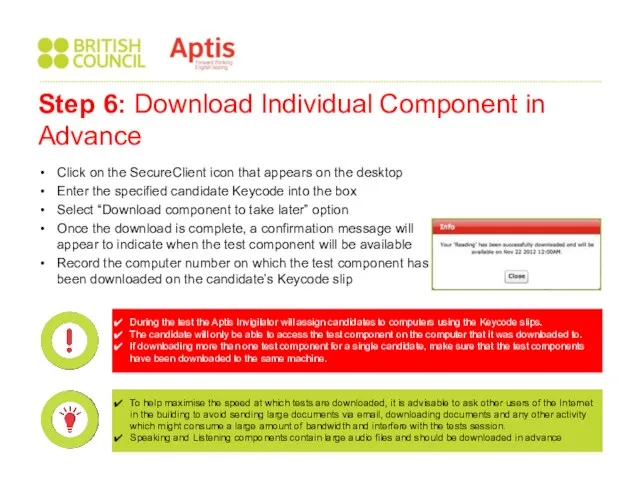
- 6. If downloading more than one test component for a single candidate, make sure that the test
- 7. For candidates who get bumped out, use the same Keycode and the candidate should start where
- 8. The Aptis System Administrator (SA) will provide you with Keycodes and PINs, which will allow you
- 9. For Speaking and Listening components, candidates will require the use of headphones and/or a microphone. You
- 10. Step 5: Setting Up The Venue Low bandwidth or poor connectivity are good reasons to download
- 11. Click on the SecureClient icon that appears on the desktop Enter the specified candidate Keycode into
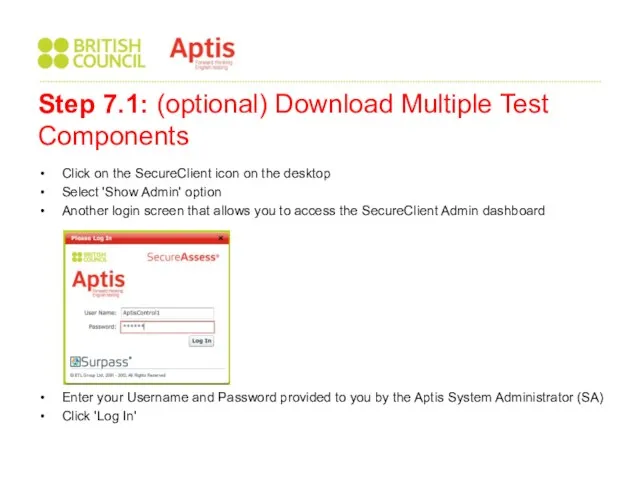
- 12. Click on the SecureClient icon on the desktop Select 'Show Admin' option Another login screen that
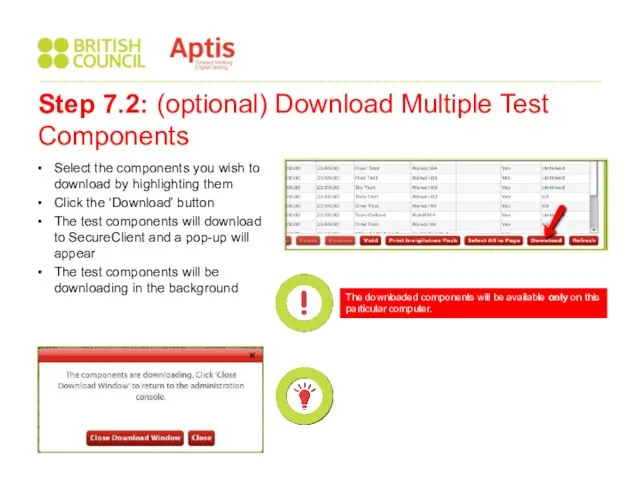
- 13. Select the components you wish to download by highlighting them Click the ‘Download’ button The test
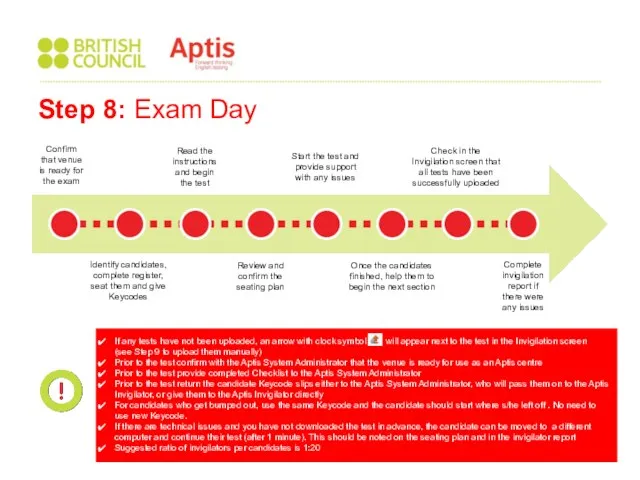
- 14. Step 8: Exam Day Confirm that venue is ready for the exam Identify candidates, complete register,
- 15. Identify which computer the test was taken on by referring to the candidate name, the Keycode
- 16. Aptis Help Portal https://centresupport.britishcouncil.org/aptishelp/wp-login.php?redirect_to=https%3A%2F%2Fcentresupport.britishcouncil.org%2Faptishelp
- 19. Скачать презентацию
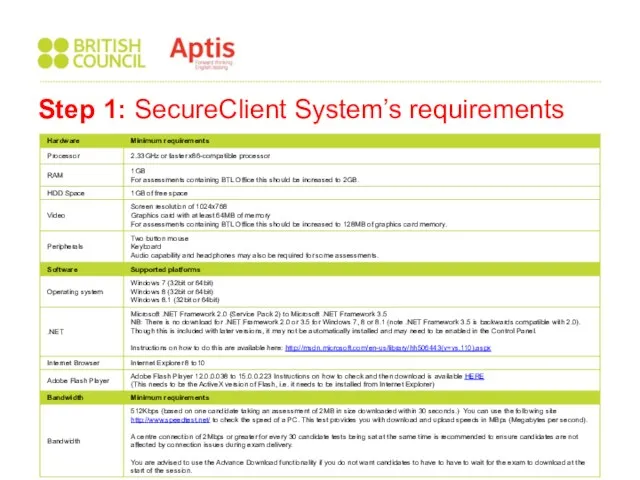
Step 1: SecureClient System’s requirements
Step 1: SecureClient System’s requirements

Go to the link: https://britishcouncil.btlsurpass.co.uk/secureassess/secureclient_installer.htm
Click on: “Click here to download
Go to the link: https://britishcouncil.btlsurpass.co.uk/secureassess/secureclient_installer.htm
Click on: “Click here to download
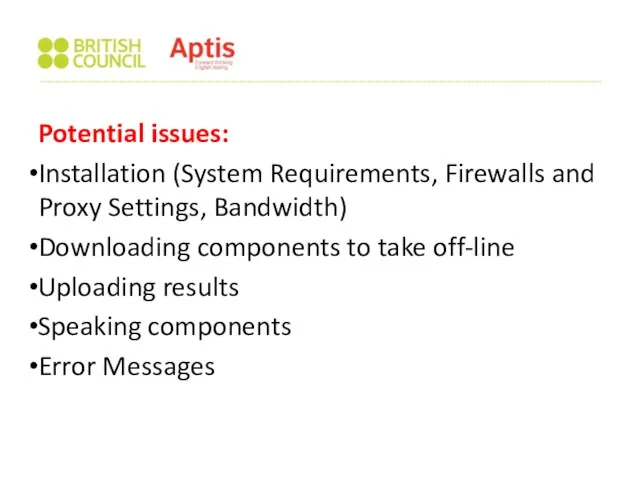
Potential issues:
Installation (System Requirements, Firewalls and Proxy Settings, Bandwidth)
Downloading components to
Potential issues:
Installation (System Requirements, Firewalls and Proxy Settings, Bandwidth)
Downloading components to
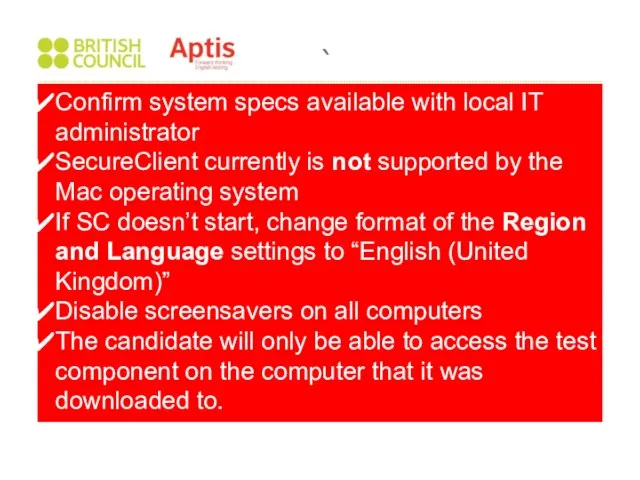
`
Confirm system specs available with local IT administrator
SecureClient currently is not
`
Confirm system specs available with local IT administrator
SecureClient currently is not
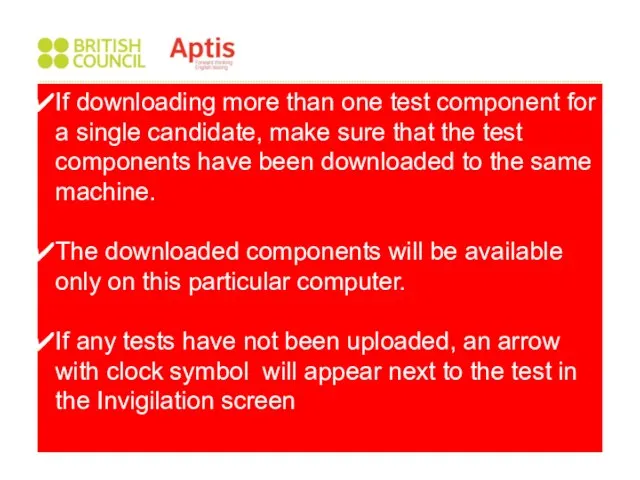
If downloading more than one test component for a single candidate,
If downloading more than one test component for a single candidate,
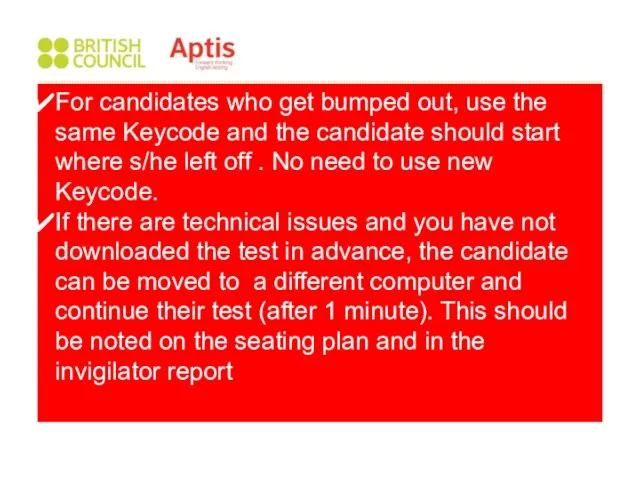
For candidates who get bumped out, use the same Keycode and
For candidates who get bumped out, use the same Keycode and
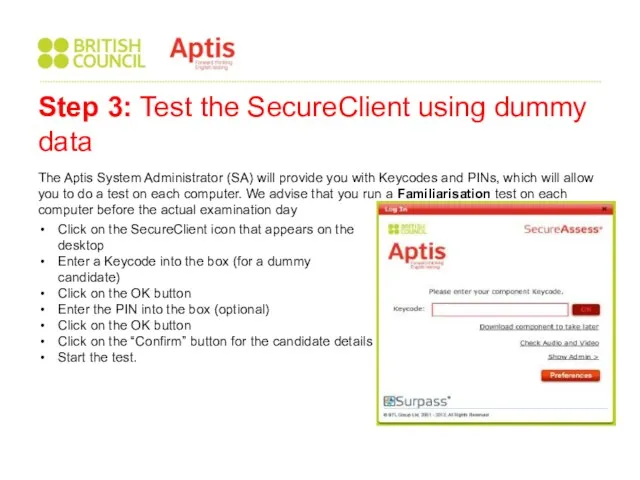
The Aptis System Administrator (SA) will provide you with Keycodes and
The Aptis System Administrator (SA) will provide you with Keycodes and
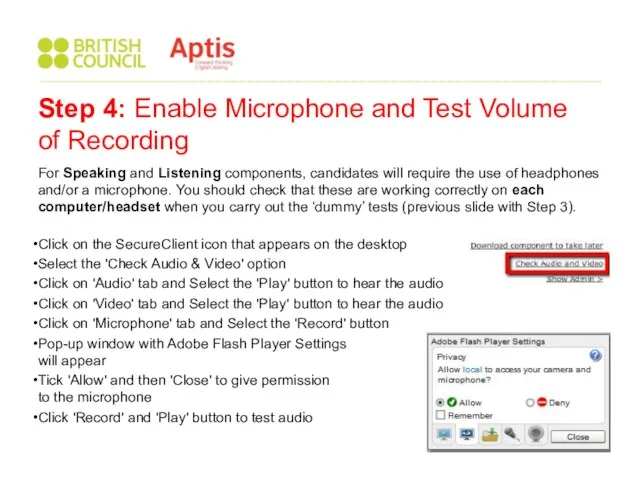
For Speaking and Listening components, candidates will require the use of
For Speaking and Listening components, candidates will require the use of
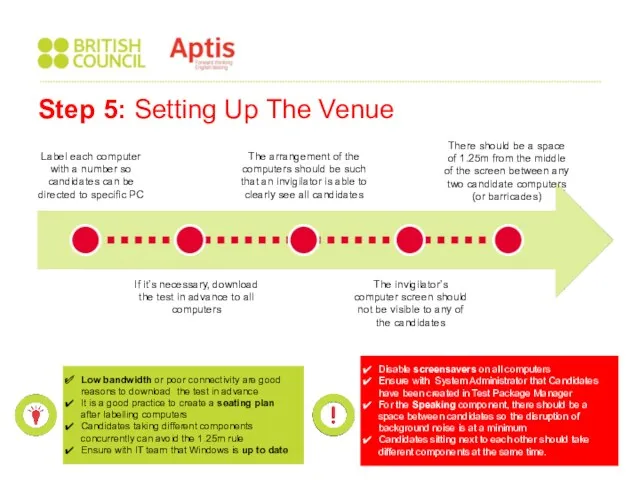
Step 5: Setting Up The Venue
Low bandwidth or poor connectivity are
Step 5: Setting Up The Venue
Low bandwidth or poor connectivity are
Click on the SecureClient icon that appears on the desktop
Enter the
Click on the SecureClient icon that appears on the desktop
Enter the
Click on the SecureClient icon on the desktop
Select 'Show Admin'
Click on the SecureClient icon on the desktop
Select 'Show Admin'
Select the components you wish to download by highlighting them
Click
Select the components you wish to download by highlighting them
Click
Step 8: Exam Day
Confirm that venue is ready for the
Step 8: Exam Day
Confirm that venue is ready for the
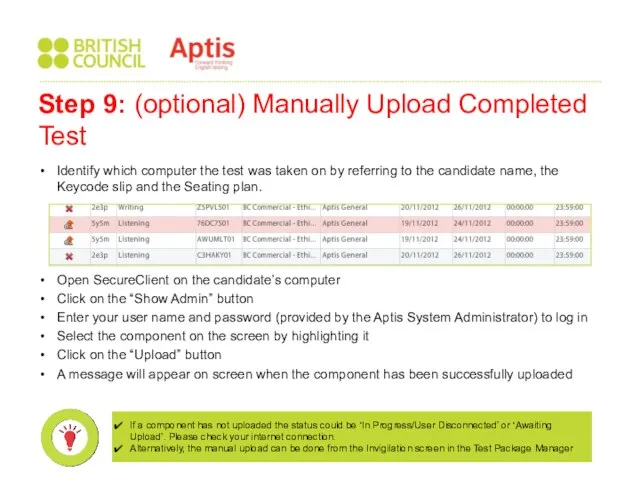
Identify which computer the test was taken on by referring to
Identify which computer the test was taken on by referring to
Aptis Help Portal
https://centresupport.britishcouncil.org/aptishelp/wp-login.php?redirect_to=https%3A%2F%2Fcentresupport.britishcouncil.org%2Faptishelp
Aptis Help Portal
https://centresupport.britishcouncil.org/aptishelp/wp-login.php?redirect_to=https%3A%2F%2Fcentresupport.britishcouncil.org%2Faptishelp
 Что такое транзакция
 Представление графической информации
 Информация. Представление информации. Единицы измерения информации.
 Свойства Flexbox для упрощённой блочной компоновки элементов на странице
 Hashtag my day. User story
 Файловые архивы. Общение в Интернете
 Лексика языка Java
 Засіб пошуку інформації на комп'ютерах. Інформатика 9 клас
 Информатика 8 сынып
 Двоичное кодирование
 Основы графической визуализации данных. Двумерный случай
 Основы SQL. Практическое применение
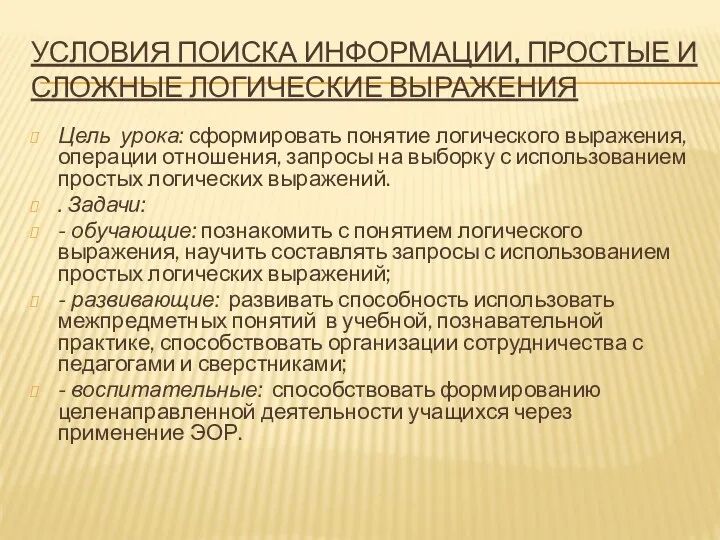 Простые и сложные логические выражения. Презентация.
 Тезаурус Безопасный интернет
 ChatGPT для SEO специалиста
 Многофайловые проекты
 Информатика как наука
 Құрылымдаушы-суретші. Паркетчик және PascalABC программалармен жұмыс істеу Мысал Паркетчик PascalABC
 Абстрактні типи даних
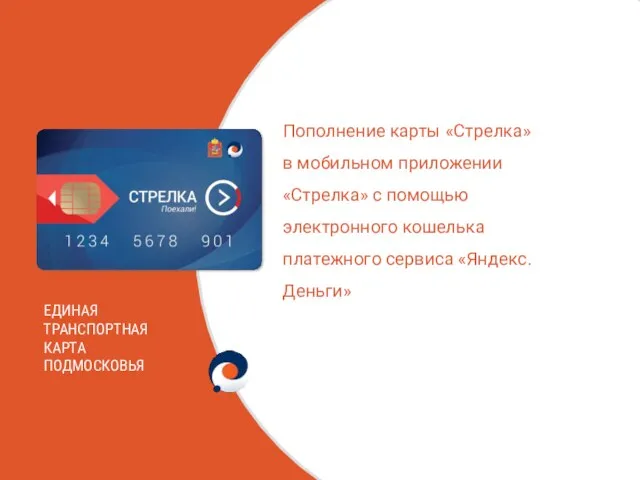 Пополнение карты Стрелка в мобильном приложении
 Spring Framework
 Развитие киберспорта в России
 Отчет по продвижению в социальных сетях WebMoney
 Классификация информационных систем
 Кодирование данных
 Общие правила написания заметок для информационно развлекательных электронных СМИ
 FL Studio
 Физические основы радиоэлектронных способов воздействия угроз на объекты