- Content of Live Profile. Part 1

Содержание
- 2. Content of Live Profile Part 1 Overview of Live Profile Enabling in Provisioning Differences between v10
- 3. Overview The “Succession Management data model XML” is used to configure: Live Profile Layout (for ULTRA,
- 4. Live Profile v3.0 setup requires access to Provisioning and an xml editor (e.g. Oxygen, Altova, notepad,
- 5. Go to Provisioning ? Company Settings Step 1 Turn on Live Profile in Company Settings Step
- 6. Step 3 Load the SuccessFactors Premium template in Pre-packaged Templates Provisioning: Enabling Live Profile, continued
- 7. Live Profile Structure as Seen by User – Ultra View
- 8. Live Profile Structure as Seen by User – v10 Personal Information: single-value data. Background Data: multiple-records
- 9. Structure – The 4 ZONES of the Data Model (1 of 2) The data model may
- 10. Structure – The 4 ZONES of the Data Model (2 of 2) ZONE 1 – DEFINE
- 11. ZONE 1 – Define Single Value Fields blocks must be listed above blocks. Parameters for include:
- 12. ZONE 1 – Default Standard-Elements Source for this information is the dtd. Standard fields may change
- 13. ZONE 2A – Multi-record user info Parameters for include: id (one value) – REQUIRED type-id (one
- 14. ZONE 2B – Trended “rating-records” Parameters for include: id (one value) – REQUIRED type-id (one value)
- 15. ZONE 2C – Employee “ScoreCard” portlets Parameters for include: id (one value) – REQUIRED type-id (one
- 16. ZONE 3 – Define Custom Filters and Permissions Parameters for include: type (write* | read) –
- 17. ZONE 4A – view-templates for v10 instances Parameters for include: id (one value) – REQUIRED Attributes
- 18. ULTRA Equivalent to ZONE 4A Plus MORE! – in Admin as of August 08 Build View-template
- 19. ZONE 4B – “talentSearch” view-template Parameters for include: id (talentSearch) – REQUIRED Attributes for include: (one
- 20. ZONE 4C – “employeeScoreCard” view-template Parameters for include: id (employeeScoreCard) – REQUIRED Attributes for include: (one
- 21. ZONE 4D – “User Directory” view-template ZONE 4D (4D) Define one special template with id=“sysUserDirectorySetting” to
- 22. Live Profile Data Model Management Download the data model 1. Company Settings, Import/Export Data Model 2.
- 23. LP Exercise 1(v10): Section Layout Order—move background section – v10 instances Customer wants to move “Functional
- 24. LP Exercise 1(ULTRA): PREWORK – Section Layout Order—move background section – ULTRA instances 0808 Build We
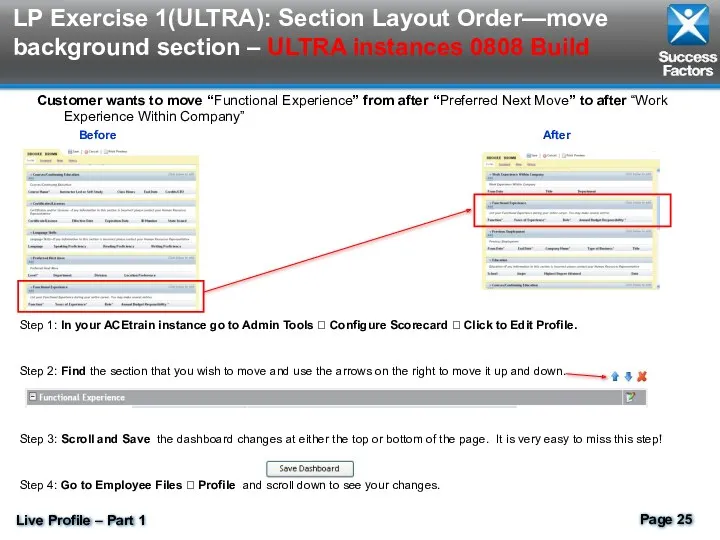
- 25. LP Exercise 1(ULTRA): Section Layout Order—move background section – ULTRA instances 0808 Build Customer wants to
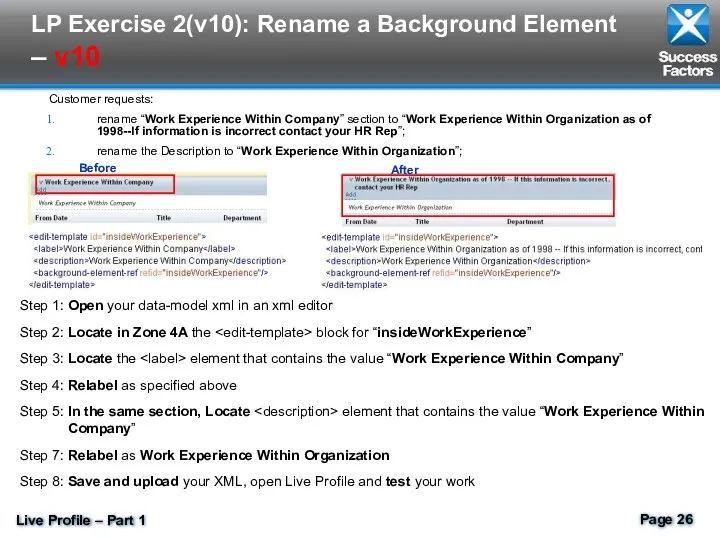
- 26. LP Exercise 2(v10): Rename a Background Element – v10 Customer requests: rename “Work Experience Within Company”
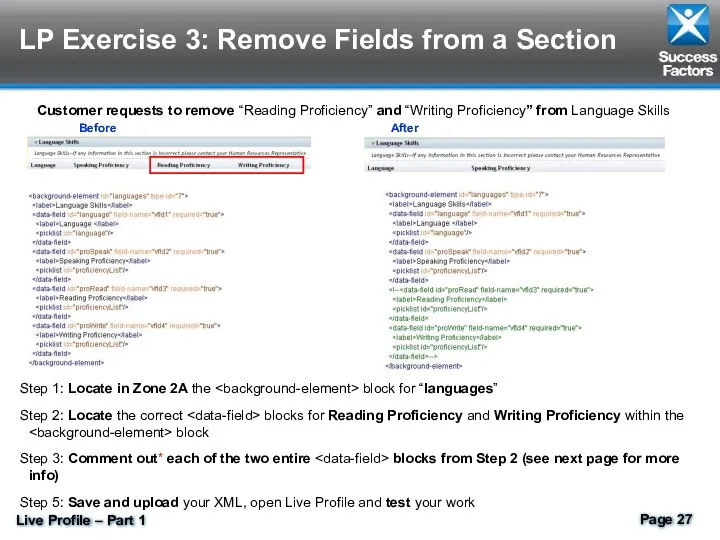
- 27. LP Exercise 3: Remove Fields from a Section Customer requests to remove “Reading Proficiency” and “Writing
- 28. “Commenting Out” code Commenting out XML code is similar to deleting the XML code. Both methods
- 30. Скачать презентацию
Content of Live Profile Part 1
Overview of Live Profile
Enabling in Provisioning
Differences
Content of Live Profile Part 1
Overview of Live Profile
Enabling in Provisioning
Differences

Overview
The “Succession Management data model XML” is used to configure:
Live Profile
Layout
Overview
The “Succession Management data model XML” is used to configure:
Live Profile
Layout
Live Profile v3.0 setup requires access to Provisioning and an xml
Live Profile v3.0 setup requires access to Provisioning and an xml
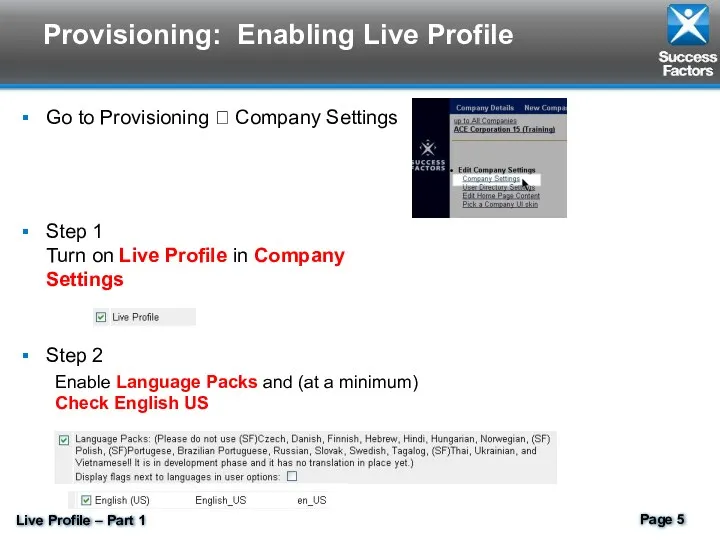
Go to Provisioning ? Company Settings
Step 1 Turn on Live Profile
Go to Provisioning ? Company Settings
Step 1 Turn on Live Profile
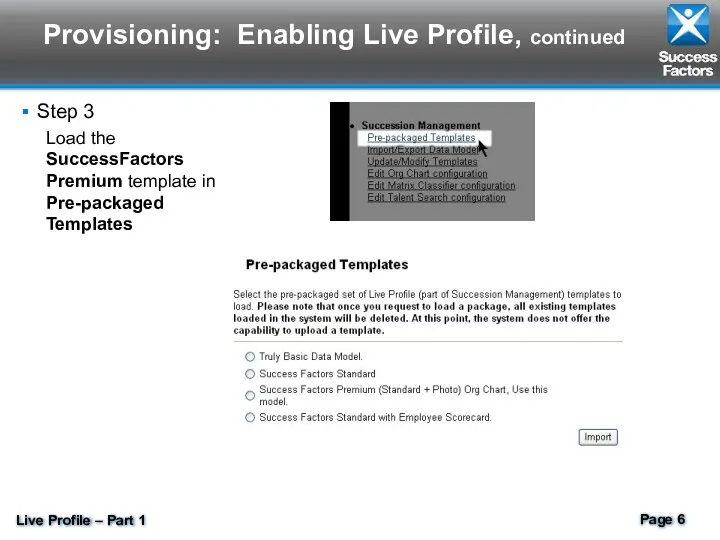
Step 3
Load the SuccessFactors Premium template in Pre-packaged Templates
Provisioning: Enabling
Step 3
Load the SuccessFactors Premium template in Pre-packaged Templates
Provisioning: Enabling
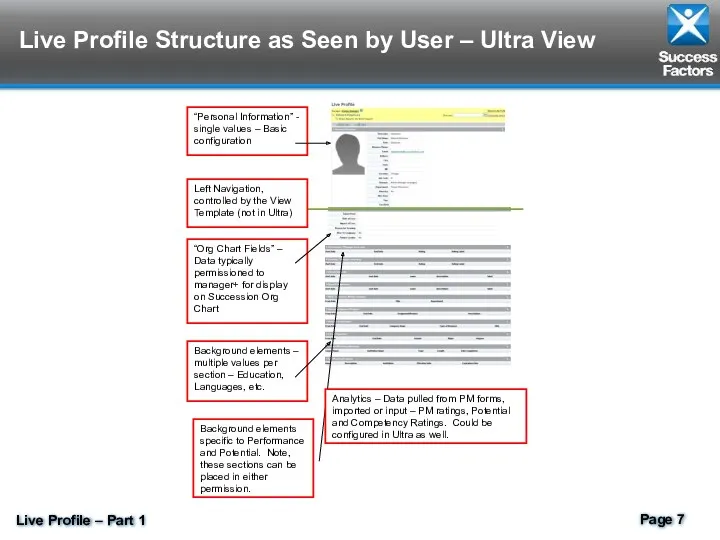
Live Profile Structure as Seen by User – Ultra View
Live Profile Structure as Seen by User – Ultra View
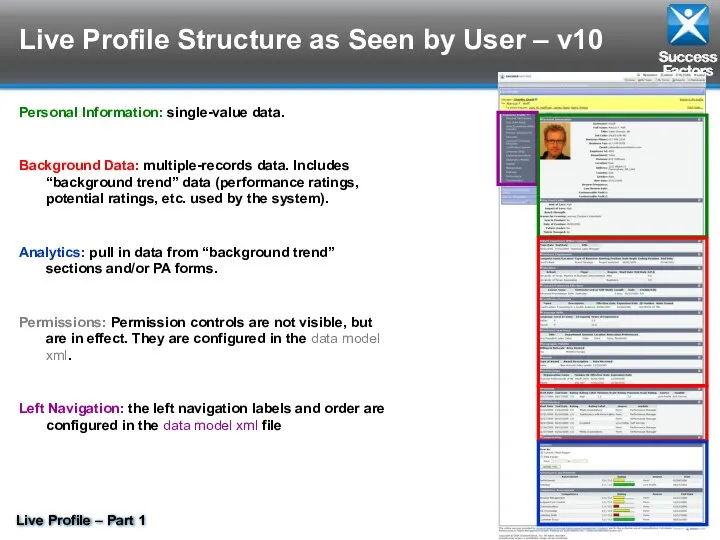
Live Profile Structure as Seen by User – v10
Personal Information: single-value
Live Profile Structure as Seen by User – v10
Personal Information: single-value
Structure – The 4 ZONES of the Data Model (1 of
Structure – The 4 ZONES of the Data Model (1 of
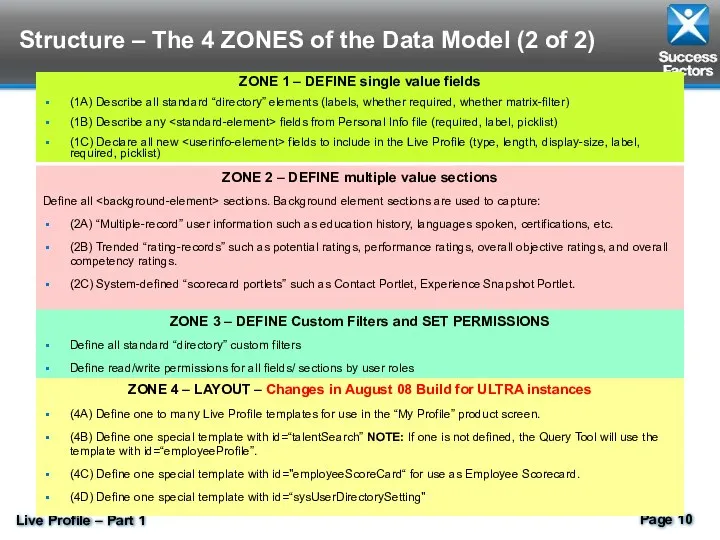
Structure – The 4 ZONES of the Data Model (2 of
Structure – The 4 ZONES of the Data Model (2 of
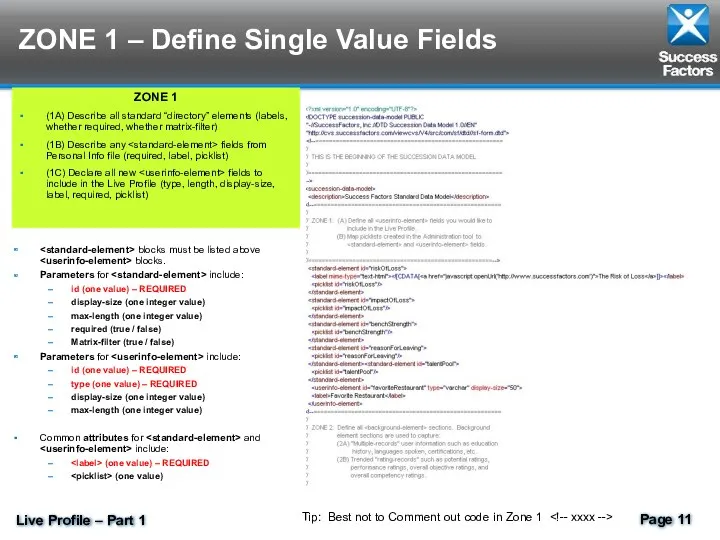
ZONE 1 – Define Single Value Fields
blocks must be listed
ZONE 1 – Define Single Value Fields

ZONE 1 – Default Standard-Elements
Source for this information is the dtd.
ZONE 1 – Default Standard-Elements
Source for this information is the dtd.
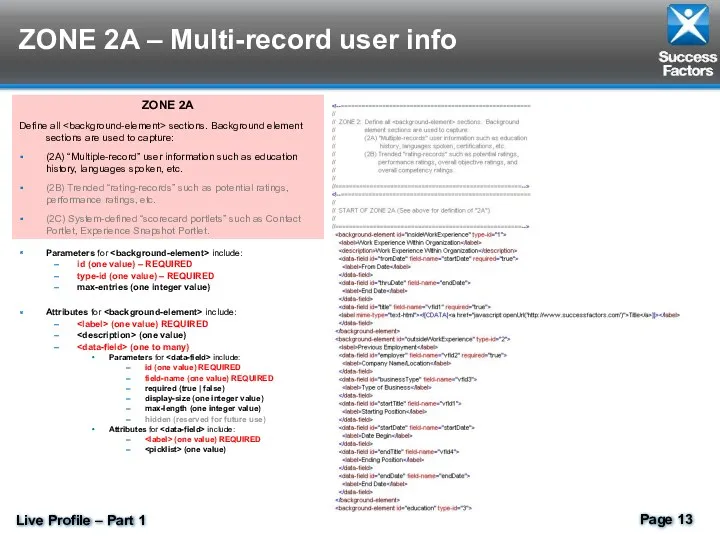
ZONE 2A – Multi-record user info
Parameters for include:
id (one
ZONE 2A – Multi-record user info
Parameters for
id (one
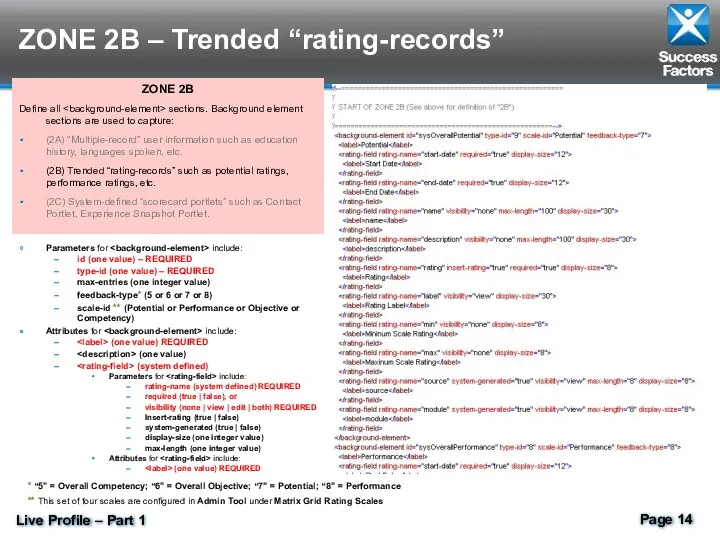
ZONE 2B – Trended “rating-records”
Parameters for include:
id (one value)
ZONE 2B – Trended “rating-records”
Parameters for
id (one value)
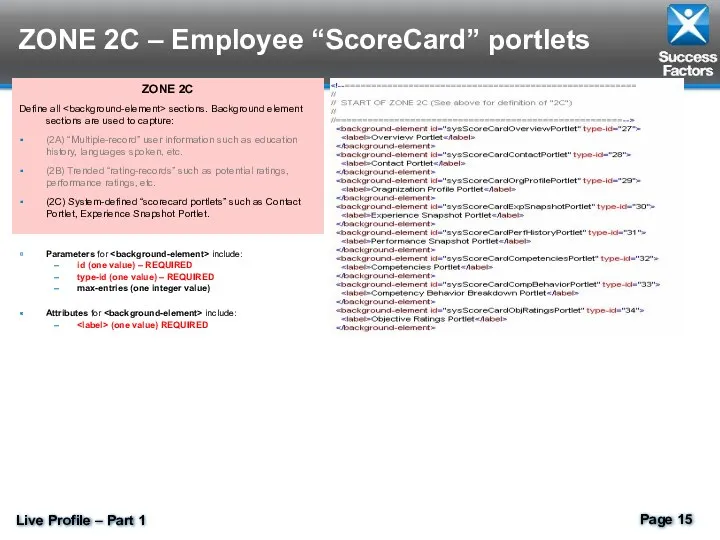
ZONE 2C – Employee “ScoreCard” portlets
Parameters for include:
id (one
ZONE 2C – Employee “ScoreCard” portlets
Parameters for
id (one
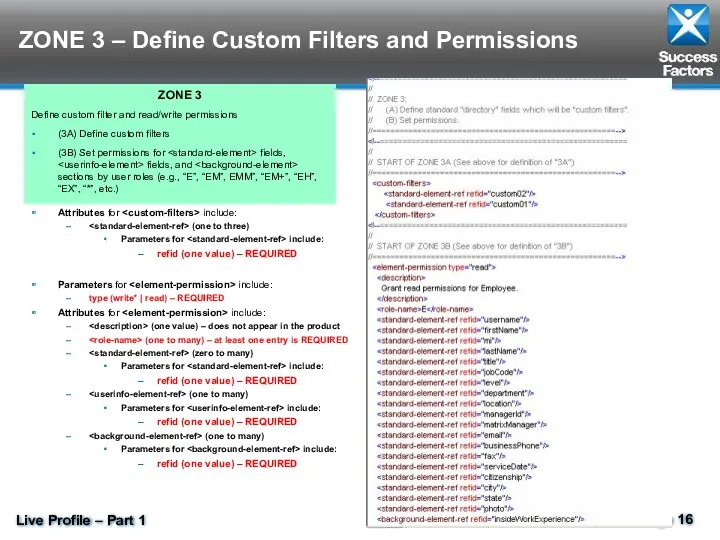
ZONE 3 – Define Custom Filters and Permissions
Parameters for include:
type
ZONE 3 – Define Custom Filters and Permissions
Parameters for
type
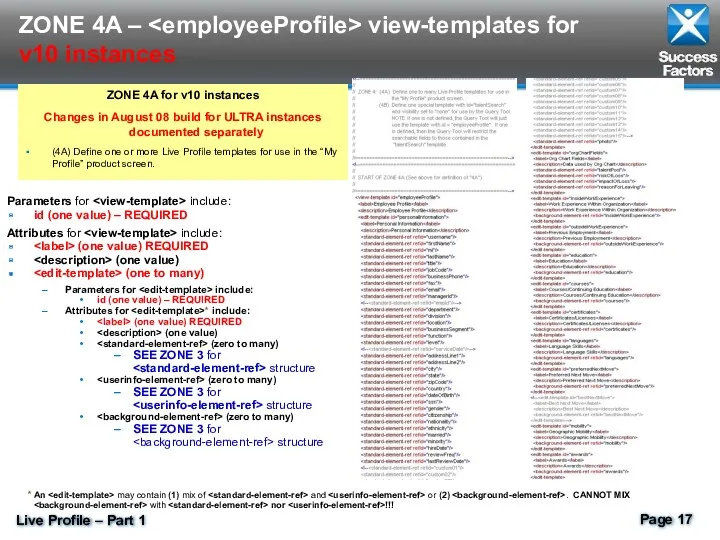
ZONE 4A – view-templates for v10 instances
Parameters for include:
id
ZONE 4A – Parameters for
id
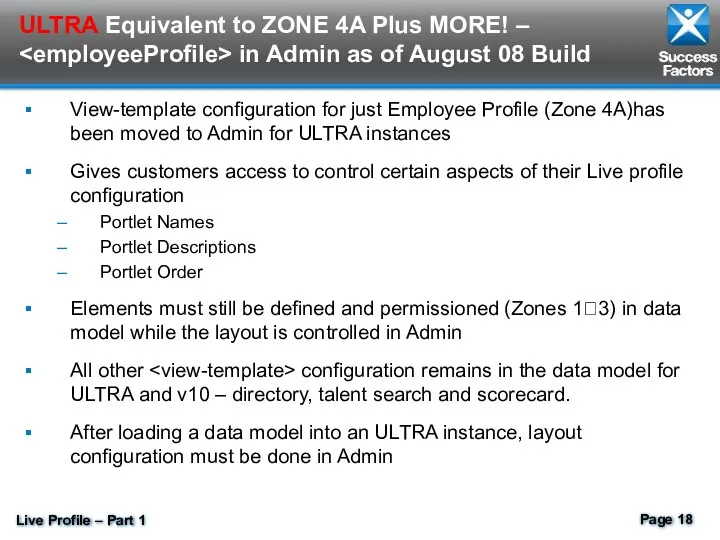
ULTRA Equivalent to ZONE 4A Plus MORE! – in Admin
ULTRA Equivalent to ZONE 4A Plus MORE! –
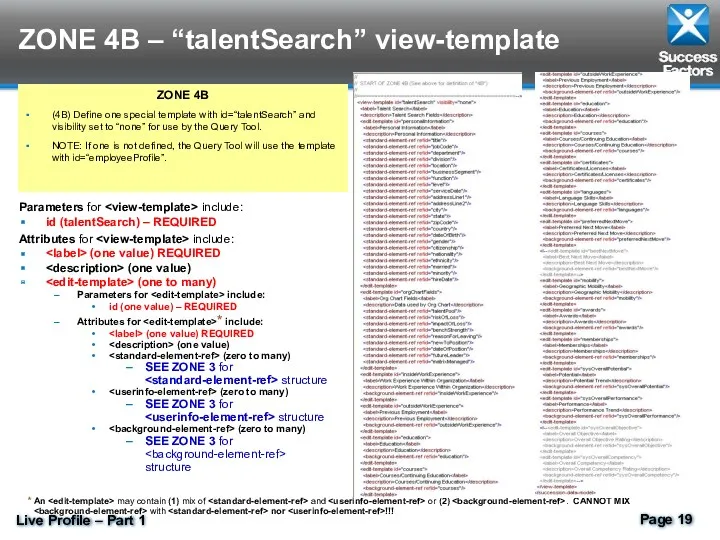
ZONE 4B – “talentSearch” view-template
Parameters for include:
id (talentSearch) – REQUIRED
Attributes
ZONE 4B – “talentSearch” view-template
Parameters for
id (talentSearch) – REQUIRED
Attributes
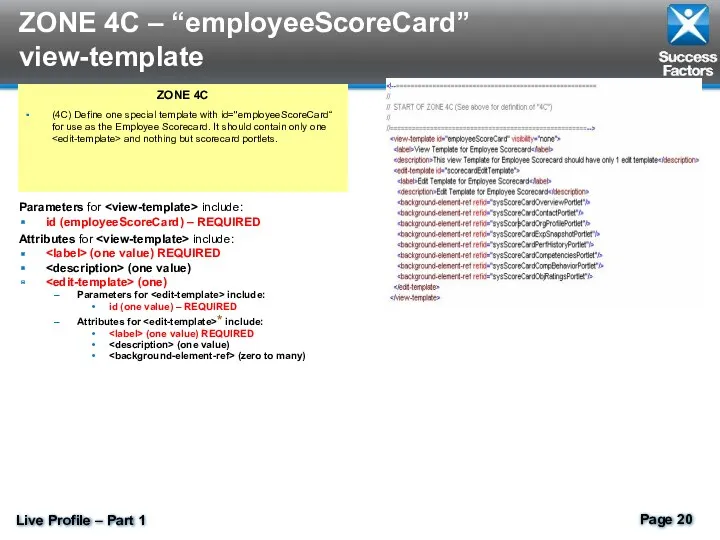
ZONE 4C – “employeeScoreCard” view-template
Parameters for include:
id (employeeScoreCard) – REQUIRED
Attributes
ZONE 4C – “employeeScoreCard” view-template
Parameters for
id (employeeScoreCard) – REQUIRED
Attributes
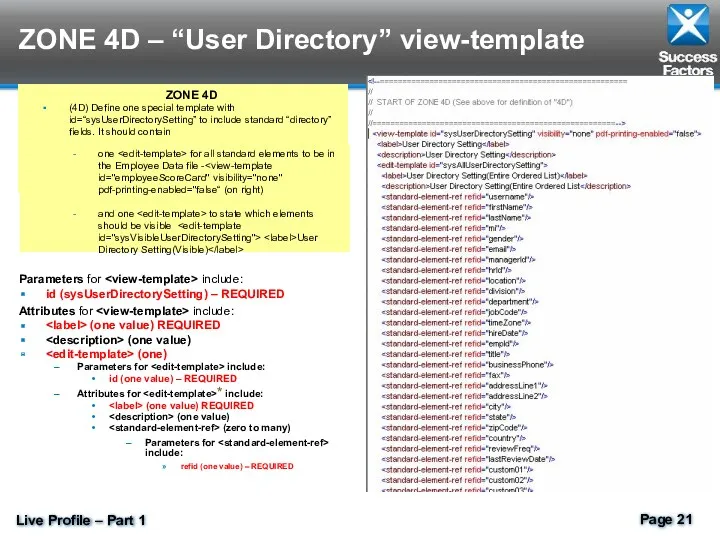
ZONE 4D – “User Directory” view-template
ZONE 4D
(4D) Define one special template
ZONE 4D – “User Directory” view-template
ZONE 4D
(4D) Define one special template
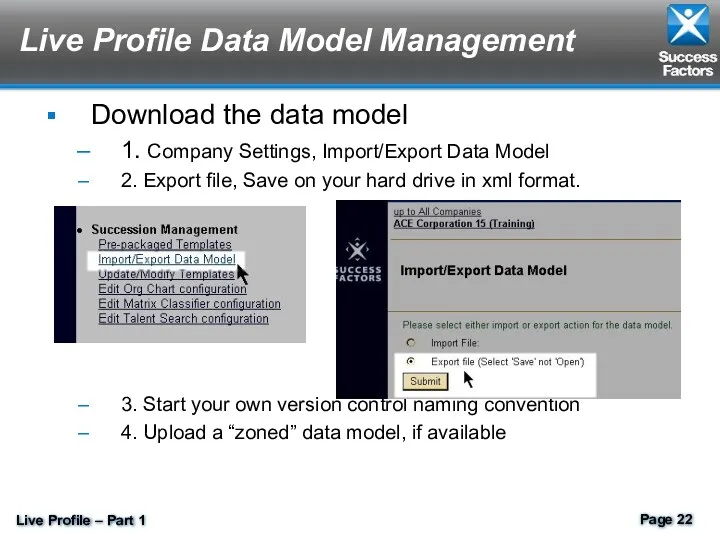
Live Profile Data Model Management
Download the data model
1. Company Settings, Import/Export
Live Profile Data Model Management
Download the data model
1. Company Settings, Import/Export
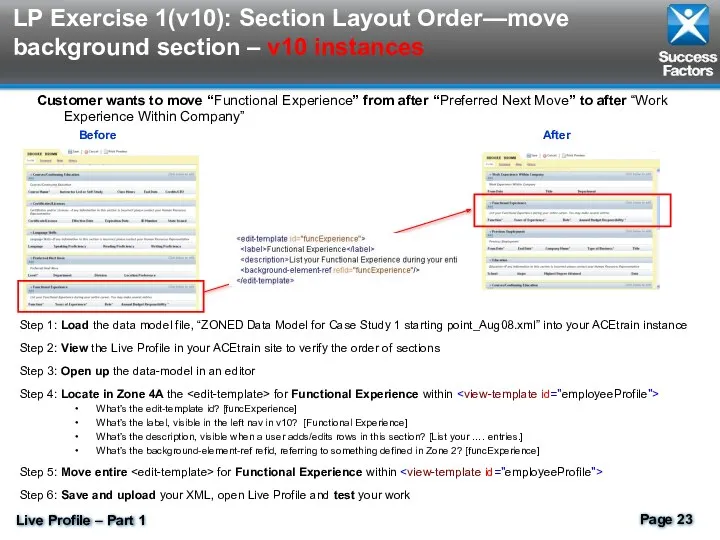
LP Exercise 1(v10): Section Layout Order—move background section – v10 instances
Customer
LP Exercise 1(v10): Section Layout Order—move background section – v10 instances
Customer
LP Exercise 1(ULTRA): PREWORK –
Section Layout Order—move background section –
LP Exercise 1(ULTRA): PREWORK – Section Layout Order—move background section –
LP Exercise 1(ULTRA): Section Layout Order—move background section – ULTRA instances
LP Exercise 1(ULTRA): Section Layout Order—move background section – ULTRA instances
LP Exercise 2(v10): Rename a Background Element – v10
Customer requests:
rename
LP Exercise 2(v10): Rename a Background Element – v10
Customer requests:
rename
LP Exercise 3: Remove Fields from a Section
Customer requests to
LP Exercise 3: Remove Fields from a Section
Customer requests to

“Commenting Out” code
Commenting out XML code is similar to deleting the
“Commenting Out” code
Commenting out XML code is similar to deleting the
 Разработка аппаратно-программного комплекса имитации нестабильности напряжения в сетях постоянного тока
 Проблемы измерения информации. Способы измерения информации
 JavaScript. Циклы
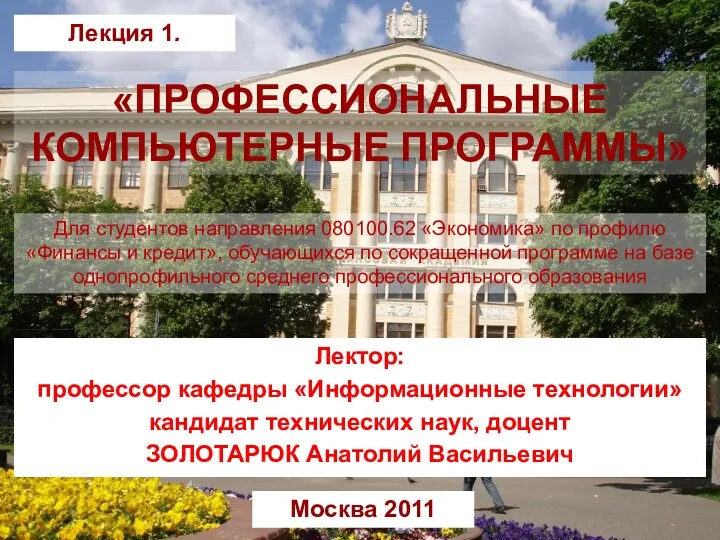 Профессиональные компьютерные программы
 Моделирование. Свойства и виды моделей
 Эстафета. Информатика
 Логическое проектирование реляционной базы данных. Лекция 8
 Компьютерный практикум по математическому анализу в среде Matlab. Практическое занятие 3
 Операторы. Язык программирования Delphi
 Портфолио
 Решение задач. Преобразование логических выражений.
 Тернарный оператор
 Управление процессами
 Платформа Б. Распределенная блокчейн-платформа для хранения и обмена данными
 Методическая инструкция. Создание таблиц со схемами для отчета по выполненным работам
 Введение в системы управления базами данных (СУБД) и основные возможности реляционной СУБД MySQL
 Программирование на языке Python. Алгоритм и его свойства
 Арифметические операции в позиционных системах счисления (4). 8 класс
 Официальный сайт Мэра Москвы MOS.RU. Государственные услуги и сервисы
 Правила оформления текстовых учебных документов
 Информация в природе, обществе и технике
 Библиолето 2018. Библиотека с. Ракитное
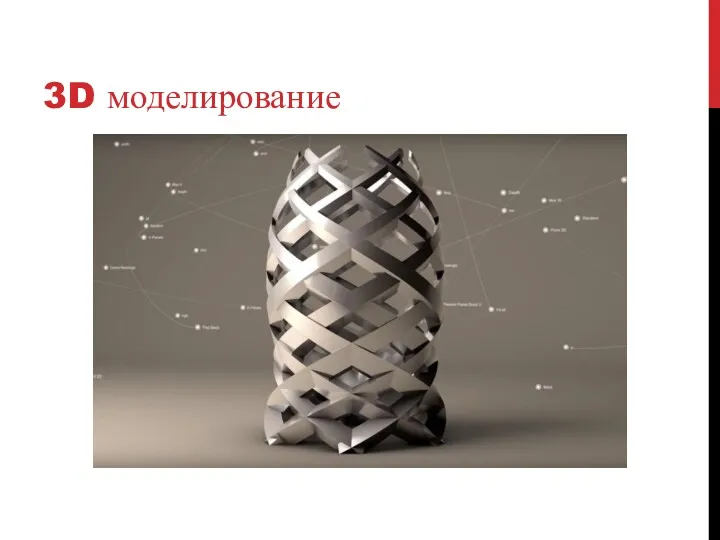 3D моделирование
 Microsoft Word
 Основы операционных систем
 Типы алгоритмов. Алгоритмы с ветвлениями
 Разработка АИС школы
 Проект Открытка в Scratch