- Development in AB Suite

Содержание
- 2. Objective By the end of this module, you’ll be able to— Implement advanced concepts of AB
- 3. Module Topics Model Hierarchy Keys Framework Methods Dictionaries Designing Presentations Class Diagrams Reference Elements Developer Security
- 4. Model Hierarchy
- 5. Developing Model Hierarchy When you develop the hierarchy, keep the following in mind: Define relationships through
- 6. Developing Model Hierarchy Event Ispec Model Dictionary Global Items Location Folder Profile Attribute Method Report Frame
- 7. Keys
- 8. Profile Keys What are keys? Keys provide an index to an ispec’s database records Keys help
- 9. Multi Keyed Classes You can specify more than one attribute as keys in an ispec. If
- 10. Multi Keyed Classes – Adding Keys to a Profile To define multiple keys in an ispec:
- 11. Framework Methods
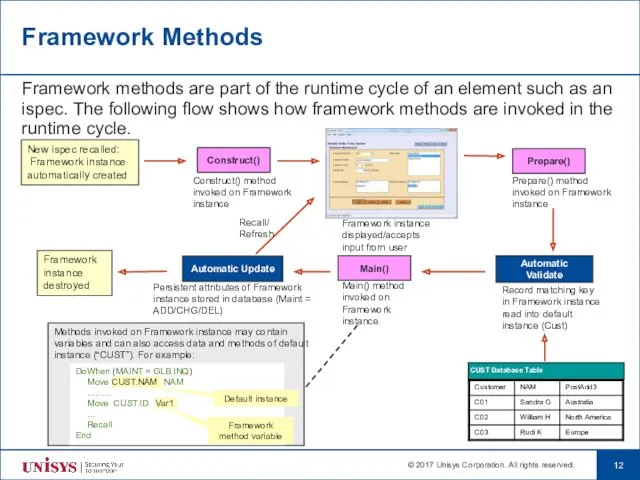
- 12. Framework Methods Framework methods are part of the runtime cycle of an element such as an
- 13. Framework Methods Framework methods are: Construct, Prepare, and Main. Depending on the stereotype, the methods are
- 14. Dictionaries
- 15. Dictionaries Dictionaries are useful for organizing classes that define attributes and variables in a model. When
- 16. Dictionaries You can create dictionaries anywhere in your model. You can also create multiple dictionaries. A
- 17. Dictionaries Example of members of CUST inheriting from the dictionary elements * * * * *
- 18. Dictionaries A dictionary can also contain class definitions that may or may not have the Multiplicity
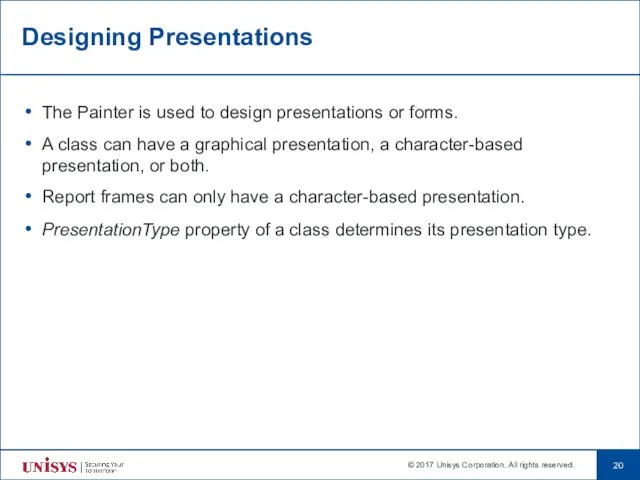
- 19. Designing Presentations
- 20. Designing Presentations The Painter is used to design presentations or forms. A class can have a
- 21. PresentationType Property The PresentationType property allows you to choose the type of presentation for a class.
- 22. Direction in Presentation Direction property of an attribute specifies how a control painted on a presentation
- 23. Adding an Attribute to the Presentation To add a new attribute to the presentation you can
- 24. Adding New Controls to the Presentation You can add controls to the presentation by dragging them
- 25. Working with the Grid Panel Grid Panels allow you to associate a set of group controls
- 26. Moving Controls into a Grid Panel Using Ctrl key
- 27. Moving Controls within a Grid Panel Using Alt key
- 28. Synchronizing an Element With the Class View The Synchronize Class View option synchronizes the selected item
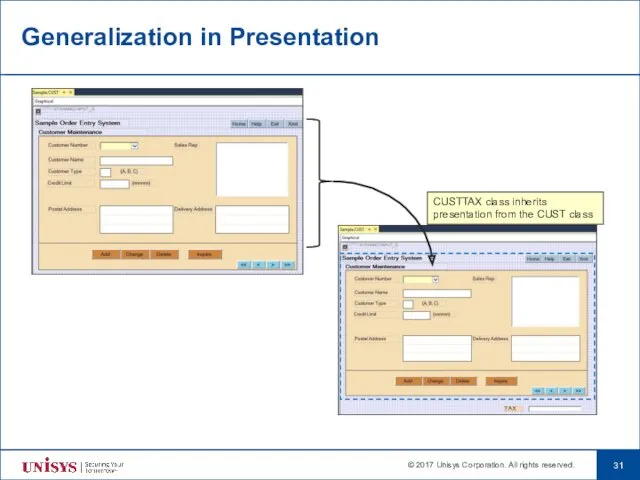
- 29. Generalization in Presentation Generalization is an Object-Oriented concept that describes “is a” relationship between two classes
- 30. Generalization in Presentation Example: Consider a class CUSTTAX that represents customers who pay tax that inherits
- 31. Generalization in Presentation CUSTTAX class inherits presentation from the CUST class
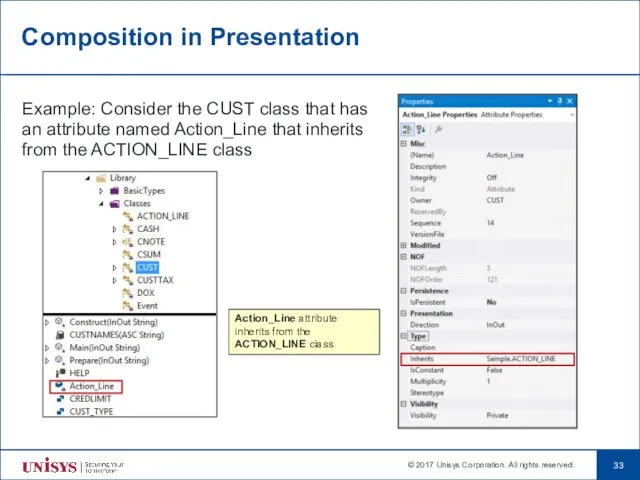
- 32. Composition in Presentation Composition is an Object-Oriented concept that describes a relationship between two objects where
- 33. Composition in Presentation Example: Consider the CUST class that has an attribute named Action_Line that inherits
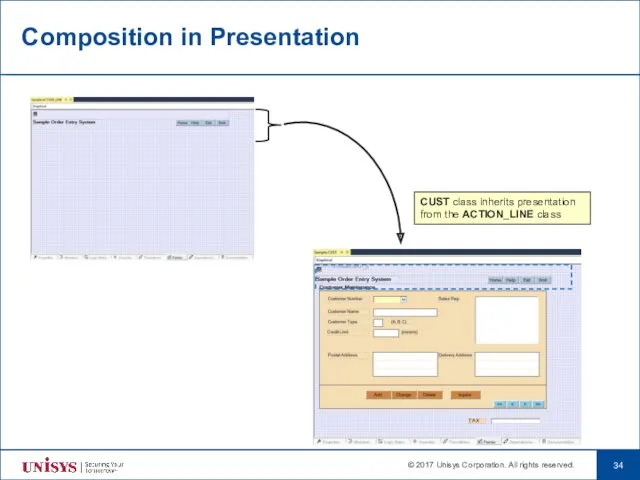
- 34. Composition in Presentation CUST class inherits presentation from the ACTION_LINE class
- 35. Logic Editor
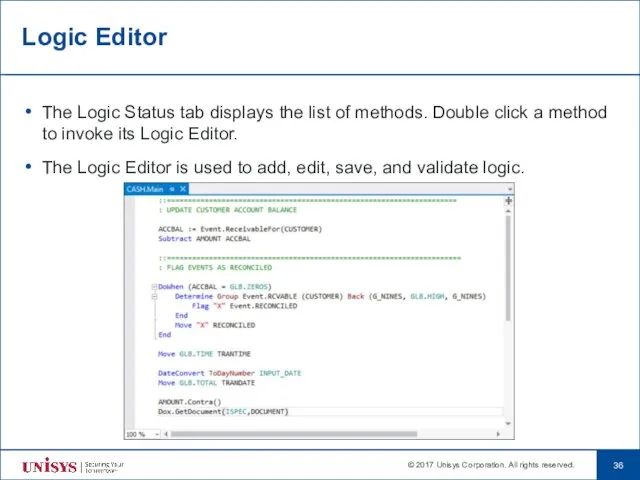
- 36. Logic Editor The Logic Status tab displays the list of methods. Double click a method to
- 37. Logic Editor Highlights Dynamic Validation Immediately identify logic errors with the red squiggle Quick Actions Quickly
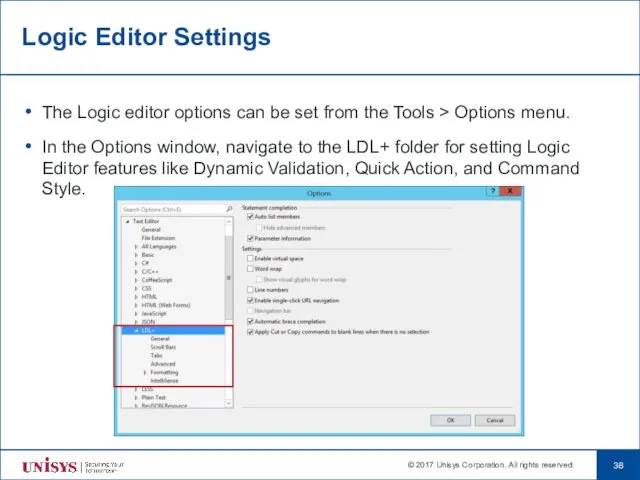
- 38. Logic Editor Settings The Logic editor options can be set from the Tools > Options menu.
- 39. Class Diagrams
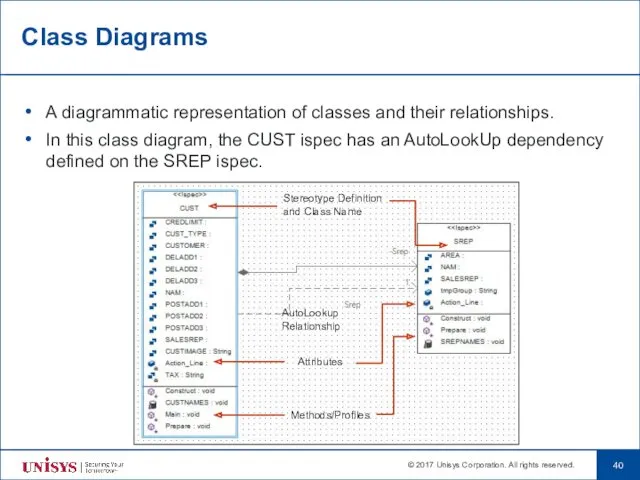
- 40. Class Diagrams A diagrammatic representation of classes and their relationships. In this class diagram, the CUST
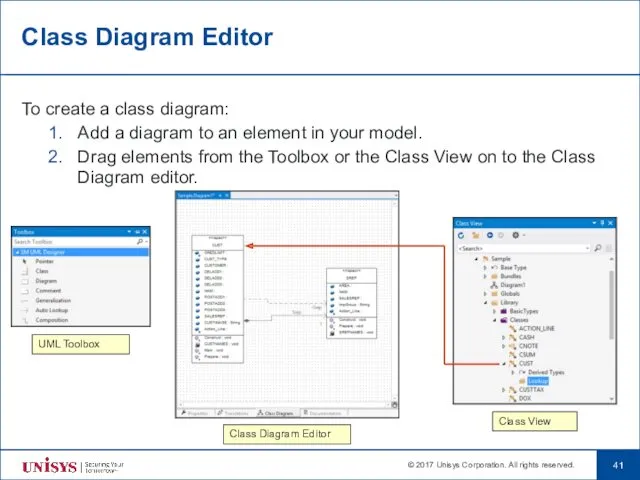
- 41. Class Diagram Editor To create a class diagram: Add a diagram to an element in your
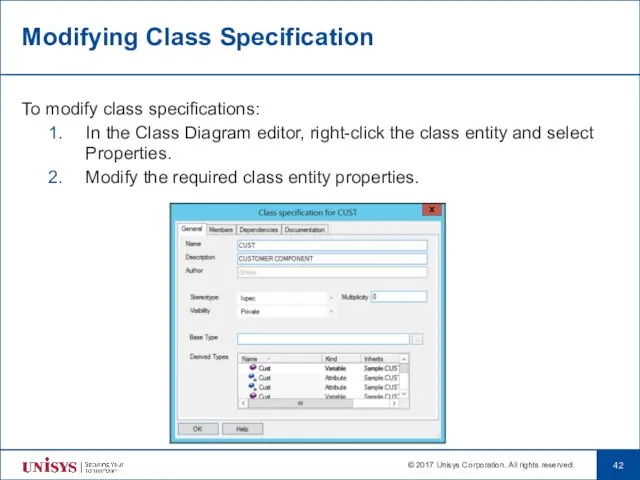
- 42. Modifying Class Specification To modify class specifications: In the Class Diagram editor, right-click the class entity
- 43. Defining Relationships You can define all the relationships using the Toolbox.
- 44. Reference Elements
- 45. Reference Elements A reference is used: To display an attribute that cannot be directly dragged onto
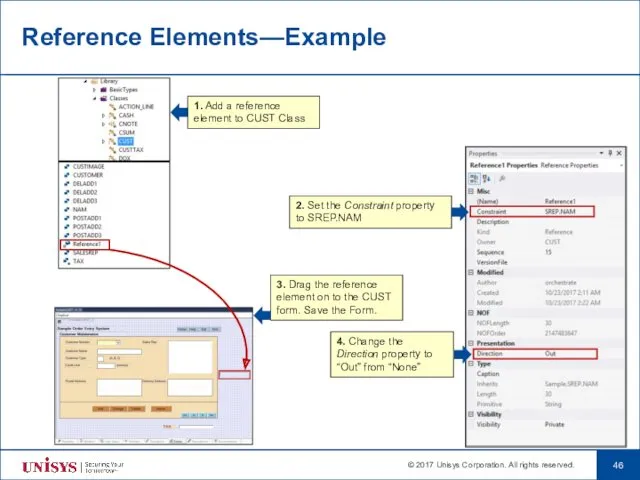
- 46. Reference Elements—Example 2. Set the Constraint property to SREP.NAM 1. Add a reference element to CUST
- 47. Reference Elements—Example When you transmit the CUST screen, SREP record is read, and the appropriate SREP.NAM
- 48. Developer Security
- 49. Developer Security Developer Security is similar to Windows Explorer Security To set the security in Developer,
- 50. Developer Security AccessControlled property can be set by: Administrative users Model database owner (db_owner) Security admin
- 51. Developer Security To set security for any element: From the View menu, select Class View to
- 52. Developer Security In the Windows Security dialog box, you can add and remove users. Types of
- 53. Developer Security The application user is denied write permission to the SampleDeploy folder. Select the Security
- 54. Documentation
- 55. Build Comment Pages Used to create a detailed report of your AB Suite project Build the
- 56. Build Comment Pages Is displayed in the HTML Browser within Visual Studio after the report is
- 57. Build Comment Pages 1. Select the Model in Class View. 3. To build a report on
- 58. Product Documentation Product Information Developer CD PI Only CD Online Help Unisys Support Web Site
- 59. Product Documentation – PI Only CD All User Guides are published for a release Except Generator
- 60. Product Documentation – Online Help Functions available for Online help: Contents Index Favorites Find Context-sensitive help
- 61. Readme Document AB Suite Readme document is supplied with every release of the product and provides
- 62. Product Documentation – Unisys Support Web Site Documentation section https://www.support.unisys.com/common/epa/DocumentationLibraries.aspx?PLA=ABS&NAV=ABS
- 63. Working Efficiently with Your Model
- 64. Working Efficiently with Your Model Better ways to define: Insertables Group Attributes Ispecs Some points to
- 65. Better Way to Define Insertables In AB Suite, an insertable stereotype is not required to define
- 66. Better Way to Define Group Attributes A group stereotype is not required to visually group attributes.
- 67. Better Way to Define Ispecs In AB Suite, it is possible to create a class with
- 68. Better Way to Define Global Attributes In AB Suite, you can avoid unnecessary declaration of global
- 69. Points to remember... Understand the structure of your model and identify the elements from an object-oriented
- 71. Скачать презентацию
Objective
By the end of this module, you’ll be able to—
Implement advanced
Objective
By the end of this module, you’ll be able to—
Implement advanced
Module Topics
Model Hierarchy
Keys
Framework Methods
Dictionaries
Designing Presentations
Class Diagrams
Reference Elements
Developer Security
Documentation
Working Effectively with
Module Topics
Model Hierarchy
Keys
Framework Methods
Dictionaries
Designing Presentations
Class Diagrams
Reference Elements
Developer Security
Documentation
Working Effectively with
Model Hierarchy
Model Hierarchy
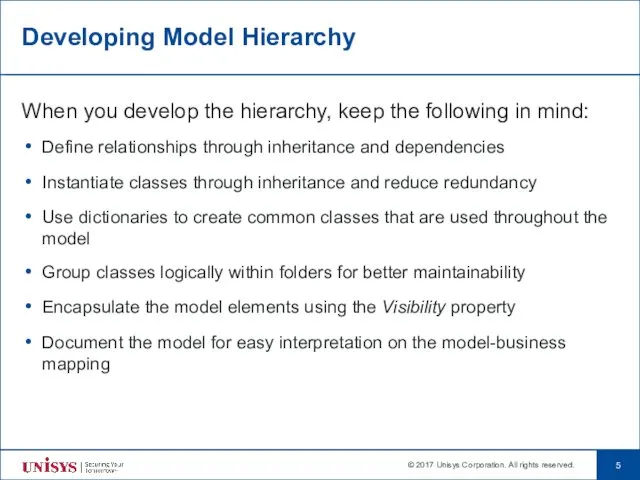
Developing Model Hierarchy
When you develop the hierarchy, keep the following in
Developing Model Hierarchy
When you develop the hierarchy, keep the following in
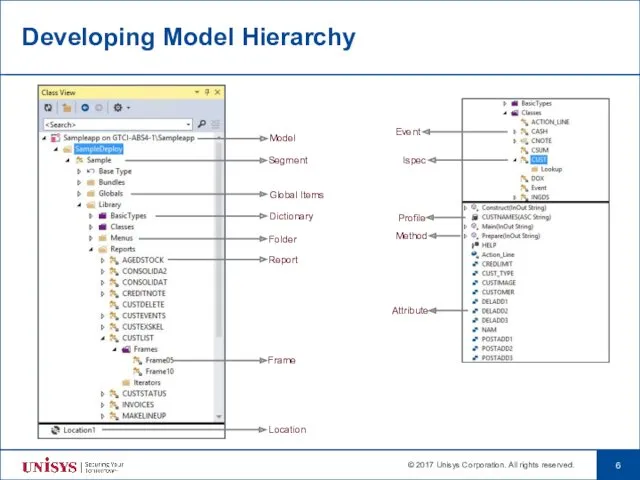
Developing Model Hierarchy
Event
Ispec
Model
Dictionary
Global Items
Location
Folder
Profile
Attribute
Method
Report
Frame
Segment
Developing Model Hierarchy
Event
Ispec
Model
Dictionary
Global Items
Location
Folder
Profile
Attribute
Method
Report
Frame
Segment
Keys
Keys
Profile Keys
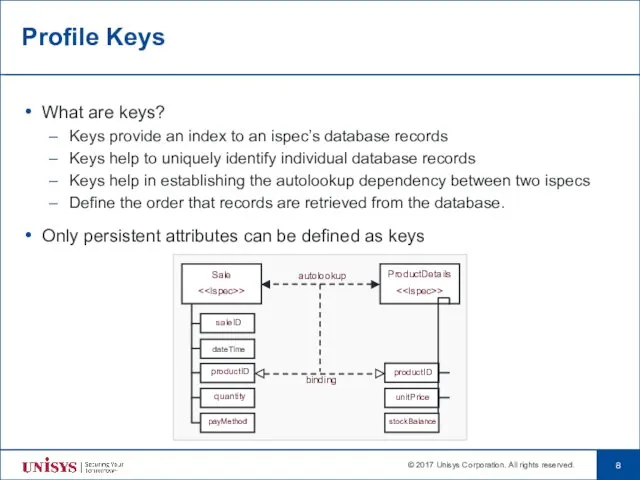
What are keys?
Keys provide an index to an ispec’s database
Profile Keys
What are keys?
Keys provide an index to an ispec’s database
Multi Keyed Classes
You can specify more than one attribute as keys
Multi Keyed Classes
You can specify more than one attribute as keys

Multi Keyed Classes – Adding Keys to a Profile
To define multiple
Multi Keyed Classes – Adding Keys to a Profile
To define multiple
Framework Methods
Framework Methods
Framework Methods
Framework methods are part of the runtime cycle of an
Framework Methods
Framework methods are part of the runtime cycle of an
Framework Methods
Framework methods are: Construct, Prepare, and Main.
Depending on the stereotype,
Framework Methods
Framework methods are: Construct, Prepare, and Main.
Depending on the stereotype,
Dictionaries
Dictionaries
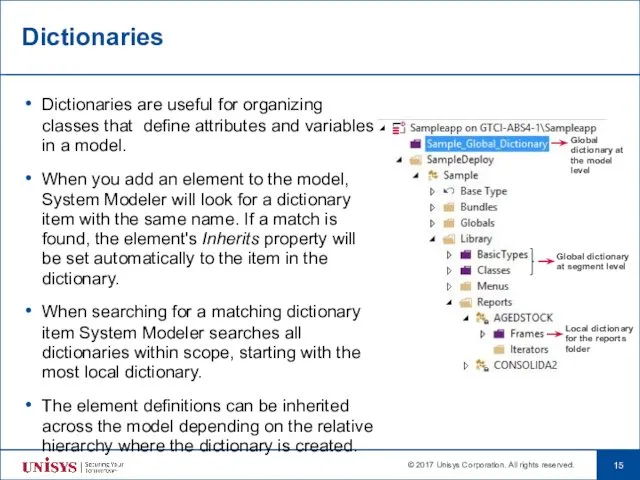
Dictionaries
Dictionaries are useful for organizing classes that define attributes and variables
Dictionaries
Dictionaries are useful for organizing classes that define attributes and variables
Dictionaries
You can create dictionaries anywhere in your model.
You can also
Dictionaries
You can create dictionaries anywhere in your model.
You can also
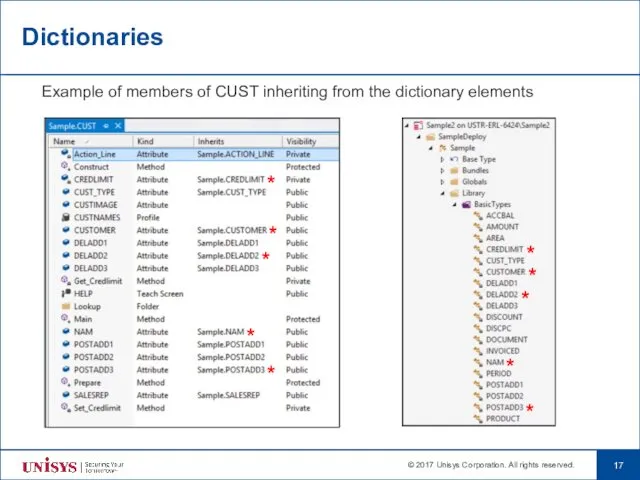
Dictionaries
Example of members of CUST inheriting from the dictionary elements
*
*
*
*
*
*
*
*
*
*
Dictionaries
Example of members of CUST inheriting from the dictionary elements
*
*
*
*
*
*
*
*
*
*
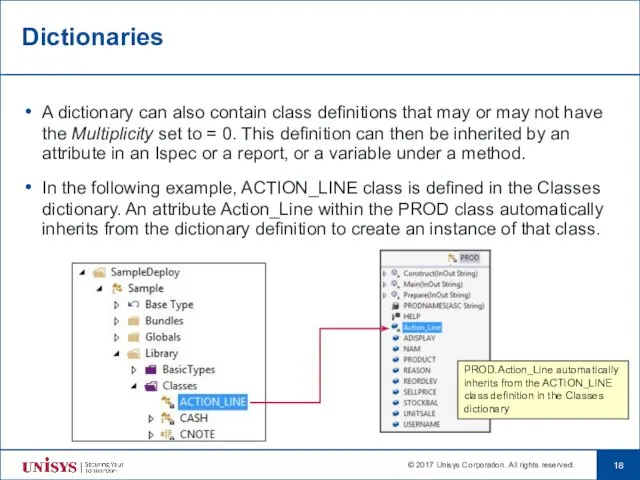
Dictionaries
A dictionary can also contain class definitions that may or may
Dictionaries
A dictionary can also contain class definitions that may or may
Designing Presentations
Designing Presentations
Designing Presentations
The Painter is used to design presentations or forms.
A class
Designing Presentations
The Painter is used to design presentations or forms.
A class
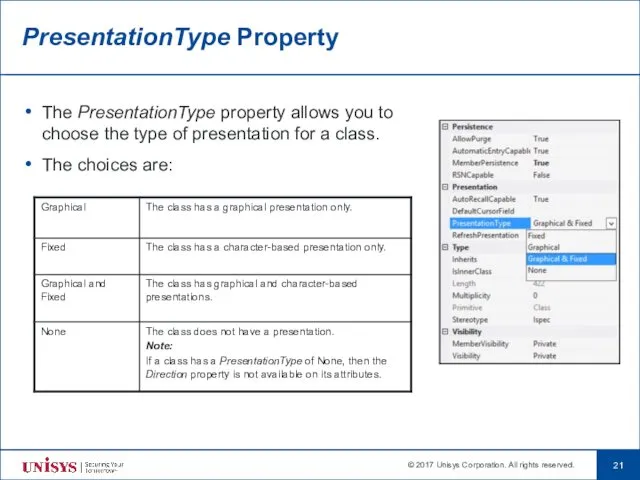
PresentationType Property
The PresentationType property allows you to choose the type of
PresentationType Property
The PresentationType property allows you to choose the type of
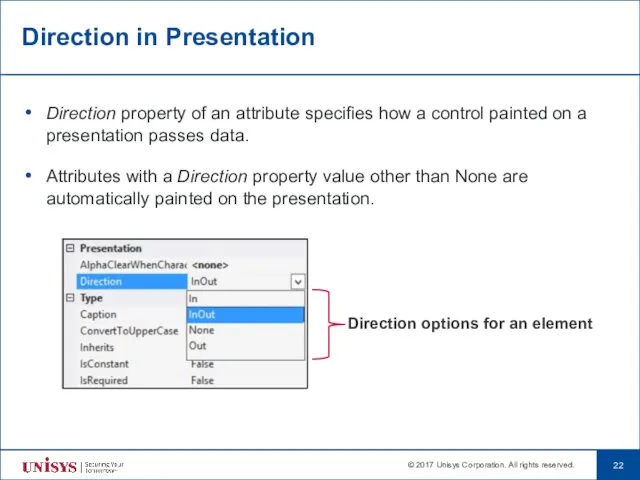
Direction in Presentation
Direction property of an attribute specifies how a control
Direction in Presentation
Direction property of an attribute specifies how a control
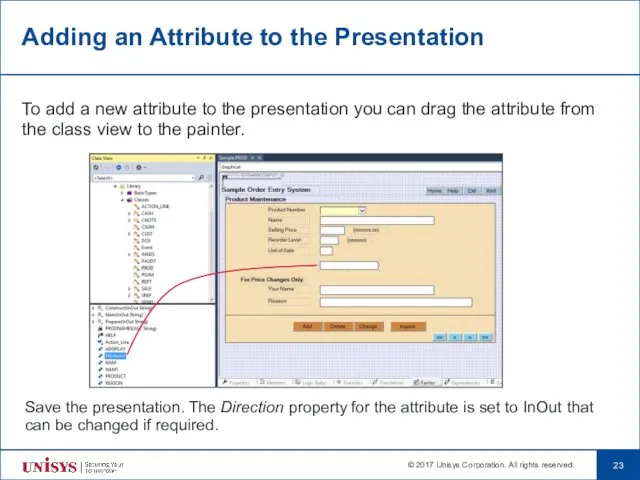
Adding an Attribute to the Presentation
To add a new attribute to
Adding an Attribute to the Presentation
To add a new attribute to
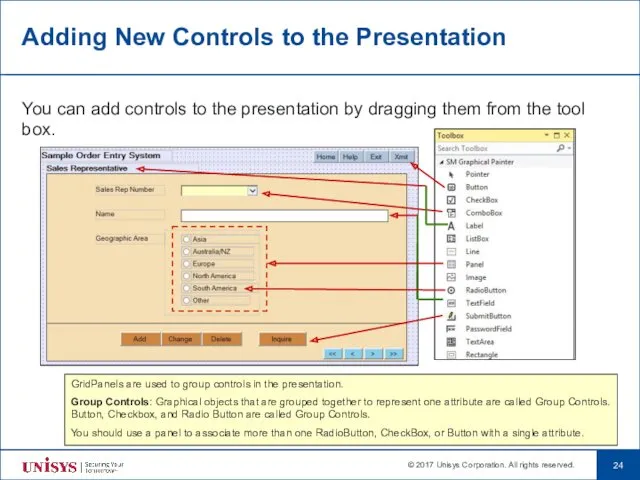
Adding New Controls to the Presentation
You can add controls to the
Adding New Controls to the Presentation
You can add controls to the
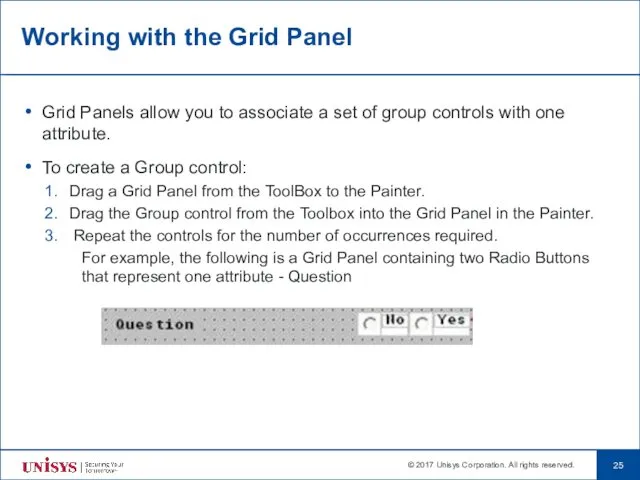
Working with the Grid Panel
Grid Panels allow you to associate a
Working with the Grid Panel
Grid Panels allow you to associate a
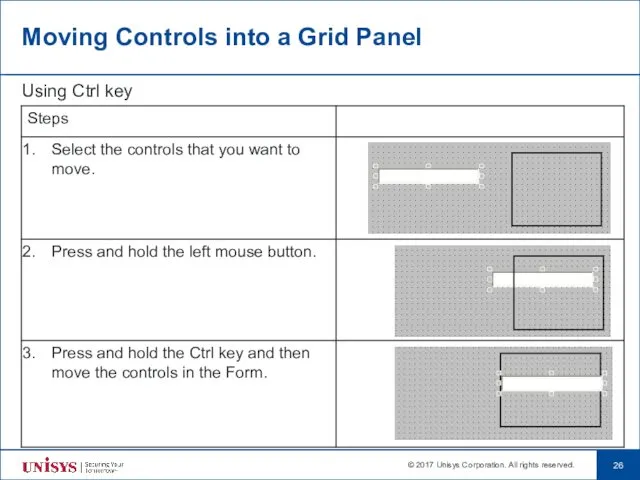
Moving Controls into a Grid Panel
Using Ctrl key
Moving Controls into a Grid Panel
Using Ctrl key
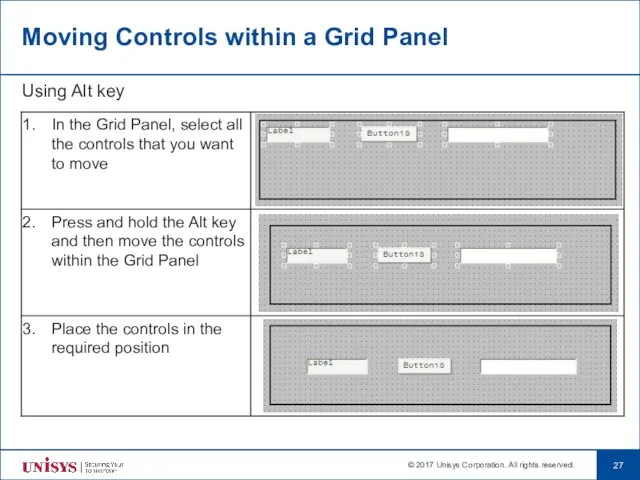
Moving Controls within a Grid Panel
Using Alt key
Moving Controls within a Grid Panel
Using Alt key
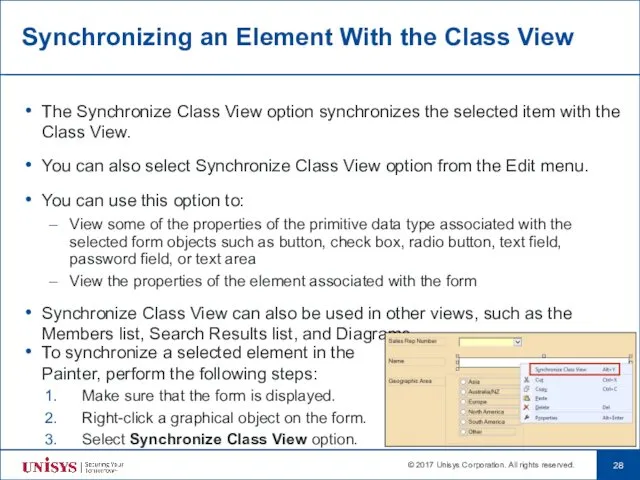
Synchronizing an Element With the Class View
The Synchronize Class View option
Synchronizing an Element With the Class View
The Synchronize Class View option
Generalization in Presentation
Generalization is an Object-Oriented concept that describes “is a”
Generalization in Presentation
Generalization is an Object-Oriented concept that describes “is a”
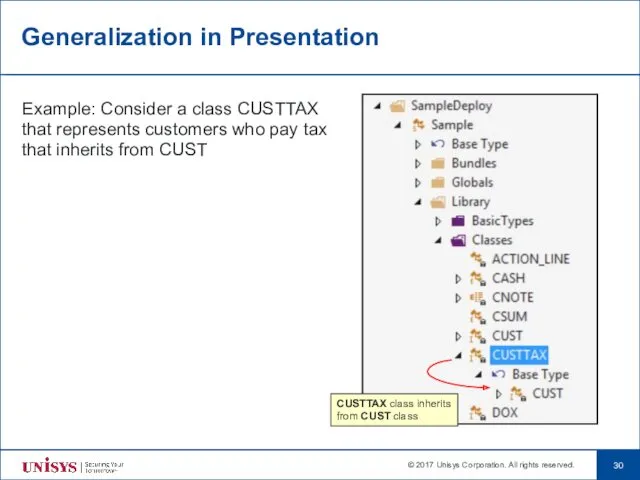
Generalization in Presentation
Example: Consider a class CUSTTAX that represents customers who
Generalization in Presentation
Example: Consider a class CUSTTAX that represents customers who
Generalization in Presentation
CUSTTAX class inherits presentation from the CUST class
Generalization in Presentation
CUSTTAX class inherits presentation from the CUST class

Composition in Presentation
Composition is an Object-Oriented concept that describes a relationship
Composition in Presentation
Composition is an Object-Oriented concept that describes a relationship
Composition in Presentation
Example: Consider the CUST class that has an attribute
Composition in Presentation
Example: Consider the CUST class that has an attribute
Composition in Presentation
CUST class inherits presentation from the ACTION_LINE class
Composition in Presentation
CUST class inherits presentation from the ACTION_LINE class
Logic Editor
Logic Editor
Logic Editor
The Logic Status tab displays the list of methods. Double
Logic Editor
The Logic Status tab displays the list of methods. Double

Logic Editor Highlights
Dynamic Validation
Immediately identify logic errors with the red squiggle
Quick
Logic Editor Highlights
Dynamic Validation
Immediately identify logic errors with the red squiggle
Quick
Logic Editor Settings
The Logic editor options can be set from the
Logic Editor Settings
The Logic editor options can be set from the
Class Diagrams
Class Diagrams
Class Diagrams
A diagrammatic representation of classes and their relationships.
In this class
Class Diagrams
A diagrammatic representation of classes and their relationships.
In this class
Class Diagram Editor
To create a class diagram:
Add a diagram to an
Class Diagram Editor
To create a class diagram:
Add a diagram to an
Modifying Class Specification
To modify class specifications:
In the Class Diagram editor, right-click
Modifying Class Specification
To modify class specifications:
In the Class Diagram editor, right-click
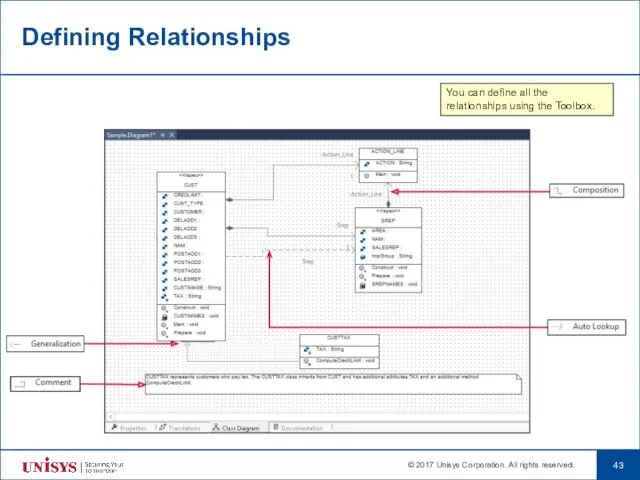
Defining Relationships
You can define all the relationships using the Toolbox.
Defining Relationships
You can define all the relationships using the Toolbox.
Reference Elements
Reference Elements
Reference Elements
A reference is used:
To display an attribute that cannot be
Reference Elements
A reference is used:
To display an attribute that cannot be
Reference Elements—Example
2. Set the Constraint property to SREP.NAM
1. Add a reference
Reference Elements—Example
2. Set the Constraint property to SREP.NAM
1. Add a reference
Reference Elements—Example
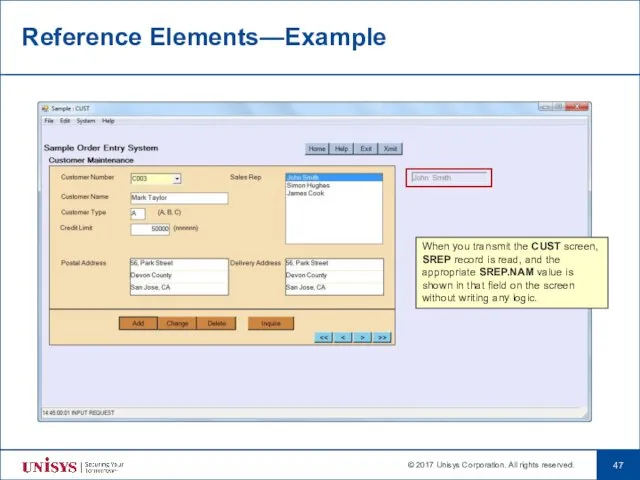
When you transmit the CUST screen, SREP record is read,
Reference Elements—Example
When you transmit the CUST screen, SREP record is read,

Developer Security
Developer Security
Developer Security
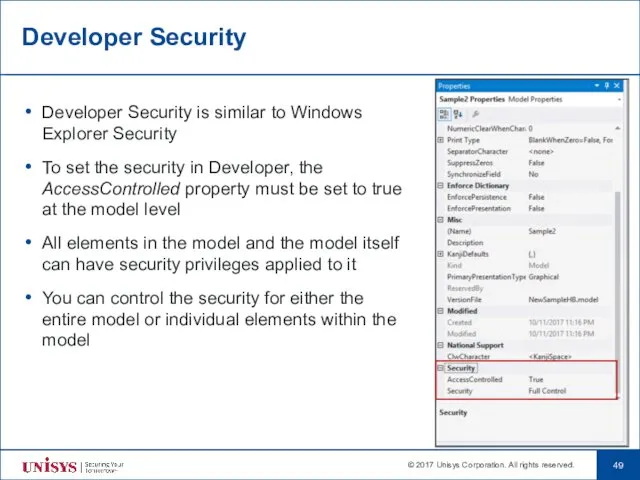
Developer Security is similar to Windows Explorer Security
To set the
Developer Security
Developer Security is similar to Windows Explorer Security
To set the
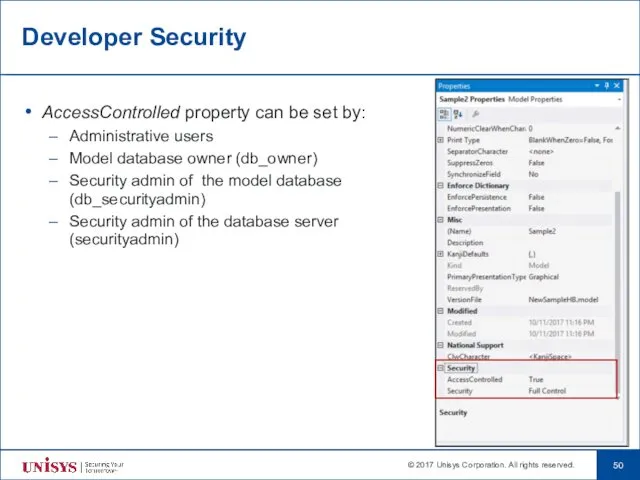
Developer Security
AccessControlled property can be set by:
Administrative users
Model database owner (db_owner)
Security
Developer Security
AccessControlled property can be set by:
Administrative users
Model database owner (db_owner)
Security
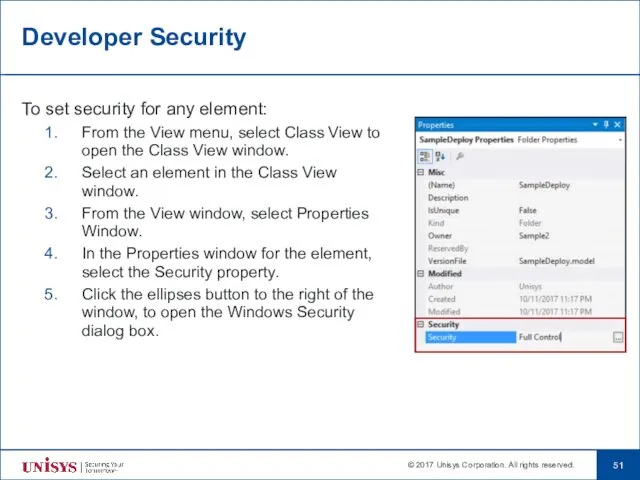
Developer Security
To set security for any element:
From the View menu, select
Developer Security
To set security for any element:
From the View menu, select
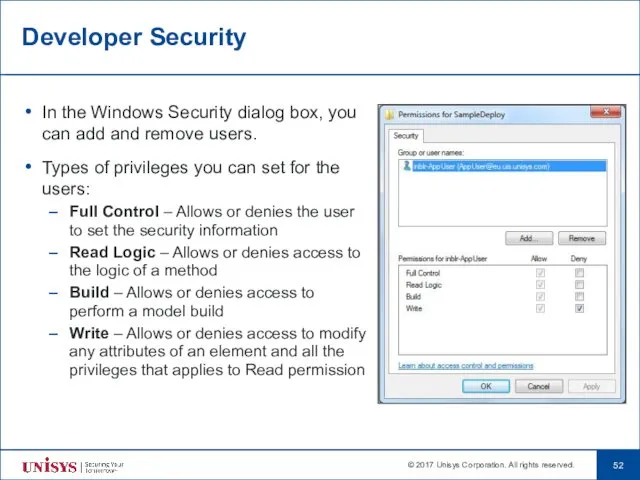
Developer Security
In the Windows Security dialog box, you can add and
Developer Security
In the Windows Security dialog box, you can add and
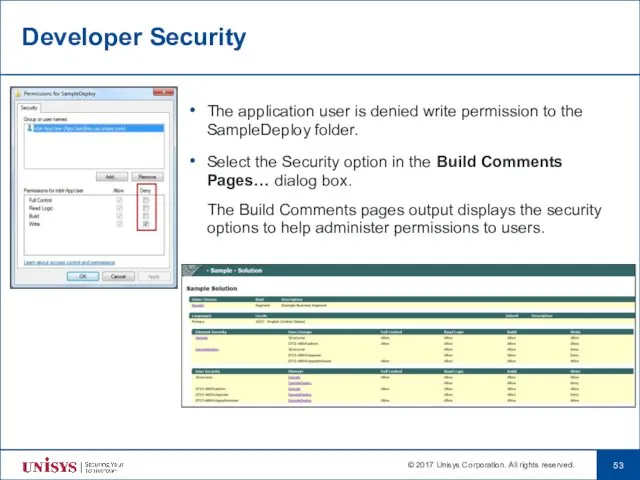
Developer Security
The application user is denied write permission to the SampleDeploy
Developer Security
The application user is denied write permission to the SampleDeploy

Documentation
Documentation
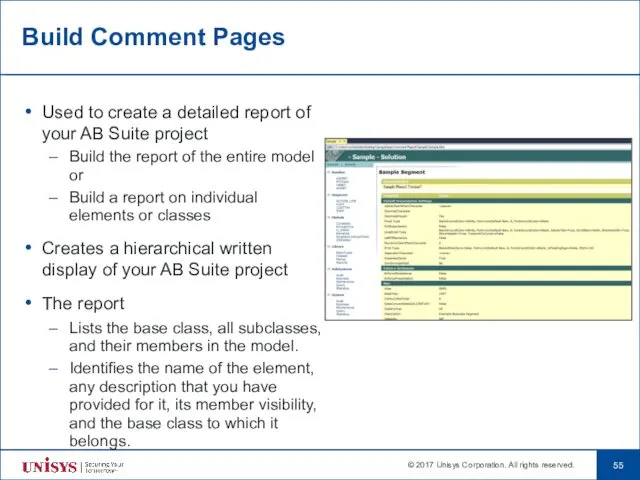
Build Comment Pages
Used to create a detailed report of your AB
Build Comment Pages
Used to create a detailed report of your AB
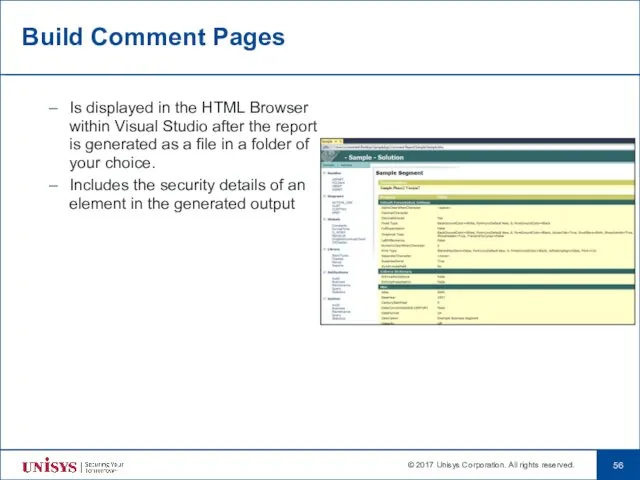
Build Comment Pages
Is displayed in the HTML Browser within Visual Studio
Build Comment Pages
Is displayed in the HTML Browser within Visual Studio
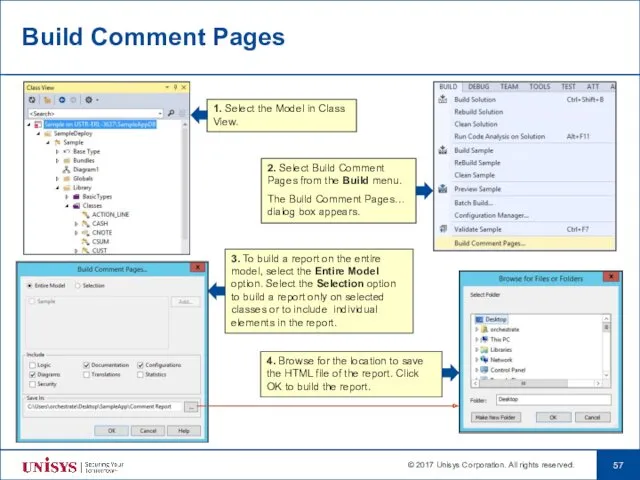
Build Comment Pages
1. Select the Model in Class View.
3. To build
Build Comment Pages
1. Select the Model in Class View.
3. To build
Product Documentation
Product Information
Developer CD
PI Only CD
Online Help
Unisys Support Web Site
Product Documentation
Product Information
Developer CD
PI Only CD
Online Help
Unisys Support Web Site
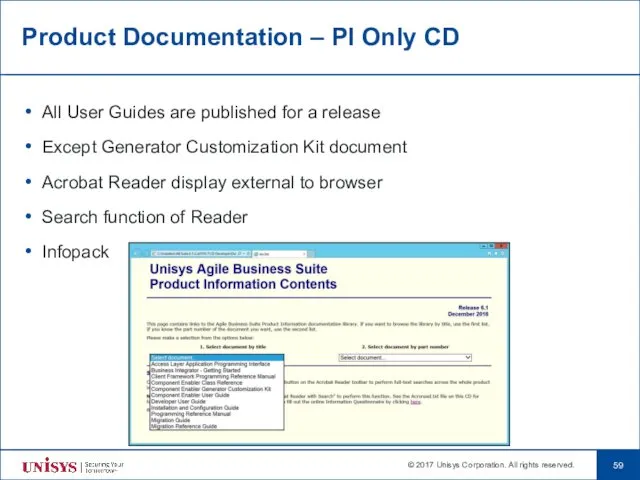
Product Documentation – PI Only CD
All User Guides are published for
Product Documentation – PI Only CD
All User Guides are published for
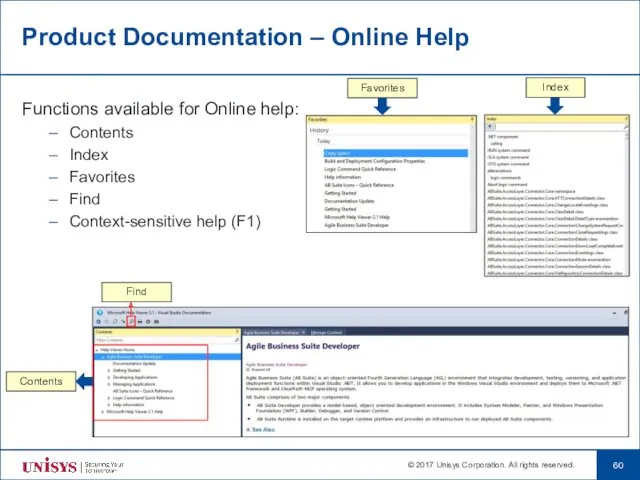
Product Documentation – Online Help
Functions available for Online help:
Contents
Index
Favorites
Find
Context-sensitive
Product Documentation – Online Help
Functions available for Online help:
Contents
Index
Favorites
Find
Context-sensitive
Readme Document
AB Suite Readme document is supplied with every release of
Readme Document
AB Suite Readme document is supplied with every release of
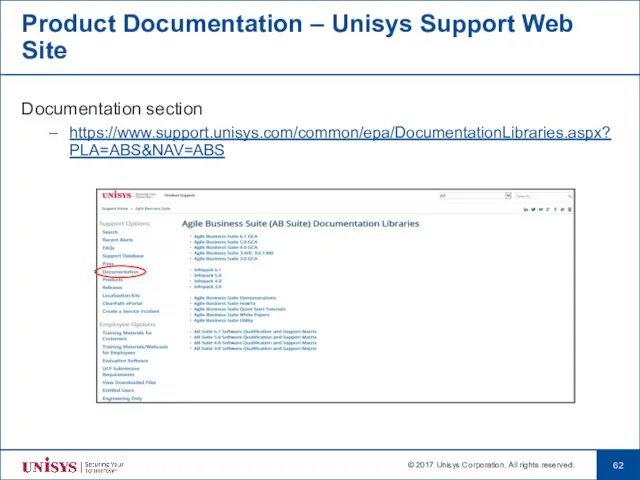
Product Documentation – Unisys Support Web Site
Documentation section
https://www.support.unisys.com/common/epa/DocumentationLibraries.aspx?PLA=ABS&NAV=ABS
Product Documentation – Unisys Support Web Site
Documentation section
https://www.support.unisys.com/common/epa/DocumentationLibraries.aspx?PLA=ABS&NAV=ABS
Working Efficiently with Your Model
Working Efficiently with Your Model
Working Efficiently with Your Model
Better ways to define:
Insertables
Group Attributes
Ispecs
Some points to
Working Efficiently with Your Model
Better ways to define:
Insertables
Group Attributes
Ispecs
Some points to
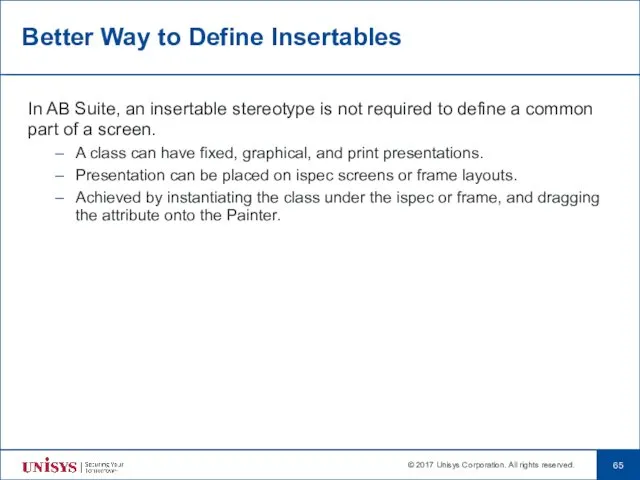
Better Way to Define Insertables
In AB Suite, an insertable stereotype is
Better Way to Define Insertables
In AB Suite, an insertable stereotype is
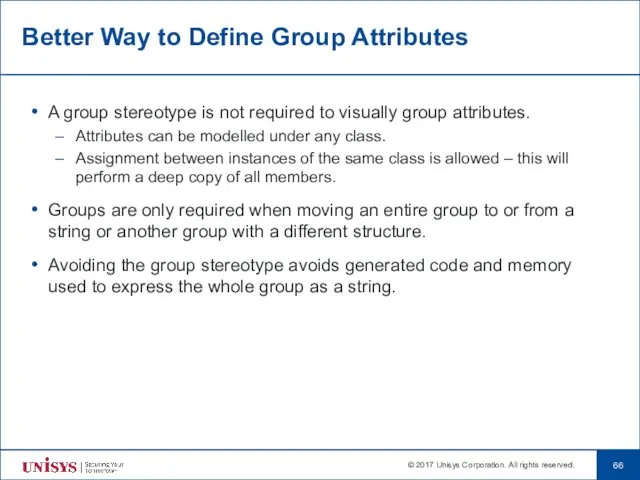
Better Way to Define Group Attributes
A group stereotype is not required
Better Way to Define Group Attributes
A group stereotype is not required
Better Way to Define Ispecs
In AB Suite, it is possible to
Better Way to Define Ispecs
In AB Suite, it is possible to
Better Way to Define Global Attributes
In AB Suite, you can avoid
Better Way to Define Global Attributes
In AB Suite, you can avoid
Points to remember...
Understand the structure of your model and identify the
Points to remember...
Understand the structure of your model and identify the
 Элективное занятие по информатике в 9 классе
 О браузерах в интернете
 SimCorp APL
 Социальная сеть, как основа современной культуры
 Типология современных радиостанций
 Об'єктно-орієнтований аналіз
 Формулы в электронных таблицах. Тест
 RAM, ROM and Virtual memory
 Четыре основных типа запросов данных в SQL
 Тема: Базы данных
 Сведения о языке программирования Паскаль
 Курс по основам программирования на Python. Функции
 Фриланс, как форма занятности
 Представление графической информации. Виды графики
 Защита информации в базах данных
 Виды профессиональной информационной деятельности человека с использованием технических средств и информационных ресурсов
 Техзадание к сайту
 Формализация понятия алгоритма
 Компьютерная графика. Борьба с шумом изображений. (Лекция 5)
 Безопасный интернет
 Браузер. Кем и когда создан
 Етапи побудови інформаційної моделі. Побудова інформаційних моделей. 7 клас
 Deployment techniques for LabVIEW™ Applications
 The Great Alone Audiobook for Free Download
 Разработка программного средства Портфолио студента
 Презентация Основы работы в векторном редакторе Corel Draw 11. Графические эффекты.
 Introduction to spring framework and dependency injection
 Безопасность в Интернете