- Introduction to Data Capture. Module 6

Содержание
- 2. Slide ● Module 6 -- Introduction to Data Capture Introduction to Data Capture Introduction to Data
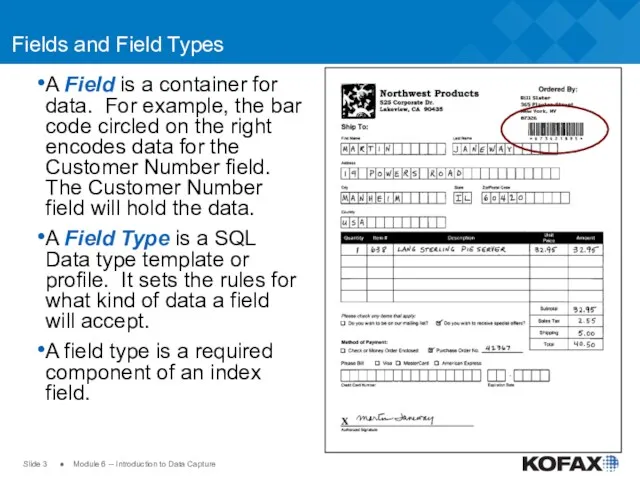
- 3. Slide ● Module 6 -- Introduction to Data Capture Fields and Field Types A Field is
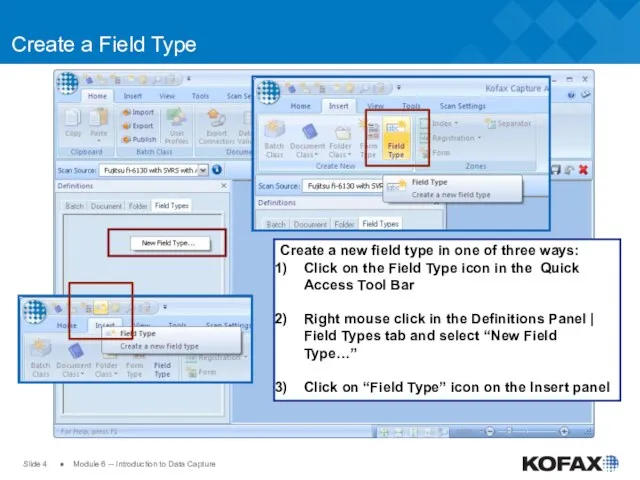
- 4. Slide ● Module 6 -- Introduction to Data Capture Create a Field Type Create a new
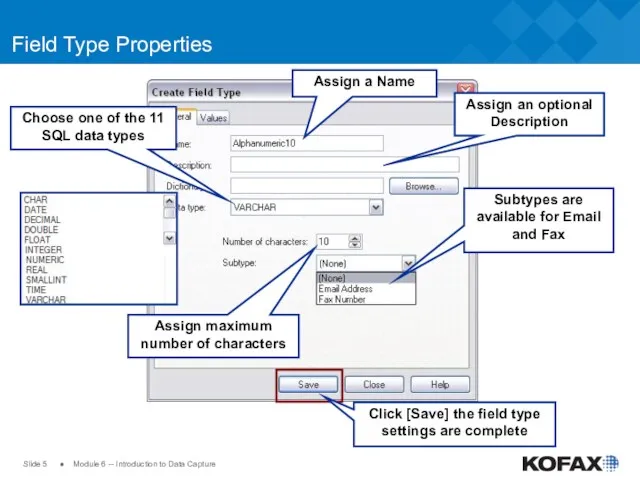
- 5. Slide ● Module 6 -- Introduction to Data Capture Field Type Properties Assign a Name Assign
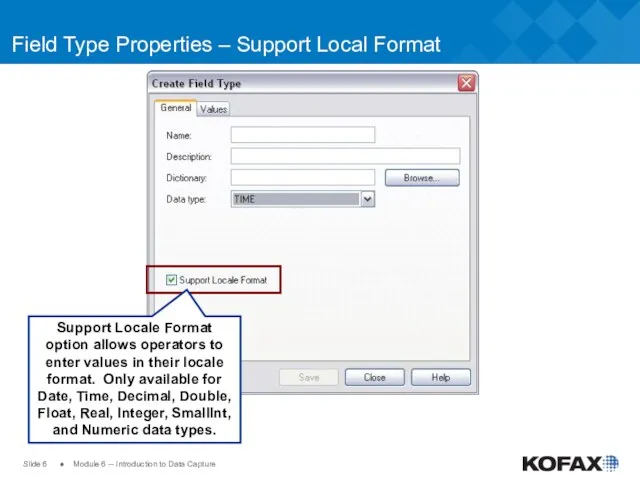
- 6. Slide ● Module 6 -- Introduction to Data Capture Field Type Properties – Support Local Format
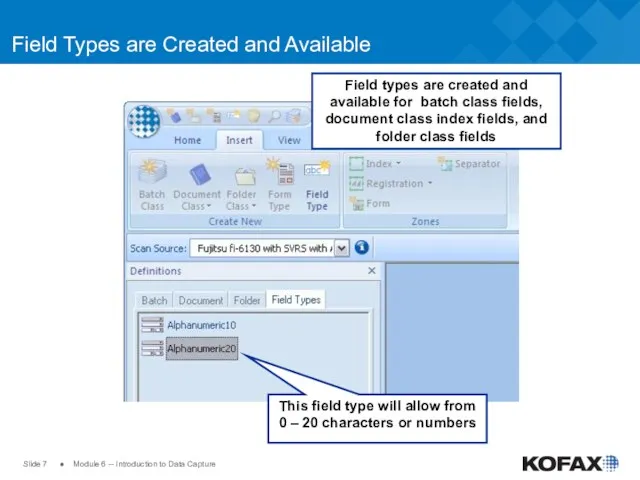
- 7. Slide ● Module 6 -- Introduction to Data Capture Field Types are Created and Available This
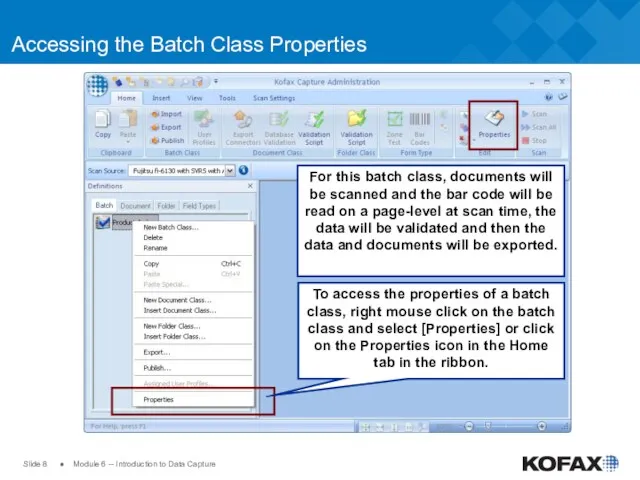
- 8. Slide ● Module 6 -- Introduction to Data Capture Accessing the Batch Class Properties To access
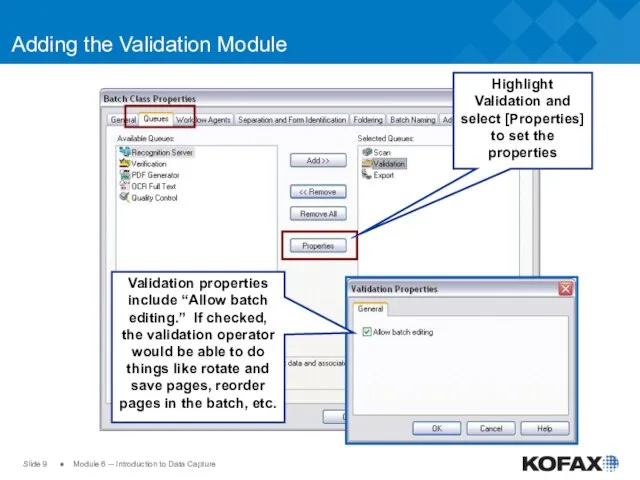
- 9. Slide ● Module 6 -- Introduction to Data Capture Adding the Validation Module Highlight Validation and
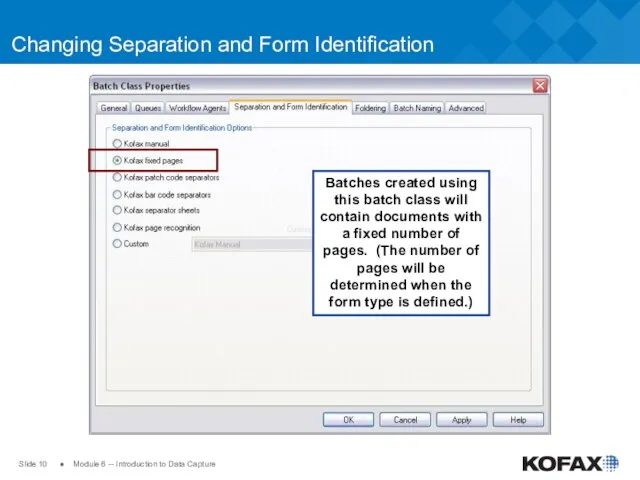
- 10. Slide ● Module 6 -- Introduction to Data Capture Changing Separation and Form Identification Batches created
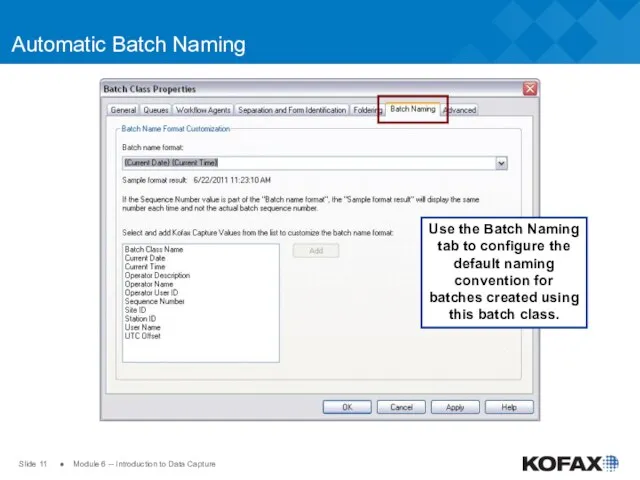
- 11. Slide ● Module 6 -- Introduction to Data Capture Automatic Batch Naming Use the Batch Naming
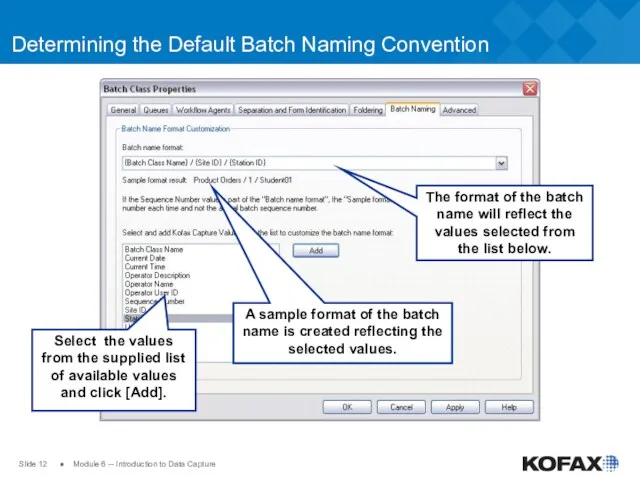
- 12. Slide ● Module 6 -- Introduction to Data Capture Determining the Default Batch Naming Convention A
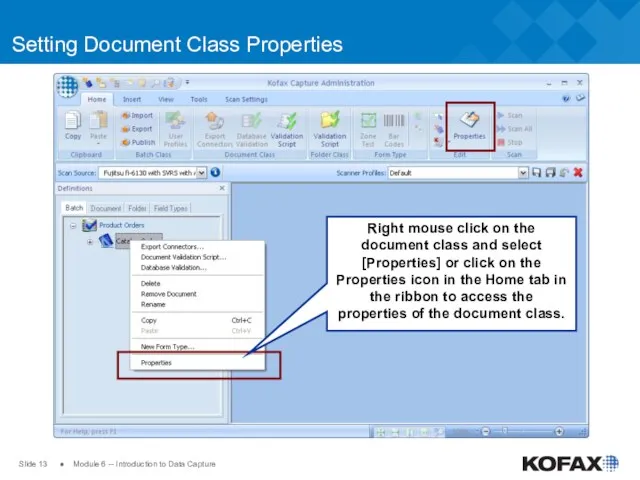
- 13. Slide ● Module 6 -- Introduction to Data Capture Setting Document Class Properties Right mouse click
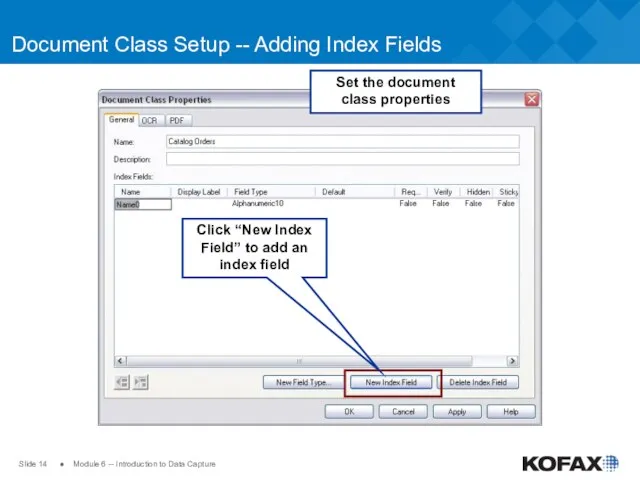
- 14. Slide ● Module 6 -- Introduction to Data Capture Document Class Setup -- Adding Index Fields
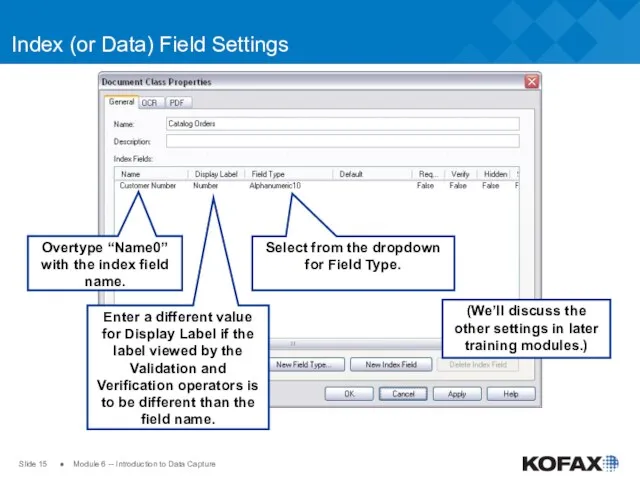
- 15. Slide ● Module 6 -- Introduction to Data Capture Index (or Data) Field Settings (We’ll discuss
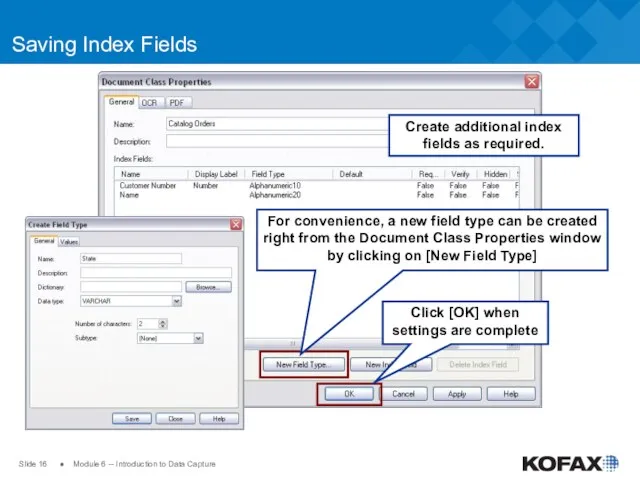
- 16. Slide ● Module 6 -- Introduction to Data Capture Saving Index Fields Click [OK] when settings
- 17. Slide ● Module 6 -- Introduction to Data Capture Adding Index Fields to the Export Connector
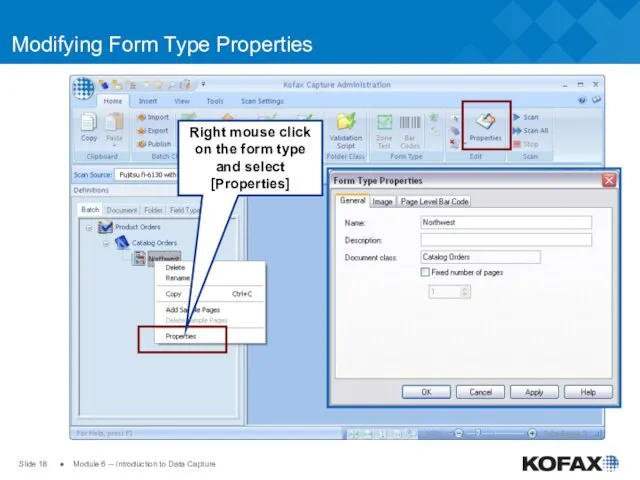
- 18. Slide ● Module 6 -- Introduction to Data Capture Modifying Form Type Properties Right mouse click
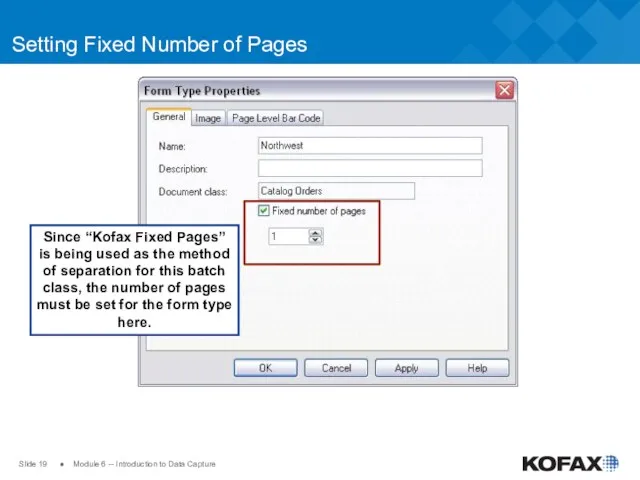
- 19. Slide ● Module 6 -- Introduction to Data Capture Setting Fixed Number of Pages Since “Kofax
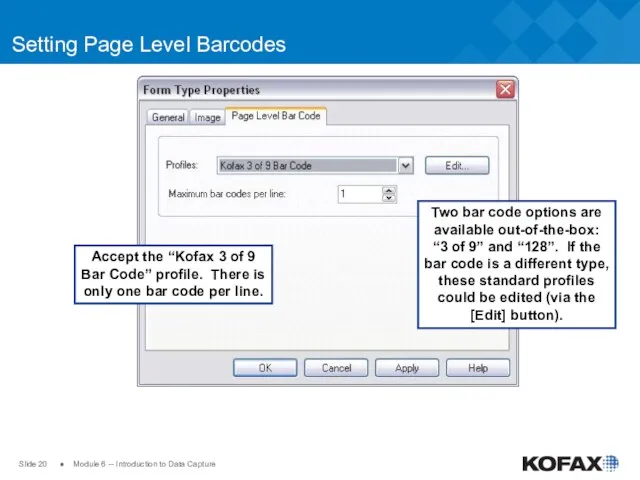
- 20. Slide ● Module 6 -- Introduction to Data Capture Setting Page Level Barcodes Accept the “Kofax
- 21. Slide ● Module 6 -- Introduction to Data Capture Sample Pages Kofax Capture uses template-based extraction.
- 22. Slide ● Module 6 -- Introduction to Data Capture Requirements and Guidelines for Sample Pages A
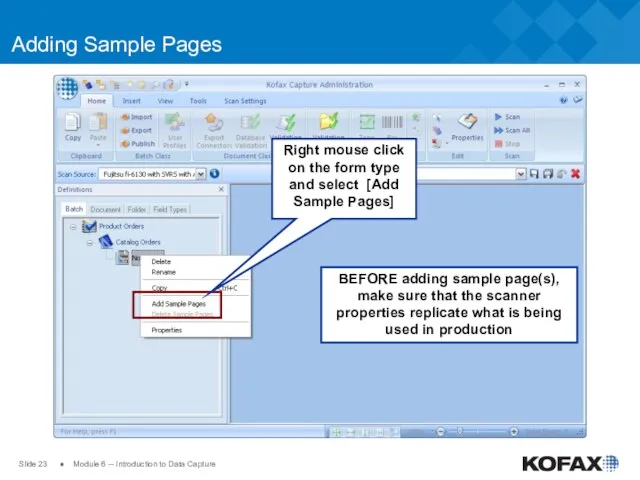
- 23. Slide ● Module 6 -- Introduction to Data Capture Adding Sample Pages BEFORE adding sample page(s),
- 24. Slide ● Module 6 -- Introduction to Data Capture Set Scanner Properties to Match Production REMEMBER:
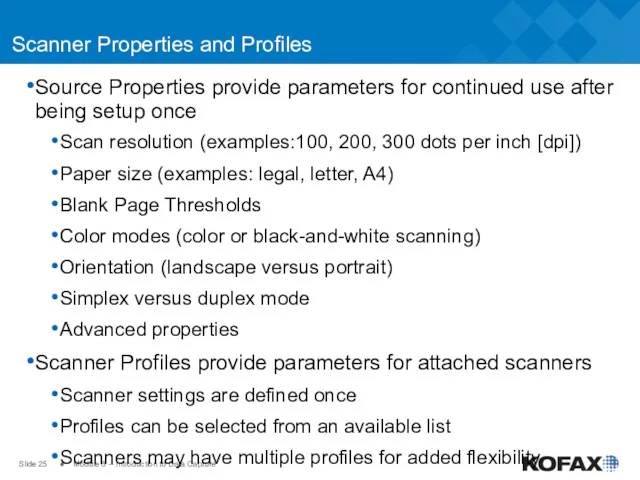
- 25. Slide ● Module 6 -- Introduction to Data Capture Scanner Properties and Profiles Source Properties provide
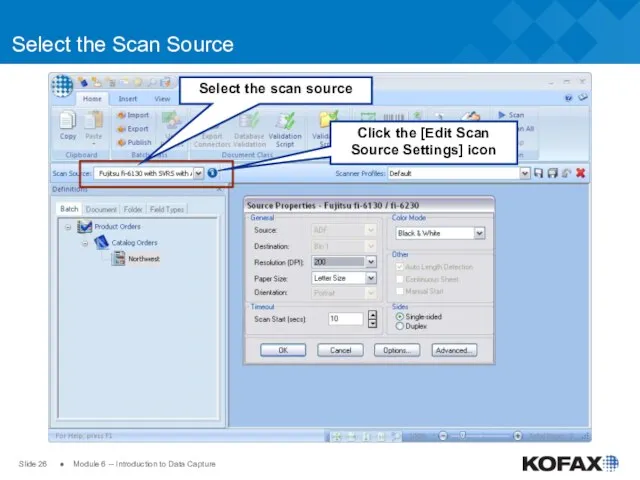
- 26. Slide ● Module 6 -- Introduction to Data Capture Select the Scan Source Click the [Edit
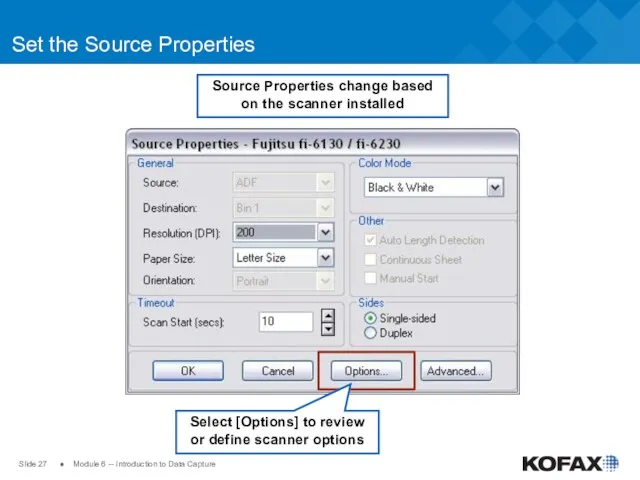
- 27. Slide ● Module 6 -- Introduction to Data Capture Set the Source Properties Source Properties change
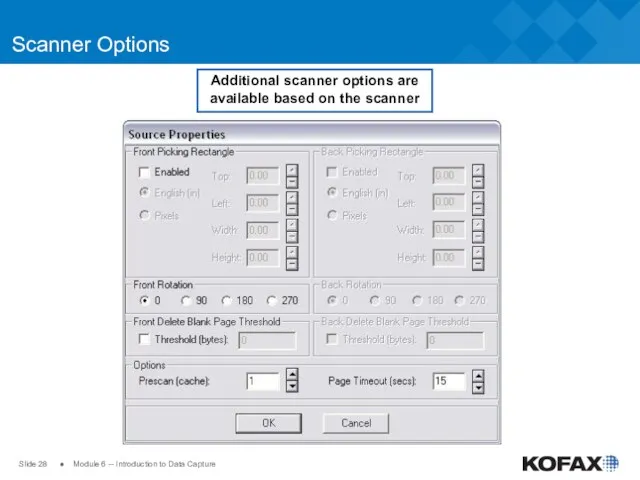
- 28. Slide ● Module 6 -- Introduction to Data Capture Scanner Options Additional scanner options are available
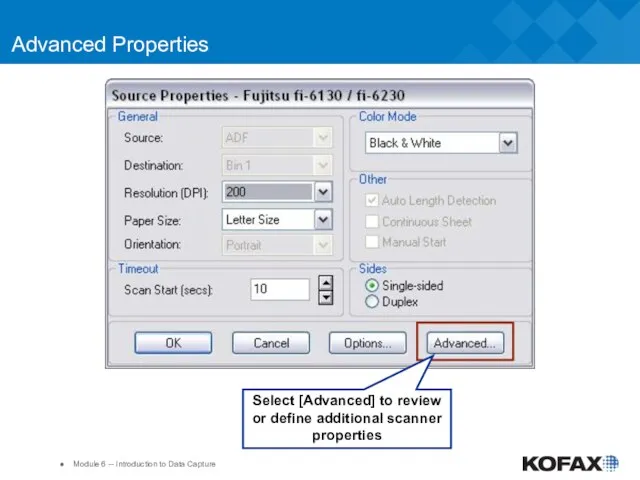
- 29. Slide ● Module 6 -- Introduction to Data Capture Advanced Properties Select [Advanced] to review or
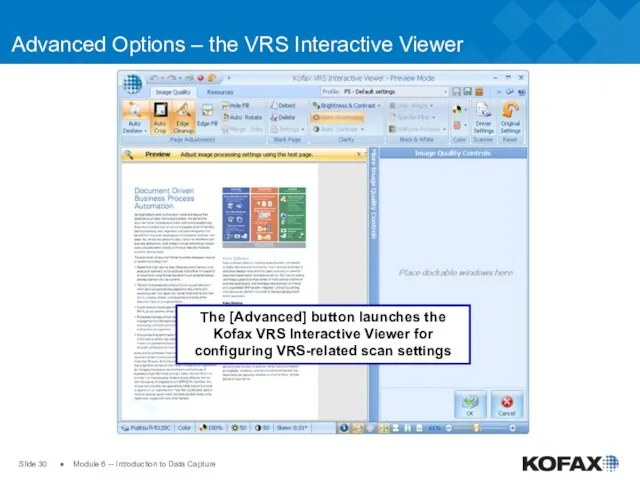
- 30. Slide ● Module 6 -- Introduction to Data Capture Advanced Options – the VRS Interactive Viewer
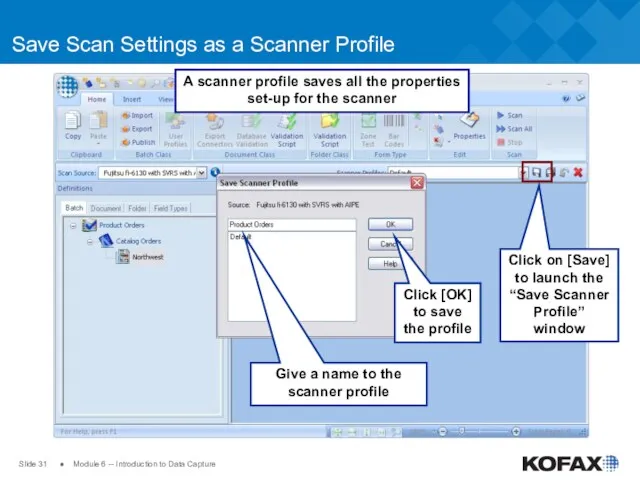
- 31. Slide ● Module 6 -- Introduction to Data Capture Save Scan Settings as a Scanner Profile
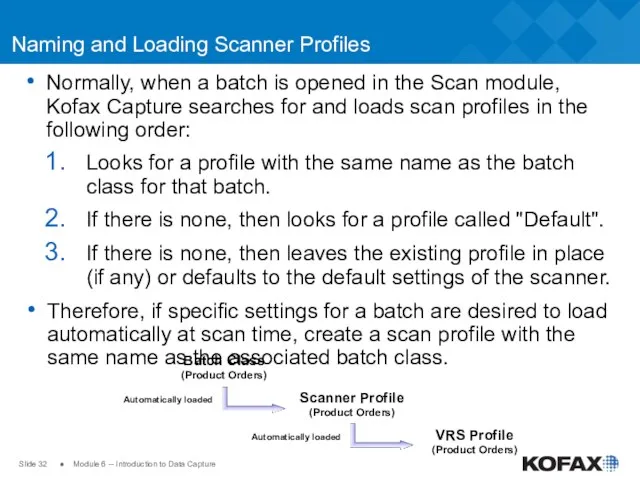
- 32. Slide ● Module 6 -- Introduction to Data Capture Naming and Loading Scanner Profiles Normally, when
- 33. Slide ● Module 6 -- Introduction to Data Capture Saved Scanner Profile Source Files Scanner profiles
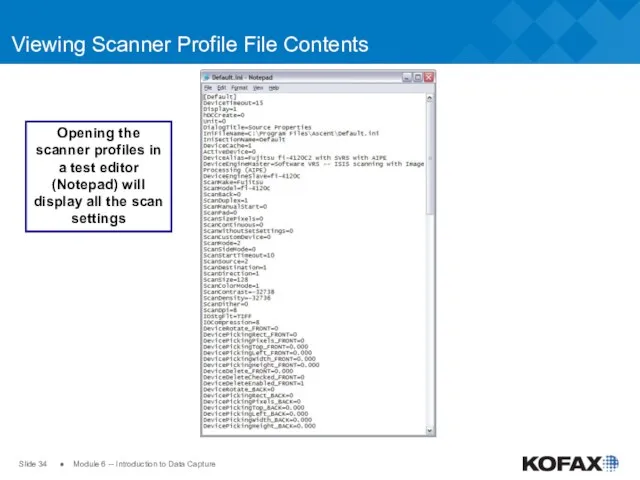
- 34. Slide ● Module 6 -- Introduction to Data Capture Viewing Scanner Profile File Contents Opening the
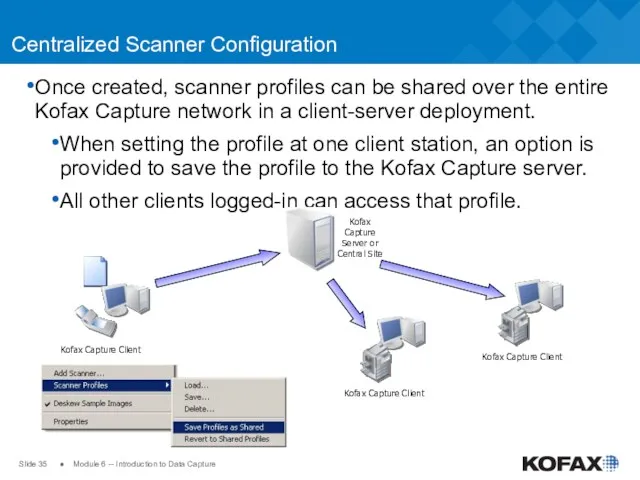
- 35. Slide ● Module 6 -- Introduction to Data Capture Centralized Scanner Configuration Once created, scanner profiles
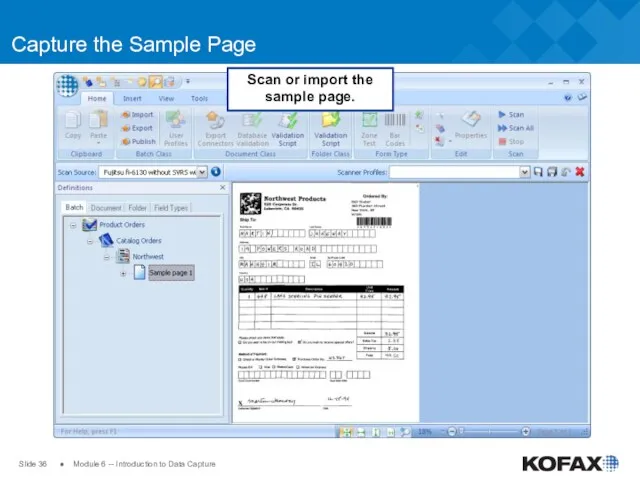
- 36. Slide ● Module 6 -- Introduction to Data Capture Capture the Sample Page Scan or import
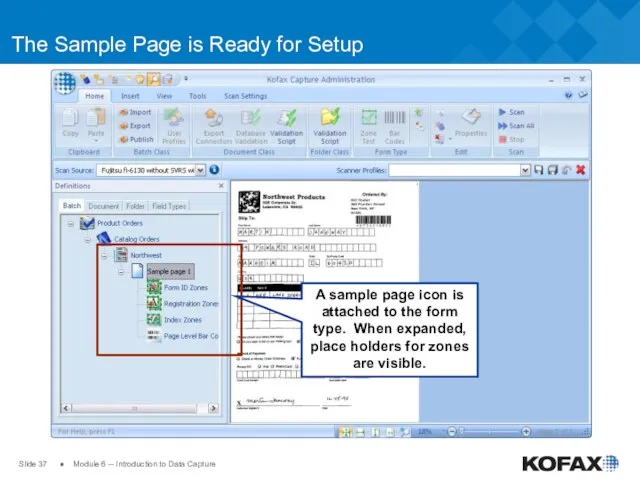
- 37. Slide ● Module 6 -- Introduction to Data Capture The Sample Page is Ready for Setup
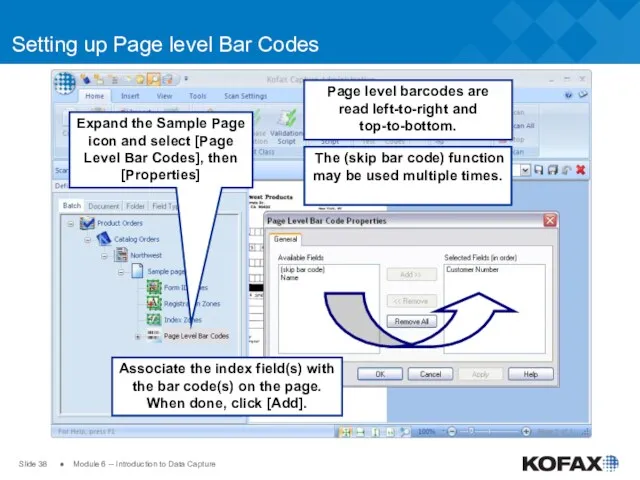
- 38. Slide ● Module 6 -- Introduction to Data Capture Setting up Page level Bar Codes Associate
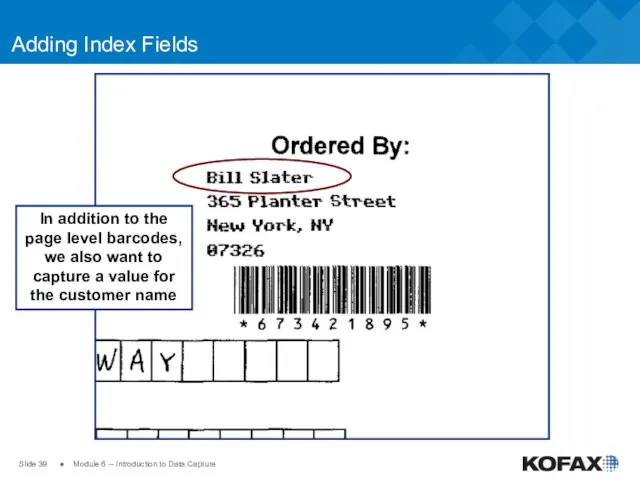
- 39. Slide ● Module 6 -- Introduction to Data Capture Adding Index Fields In addition to the
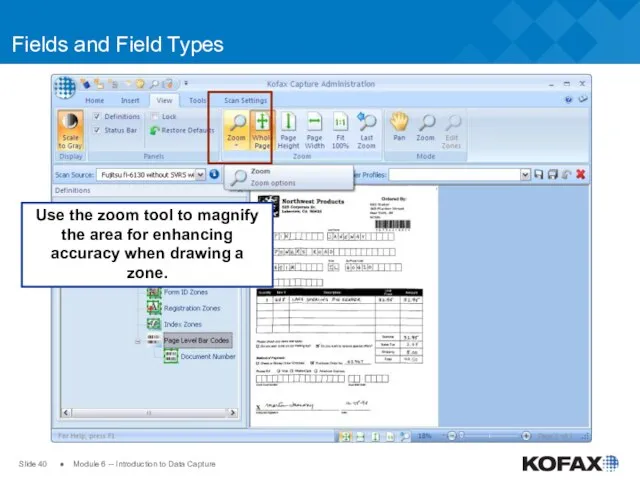
- 40. Slide ● Module 6 -- Introduction to Data Capture Fields and Field Types Use the zoom
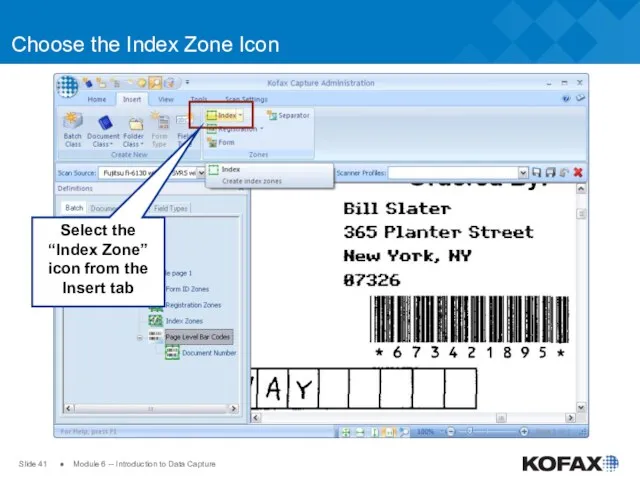
- 41. Slide ● Module 6 -- Introduction to Data Capture Choose the Index Zone Icon Select the
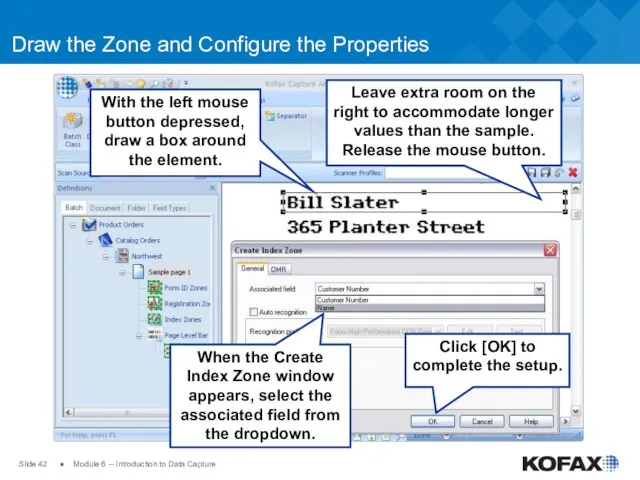
- 42. Slide ● Module 6 -- Introduction to Data Capture Draw the Zone and Configure the Properties
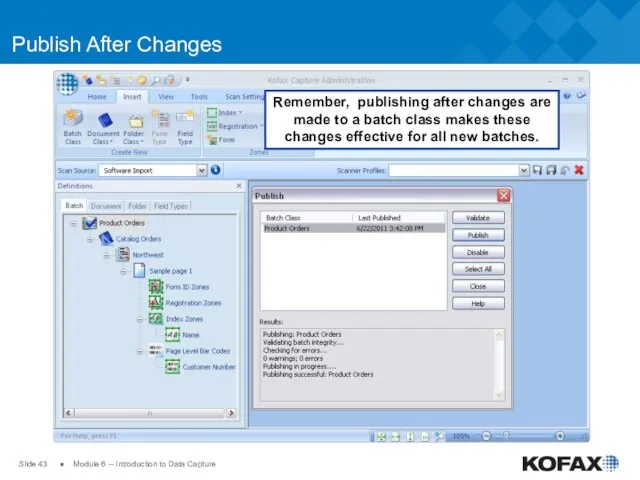
- 43. Slide ● Module 6 -- Introduction to Data Capture Publish After Changes Remember, publishing after changes
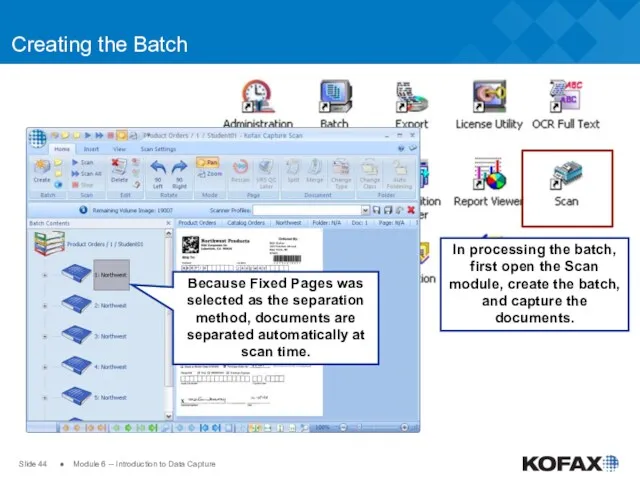
- 44. Slide ● Module 6 -- Introduction to Data Capture Creating the Batch Because Fixed Pages was
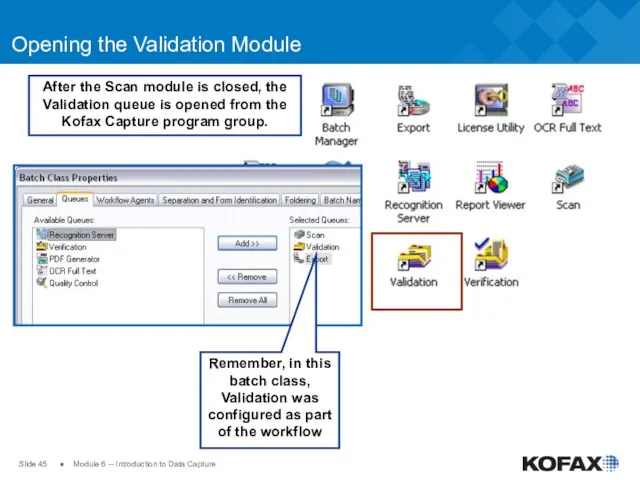
- 45. Slide ● Module 6 -- Introduction to Data Capture Opening the Validation Module After the Scan
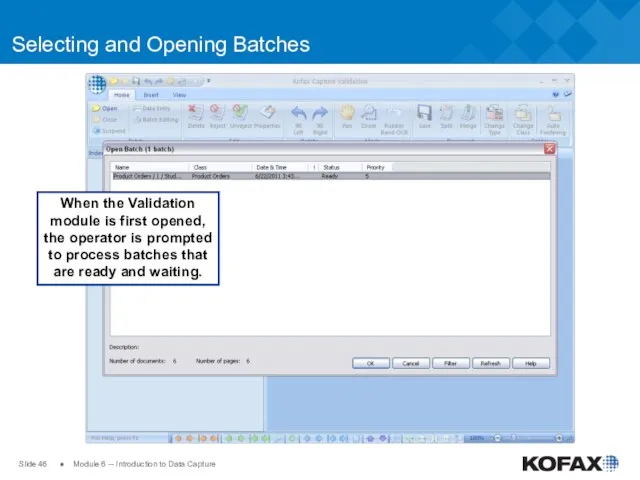
- 46. Slide ● Module 6 -- Introduction to Data Capture Selecting and Opening Batches When the Validation
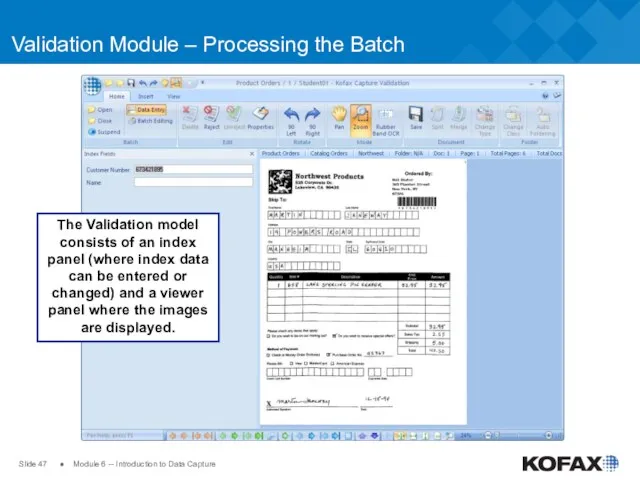
- 47. Slide ● Module 6 -- Introduction to Data Capture Validation Module – Processing the Batch The
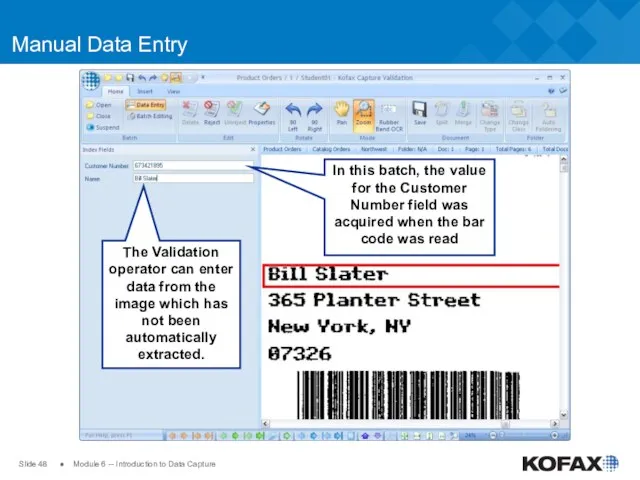
- 48. Slide ● Module 6 -- Introduction to Data Capture Manual Data Entry In this batch, the
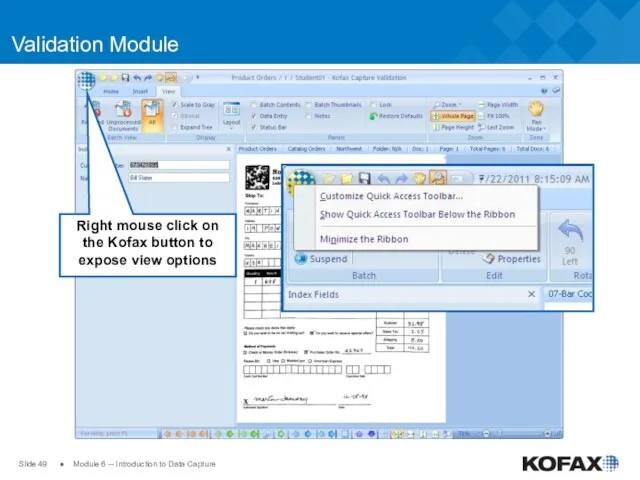
- 49. Slide ● Module 6 -- Introduction to Data Capture Validation Module Right mouse click on the
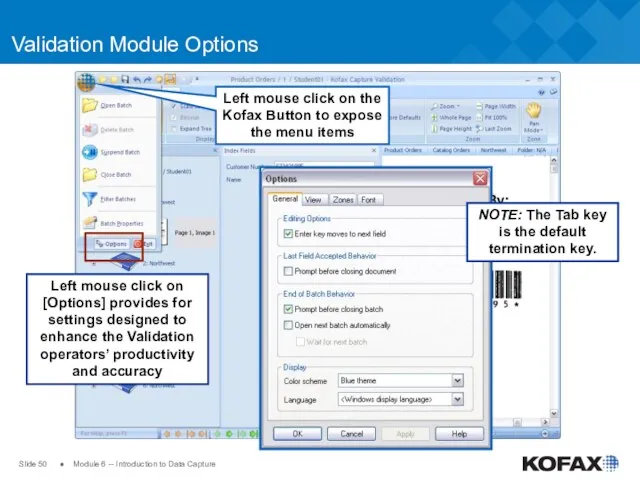
- 50. Slide ● Module 6 -- Introduction to Data Capture Validation Module Options Left mouse click on
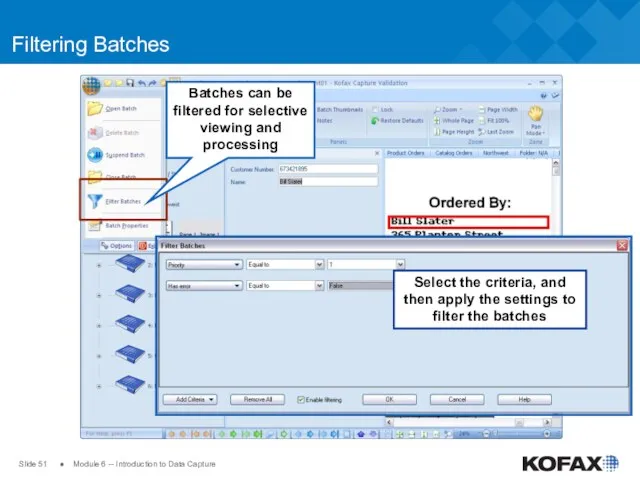
- 51. Slide ● Module 6 -- Introduction to Data Capture Filtering Batches Batches can be filtered for
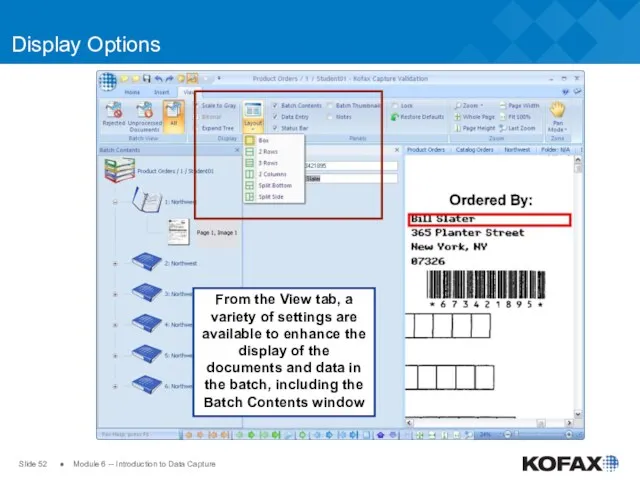
- 52. Slide ● Module 6 -- Introduction to Data Capture Display Options From the View tab, a
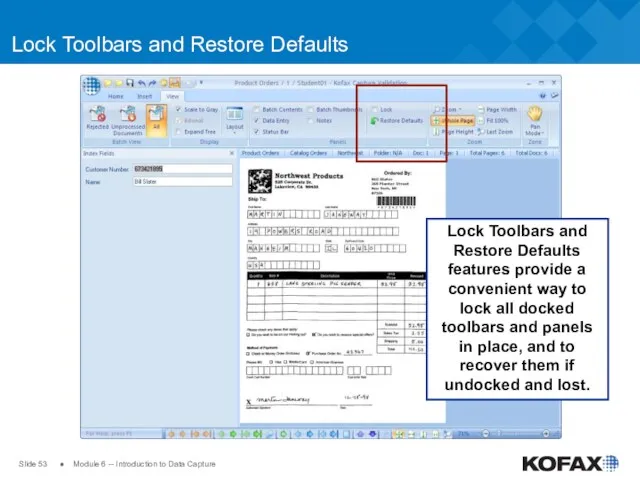
- 53. Slide ● Module 6 -- Introduction to Data Capture Lock Toolbars and Restore Defaults Lock Toolbars
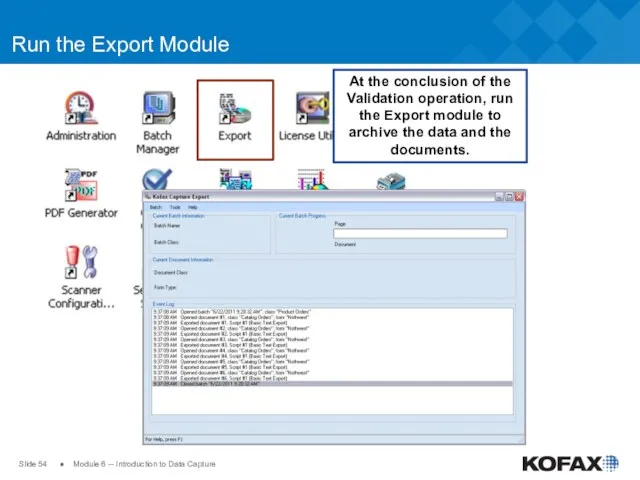
- 54. Slide ● Module 6 -- Introduction to Data Capture Run the Export Module At the conclusion
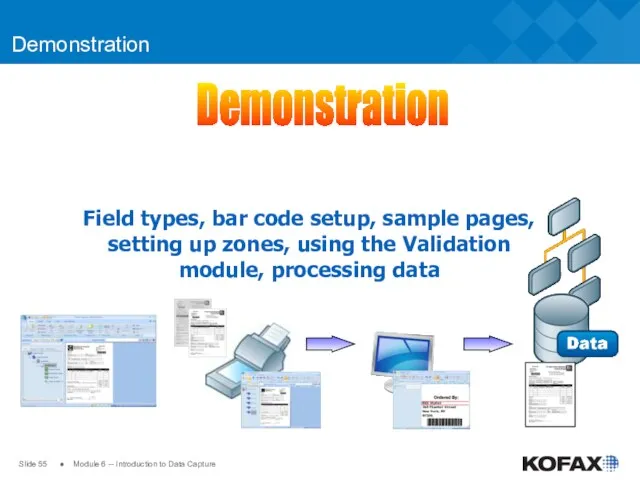
- 55. Slide ● Module 6 -- Introduction to Data Capture Demonstration Field types, bar code setup, sample
- 57. Скачать презентацию
Slide
● Module 6 -- Introduction to Data Capture
Introduction to Data
Slide
● Module 6 -- Introduction to Data Capture
Introduction to Data
Slide
● Module 6 -- Introduction to Data Capture
Fields and Field
Slide
● Module 6 -- Introduction to Data Capture
Fields and Field
Slide
● Module 6 -- Introduction to Data Capture
Create a Field
Slide
● Module 6 -- Introduction to Data Capture
Create a Field
Slide
● Module 6 -- Introduction to Data Capture
Field Type Properties
Assign
Slide
● Module 6 -- Introduction to Data Capture
Field Type Properties
Assign
Slide
● Module 6 -- Introduction to Data Capture
Field Type Properties
Slide
● Module 6 -- Introduction to Data Capture
Field Type Properties
Slide
● Module 6 -- Introduction to Data Capture
Field Types are
Slide
● Module 6 -- Introduction to Data Capture
Field Types are
Slide
● Module 6 -- Introduction to Data Capture
Accessing the Batch
Slide
● Module 6 -- Introduction to Data Capture
Accessing the Batch
Slide
● Module 6 -- Introduction to Data Capture
Adding the Validation
Slide
● Module 6 -- Introduction to Data Capture
Adding the Validation
Slide
● Module 6 -- Introduction to Data Capture
Changing Separation and
Slide
● Module 6 -- Introduction to Data Capture
Changing Separation and
Slide
● Module 6 -- Introduction to Data Capture
Automatic Batch Naming
Use
Slide
● Module 6 -- Introduction to Data Capture
Automatic Batch Naming
Use
Slide
● Module 6 -- Introduction to Data Capture
Determining the Default
Slide
● Module 6 -- Introduction to Data Capture
Determining the Default
Slide
● Module 6 -- Introduction to Data Capture
Setting Document Class
Slide
● Module 6 -- Introduction to Data Capture
Setting Document Class
Slide
● Module 6 -- Introduction to Data Capture
Document Class Setup
Slide
● Module 6 -- Introduction to Data Capture
Document Class Setup
Slide
● Module 6 -- Introduction to Data Capture
Index (or Data)
Slide
● Module 6 -- Introduction to Data Capture
Index (or Data)
Slide
● Module 6 -- Introduction to Data Capture
Saving Index Fields
Click
Slide
● Module 6 -- Introduction to Data Capture
Saving Index Fields
Click

Slide
● Module 6 -- Introduction to Data Capture
Adding Index Fields
Slide
● Module 6 -- Introduction to Data Capture
Adding Index Fields
Slide
● Module 6 -- Introduction to Data Capture
Modifying Form Type
Slide
● Module 6 -- Introduction to Data Capture
Modifying Form Type
Slide
● Module 6 -- Introduction to Data Capture
Setting Fixed Number
Slide
● Module 6 -- Introduction to Data Capture
Setting Fixed Number
Slide
● Module 6 -- Introduction to Data Capture
Setting Page Level
Slide
● Module 6 -- Introduction to Data Capture
Setting Page Level
Slide
● Module 6 -- Introduction to Data Capture
Sample Pages
Kofax Capture
Slide
● Module 6 -- Introduction to Data Capture
Sample Pages
Kofax Capture
Slide
● Module 6 -- Introduction to Data Capture
Requirements and Guidelines
Slide
● Module 6 -- Introduction to Data Capture
Requirements and Guidelines
Slide
● Module 6 -- Introduction to Data Capture
Adding Sample Pages
BEFORE
Slide
● Module 6 -- Introduction to Data Capture
Adding Sample Pages
BEFORE

Slide
● Module 6 -- Introduction to Data Capture
Set Scanner Properties
Slide
● Module 6 -- Introduction to Data Capture
Set Scanner Properties
Slide
● Module 6 -- Introduction to Data Capture
Scanner Properties and
Slide
● Module 6 -- Introduction to Data Capture
Scanner Properties and
Slide
● Module 6 -- Introduction to Data Capture
Select the Scan
Slide
● Module 6 -- Introduction to Data Capture
Select the Scan
Slide
● Module 6 -- Introduction to Data Capture
Set the Source
Slide
● Module 6 -- Introduction to Data Capture
Set the Source
Slide
● Module 6 -- Introduction to Data Capture
Scanner Options
Additional scanner
Slide
● Module 6 -- Introduction to Data Capture
Scanner Options
Additional scanner
Slide
● Module 6 -- Introduction to Data Capture
Advanced Properties
Select [Advanced]
Slide
● Module 6 -- Introduction to Data Capture
Advanced Properties
Select [Advanced]
Slide
● Module 6 -- Introduction to Data Capture
Advanced Options –
Slide
● Module 6 -- Introduction to Data Capture
Advanced Options –
Slide
● Module 6 -- Introduction to Data Capture
Save Scan Settings
Slide
● Module 6 -- Introduction to Data Capture
Save Scan Settings
Slide
● Module 6 -- Introduction to Data Capture
Naming and Loading
Slide
● Module 6 -- Introduction to Data Capture
Naming and Loading

Slide
● Module 6 -- Introduction to Data Capture
Saved Scanner Profile
Slide
● Module 6 -- Introduction to Data Capture
Saved Scanner Profile
Slide
● Module 6 -- Introduction to Data Capture
Viewing Scanner Profile
Slide
● Module 6 -- Introduction to Data Capture
Viewing Scanner Profile
Slide
● Module 6 -- Introduction to Data Capture
Centralized Scanner Configuration
Slide
● Module 6 -- Introduction to Data Capture
Centralized Scanner Configuration
Slide
● Module 6 -- Introduction to Data Capture
Capture the Sample
Slide
● Module 6 -- Introduction to Data Capture
Capture the Sample
Slide
● Module 6 -- Introduction to Data Capture
The Sample Page
Slide
● Module 6 -- Introduction to Data Capture
The Sample Page
Slide
● Module 6 -- Introduction to Data Capture
Setting up Page
Slide
● Module 6 -- Introduction to Data Capture
Setting up Page
Slide
● Module 6 -- Introduction to Data Capture
Adding Index Fields
In
Slide
● Module 6 -- Introduction to Data Capture
Adding Index Fields
In
Slide
● Module 6 -- Introduction to Data Capture
Fields and Field
Slide
● Module 6 -- Introduction to Data Capture
Fields and Field
Slide
● Module 6 -- Introduction to Data Capture
Choose the Index
Slide
● Module 6 -- Introduction to Data Capture
Choose the Index
Slide
● Module 6 -- Introduction to Data Capture
Draw the Zone
Slide
● Module 6 -- Introduction to Data Capture
Draw the Zone
Slide
● Module 6 -- Introduction to Data Capture
Publish After Changes
Remember,
Slide
● Module 6 -- Introduction to Data Capture
Publish After Changes
Remember,
Slide
● Module 6 -- Introduction to Data Capture
Creating the Batch
Because
Slide
● Module 6 -- Introduction to Data Capture
Creating the Batch
Because
Slide
● Module 6 -- Introduction to Data Capture
Opening the Validation
Slide
● Module 6 -- Introduction to Data Capture
Opening the Validation
Slide
● Module 6 -- Introduction to Data Capture
Selecting and Opening
Slide
● Module 6 -- Introduction to Data Capture
Selecting and Opening
Slide
● Module 6 -- Introduction to Data Capture
Validation Module –
Slide
● Module 6 -- Introduction to Data Capture
Validation Module –
Slide
● Module 6 -- Introduction to Data Capture
Manual Data Entry
In
Slide
● Module 6 -- Introduction to Data Capture
Manual Data Entry
In
Slide
● Module 6 -- Introduction to Data Capture
Validation Module
Right mouse
Slide
● Module 6 -- Introduction to Data Capture
Validation Module
Right mouse
Slide
● Module 6 -- Introduction to Data Capture
Validation Module Options
Left
Slide
● Module 6 -- Introduction to Data Capture
Validation Module Options
Left
Slide
● Module 6 -- Introduction to Data Capture
Filtering Batches
Batches can
Slide
● Module 6 -- Introduction to Data Capture
Filtering Batches
Batches can
Slide
● Module 6 -- Introduction to Data Capture
Display Options
From the
Slide
● Module 6 -- Introduction to Data Capture
Display Options
From the
Slide
● Module 6 -- Introduction to Data Capture
Lock Toolbars and
Slide
● Module 6 -- Introduction to Data Capture
Lock Toolbars and
Slide
● Module 6 -- Introduction to Data Capture
Run the Export
Slide
● Module 6 -- Introduction to Data Capture
Run the Export
Slide
● Module 6 -- Introduction to Data Capture
Demonstration
Field types, bar
Slide
● Module 6 -- Introduction to Data Capture
Demonstration
Field types, bar
 Файлы записей. Структуры данных. Лекция 4
 Администрирование информационных систем. Серверы имен. DNS, WINS
 Алгоритмы и исполнители. Основы алгоритмизации
 Базы данных. Система управления базами данных
 Растрові моделі даних
 Измерение информации. Кодирование информации
 Основні поняття реляційної моделі даних
 Алфавитный подход к измерению количества информации.
 Кодирование информации
 Виды баз данных
 По мотивам Python Tips, Tricks, and Hacks
 Документационное обеспечение управления
 Система защиты от DDoS атак на основе анализа логов
 Алгоритми з повторенням і розгалуженням. 7 клас. Урок №11
 Система делает возможным приобрести билеты на многие мероприятия на сайте
 Элементарное программирование
 Работа с таблицами в редакторе MS Word
 Algorithms and data structures. Lecture 6. Sorting
 Программирование (Python)
 Кодирование графической информации
 Лекция 2 по архитектуре компьютеров. Типы структур вычислительных машин
 Знакомство с JavaScript
 Измерение информации: вероятностный подход
 Язык программирования Pascal
 SWI Prolog Стандартные предикаты управления логическим выводом
 Жизненный цикл информационных систем
 Урок - КВН
 Виртуальный литературный навигатор