- Gold stock development

Содержание
- 2. Group Introduction Trainee Name Trainee Name Trainee Name Trainee Name Trainee Name Trainee Name Trainee Name
- 3. Objectives & Benefits After this training : You will understand : The G.O.L.D. architecture How G.O.L.D.
- 4. Pre-Requisites JAVA PRO*C Knowledge Software ADER (mandatory) Report Designer (mandatory) Eclipse (recommended) Crimson /Notepad++ / Ultra
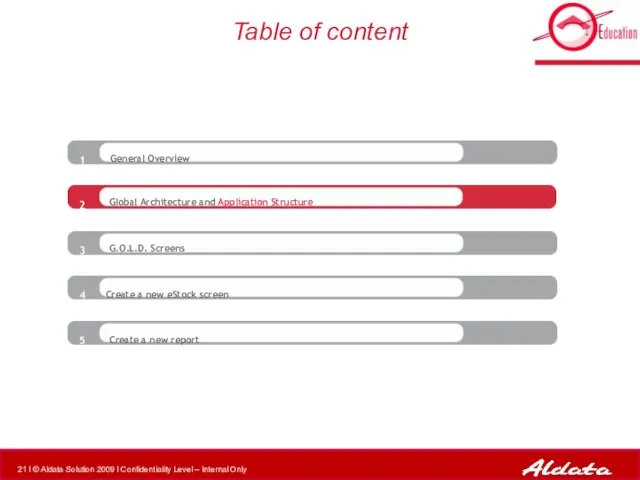
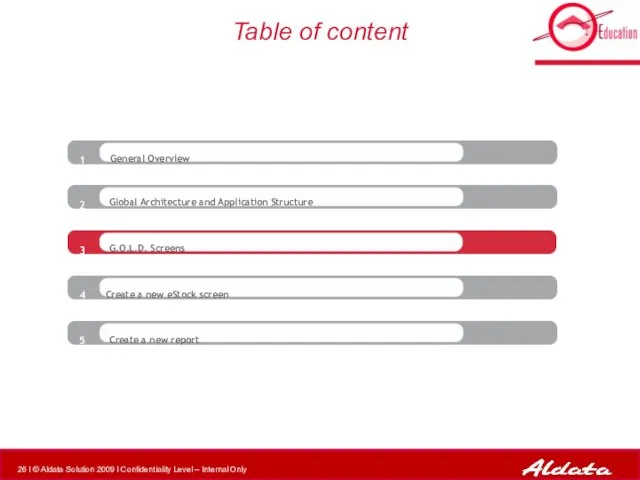
- 5. General Overview 1 2 3 Table of content 4 5 Global Architecture and Application Structure G.O.L.D.
- 6. General Overview : About G.O.L.D 1 2 3 Table of content 4 5 Global Architecture and
- 7. G.O.L.D. solution map : a reminder
- 8. G.O.L.D. Stock G.O.L.D. Stock is a set designed to control the following functions: the basic data
- 9. Interfacing G.O.L.D. Definition : G.O.L.D. can be interfaced with third party systems from which it can
- 10. General Overview : Development tools 1 2 3 Table of content 4 5 Global Architecture and
- 11. ADER ADER : is a small application developed by the Aldata R&D team is used to
- 12. Eclipse Java integrated development environment
- 13. Graphic Framework Documentation Graphic Framework Documentation (JavaDoc UI) is delivered in ZIP format contains the rules
- 14. Report Designer Report Designer : is a small application developed by the Aldata R&D team is
- 15. Setup server and database connection Install development tools (c:\sdt\) ADER REPORT DESIGNER Graphic Framework Documentation (JavaDoc
- 16. General Overview 1 2 3 Table of content 4 5 Global Architecture and Application Structure G.O.L.D.
- 17. A 3 tiers architecture G.O.L.D. is a 3 tiers architecture solution where : The G.O.L.D. clients
- 18. G.O.L.D. Modules managed eStock eRetail Adm Pda
- 19. eStock Application Client tier: data display, user events and controls of user interface. Java. Aldata graphical
- 20. Node_CEN GAIA G.O.L.D. Prod server Node_STK CEN Batch STK Batch Node_TEST GAIA G.O.L.D. Test server Node_LOAD
- 21. General Overview 1 2 3 Table of content 4 5 Global Architecture and Application Structure G.O.L.D.
- 22. Application Structure all batches and programs required by G.O.L.D. the communication framework of G.O.L.D. : G.A.I.A.
- 23. G.A.I.A.
- 24. Server Side
- 25. Client Side Report templates
- 26. General Overview 1 2 3 Table of content 4 5 Global Architecture and Application Structure G.O.L.D.
- 27. G.O.L.D. Screens ADER is used to create screens quickly and easily while maintaining a common look
- 28. Standard Screen Rules : A margin of 1 is set between the panels and the edges
- 29. Standard Screen : example b a c
- 30. Small Screen Rules : Adjust the size of the screen according to its content. By default:
- 31. Table Layout – 1/3 Standard Panel
- 32. Table Layout – 2/3 Modifiable Panel
- 33. Table Layout – 3/3 Button Panel (table + button on same panel) Button will be centered
- 34. Text Fields Text Fields : Height : 2 units. Plan enough space between the description and
- 35. Buttons and Checkboxes Buttons : Size of Panel : 4 units Height : 2 units Checkboxes
- 36. Field Descriptions Descriptions : Only the first word of the description has a capital letter. An
- 37. Layout The layout must be thought through so the tool stays user-friendly Fields must be vertically
- 38. Scheduling screen OISJEntete OISJToolbar OISJScreen
- 39. Scheduling screen OISJTabbedPane OISJPanel OISJPanel
- 40. Scheduling screen OISField OISJTable OISJLabel OISJButton
- 41. TS200_GOLDStockDevelopment_Exercises - 1 Log into G.O.L.D. Open screens and note the different types of layout Open
- 42. TS200_GOLDStockDevelopment_Exercises - 2 Add new column in the table (Add query field) EXERCISE: Modify screen
- 43. General Overview 1 2 3 Table of content 4 5 Global Architecture and Application Structure G.O.L.D.
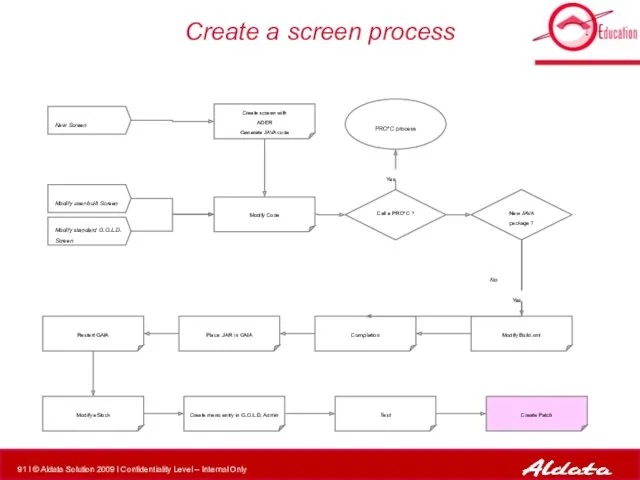
- 44. Create a screen process Modify Code PRO*C process New Screen Modify standard G.O.L.D. Screen Modify user-built
- 45. ADER ADER is used to create G.O.L.D. screens quickly and easily. Screens are developed using the
- 46. ADER process Create new project Create screen with ADER Generate JAVA code Set project properties Add
- 47. Create New Project By default, the SCREEN object is shown. It is the root panel, where
- 48. Available Components Decimal field (OISDecimalField) Numeric field (OISIntergerfield) Text field (OISStringField) Tabbed panel (OISJTabbedPane) Panel (OISJPANEL)
- 49. Available Components Text – multi-lines (OISJTextArea) Button (OISJButton) Time field (OISTimeField) Date field (OISDateField) Table (OISJTable)
- 50. Set Project Properties – 1/2 Name of the class package Name of the class JAVA screen
- 51. Set Project Properties – 1/2 What application will use the class (retail, stock) Link to a
- 52. Add Containers – 1/2 2 1 Define the size of the object. Define the component name.
- 53. Add Containers – 2/2 List of components in the screen Properties of selected component. 3 If
- 54. Add Comments
- 55. Adding components Select the container component 1 2 3 Select component type you want to add
- 56. Labels 4 If necessary, modify properties
- 57. Text Fields Should be controlled by checkListener Mandatory field Max number of characters in field UPPERCASE,
- 58. Lists of Values (LOV) Same properties as text field
- 59. Date Field
- 60. Table
- 61. Button Text on Button Button JAVA name (used by actionPerformed)
- 62. Delete a component clic 1 2 You can also Right-clic on object and delete
- 63. Create an image Use ADER to print mock-up. Tip ! Use image to get screen validated
- 64. Save Project Save project as .ADER before exporting so you can modify your screen if necessary.
- 65. JAVA Export Project properties must be set-up before export. If you forgot to set them up,
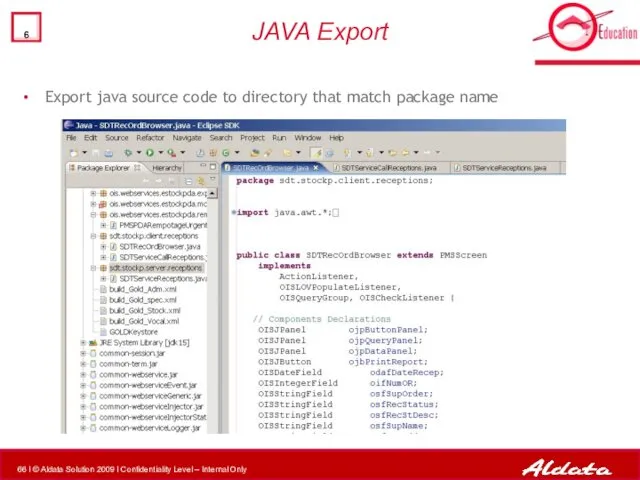
- 66. JAVA Export Export java source code to directory that match package name
- 67. Open the following file for more details on this exercise TS200_GOLDStockDevelopment_Exercises – 3 Launch Ader Set
- 68. Create a screen process Modify Code PRO*C process New Screen Modify standard G.O.L.D. Screen Modify user-built
- 69. Modify Code – Implement logic Replace hard coded labels getLabel(613,"Advanced Goods Receiving Note management") Add constraints
- 70. Modify Code – Service call Client Java screen Service call Server
- 71. Create a screen process Modify Code PRO*C process New Screen Modify standard G.O.L.D. Screen Modify user-built
- 72. Build.XML structure – 1/2 The file build.xml is used to compile JAR files Structure of build.xml
- 73. Build.XML structure – 2/2 The file build.xml is used to compile JAR files Structure of build.xml
- 74. Modify build.xml Create a new in build.xml when you create a new package Client Side Server
- 75. Create a screen process Modify Code PRO*C process New Screen Modify standard G.O.L.D. Screen Modify user-built
- 76. Compilation Connect to an Unix Compile (launch build.xml) ant [–f buildfile] Target_Name
- 77. Create a screen process Modify Code PRO*C process New Screen Modify standard G.O.L.D. Screen Modify user-built
- 78. Place .JAR files Client Side : $GOLD_HOME\gaia\deploy\DEFAULT\web\estock Server Side $GOLD_HOME\gaia\deploy\DEFAULT\resource\estock\lib
- 79. Create a screen process Modify Code PRO*C process New Screen Modify standard G.O.L.D. Screen Modify user-built
- 80. Restart GAIA Connect to an Unix and go to the GAIA folder with cd $GAIA_HOME show_gaia
- 81. Create a screen process Modify Code PRO*C process New Screen Modify standard G.O.L.D. Screen Modify user-built
- 82. Modify estock.html Add .jar call to eStock.html
- 83. Create a screen process Modify Code PRO*C process New Screen Modify standard G.O.L.D. Screen Modify user-built
- 84. Two ways to add menu entry : Manually (see next screen) SQL Create menu entry in
- 85. Create menu entry in G.O.L.D. 2 1 Folder under which the menu entry should appear
- 86. Create menu entry in G.O.L.D.
- 87. Create a screen process Modify Code PRO*C process New Screen Modify standard G.O.L.D. Screen Modify user-built
- 88. Test in G.O.L.D.
- 89. Test in G.O.L.D.
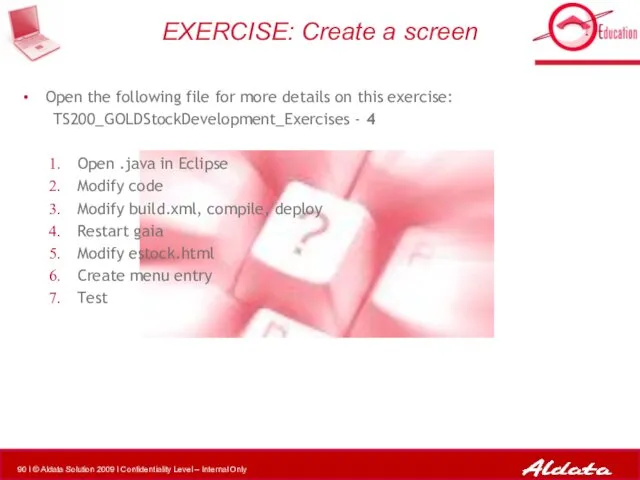
- 90. Open the following file for more details on this exercise: TS200_GOLDStockDevelopment_Exercises - 4 Open .java in
- 91. Create a screen process Modify Code PRO*C process New Screen Modify standard G.O.L.D. Screen Modify user-built
- 92. Patch Content The Patch is subdivided in following directories: /sql Contains SQL scripts for database modification,
- 93. According to what we have just seen, if you create a new screen for your client,
- 94. Create Patch Files you MUST add to patch after a screen was created : xxx.server.yyy.jar xxx.client.yyy.jar
- 95. General Overview 1 2 3 Table of content 4 5 Global Architecture and Application Structure G.O.L.D.
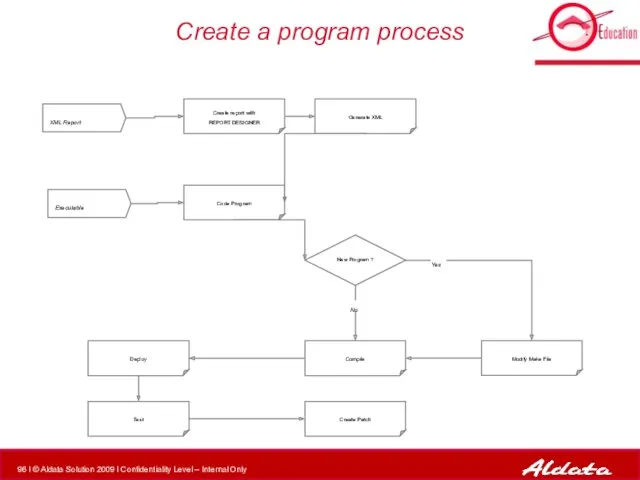
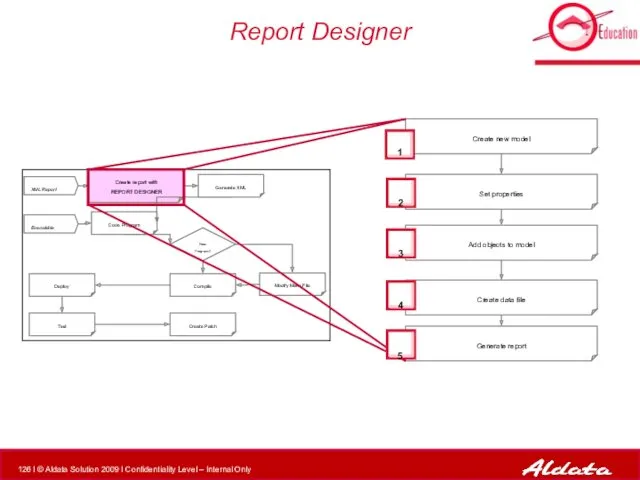
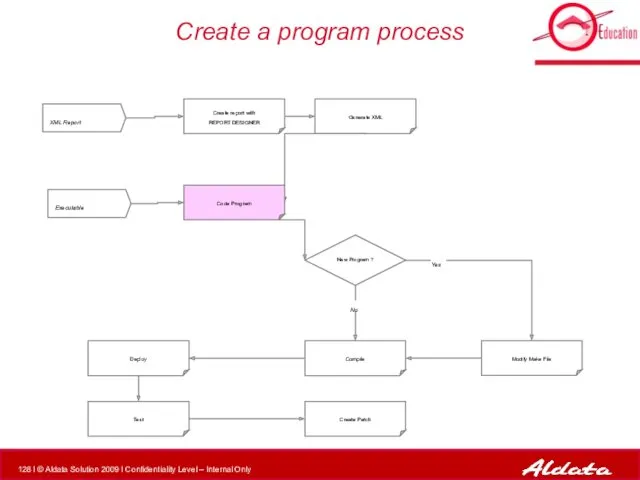
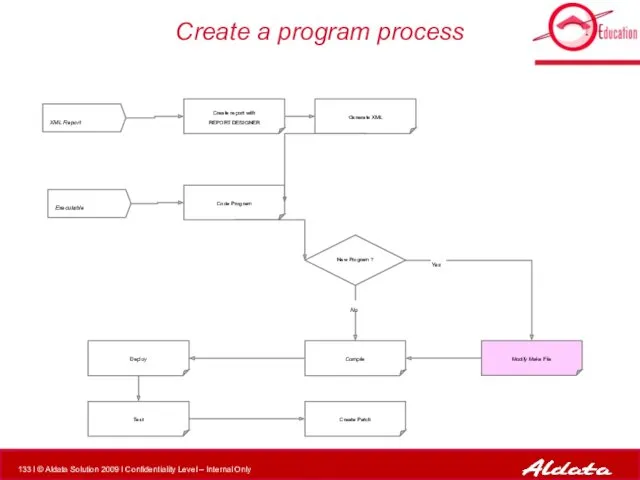
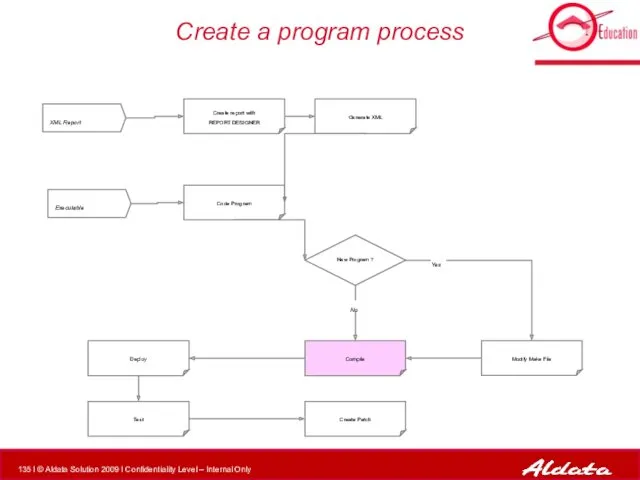
- 96. Create a program process XML Report Executable Modify Make File Compile New Program ? Create report
- 97. Report Generation The creation of a report consists of two steps: Program that provides the data
- 98. Report model XML language is used to describe the model. A model set is composed of
- 99. Report model templates Each model file contains the definition of several templates corresponding to a given
- 100. Report Designer Report Designer is a reporting tool 100% Java (Swing) use to publish reports into
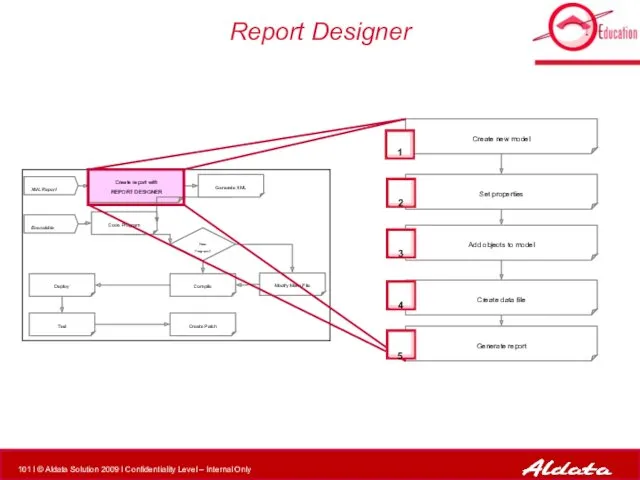
- 101. Report Designer Create report with REPORT DESIGNER XML Report Executable Modify Make File Compile New Program
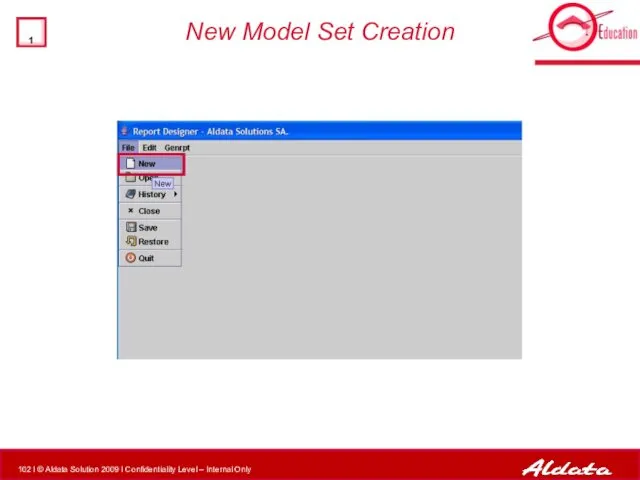
- 102. New Model Set Creation
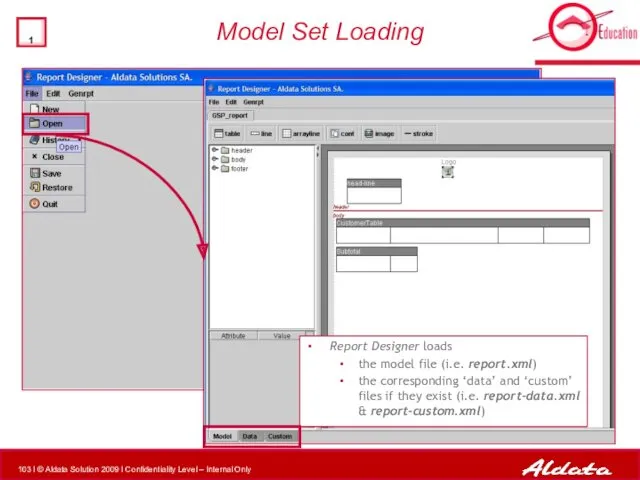
- 103. Model Set Loading Report Designer loads the model file (i.e. report.xml) the corresponding ‘data’ and ‘custom’
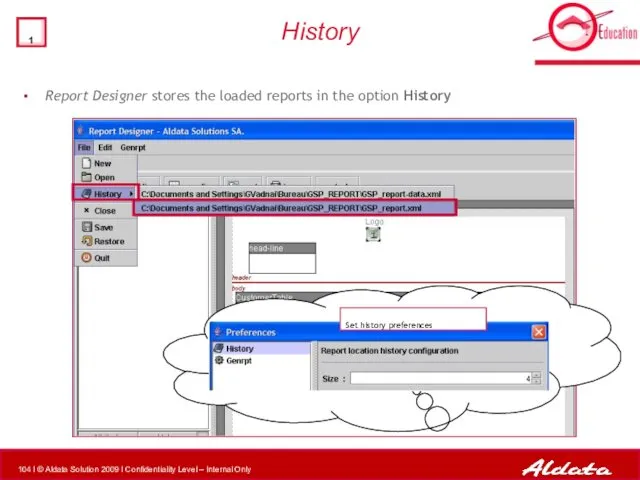
- 104. History Report Designer stores the loaded reports in the option History Set history preferences
- 105. Models All objects that are on the model set simple object (none for now) container that
- 106. Toolbar Move up/down the selected model in the model set add or remove a model to
- 107. Page Setup (Title Object) This object must absolutely be present in the model and set up
- 108. Set Genrpt properties complete path to the genrpt.exe program User/Password oracle for the connexion to the
- 109. Set environment variables Decimal separator ( '.' or ',') Date format : use same codes as
- 110. Add objects to model Simple objects that can be dragged and dropped to be included in
- 111. Properties common to all objects. Indicate if Generator should keep this block and the next one
- 112. Table Object Description numbers for the header. i.e. 172,223,1696,460 Size of each column. Alignment for each
- 113. Table Object Font size for characters. Possible values: 1, 2, 3, 4…11 (from the smallest to
- 114. Table Aspect Graphic aspect of the table. "gray" : highlight a line out of two "grid"
- 115. Table Aspect : examples Graphic aspect of the table. “gray” “gray” + “grid” Nothing “box” “box”
- 116. Line Object Object used to insert a line of text into a report and does not
- 117. Arrayline Object Arrayline objects are tables with non-homogeneous data. Some columns of the table may not
- 118. Container Object Objects cannot be aligned horizontally when using simple objects : you must use a
- 119. Image Object Object used to insert an image into a report and does not retrieve any
- 120. Stroke Object Object used to display an horizontal line in the document and does not retrieve
- 121. Create data file – 1/2 2 1 Auto-build is used to generate some test data Creating
- 122. Create data file – 2/2 Max number of characters for this field
- 123. Generate Report Pick Format
- 124. Preview Report Layout Modele Name=“title” Modele Name=“CustomerTable” Modele Name=“head-line” Modele Name=“Subtotal” Modele Name=“Logo” Modeles
- 125. Create a program process XML Report Executable Modify Make File Compile New Program ? Create report
- 126. Report Designer Create report with REPORT DESIGNER XML Report Executable Modify Make File Compile New Program
- 127. Open the following file for more details on this exercise: TS200_GOLDStockDevelopment_Exercises 5.Report Designer 1.1. Set preferences
- 128. Create a program process XML Report Executable Modify Make File Compile New Program ? Create report
- 129. Code report program In the program is implemented logic for report, report XML data generation Pro*C
- 130. Code report program Utility functions for WriteRow: char * DoubleToChar (arg1, arron) This function changes the
- 131. Open the following file for more details on this exercise: TS200_GOLDStockDevelopment_Exercises – 5, 6 Report designer
- 132. Open the following file for more details on this exercise: TS200_GOLDStockDevelopment_Exercises – 7 Review source code
- 133. Create a program process XML Report Executable Modify Make File Compile New Program ? Create report
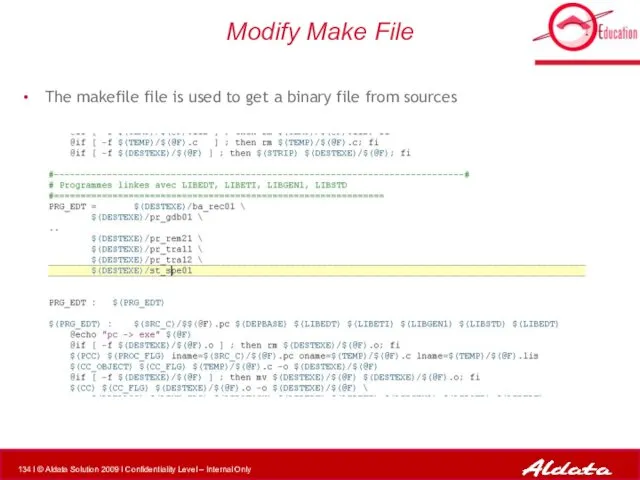
- 134. Modify Make File The makefile file is used to get a binary file from sources
- 135. Create a program process XML Report Executable Modify Make File Compile New Program ? Create report
- 136. Compilation The compilation, though one command is used, two compiles are done : Oracle Proc CC
- 137. Create a program process XML Report Executable Modify Make File Compile New Program ? Create report
- 138. Deploy and test Program/Batch $BIN ($GOLD_HOME\bin) Report XML Model $XML ($GOLD_HOME\gaia\deploy\DEFAULT\web\estock\xml) Test compiled binary from command
- 139. Open the following file for more details on this exercise: TS200_GOLDStockDevelopment_Exercises - 8 Customize report Alter
- 140. Open the following file for more details on this exercise: TS200_GOLDStockDevelopment_Exercises - 9 Design report template
- 141. Create a program process XML Report Executable Modify Make File Compile New Program ? Create report
- 142. Create Patch Files you MUST add to patch after a program was created : Binary files
- 143. TS200_GOLDStockDevelopment_Exercises - 10 If you create a new screen + report for your client, what will
- 144. Patch Content Previous’ page answers : xxx.server.yyy.jar xxx.client.yyy.jar estock.html prXXX modele.xml You could also need to
- 145. Questions?
- 146. Please complete the following quiz on the intranet: TS200_GOLDStockDevelopment_Quiz Quiz
- 148. Скачать презентацию

Group Introduction
Trainee Name
Trainee Name
Trainee Name
Trainee Name
Trainee Name
Trainee Name
Trainee Name
Trainee Name
Trainer Name,
Group Introduction
Trainee Name
Trainee Name
Trainee Name
Trainee Name
Trainee Name
Trainee Name
Trainee Name
Trainee Name
Trainer Name,
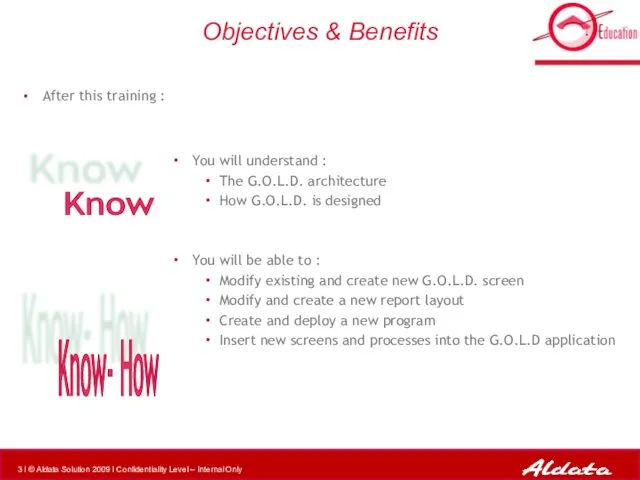
Objectives & Benefits
After this training :
You will understand :
The G.O.L.D. architecture
How
Objectives & Benefits
After this training :
You will understand :
The G.O.L.D. architecture
How
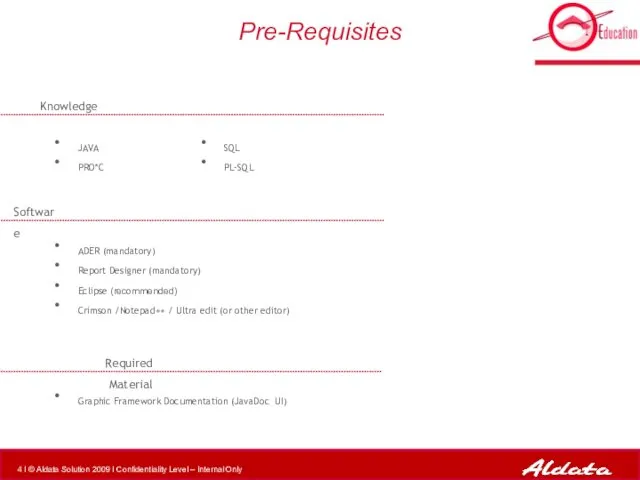
Pre-Requisites
JAVA
PRO*C
Knowledge
Software
ADER (mandatory)
Report Designer (mandatory)
Eclipse (recommended)
Crimson /Notepad++ / Ultra edit
Pre-Requisites
JAVA
PRO*C
Knowledge
Software
ADER (mandatory)
Report Designer (mandatory)
Eclipse (recommended)
Crimson /Notepad++ / Ultra edit
General Overview
1
2
3
Table of content
4
5
Global Architecture and Application Structure
G.O.L.D. Screens
Create
General Overview
1
2
3
Table of content
4
5
Global Architecture and Application Structure
G.O.L.D. Screens
Create
General Overview : About G.O.L.D
1
2
3
Table of content
4
5
Global Architecture and
General Overview : About G.O.L.D
1
2
3
Table of content
4
5
Global Architecture and
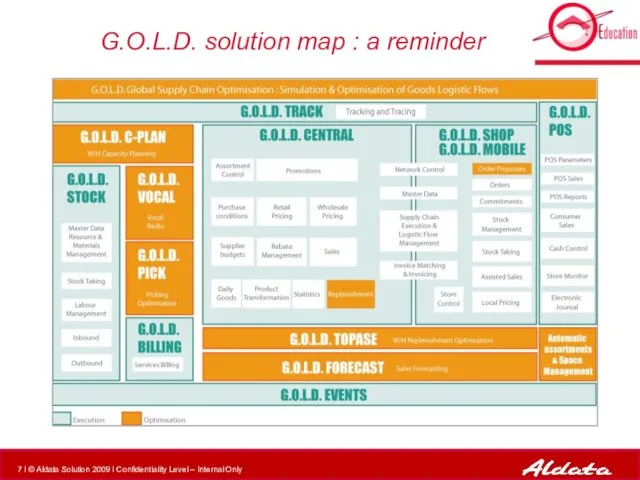
G.O.L.D. solution map : a reminder
G.O.L.D. solution map : a reminder
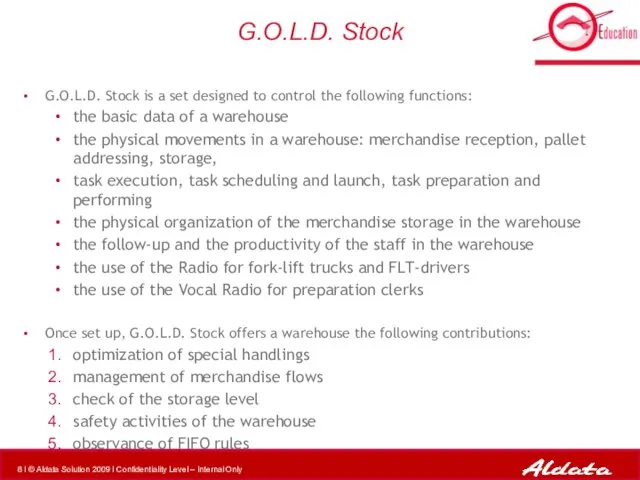
G.O.L.D. Stock
G.O.L.D. Stock is a set designed to control the following
G.O.L.D. Stock
G.O.L.D. Stock is a set designed to control the following
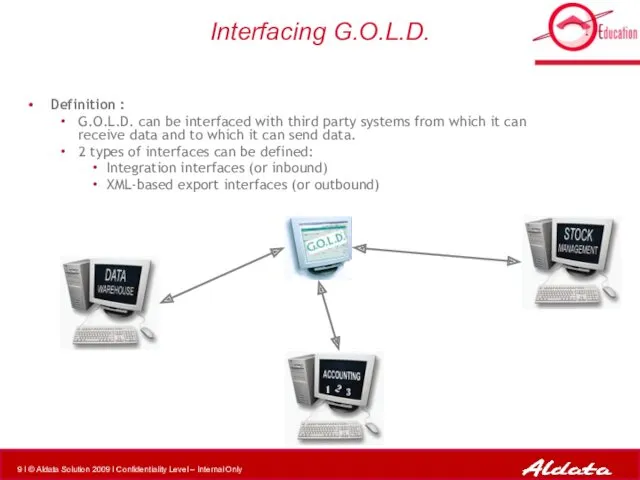
Interfacing G.O.L.D.
Definition :
G.O.L.D. can be interfaced with third party systems from
Interfacing G.O.L.D.
Definition :
G.O.L.D. can be interfaced with third party systems from
General Overview : Development tools
1
2
3
Table of content
4
5
Global Architecture and
General Overview : Development tools
1
2
3
Table of content
4
5
Global Architecture and
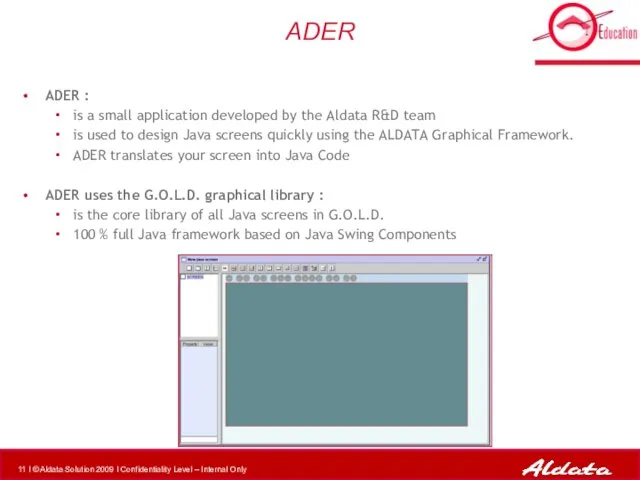
ADER
ADER :
is a small application developed by the Aldata R&D team
is
ADER
ADER :
is a small application developed by the Aldata R&D team
is
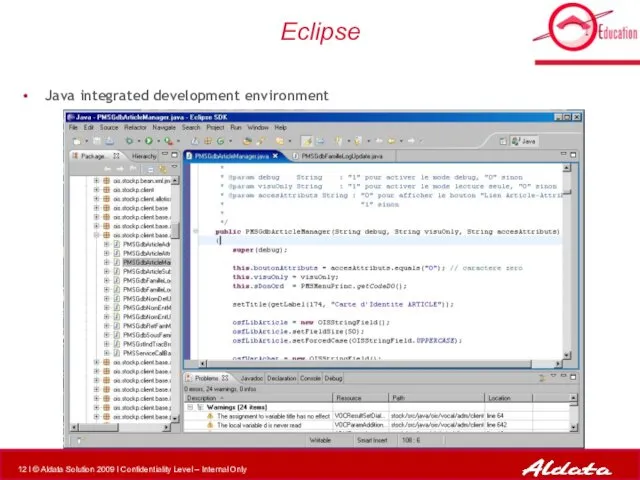
Eclipse
Java integrated development environment
Eclipse
Java integrated development environment
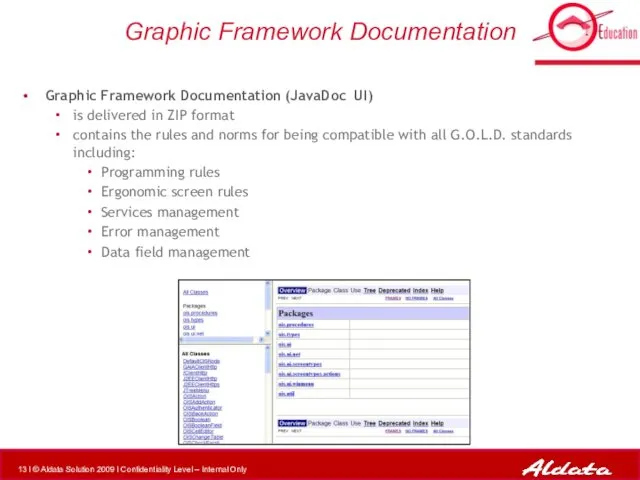
Graphic Framework Documentation
Graphic Framework Documentation (JavaDoc UI)
is delivered in ZIP format
Graphic Framework Documentation
Graphic Framework Documentation (JavaDoc UI)
is delivered in ZIP format
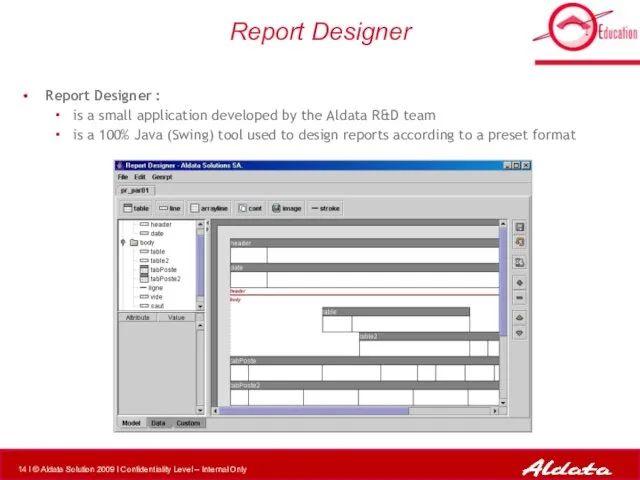
Report Designer
Report Designer :
is a small application developed by the Aldata
Report Designer
Report Designer :
is a small application developed by the Aldata
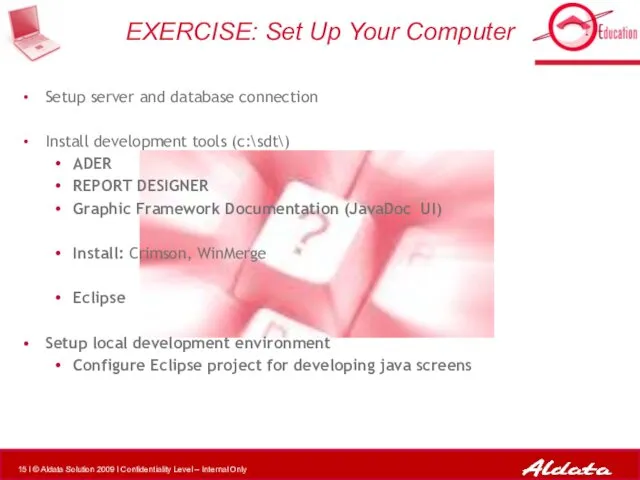
Setup server and database connection
Install development tools (c:\sdt\)
ADER
REPORT DESIGNER
Graphic Framework
Setup server and database connection
Install development tools (c:\sdt\)
ADER
REPORT DESIGNER
Graphic Framework
General Overview
1
2
3
Table of content
4
5
Global Architecture and Application Structure
G.O.L.D. Screens
Create
General Overview
1
2
3
Table of content
4
5
Global Architecture and Application Structure
G.O.L.D. Screens
Create
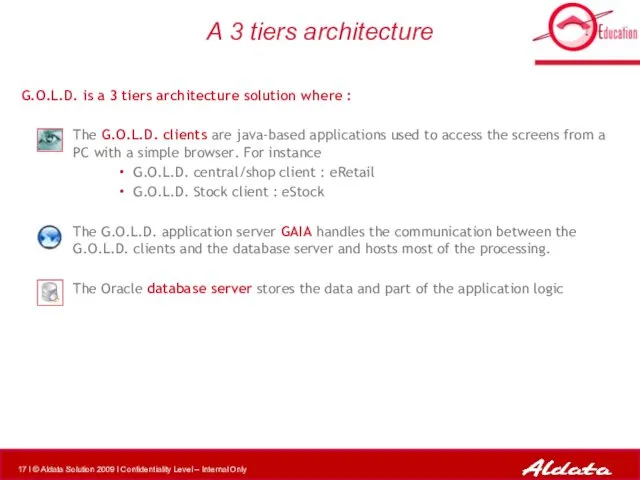
A 3 tiers architecture
G.O.L.D. is a 3 tiers architecture solution where
A 3 tiers architecture
G.O.L.D. is a 3 tiers architecture solution where

G.O.L.D. Modules managed
eStock
eRetail
Adm
Pda
G.O.L.D. Modules managed
eStock
eRetail
Adm
Pda
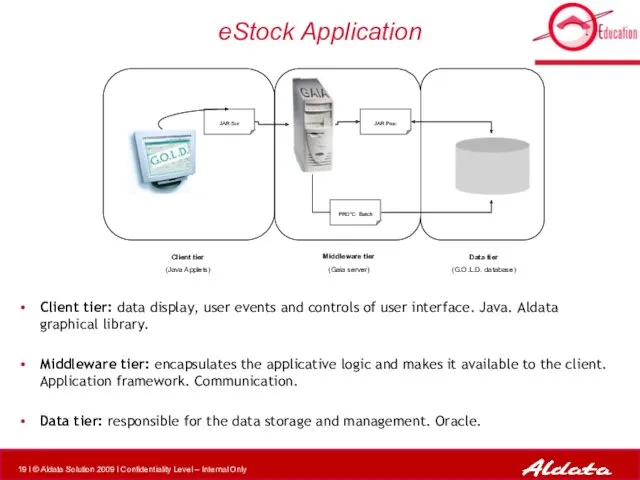
eStock Application
Client tier: data display, user events and controls of user
eStock Application
Client tier: data display, user events and controls of user

Node_CEN
GAIA
G.O.L.D. Prod server
Node_STK
CEN Batch
STK Batch
Node_TEST
GAIA
G.O.L.D. Test server
Node_LOAD
CEN Batch
STK Batch
Deployment
G.O.L.D. Central PO
G.O.L.D.
Node_CEN
GAIA
G.O.L.D. Prod server
Node_STK
CEN Batch
STK Batch
Node_TEST
GAIA
G.O.L.D. Test server
Node_LOAD
CEN Batch
STK Batch
Deployment
G.O.L.D. Central PO
G.O.L.D.
General Overview
1
2
3
Table of content
4
5
Global Architecture and Application Structure
G.O.L.D. Screens
Create
General Overview
1
2
3
Table of content
4
5
Global Architecture and Application Structure
G.O.L.D. Screens
Create
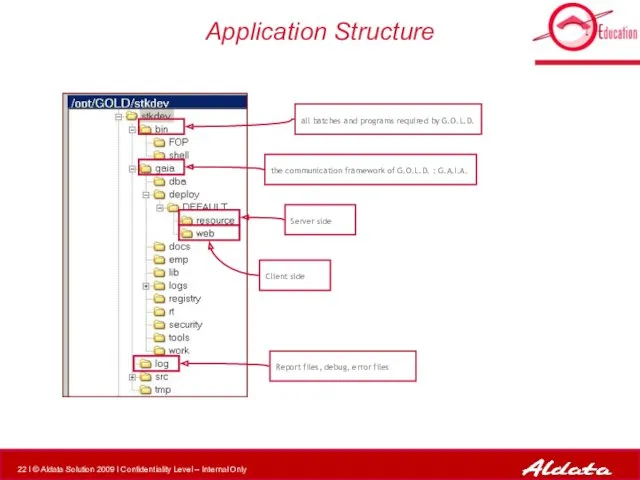
Application Structure
all batches and programs required by G.O.L.D.
the communication framework of
Application Structure
all batches and programs required by G.O.L.D.
the communication framework of

G.A.I.A.
G.A.I.A.
Server Side
Server Side
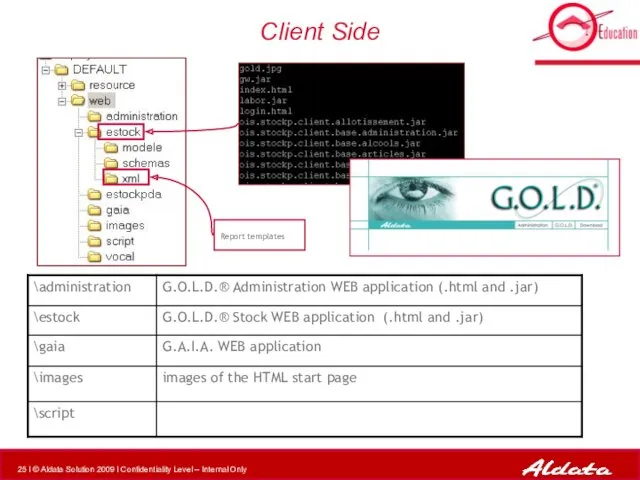
Client Side
Report templates
Client Side
Report templates
General Overview
1
2
3
Table of content
4
5
Global Architecture and Application Structure
G.O.L.D. Screens
Create
General Overview
1
2
3
Table of content
4
5
Global Architecture and Application Structure
G.O.L.D. Screens
Create
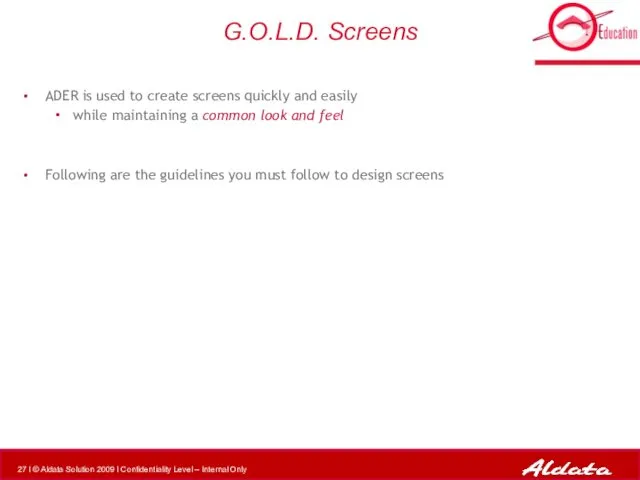
G.O.L.D. Screens
ADER is used to create screens quickly and easily
while
G.O.L.D. Screens
ADER is used to create screens quickly and easily
while
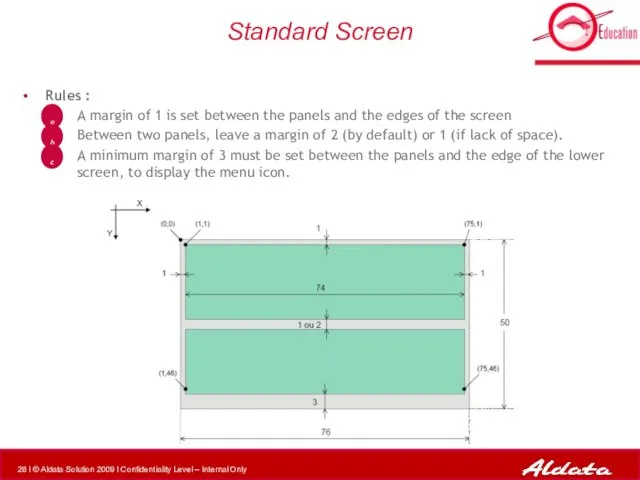
Standard Screen
Rules :
A margin of 1 is set between the panels
Standard Screen
Rules :
A margin of 1 is set between the panels
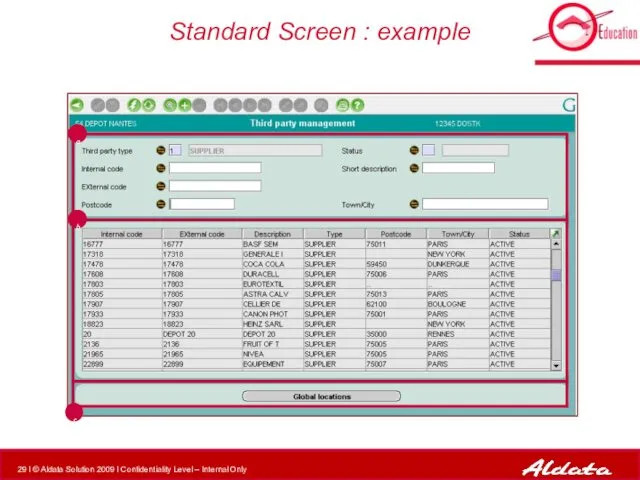
Standard Screen : example
b
a
c
Standard Screen : example
b
a
c
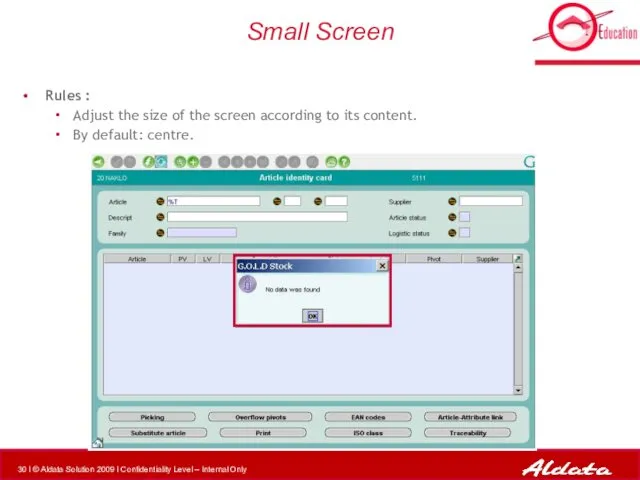
Small Screen
Rules :
Adjust the size of the screen according to
Small Screen
Rules :
Adjust the size of the screen according to

Table Layout – 1/3
Standard Panel
Table Layout – 1/3
Standard Panel
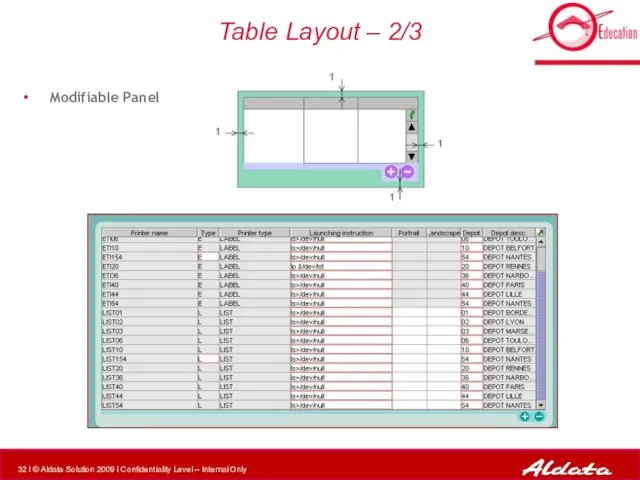
Table Layout – 2/3
Modifiable Panel
Table Layout – 2/3
Modifiable Panel
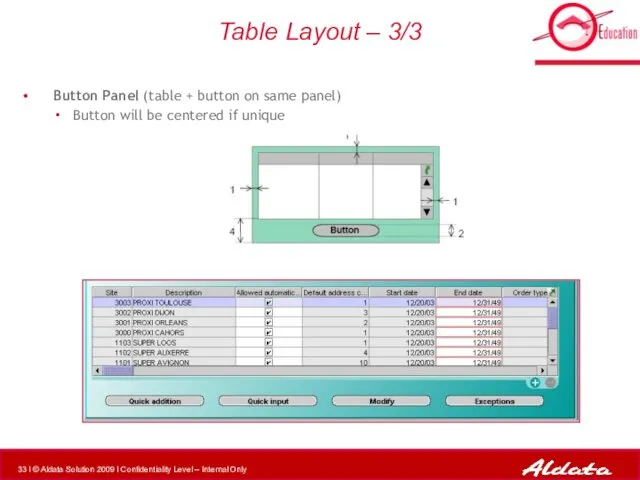
Table Layout – 3/3
Button Panel (table + button on same
Table Layout – 3/3
Button Panel (table + button on same
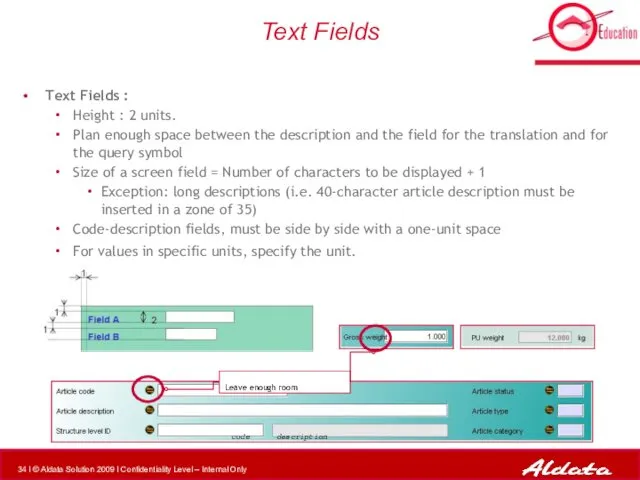
Text Fields
Text Fields :
Height : 2 units.
Plan enough space between
Text Fields
Text Fields :
Height : 2 units.
Plan enough space between
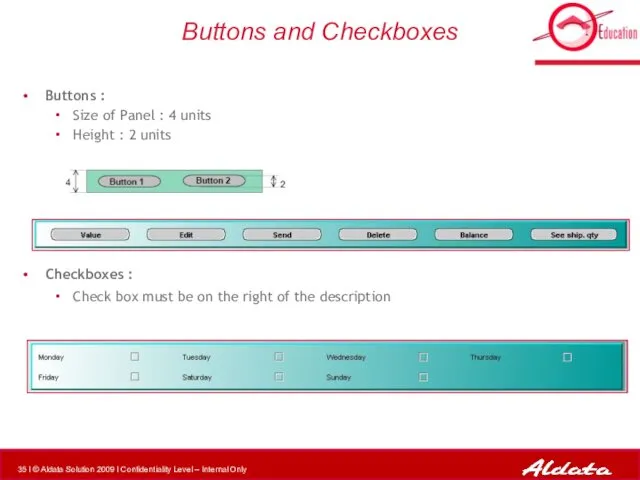
Buttons and Checkboxes
Buttons :
Size of Panel : 4 units
Height : 2
Buttons and Checkboxes
Buttons :
Size of Panel : 4 units
Height : 2
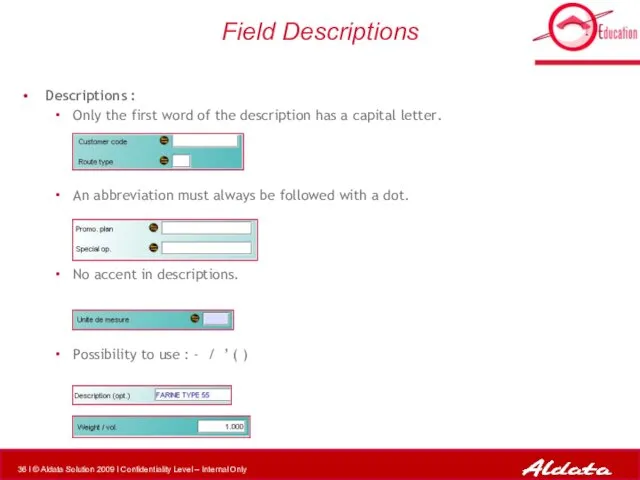
Field Descriptions
Descriptions :
Only the first word of the description has
Field Descriptions
Descriptions :
Only the first word of the description has
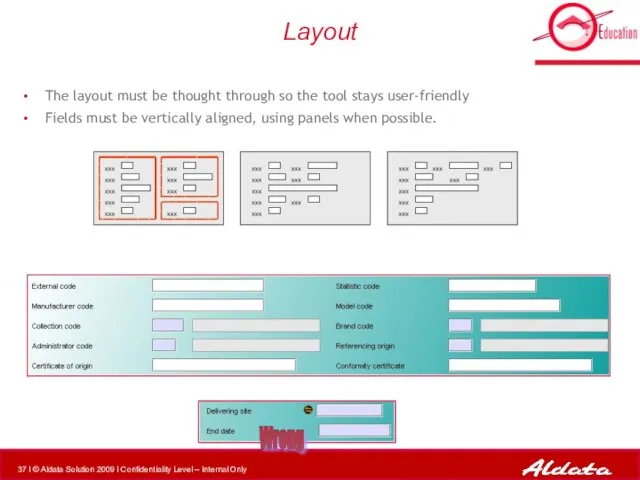
Layout
The layout must be thought through so the tool stays user-friendly
Layout
The layout must be thought through so the tool stays user-friendly

Scheduling screen
OISJEntete
OISJToolbar
OISJScreen
Scheduling screen
OISJEntete
OISJToolbar
OISJScreen

Scheduling screen
OISJTabbedPane
OISJPanel
OISJPanel
Scheduling screen
OISJTabbedPane
OISJPanel
OISJPanel
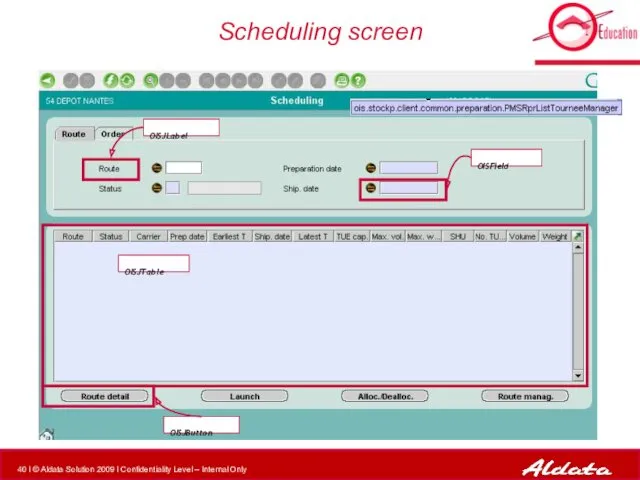
Scheduling screen
OISField
OISJTable
OISJLabel
OISJButton
Scheduling screen
OISField
OISJTable
OISJLabel
OISJButton
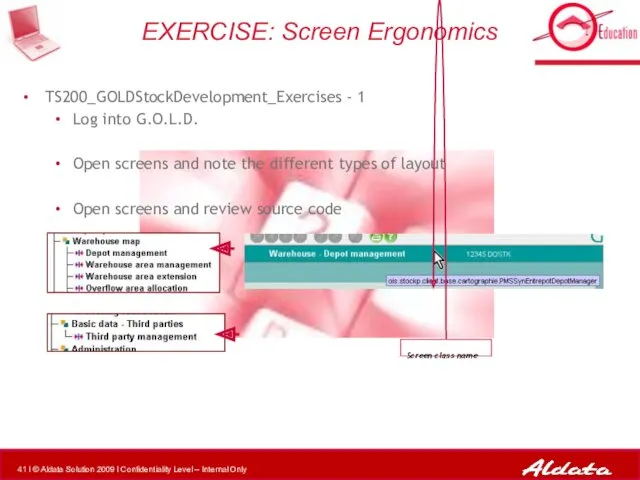
TS200_GOLDStockDevelopment_Exercises - 1
Log into G.O.L.D.
Open screens and note the different
TS200_GOLDStockDevelopment_Exercises - 1
Log into G.O.L.D.
Open screens and note the different
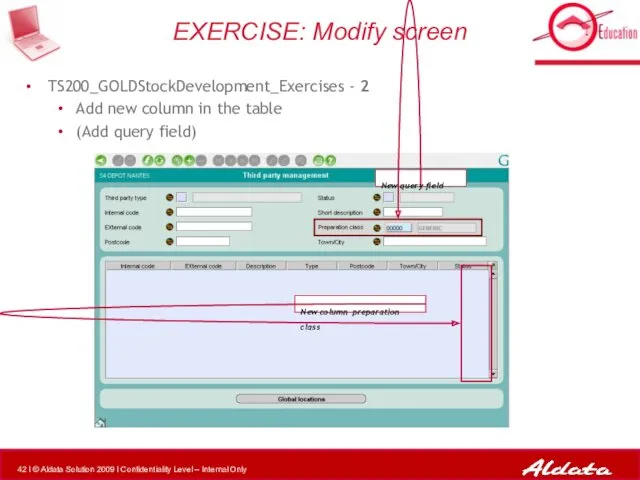
TS200_GOLDStockDevelopment_Exercises - 2
Add new column in the table
(Add query field)
EXERCISE: Modify
TS200_GOLDStockDevelopment_Exercises - 2
Add new column in the table
(Add query field)
EXERCISE: Modify
General Overview
1
2
3
Table of content
4
5
Global Architecture and Application Structure
G.O.L.D. Screens
Create
General Overview
1
2
3
Table of content
4
5
Global Architecture and Application Structure
G.O.L.D. Screens
Create
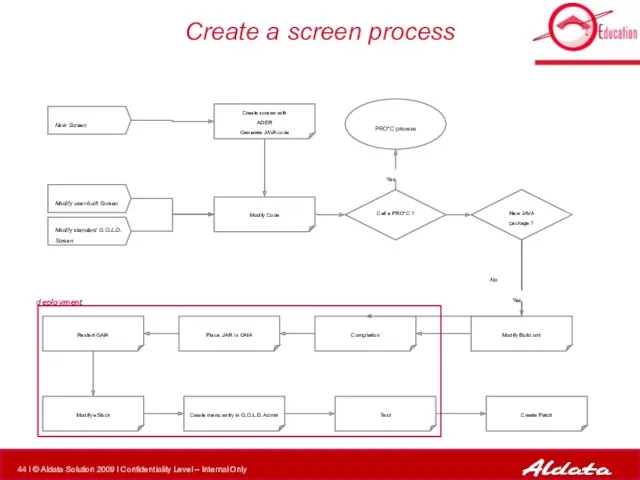
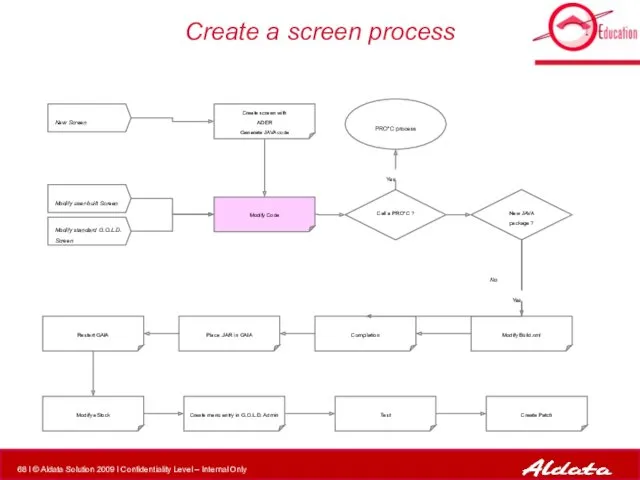
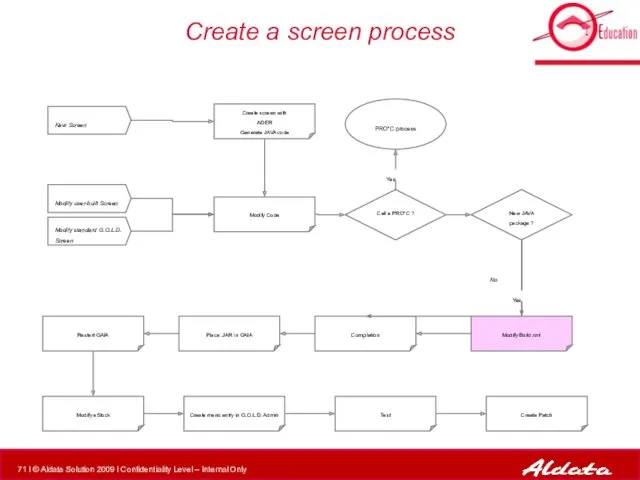
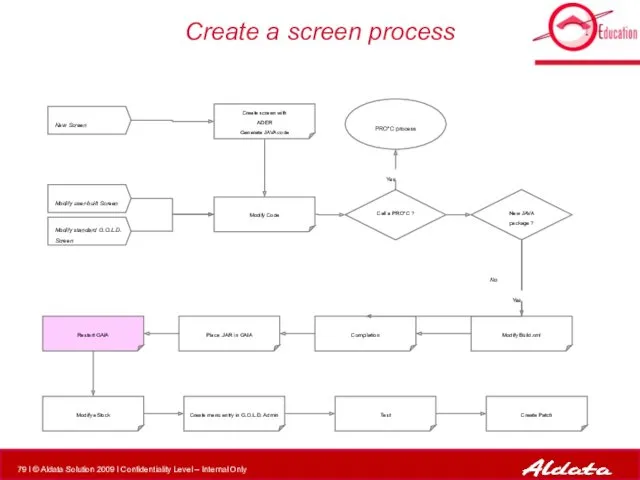
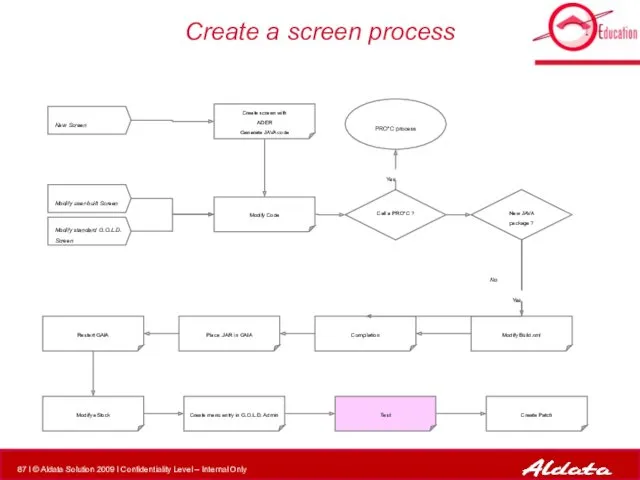
Create a screen process
Modify Code
PRO*C process
New Screen
Modify standard G.O.L.D. Screen
Modify user-built
Create a screen process
Modify Code
PRO*C process
New Screen
Modify standard G.O.L.D. Screen
Modify user-built
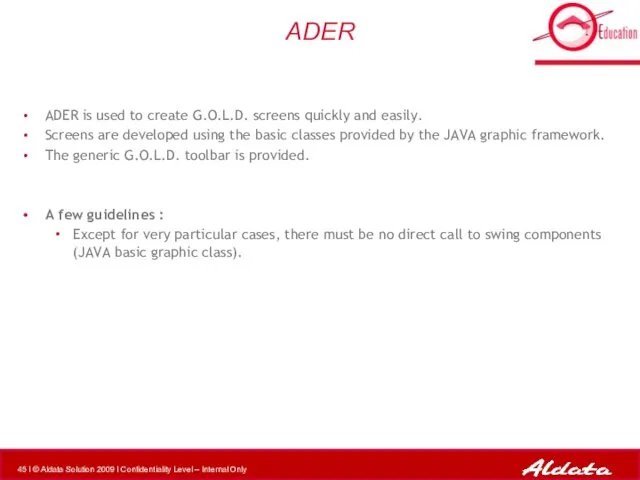
ADER
ADER is used to create G.O.L.D. screens quickly and easily.
Screens are
ADER
ADER is used to create G.O.L.D. screens quickly and easily.
Screens are
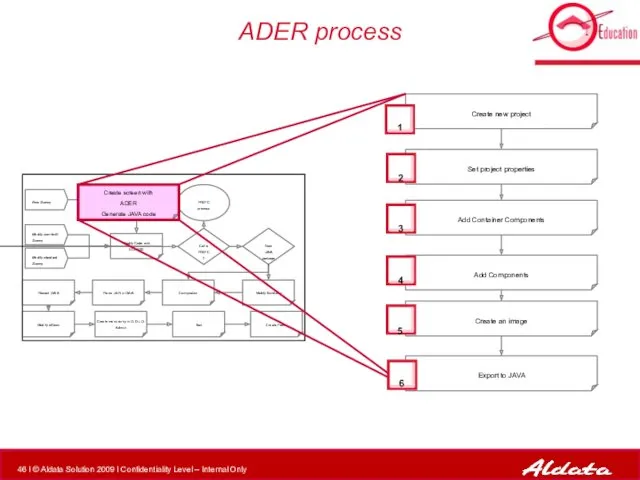
ADER process
Create new project
Create screen with
ADER
Generate JAVA code
Set project
ADER process
Create new project
Create screen with
ADER
Generate JAVA code
Set project
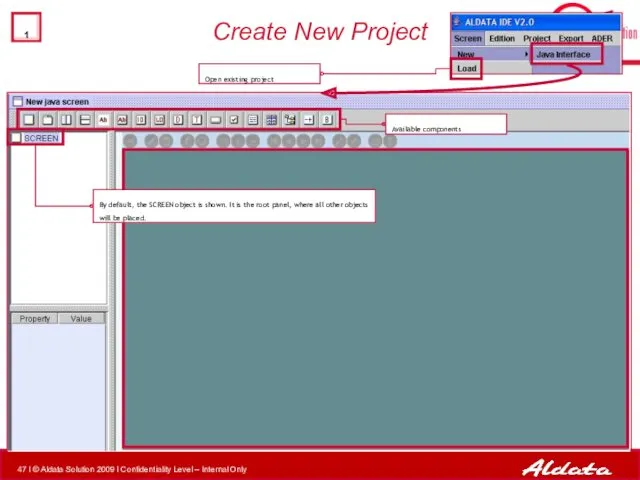
Create New Project
By default, the SCREEN object is shown. It is
Create New Project
By default, the SCREEN object is shown. It is
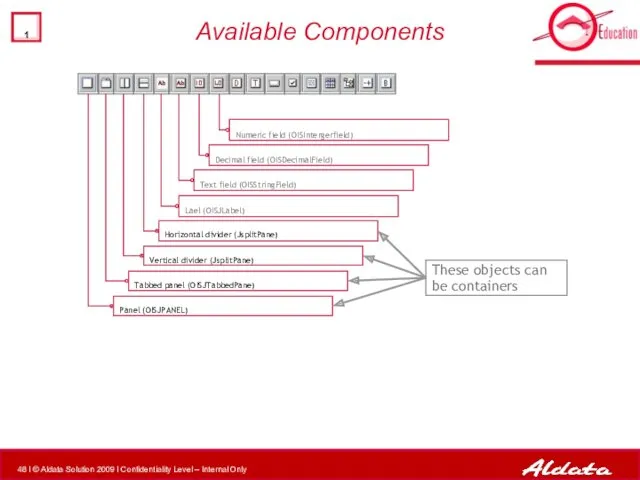
Available Components
Decimal field (OISDecimalField)
Numeric field (OISIntergerfield)
Text field (OISStringField)
Tabbed panel (OISJTabbedPane)
Panel (OISJPANEL)
Horizontal
Available Components
Decimal field (OISDecimalField)
Numeric field (OISIntergerfield)
Text field (OISStringField)
Tabbed panel (OISJTabbedPane)
Panel (OISJPANEL)
Horizontal
Available Components
Text – multi-lines (OISJTextArea)
Button (OISJButton)
Time field (OISTimeField)
Date field (OISDateField)
Table
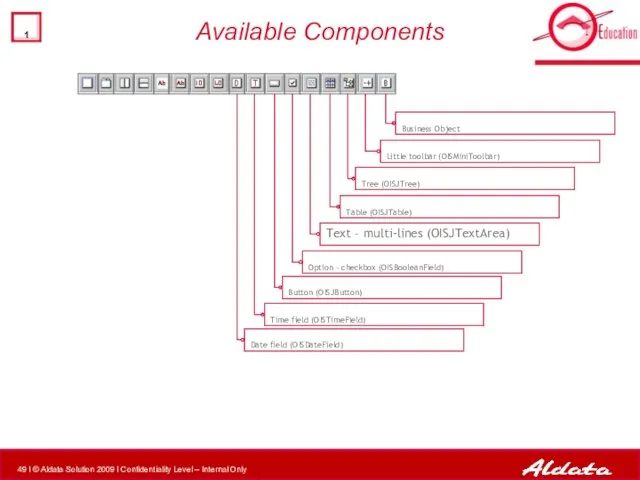
Available Components
Text – multi-lines (OISJTextArea)
Button (OISJButton)
Time field (OISTimeField)
Date field (OISDateField)
Table

Set Project Properties – 1/2
Name of the class package
Name of the
Set Project Properties – 1/2
Name of the class package
Name of the
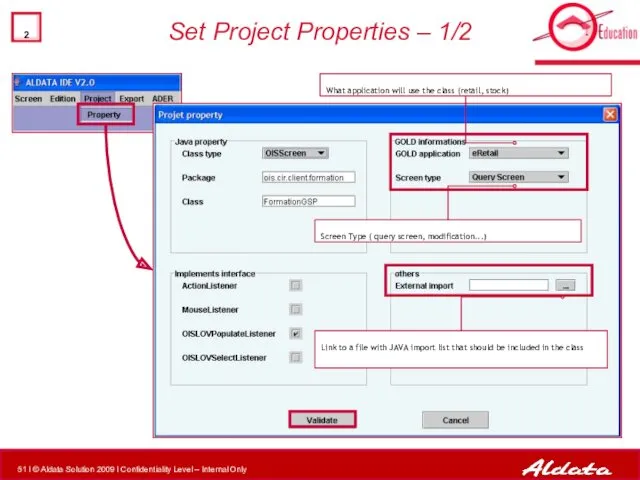
Set Project Properties – 1/2
What application will use the class (retail,
Set Project Properties – 1/2
What application will use the class (retail,
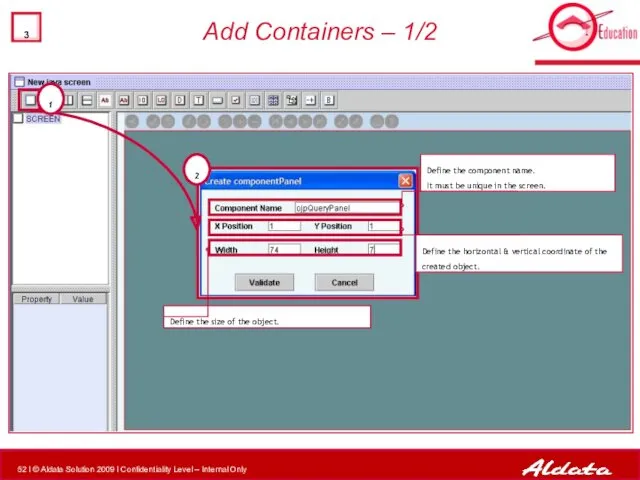
Add Containers – 1/2
2
1
Define the size of the object.
Define the component
Add Containers – 1/2
2
1
Define the size of the object.
Define the component
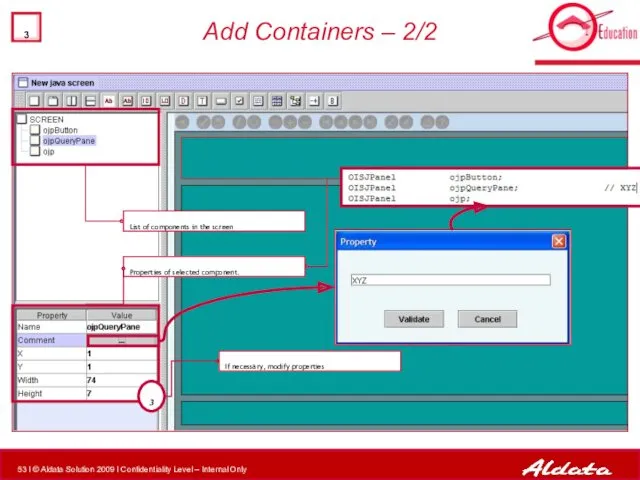
Add Containers – 2/2
List of components in the screen
Properties of selected
Add Containers – 2/2
List of components in the screen
Properties of selected
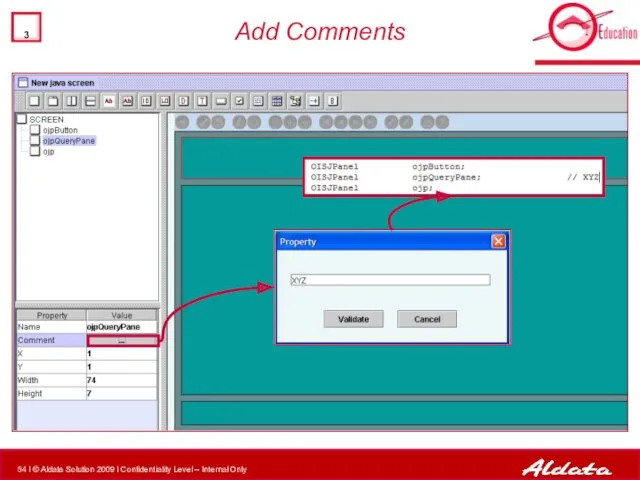
Add Comments
Add Comments
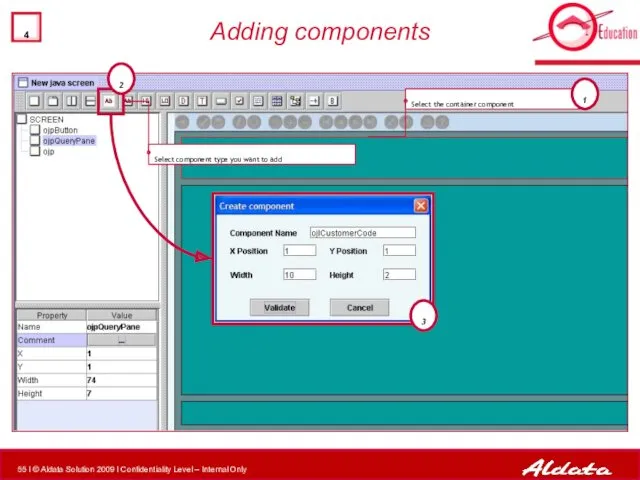
Adding components
Select the container component
1
2
3
Select component type you want to add
Adding components
Select the container component
1
2
3
Select component type you want to add
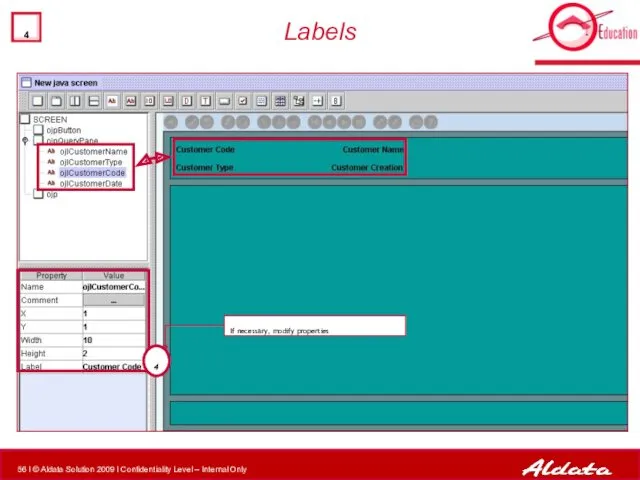
Labels
4
If necessary, modify properties
Labels
4
If necessary, modify properties
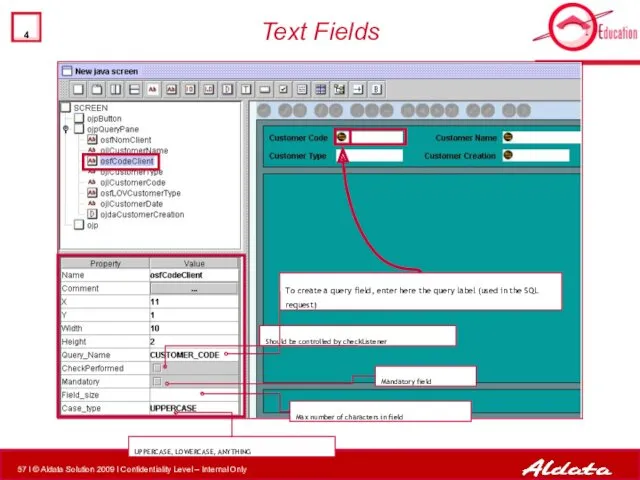
Text Fields
Should be controlled by checkListener
Mandatory field
Max number of characters in
Text Fields
Should be controlled by checkListener
Mandatory field
Max number of characters in
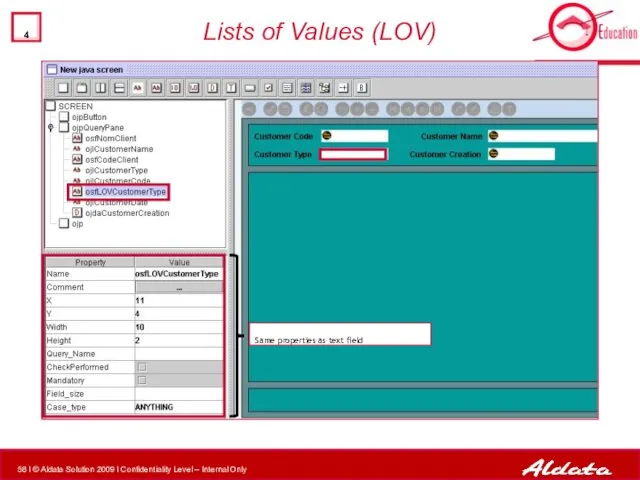
Lists of Values (LOV)
Same properties as text field
Lists of Values (LOV)
Same properties as text field
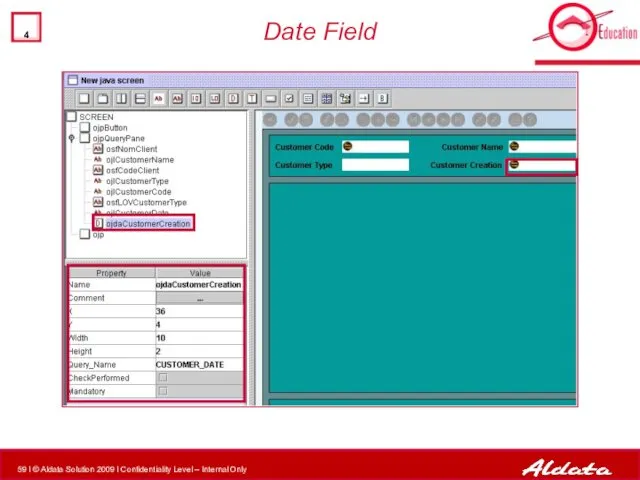
Date Field
Date Field
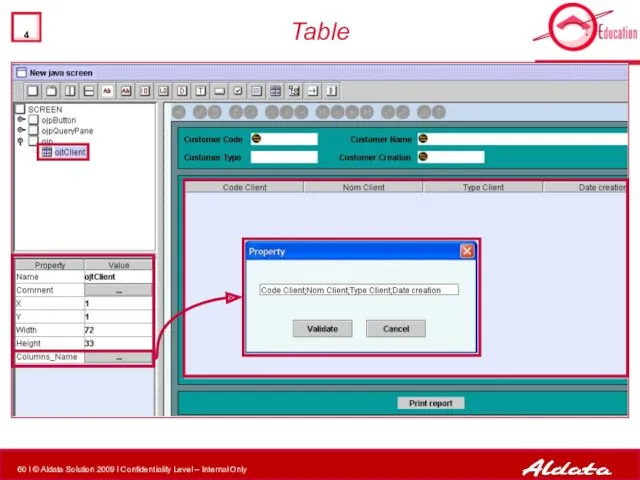
Table
Table
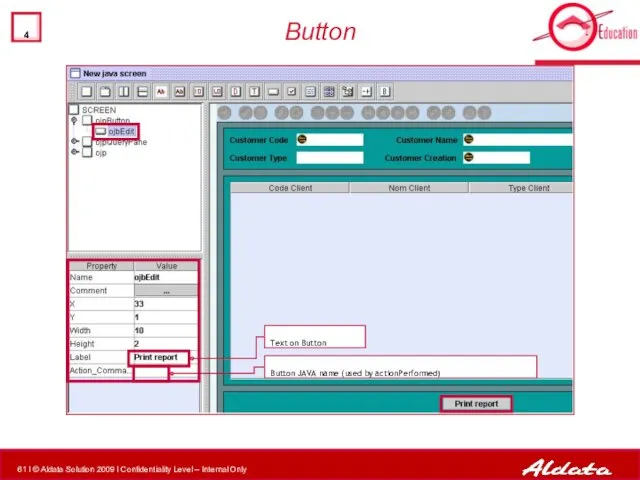
Button
Text on Button
Button JAVA name (used by actionPerformed)
Button
Text on Button
Button JAVA name (used by actionPerformed)
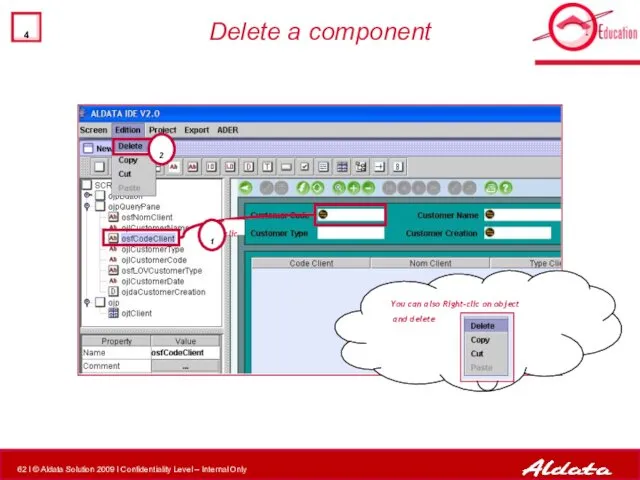
Delete a component
clic
1
2
You can also Right-clic on object
and delete
Delete a component
clic
1
2
You can also Right-clic on object
and delete
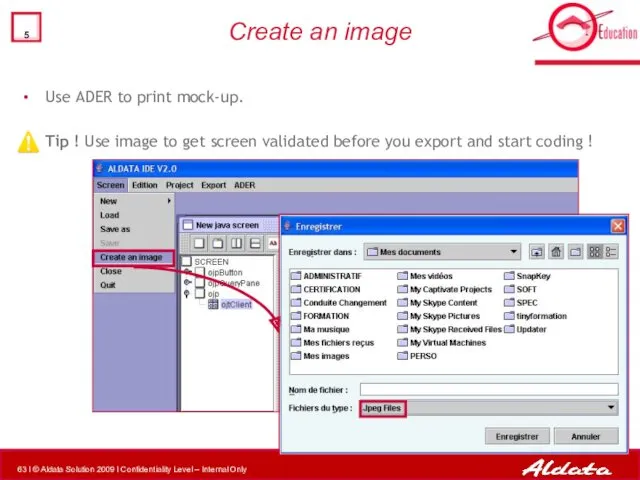
Create an image
Use ADER to print mock-up.
Tip ! Use image
Create an image
Use ADER to print mock-up.
Tip ! Use image
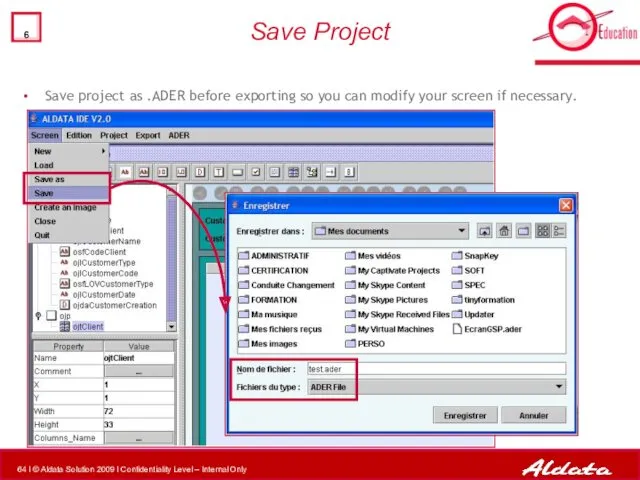
Save Project
Save project as .ADER before exporting so you can modify
Save Project
Save project as .ADER before exporting so you can modify
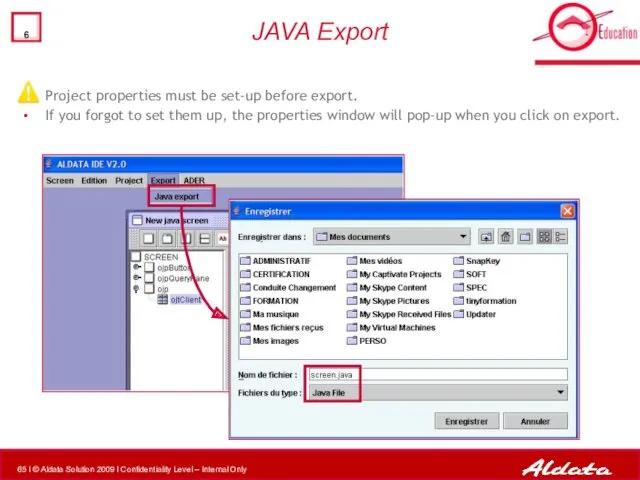
JAVA Export
Project properties must be set-up before export.
If you forgot to
JAVA Export
Project properties must be set-up before export.
If you forgot to
JAVA Export
Export java source code to directory that match package name
JAVA Export
Export java source code to directory that match package name

Open the following file for more details on this exercise
TS200_GOLDStockDevelopment_Exercises –
Open the following file for more details on this exercise TS200_GOLDStockDevelopment_Exercises –
Create a screen process
Modify Code
PRO*C process
New Screen
Modify standard G.O.L.D. Screen
Modify user-built
Create a screen process
Modify Code
PRO*C process
New Screen
Modify standard G.O.L.D. Screen
Modify user-built
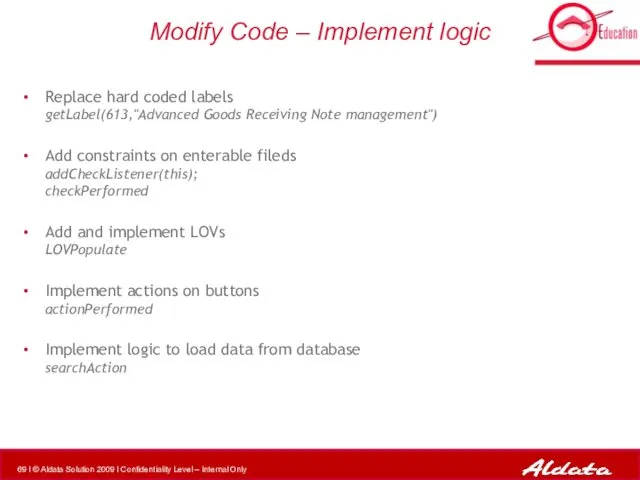
Modify Code – Implement logic
Replace hard coded labels
getLabel(613,"Advanced Goods Receiving
Modify Code – Implement logic
Replace hard coded labels getLabel(613,"Advanced Goods Receiving
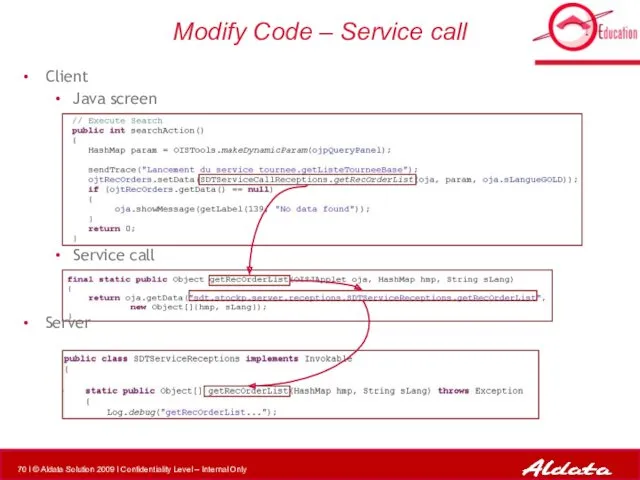
Modify Code – Service call
Client
Java screen
Service call
Server
Modify Code – Service call
Client
Java screen
Service call
Server
Create a screen process
Modify Code
PRO*C process
New Screen
Modify standard G.O.L.D. Screen
Modify user-built
Create a screen process
Modify Code
PRO*C process
New Screen
Modify standard G.O.L.D. Screen
Modify user-built

Build.XML structure – 1/2
The file build.xml is used to compile JAR
Build.XML structure – 1/2
The file build.xml is used to compile JAR

Build.XML structure – 2/2
The file build.xml is used to compile JAR
Build.XML structure – 2/2
The file build.xml is used to compile JAR
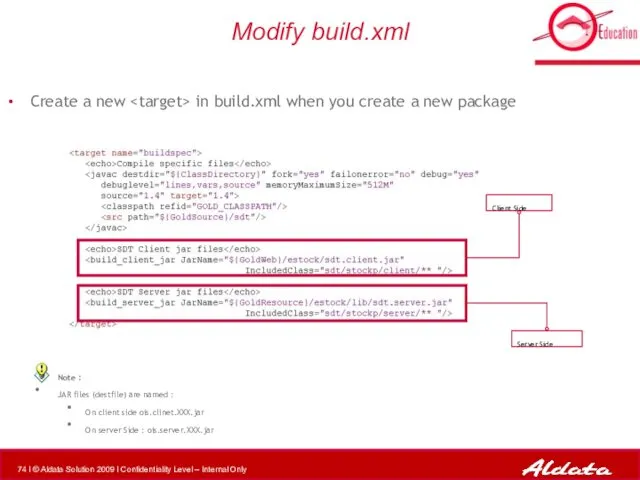
Modify build.xml
Create a new in build.xml when you create a
Modify build.xml
Create a new
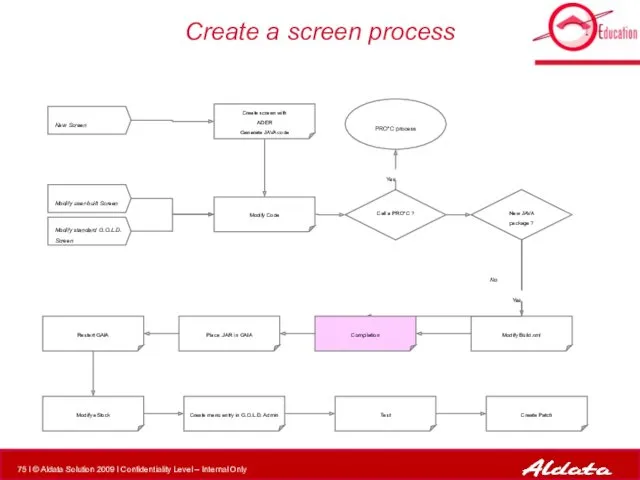
Create a screen process
Modify Code
PRO*C process
New Screen
Modify standard G.O.L.D. Screen
Modify user-built
Create a screen process
Modify Code
PRO*C process
New Screen
Modify standard G.O.L.D. Screen
Modify user-built
![Compilation Connect to an Unix Compile (launch build.xml) ant [–f buildfile] Target_Name](/_ipx/f_webp&q_80&fit_contain&s_1440x1080/imagesDir/jpg/99692/slide-75.jpg)
Compilation
Connect to an Unix
Compile (launch build.xml)
ant [–f buildfile] Target_Name
Compilation
Connect to an Unix
Compile (launch build.xml)
ant [–f buildfile] Target_Name
Create a screen process
Modify Code
PRO*C process
New Screen
Modify standard G.O.L.D. Screen
Modify user-built
Create a screen process
Modify Code
PRO*C process
New Screen
Modify standard G.O.L.D. Screen
Modify user-built
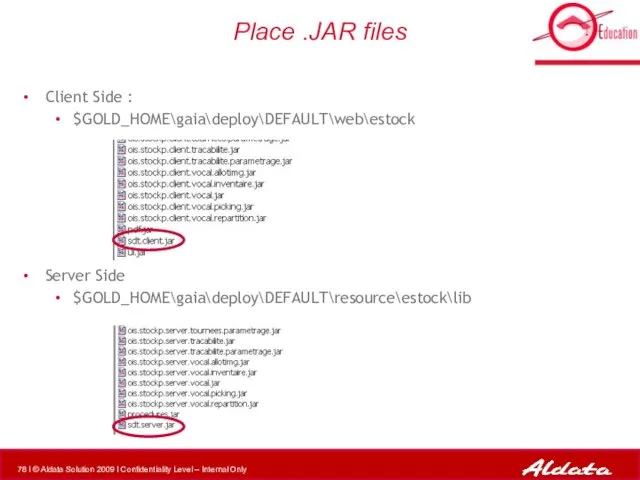
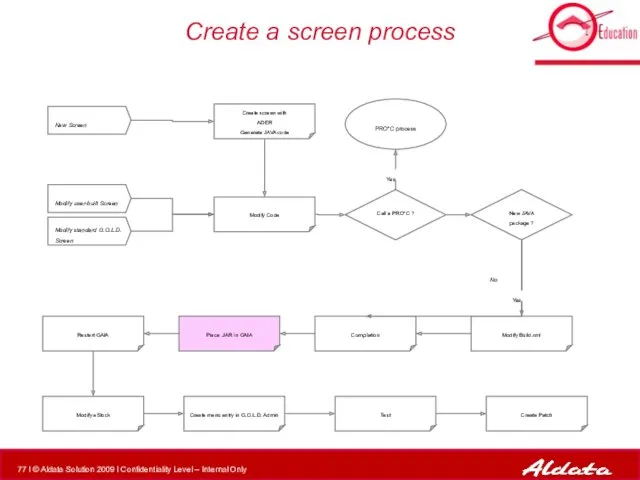
Place .JAR files
Client Side :
$GOLD_HOME\gaia\deploy\DEFAULT\web\estock
Server Side
$GOLD_HOME\gaia\deploy\DEFAULT\resource\estock\lib
Place .JAR files
Client Side :
$GOLD_HOME\gaia\deploy\DEFAULT\web\estock
Server Side
$GOLD_HOME\gaia\deploy\DEFAULT\resource\estock\lib
Create a screen process
Modify Code
PRO*C process
New Screen
Modify standard G.O.L.D. Screen
Modify user-built
Create a screen process
Modify Code
PRO*C process
New Screen
Modify standard G.O.L.D. Screen
Modify user-built

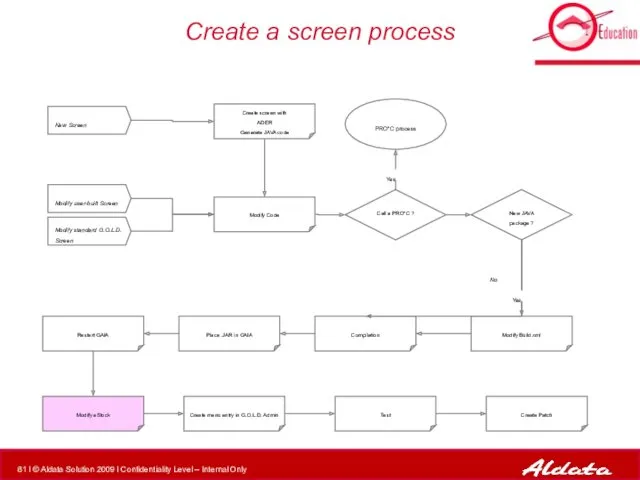
Restart GAIA
Connect to an Unix and go to the GAIA folder
Restart GAIA
Connect to an Unix and go to the GAIA folder
Create a screen process
Modify Code
PRO*C process
New Screen
Modify standard G.O.L.D. Screen
Modify user-built
Create a screen process
Modify Code
PRO*C process
New Screen
Modify standard G.O.L.D. Screen
Modify user-built

Modify estock.html
Add .jar call to eStock.html
Modify estock.html
Add .jar call to eStock.html
Create a screen process
Modify Code
PRO*C process
New Screen
Modify standard G.O.L.D. Screen
Modify user-built
Create a screen process
Modify Code
PRO*C process
New Screen
Modify standard G.O.L.D. Screen
Modify user-built

Two ways to add menu entry :
Manually (see next screen)
SQL
Create
Two ways to add menu entry :
Manually (see next screen)
SQL
Create
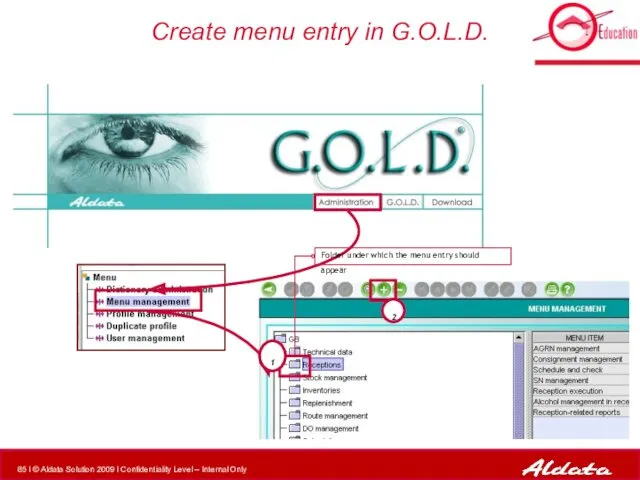
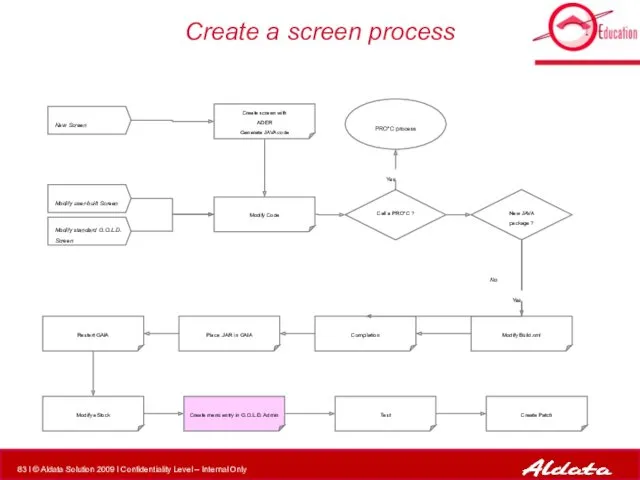
Create menu entry in G.O.L.D.
2
1
Folder under which the menu entry should
Create menu entry in G.O.L.D.
2
1
Folder under which the menu entry should

Create menu entry in G.O.L.D.
Create menu entry in G.O.L.D.
Create a screen process
Modify Code
PRO*C process
New Screen
Modify standard G.O.L.D. Screen
Modify user-built
Create a screen process
Modify Code
PRO*C process
New Screen
Modify standard G.O.L.D. Screen
Modify user-built
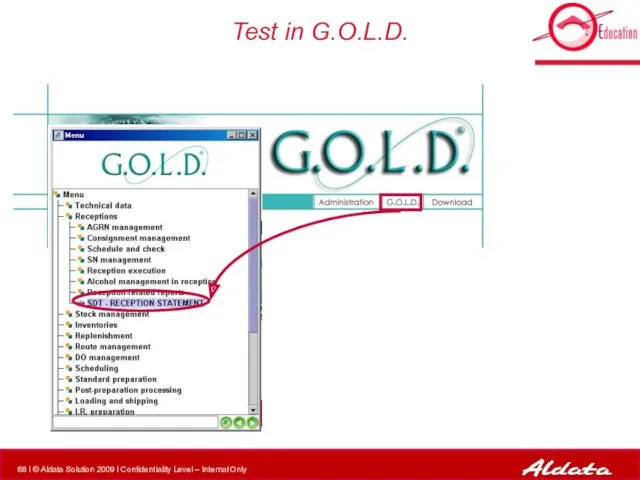
Test in G.O.L.D.
Test in G.O.L.D.
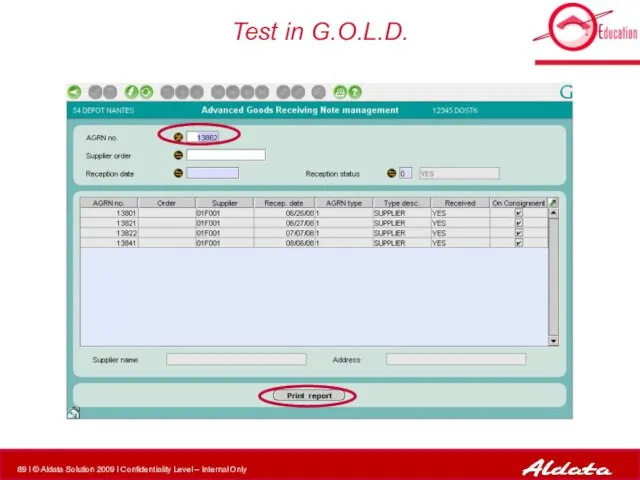
Test in G.O.L.D.
Test in G.O.L.D.
Open the following file for more details on this exercise:
TS200_GOLDStockDevelopment_Exercises -
Open the following file for more details on this exercise:
TS200_GOLDStockDevelopment_Exercises -
Create a screen process
Modify Code
PRO*C process
New Screen
Modify standard G.O.L.D. Screen
Modify user-built
Create a screen process
Modify Code
PRO*C process
New Screen
Modify standard G.O.L.D. Screen
Modify user-built

Patch Content
The Patch is subdivided in following directories:
/sql
Contains SQL scripts for
Patch Content
The Patch is subdivided in following directories:
/sql
Contains SQL scripts for
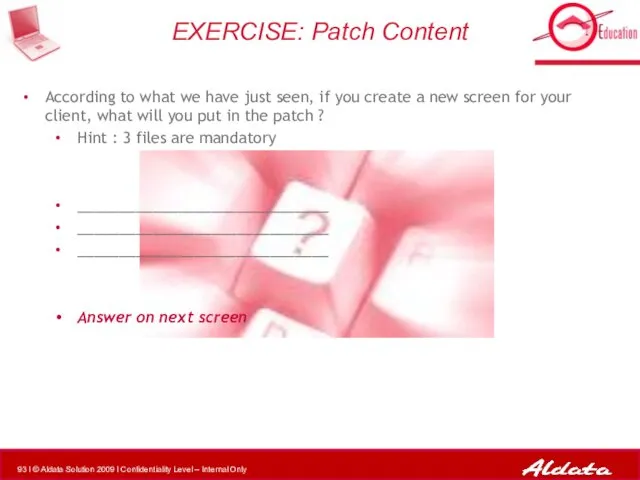
According to what we have just seen, if you create a
According to what we have just seen, if you create a

Create Patch
Files you MUST add to patch after a screen was
Create Patch
Files you MUST add to patch after a screen was

General Overview
1
2
3
Table of content
4
5
Global Architecture and Application Structure
G.O.L.D. Screens
Create
General Overview
1
2
3
Table of content
4
5
Global Architecture and Application Structure
G.O.L.D. Screens
Create
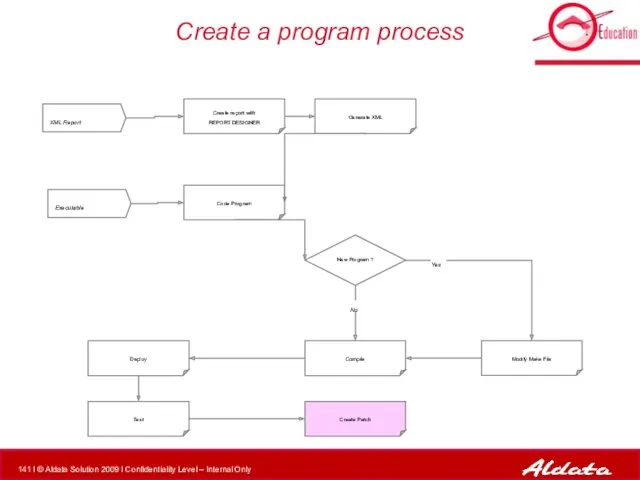
Create a program process
XML Report
Executable
Modify Make File
Compile
New Program ?
Create report with
Create a program process
XML Report
Executable
Modify Make File
Compile
New Program ?
Create report with
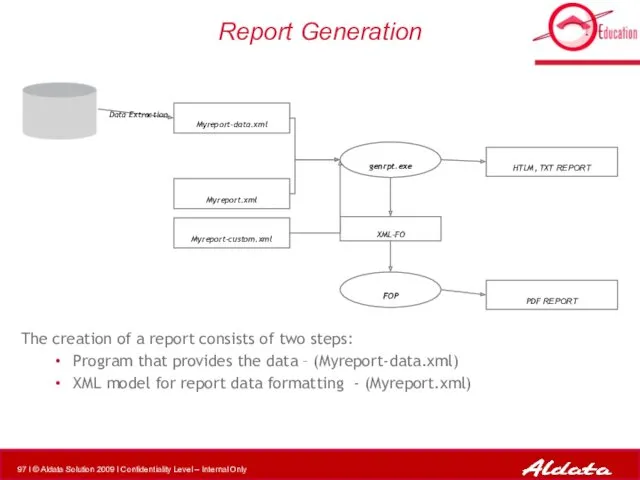
Report Generation
The creation of a report consists of two steps:
Program that
Report Generation
The creation of a report consists of two steps:
Program that
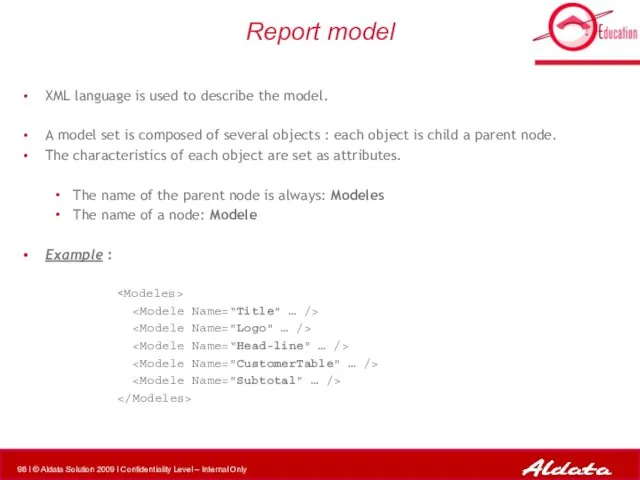
Report model
XML language is used to describe the model.
A model
Report model
XML language is used to describe the model.
A model
Report model templates
Each model file contains the definition of several
Report model templates
Each model file contains the definition of several
Report Designer
Report Designer is a reporting tool 100% Java (Swing) use
Report Designer
Report Designer is a reporting tool 100% Java (Swing) use
Report Designer
Create report with
REPORT DESIGNER
XML Report
Executable
Modify Make File
Compile
New Program ?
Deploy
Test
Generate
Report Designer
Create report with
REPORT DESIGNER
XML Report
Executable
Modify Make File
Compile
New Program ?
Deploy
Test
Generate
New Model Set Creation
New Model Set Creation
Model Set Loading
Report Designer loads
the model file (i.e. report.xml)
the
Model Set Loading
Report Designer loads
the model file (i.e. report.xml)
the
History
Report Designer stores the loaded reports in the option History
Set history
History
Report Designer stores the loaded reports in the option History
Set history

Models
All objects that are on the model set
simple object (none
Models
All objects that are on the model set
simple object (none
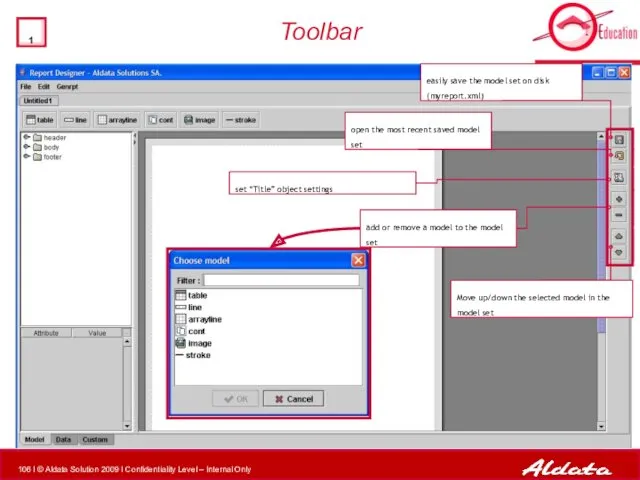
Toolbar
Move up/down the selected model in the model set
add or remove
Toolbar
Move up/down the selected model in the model set
add or remove

Page Setup (Title Object)
This object must absolutely be present in the
Page Setup (Title Object)
This object must absolutely be present in the
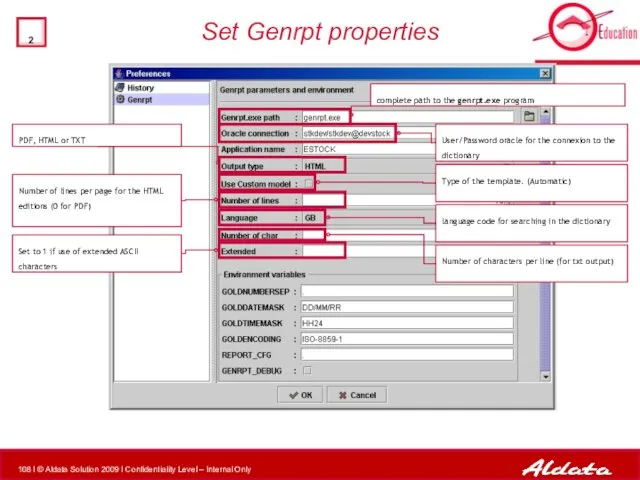
Set Genrpt properties
complete path to the genrpt.exe program
User/Password oracle for
Set Genrpt properties
complete path to the genrpt.exe program
User/Password oracle for
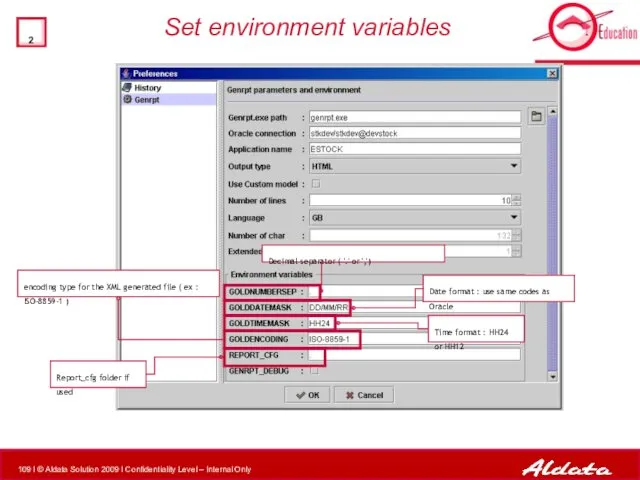
Set environment variables
Decimal separator ( '.' or ',')
Date format : use
Set environment variables
Decimal separator ( '.' or ',')
Date format : use
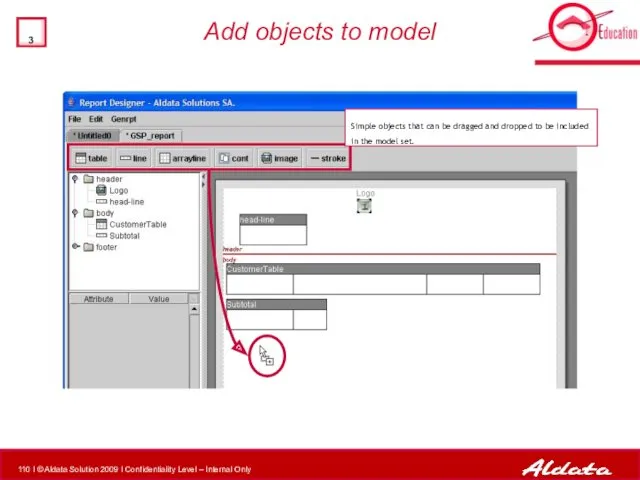
Add objects to model
Simple objects that can be dragged and dropped
Add objects to model
Simple objects that can be dragged and dropped

Properties common to all objects.
Indicate if Generator should keep this block
Properties common to all objects.
Indicate if Generator should keep this block
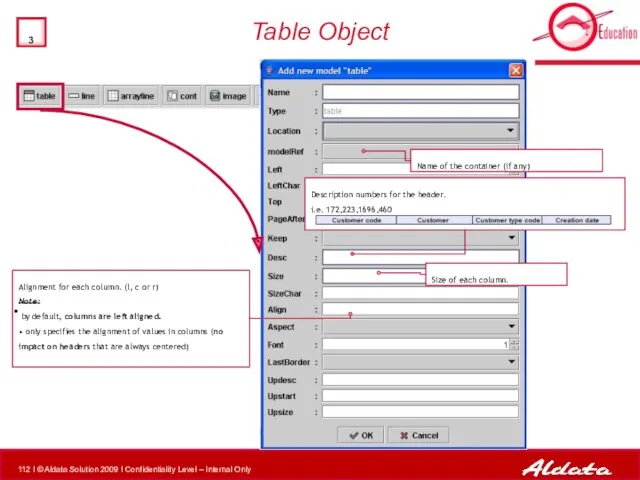
Table Object
Description numbers for the header.
i.e. 172,223,1696,460
Size of each column.
Alignment
Table Object
Description numbers for the header.
i.e. 172,223,1696,460
Size of each column.
Alignment
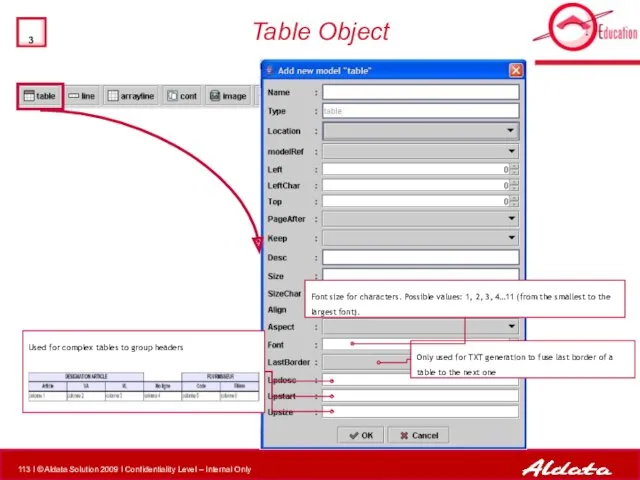
Table Object
Font size for characters. Possible values: 1, 2, 3, 4…11
Table Object
Font size for characters. Possible values: 1, 2, 3, 4…11
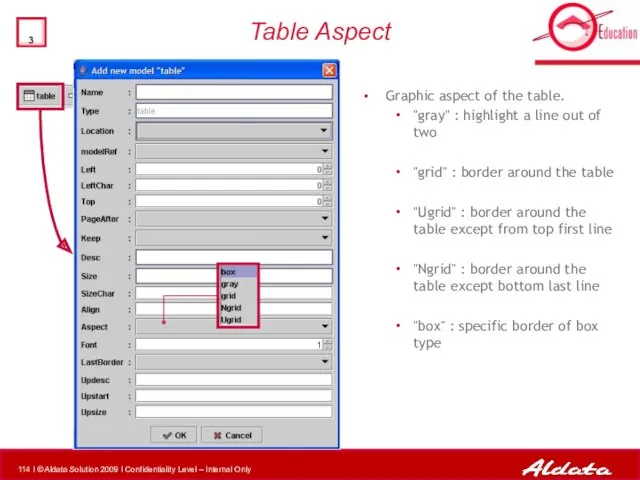
Table Aspect
Graphic aspect of the table.
"gray" : highlight a line
Table Aspect
Graphic aspect of the table.
"gray" : highlight a line
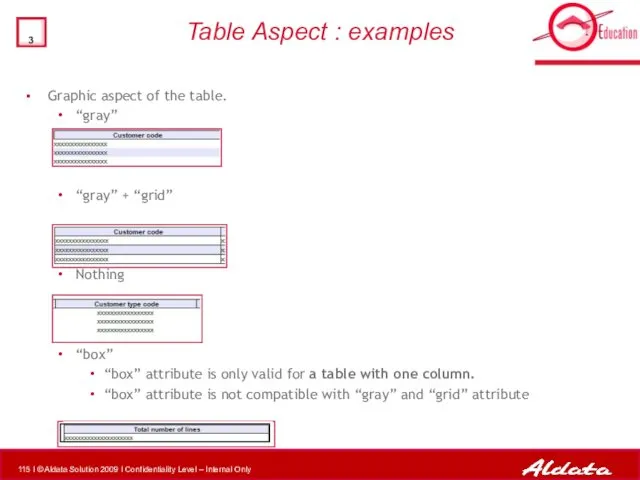
Table Aspect : examples
Graphic aspect of the table.
“gray”
“gray” + “grid”
Table Aspect : examples
Graphic aspect of the table.
“gray”
“gray” + “grid”
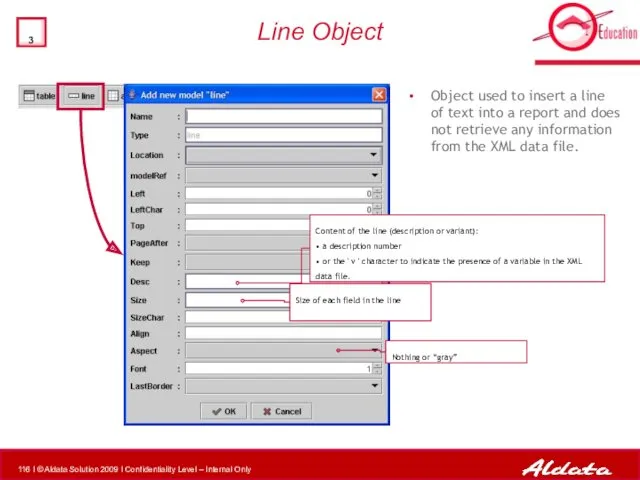
Line Object
Object used to insert a line of text into a
Line Object
Object used to insert a line of text into a
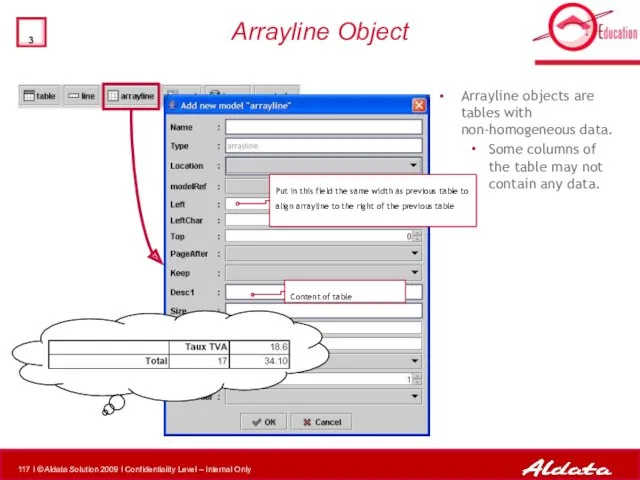
Arrayline Object
Arrayline objects are tables with non-homogeneous data.
Some columns of the
Arrayline Object
Arrayline objects are tables with non-homogeneous data.
Some columns of the
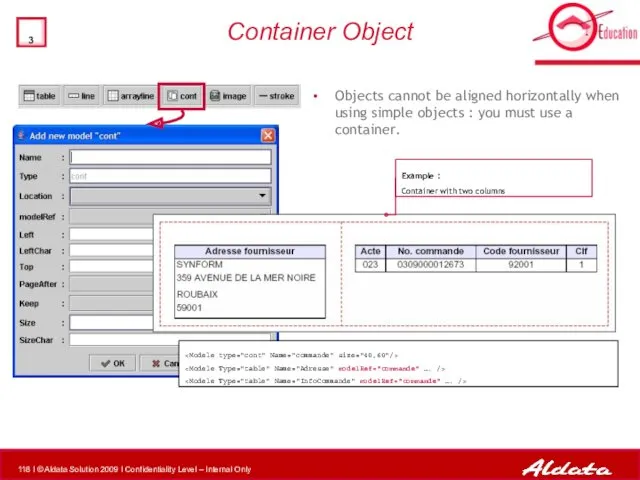
Container Object
Objects cannot be aligned horizontally when using simple objects :
Container Object
Objects cannot be aligned horizontally when using simple objects :

Image Object
Object used to insert an image into a report and
Image Object
Object used to insert an image into a report and
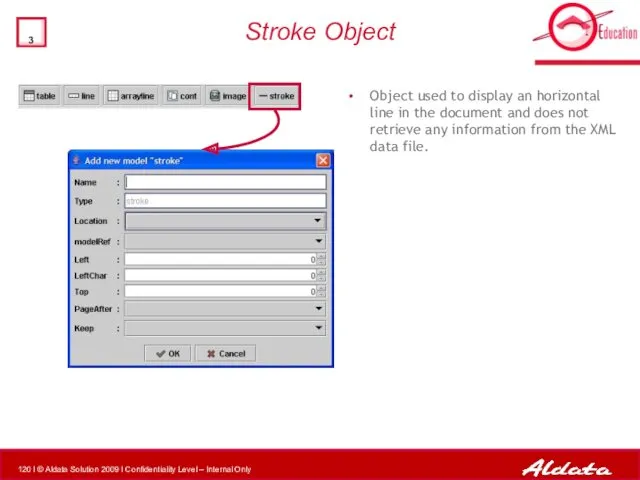
Stroke Object
Object used to display an horizontal line in the document
Stroke Object
Object used to display an horizontal line in the document
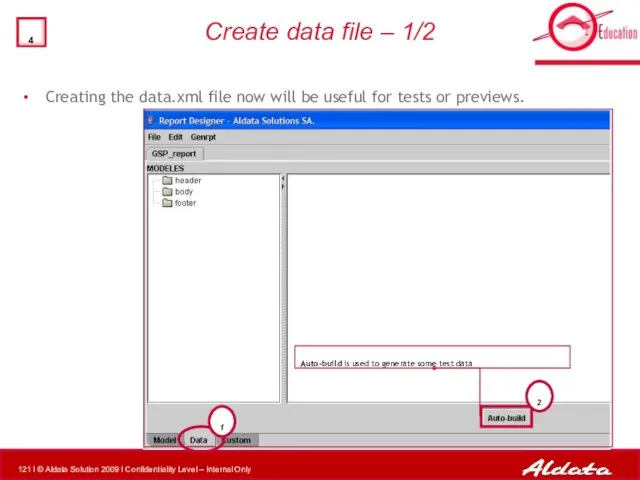
Create data file – 1/2
2
1
Auto-build is used to generate some test
Create data file – 1/2
2
1
Auto-build is used to generate some test
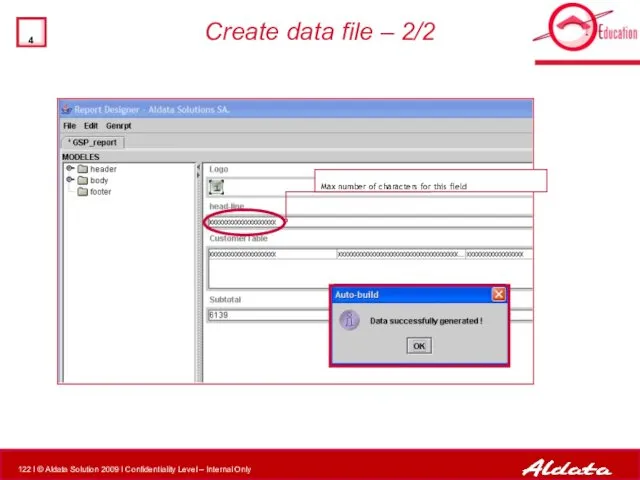
Create data file – 2/2
Max number of characters for this field
Create data file – 2/2
Max number of characters for this field
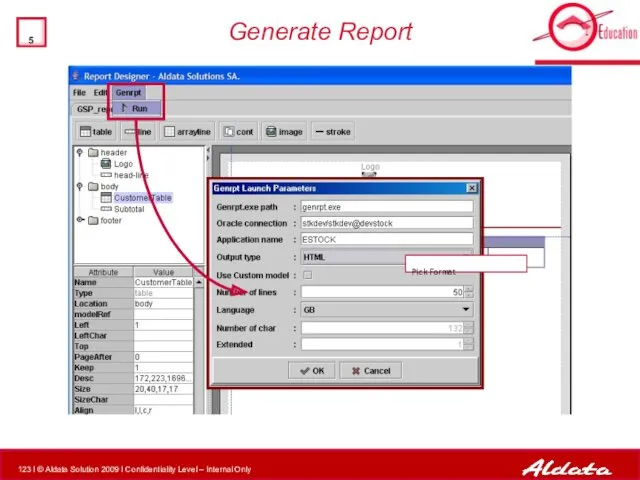
Generate Report
Pick Format
Generate Report
Pick Format

Preview Report Layout
Modele Name=“title”
Modele Name=“CustomerTable”
Modele Name=“head-line”
Modele Name=“Subtotal”
Modele Name=“Logo”
Modeles
Preview Report Layout
Modele Name=“title”
Modele Name=“CustomerTable”
Modele Name=“head-line”
Modele Name=“Subtotal”
Modele Name=“Logo”
Modeles

Create a program process
XML Report
Executable
Modify Make File
Compile
New Program ?
Create report with
Create a program process
XML Report
Executable
Modify Make File
Compile
New Program ?
Create report with
Report Designer
Create report with
REPORT DESIGNER
XML Report
Executable
Modify Make File
Compile
New Program ?
Deploy
Test
Generate
Report Designer
Create report with
REPORT DESIGNER
XML Report
Executable
Modify Make File
Compile
New Program ?
Deploy
Test
Generate
Open the following file for more details on this exercise:
TS200_GOLDStockDevelopment_Exercises
5.Report Designer
1.1. Set
Open the following file for more details on this exercise:
TS200_GOLDStockDevelopment_Exercises
5.Report Designer
1.1. Set
Create a program process
XML Report
Executable
Modify Make File
Compile
New Program ?
Create report with
Create a program process
XML Report
Executable
Modify Make File
Compile
New Program ?
Create report with
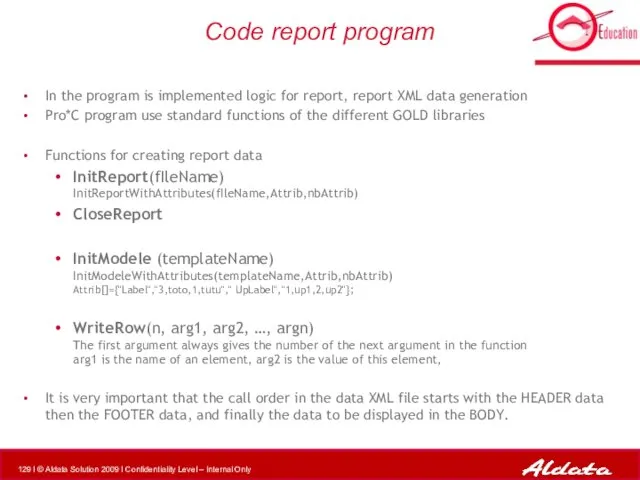
Code report program
In the program is implemented logic for report, report
Code report program
In the program is implemented logic for report, report
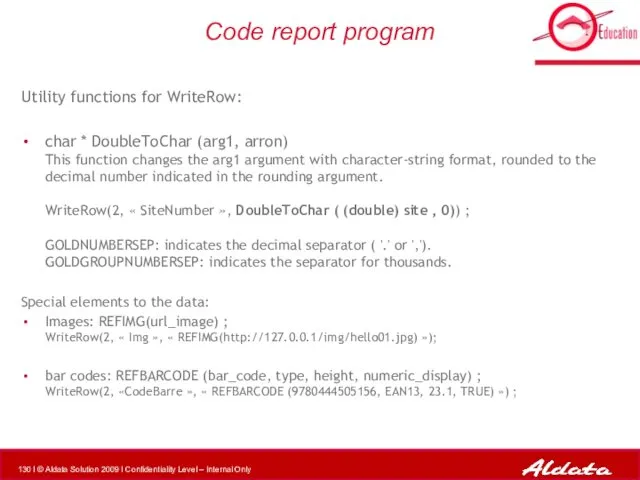
Code report program
Utility functions for WriteRow:
char * DoubleToChar (arg1, arron)
This
Code report program
Utility functions for WriteRow:
char * DoubleToChar (arg1, arron)
This
Open the following file for more details on this exercise:
TS200_GOLDStockDevelopment_Exercises –
Open the following file for more details on this exercise:
TS200_GOLDStockDevelopment_Exercises –
Open the following file for more details on this exercise:
TS200_GOLDStockDevelopment_Exercises –
Open the following file for more details on this exercise:
TS200_GOLDStockDevelopment_Exercises –
Create a program process
XML Report
Executable
Modify Make File
Compile
New Program ?
Create report with
Create a program process
XML Report
Executable
Modify Make File
Compile
New Program ?
Create report with
Modify Make File
The makefile file is used to get a binary
Modify Make File
The makefile file is used to get a binary
Create a program process
XML Report
Executable
Modify Make File
Compile
New Program ?
Create report with
Create a program process
XML Report
Executable
Modify Make File
Compile
New Program ?
Create report with

Compilation
The compilation, though one command is used, two compiles are done
Compilation
The compilation, though one command is used, two compiles are done

Create a program process
XML Report
Executable
Modify Make File
Compile
New Program ?
Create report with
Create a program process
XML Report
Executable
Modify Make File
Compile
New Program ?
Create report with
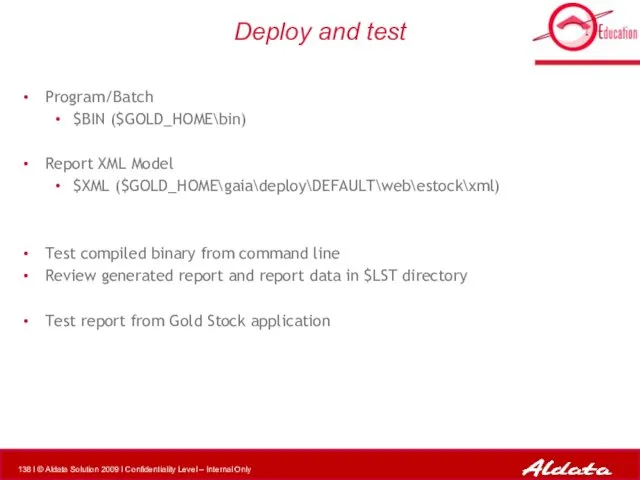
Deploy and test
Program/Batch
$BIN ($GOLD_HOME\bin)
Report XML Model
$XML ($GOLD_HOME\gaia\deploy\DEFAULT\web\estock\xml)
Test compiled binary from
Deploy and test
Program/Batch
$BIN ($GOLD_HOME\bin)
Report XML Model
$XML ($GOLD_HOME\gaia\deploy\DEFAULT\web\estock\xml)
Test compiled binary from
Open the following file for more details on this exercise:
TS200_GOLDStockDevelopment_Exercises -
Open the following file for more details on this exercise:
TS200_GOLDStockDevelopment_Exercises -
Open the following file for more details on this exercise:
TS200_GOLDStockDevelopment_Exercises -
Open the following file for more details on this exercise:
TS200_GOLDStockDevelopment_Exercises -
Create a program process
XML Report
Executable
Modify Make File
Compile
New Program ?
Create report with
Create a program process
XML Report
Executable
Modify Make File
Compile
New Program ?
Create report with

Create Patch
Files you MUST add to patch after a program was
Create Patch
Files you MUST add to patch after a program was
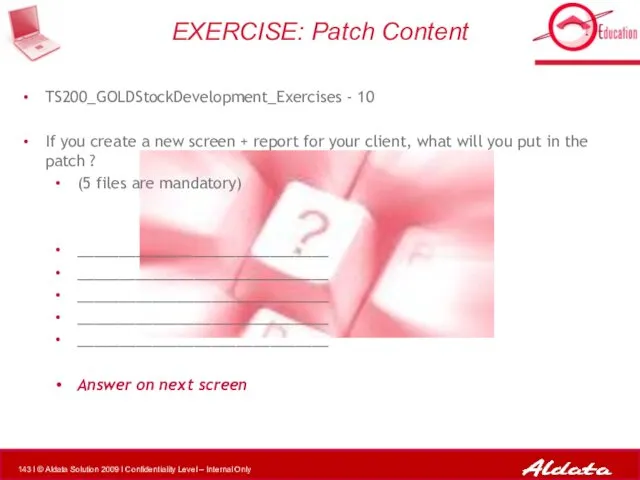
TS200_GOLDStockDevelopment_Exercises - 10
If you create a new screen + report for
TS200_GOLDStockDevelopment_Exercises - 10
If you create a new screen + report for
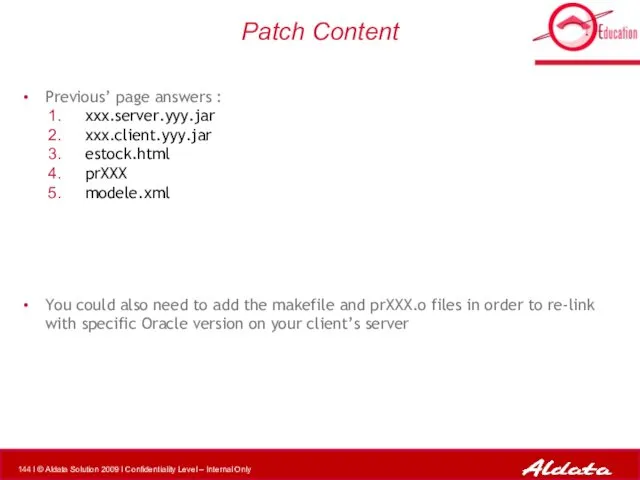
Patch Content
Previous’ page answers :
xxx.server.yyy.jar
xxx.client.yyy.jar
estock.html
prXXX
modele.xml
You could also need to add the
Patch Content
Previous’ page answers :
xxx.server.yyy.jar
xxx.client.yyy.jar
estock.html
prXXX
modele.xml
You could also need to add the

Questions?
Questions?
Please complete the following quiz on the intranet:
TS200_GOLDStockDevelopment_Quiz
Quiz
Please complete the following quiz on the intranet:
TS200_GOLDStockDevelopment_Quiz
Quiz
 New Tiggo 4! Добро пожаловать!
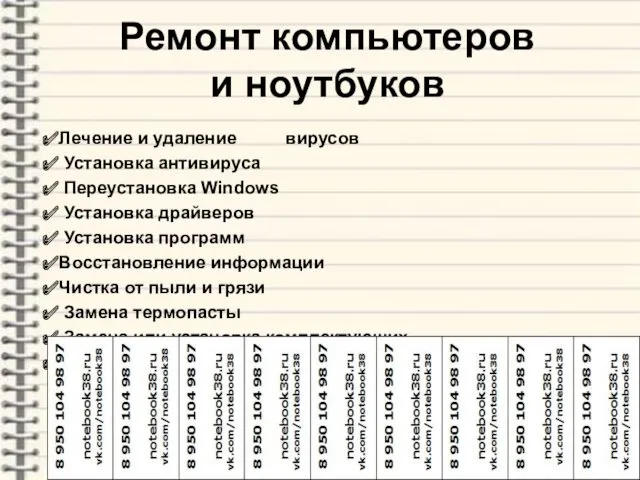 Ремонт компьютеров и ноутбуков
 CARlinto - сервис для покупки новых автомобилей
 Компания Батэль
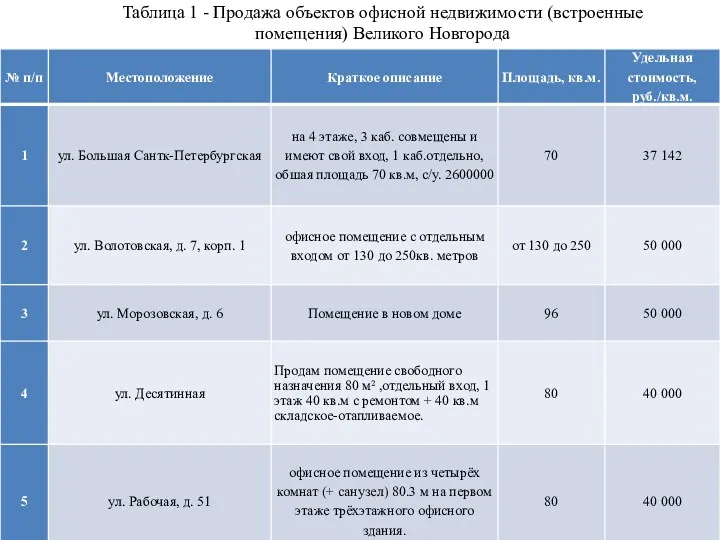 Продажа объектов офисной недвижимости (встроенные помещения) Великого Новгорода
 Инструктаж по работе с сетями Эльдорадо
 Стратегия развития аэропорта в качестве хаба международных перевозок (на примере АО Международный аэропорт Шереметьево)
 Stibo. Professional Services. Web content v4CW
 Внутренняя оптимизация. Текстовое ранжирование
 Позиционирование бренда Apple
 Компания Дальрефтранс. Перевозка скоропортящихся грузов
 Центр размещения заказов EOC. Краткое руководство пользователя
 Стратегия SMM-продвижения
 Рекомендации предпринимателям
 Коммерческое предложение на разработку брендбука
 Сувенирная продукция, как маркетинговый инструмент рекламной кампании
 GreenWay - для новичков
 Анализ эффективности маркетинговых связей с общественностью с целью повышения уровня продаж на примере гостиницы Дублин
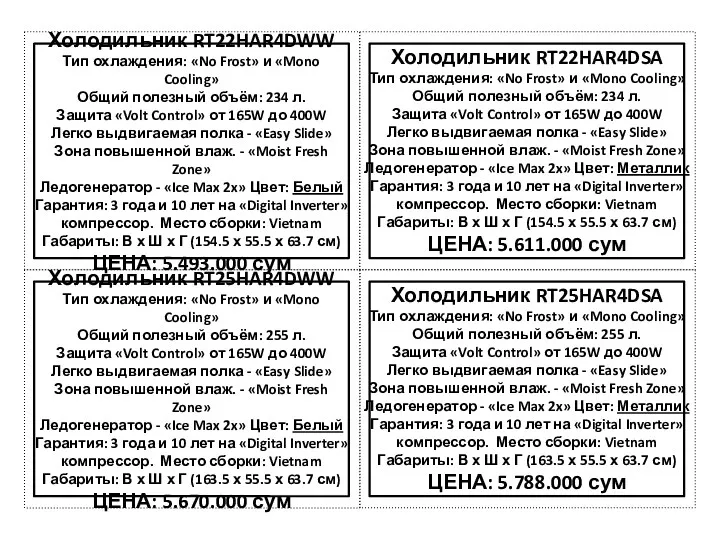 Ценники на большие холодильники Samsung 2021
 Making a presentation: language and phrases
 Конструктивные особенности межкомнатных дверей BELWOODDOORS. Лекция №1
 Каталог домов
 Школа – территория супер героев. Школьная форма
 Oriflame. Косметика растительного происхождения
 Маркетинг персонала: понятие, задачи, функции
 LED Bridgelux. Наша продукция
 Продуктовый портфель. Группа компаний О3
 Имидж, репутация, поведение как факторы жизненного успеха