- System сonfiguration (iPECS-MG)

Содержание
- 2. Contents iPECS-MG System Capacity Board Configuration Logical Slot Assignment IP Phone Registration SIP Phone Registration MPB
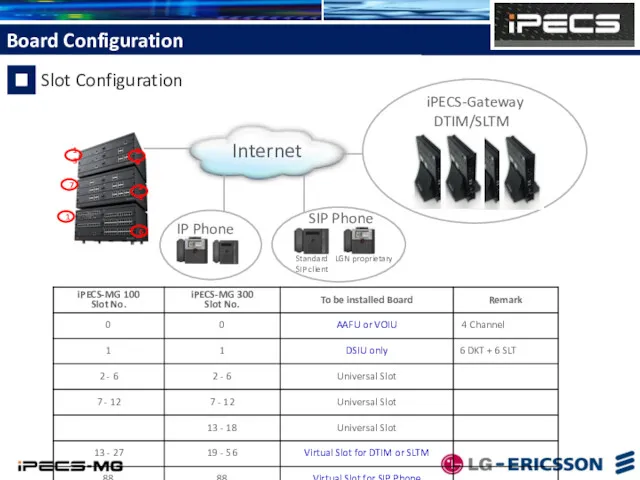
- 4. Internet iPECS-Gateway DTIM/SLTM Standard SIP client LGN proprietary SIP Phone IP Phone Slot Configuration 1 6
- 5. If the 1st switch of the DIP on the MPB100/300 is OFF position, boards on internal
- 6. User can check board configuration through RS232, telnet or Web-Admin. 1) RS232 - Connect Serial Cable
- 7. 3) Web-Admin Board Configuration Check
- 8. Installed Configuration is displayed. Internal Board Configuration
- 9. Add MAC Address to DTIM/SLTM Registration Table (PGM 107), Then if GW tries to register. It
- 10. The Station, CO line and VMIB’s logical order can be programmed by PGM 103. After changing,
- 11. IP phones (LIP-8000/7000 series) can be registered in iPECS-MG, which can be installed in the company
- 12. 1) Power on the IP Phone. the following message will be displayed on LCD. Press”*” to
- 13. When IP phone talks to Digital Phone or accesses CO line, The voice is connected to
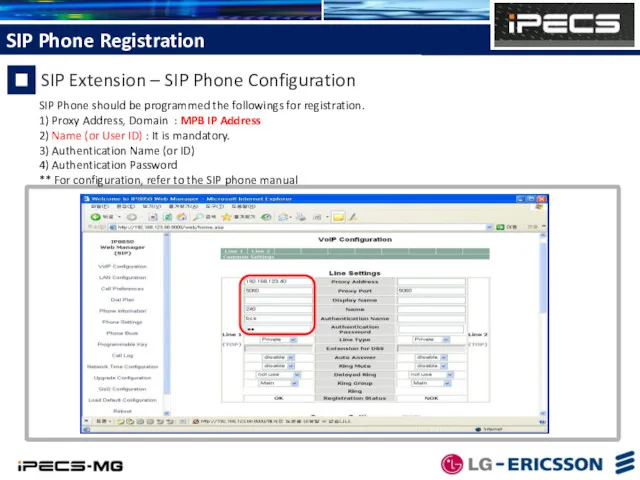
- 14. Standard SIP phones can be registered in iPECS-MG, which can be installed in the company LAN
- 15. SIP Phone should be programmed the followings for registration. 1) Proxy Address, Domain : MPB IP
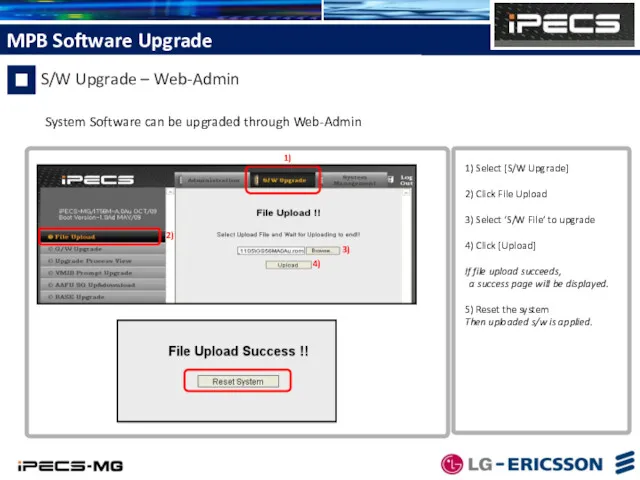
- 16. System Software can be upgraded through Web-Admin 1) Select [S/W Upgrade] 2) Click File Upload 3)
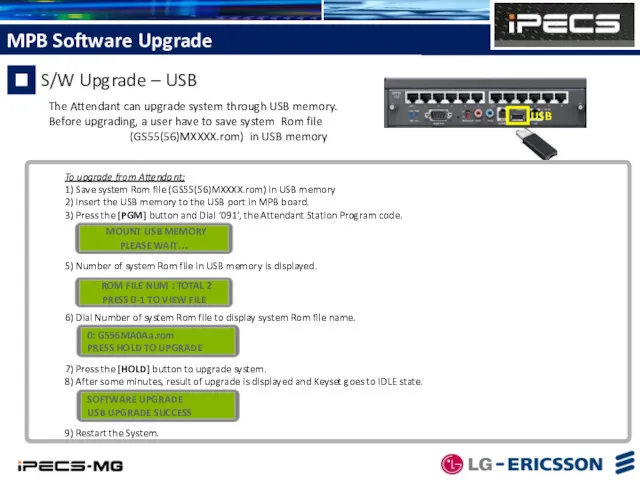
- 17. The Attendant can upgrade system through USB memory. Before upgrading, a user have to save system
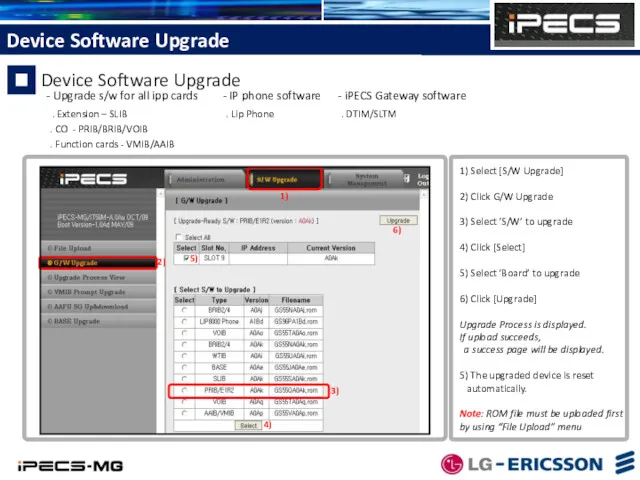
- 18. - Upgrade s/w for all ipp cards - IP phone software - iPECS Gateway software .
- 19. 1) Select [S/W Upgrade] 2) Click VMIB Prompt Upgrade 3) Select ‘Prompt’ to upload 4) Click
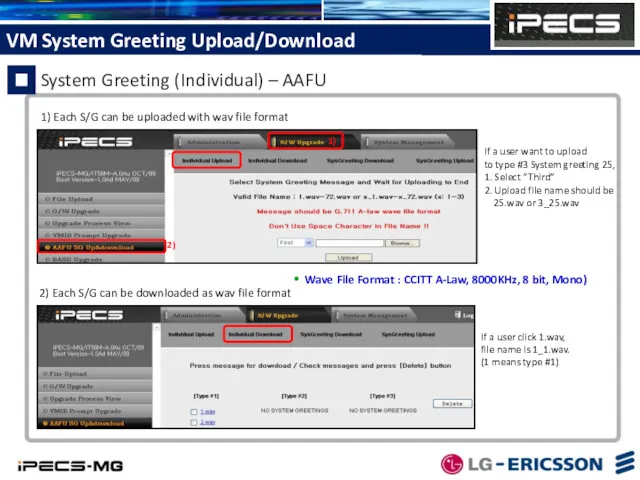
- 20. - VM System Greeting can be recorded by [Sound Recorder] - Each S/G can be uploaded
- 21. 1) 2) If a user click 1.wav, file name is 1_1.wav. (1 means type #1) If
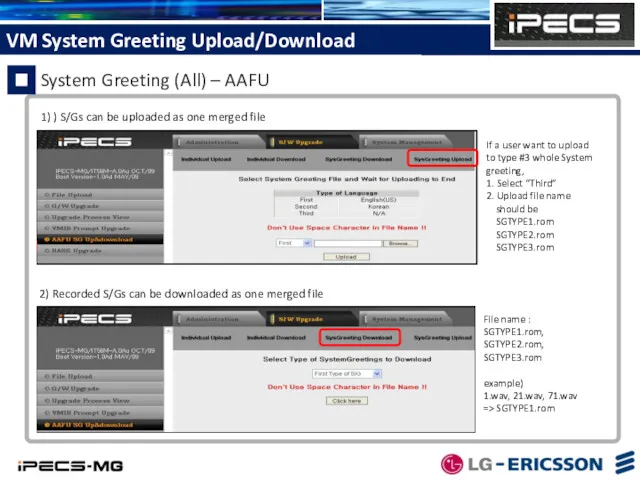
- 22. 1) 2) 1) ) S/Gs can be uploaded as one merged file 2) Recorded S/Gs can
- 24. Скачать презентацию
Contents
iPECS-MG System Capacity
Board Configuration
Logical Slot Assignment
IP Phone
Contents
iPECS-MG System Capacity
Board Configuration
Logical Slot Assignment
IP Phone
Internet
iPECS-Gateway
DTIM/SLTM
Standard
SIP client
LGN proprietary
SIP Phone
IP Phone
Slot Configuration
1
6
7
12
13
18
Internet
iPECS-Gateway
DTIM/SLTM
Standard
SIP client
LGN proprietary
SIP Phone
IP Phone
Slot Configuration
1
6
7
12
13
18
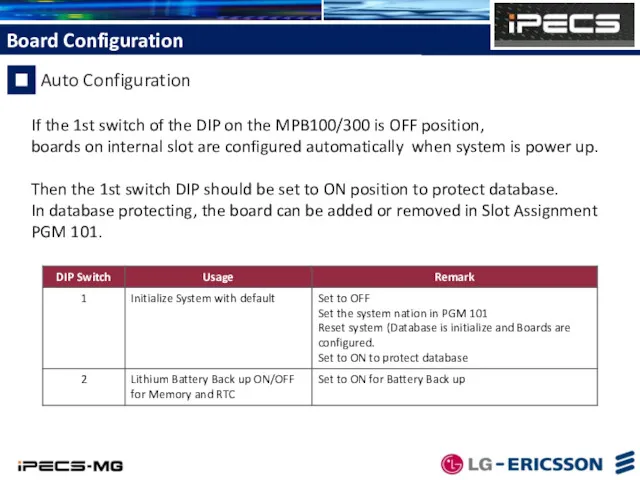
If the 1st switch of the DIP on the MPB100/300 is
If the 1st switch of the DIP on the MPB100/300 is
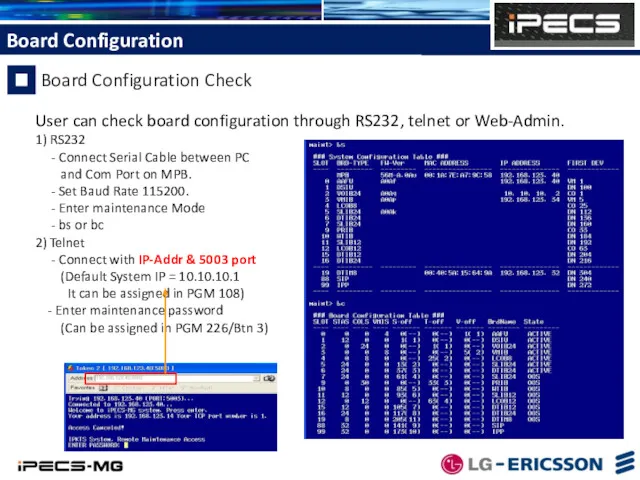
User can check board configuration through RS232, telnet or Web-Admin.
1) RS232
User can check board configuration through RS232, telnet or Web-Admin.
1) RS232
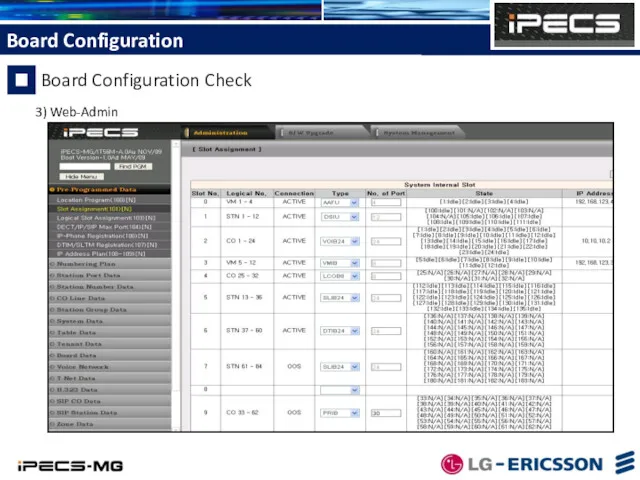
3) Web-Admin
Board Configuration Check
3) Web-Admin
Board Configuration Check
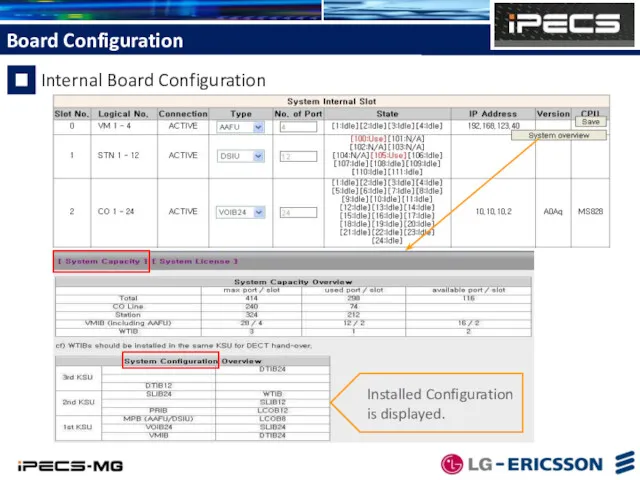
Installed Configuration
is displayed.
Internal Board Configuration
Installed Configuration
is displayed.
Internal Board Configuration
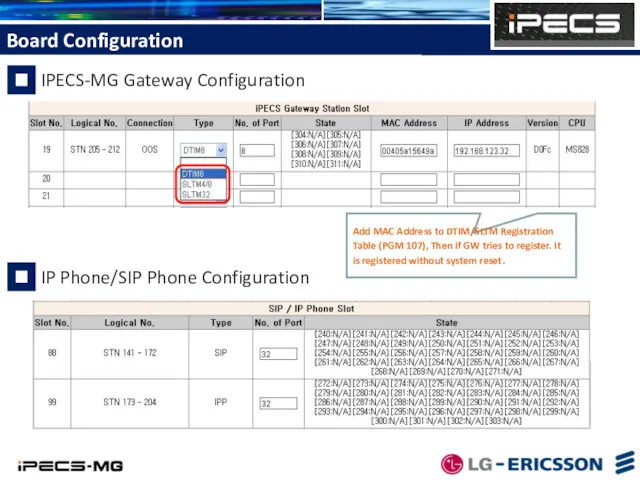
Add MAC Address to DTIM/SLTM Registration Table (PGM 107), Then if
Add MAC Address to DTIM/SLTM Registration Table (PGM 107), Then if
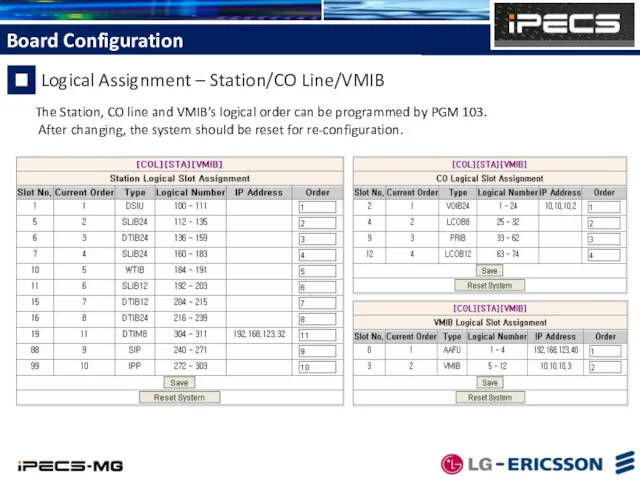
The Station, CO line and VMIB’s logical order can be programmed
The Station, CO line and VMIB’s logical order can be programmed

IP phones (LIP-8000/7000 series) can be registered in iPECS-MG, which can
IP phones (LIP-8000/7000 series) can be registered in iPECS-MG, which can
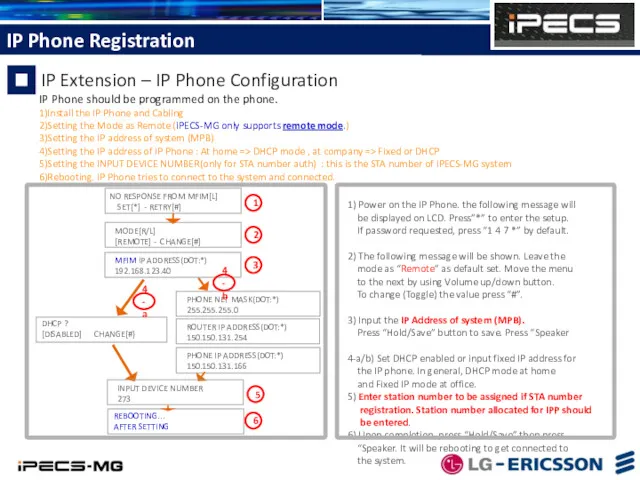
1) Power on the IP Phone. the following message will
1) Power on the IP Phone. the following message will
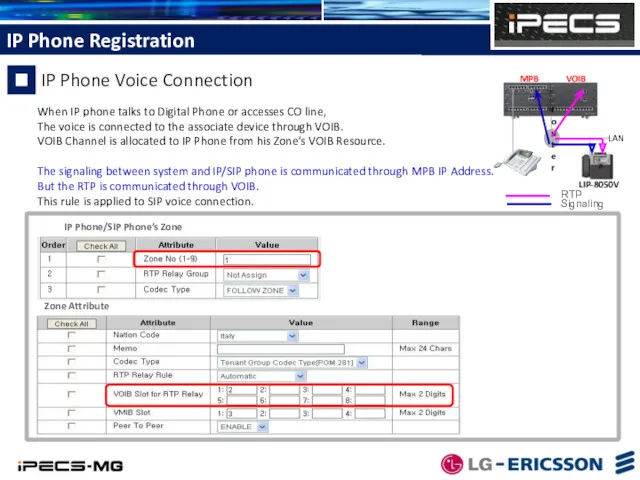
When IP phone talks to Digital Phone or accesses CO line,
The
When IP phone talks to Digital Phone or accesses CO line,
The
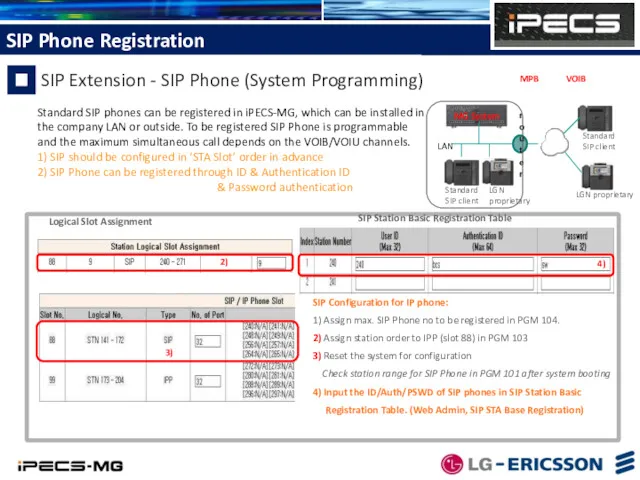
Standard SIP phones can be registered in iPECS-MG, which can be
Standard SIP phones can be registered in iPECS-MG, which can be
SIP Phone should be programmed the followings for registration.
1) Proxy Address,
SIP Phone should be programmed the followings for registration.
1) Proxy Address,
System Software can be upgraded through Web-Admin
1) Select [S/W Upgrade]
2) Click
System Software can be upgraded through Web-Admin
1) Select [S/W Upgrade]
2) Click
The Attendant can upgrade system through USB memory.
Before upgrading, a user
The Attendant can upgrade system through USB memory.
Before upgrading, a user
- Upgrade s/w for all ipp cards - IP phone
- Upgrade s/w for all ipp cards - IP phone
![1) Select [S/W Upgrade] 2) Click VMIB Prompt Upgrade 3)](/_ipx/f_webp&q_80&fit_contain&s_1440x1080/imagesDir/jpg/143736/slide-18.jpg)
1) Select [S/W Upgrade]
2) Click VMIB Prompt Upgrade
3) Select ‘Prompt’ to
1) Select [S/W Upgrade]
2) Click VMIB Prompt Upgrade
3) Select ‘Prompt’ to
![- VM System Greeting can be recorded by [Sound Recorder]](/_ipx/f_webp&q_80&fit_contain&s_1440x1080/imagesDir/jpg/143736/slide-19.jpg)
- VM System Greeting can be recorded by [Sound Recorder]
- Each
- VM System Greeting can be recorded by [Sound Recorder]
- Each
1)
2)
If a user click 1.wav,
file name is 1_1.wav.
(1 means type #1)
If
1)
2)
If a user click 1.wav,
file name is 1_1.wav.
(1 means type #1)
If
1)
2)
1) ) S/Gs can be uploaded as one merged file
2) Recorded
1)
2)
1) ) S/Gs can be uploaded as one merged file
2) Recorded
 Windows 2003/2008 Server. Администрирование
 Рекламное агентство ЭХО
 Использование простого класса в программе на C# с графическим интерфейсом пользователя (GUI)
 Поиск информации в Интернет (web)
 Дерево игры. Поиск выигрышной стратегии
 Динамические структуры данных (язык Си). Тема 6. Деревья
 Указатели в C++
 RunMusic. Мобільний додаток для активних людей
 Работа с XML-данными
 Глобальные компьютерные сети. Использование Internet –ресурсов в медицинской практике
 Компьютерные словари и системы компьютерного перевода текста
 Всемирная сеть Интернет
 Реляционные базы данных
 Основные этапы моделирования
 Человеко-компьютерное взаимодействие
 Компьютерные справочно-правовые системы
 Розвиток обчислювальної техніки
 Настройка сетевых параметров операционных систем Windows и Linux
 Классификация структур данных. Лекция 2
 1С управление торговлей как средство автоматизации торгово-расчетных операций
 Архитектура фон Неймана
 Структура научной статьи. Виды обзорных статей. Тезисы
 Основы сетей передачи данных. Общие принципы построения сетей. Коммутация каналов и пакетов
 Семантические элементы HTML
 Разработка алгоритмов и программ оперативной аналитической обработки коротких текстов
 Основи автоматизованого проектування
 Тж ақпараттық- аналитикалық жүйесі
 Антивирусные программы