- Arduino philosophy and community

Содержание
- 2. What is Arduino? Physical Device IDE Community http://www.arduino.cc
- 3. Arduino Philosophy and Community Open Source Physical Computing Platform “open source hardware” open source: free to
- 4. Arduino Hardware Similar to Basic Stamp (if you know of it) but cheaper, faster, & open
- 5. Arduino Hardware Variety Openness has its advantages, many different varieties. Anyone can build an Arduino work-alike
- 6. Arduino Capabilities 16 kBytes of Flash program memory 1 kByte of RAM 16 MHz (Apple II:
- 7. Arduino Types Comparison
- 8. Arduino Uno
- 9. Arduino Terminology “sketch” – a program you write to run on an Arduino board “pin” –
- 10. Arduino Software Like a text editor View/write/edit sketches But then you program them into hardware
- 11. Installing Arduino Get the Arduino software & unzip it Plug in Arduino board Install the driver
- 12. Plug in Arduino board
- 13. Windows Driver Install
- 14. Mac Driver Install
- 15. Selecting Location & Type usually highest numbered port starts with tty.usbserial
- 16. Arduino IDE
- 17. Using Arduino Write your sketch Press Compile button (to check for errors) Press Upload button to
- 18. Status Messages
- 19. Troubleshooting Most common problem is incorrect serial port setting If you ever have any “weird” errors
- 20. I made an LED blink, so what? Most actuators are switched on and off with a
- 21. Development Cycle Make as many changes as you want Not like most web programming: edit ➝
- 22. Lots of Built-in Examples And all over the Net. Search for “Arduino tutorial” or “Arduino notes”
- 23. Proteus ISIS Simulation System Proteus is a CAD (Computer Aided Design) type software package It combines
- 24. Proteus Menu and Navigation
- 25. Creating a Circuit on Proteus
- 26. Connecting Elements
- 27. Simulation
- 28. Installing Arduino Library for Proteus For Windows XP Copy file BLOGEMBARCADO.LIB into: C:\Program Files\Labcenter Electronics\Proteus 8
- 29. Loading the compiled file to Proteus File –> Preferences -> Show verbose output during compilation
- 30. Loading the compiled file to Proteus Select and copy the location of .hex file
- 31. Loading the compiled file to Proteus Paste the location of .hex file here Double click
- 32. Useful Links http://arduino.cc/ Official homepage. Also check out the Playground & forums http://arduino.ru/ Lots of useful
- 33. Some Common Commands Serial.println(value); Prints the value to the Serial Monitor on your computer pinMode(pin, mode);
- 34. Hidden Treasure int main(void) { init(); // initializes the Arduino hardware setup(); for (;;) loop(); return
- 35. Tasks Blinking LED on 12th pin 3 LEDs blink by order (interval - 1s) Traffic lights
- 36. Arduino data types
- 37. Flow control do{ // assign readSensors value to x x = readSensors(); delay (50); // pauses
- 38. Using Floating-Point Numbers float value = 1.1; void setup(){ Serial.begin(9600); } void loop(){ value = value
- 39. Arrays Arrays are zero indexed, with the first value in the array beginning at index number
- 41. Скачать презентацию
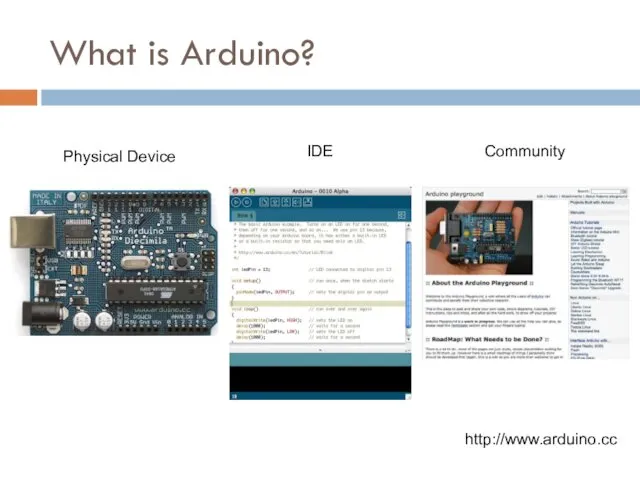
What is Arduino?
Physical Device
IDE
Community
http://www.arduino.cc
What is Arduino?
Physical Device
IDE
Community
http://www.arduino.cc
Arduino Philosophy and Community
Open Source Physical Computing Platform
“open source hardware”
open source:
Arduino Philosophy and Community
Open Source Physical Computing Platform
“open source hardware”
open source:
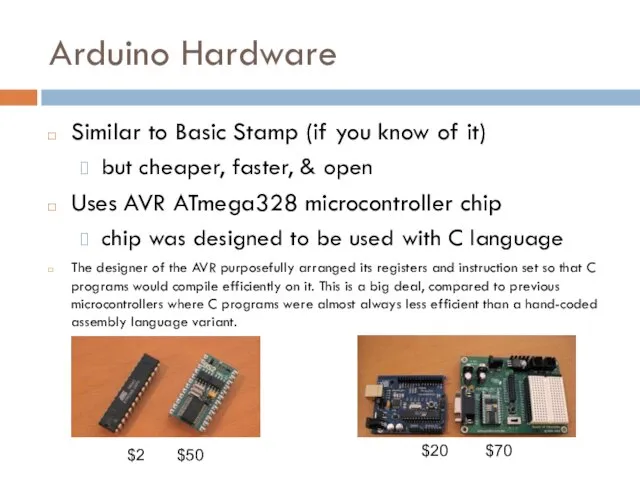
Arduino Hardware
Similar to Basic Stamp (if you know of it)
but cheaper,
Arduino Hardware
Similar to Basic Stamp (if you know of it)
but cheaper,
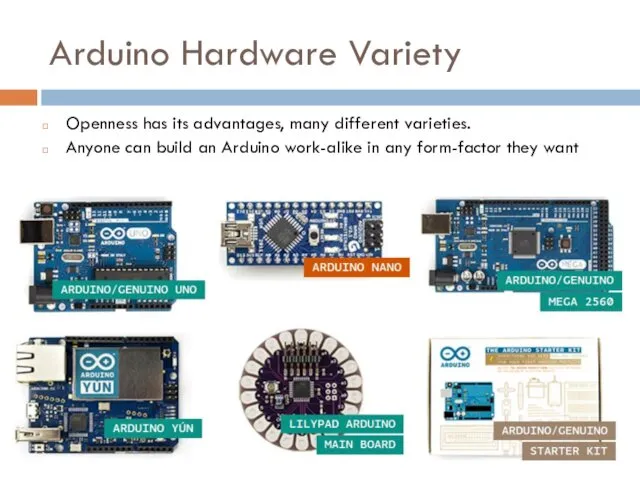
Arduino Hardware Variety
Openness has its advantages, many different varieties.
Anyone can build
Arduino Hardware Variety
Openness has its advantages, many different varieties.
Anyone can build
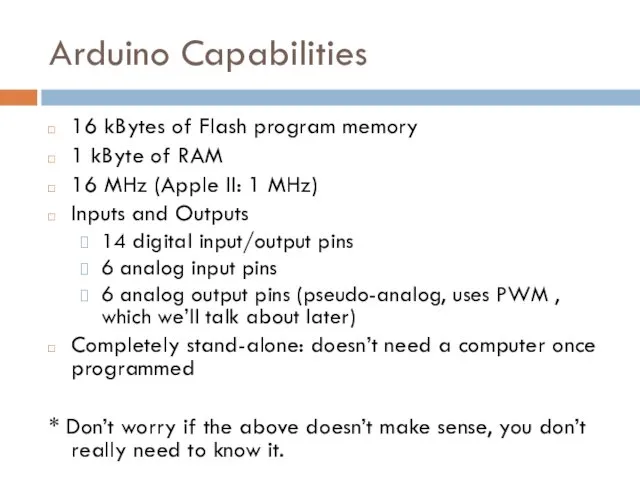
Arduino Capabilities
16 kBytes of Flash program memory
1 kByte of RAM
16 MHz
Arduino Capabilities
16 kBytes of Flash program memory
1 kByte of RAM
16 MHz
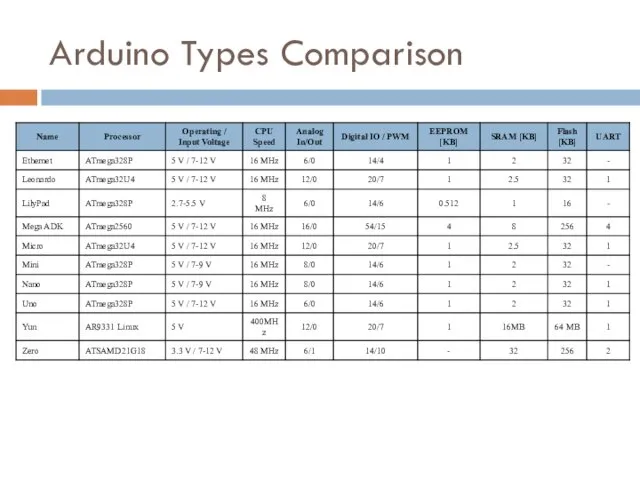
Arduino Types Comparison
Arduino Types Comparison
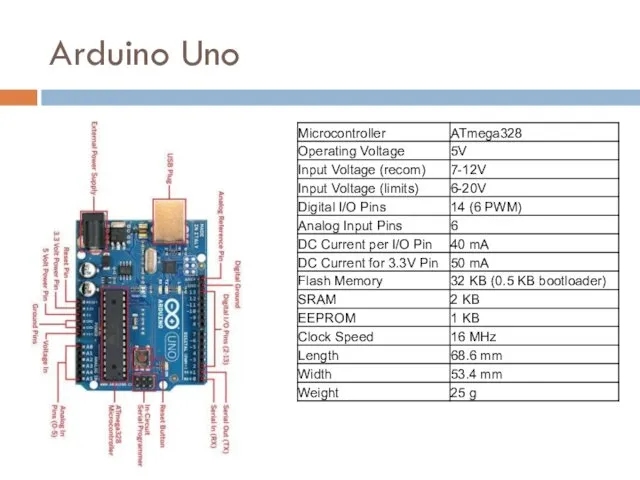
Arduino Uno
Arduino Uno
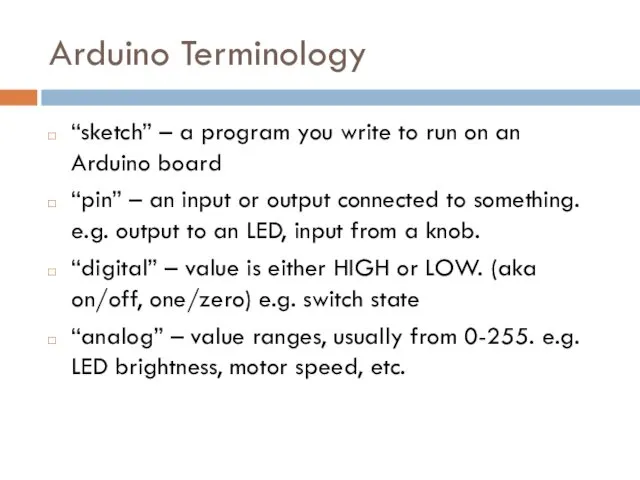
Arduino Terminology
“sketch” – a program you write to run on an
Arduino Terminology
“sketch” – a program you write to run on an
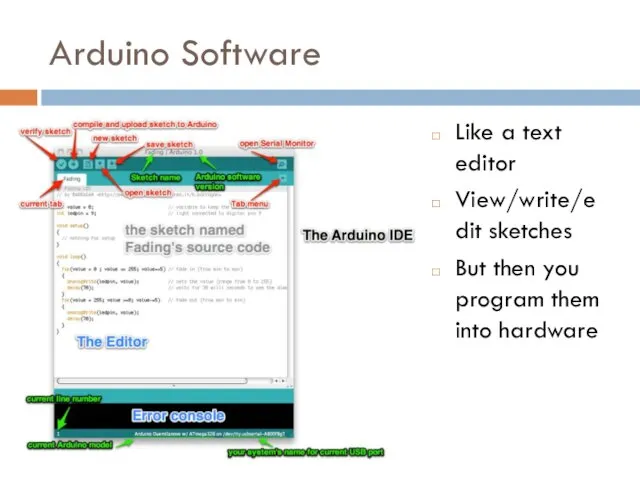
Arduino Software
Like a text editor
View/write/edit sketches
But then you program them into
Arduino Software
Like a text editor
View/write/edit sketches
But then you program them into
Installing Arduino
Get the Arduino software & unzip it
Plug in Arduino board
Install
Installing Arduino
Get the Arduino software & unzip it
Plug in Arduino board
Install
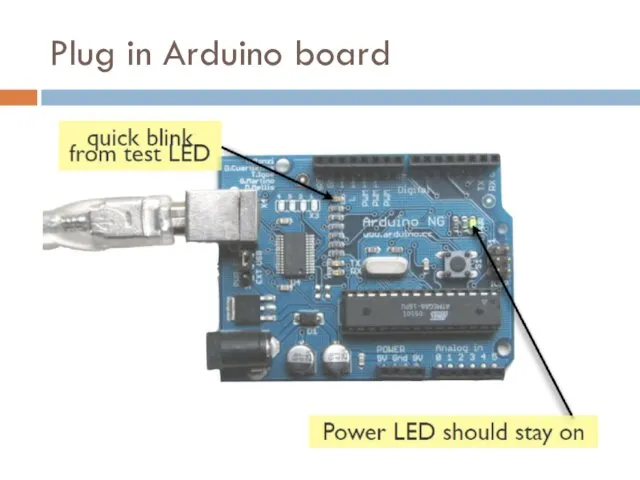
Plug in Arduino board
Plug in Arduino board
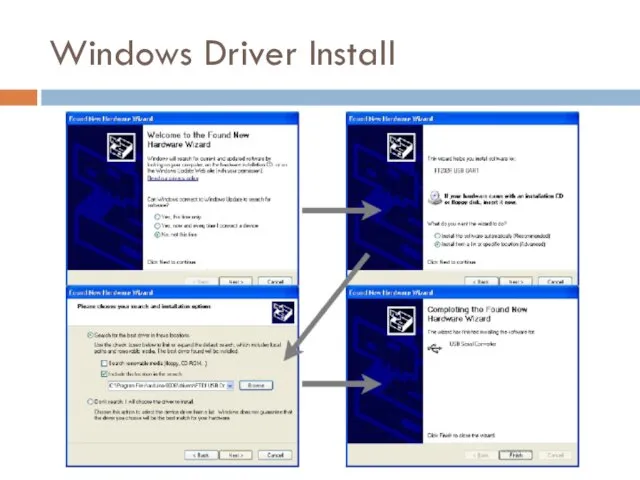
Windows Driver Install
Windows Driver Install
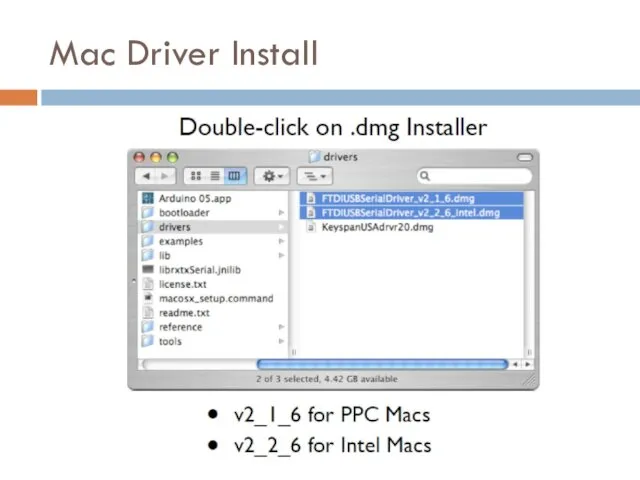
Mac Driver Install
Mac Driver Install
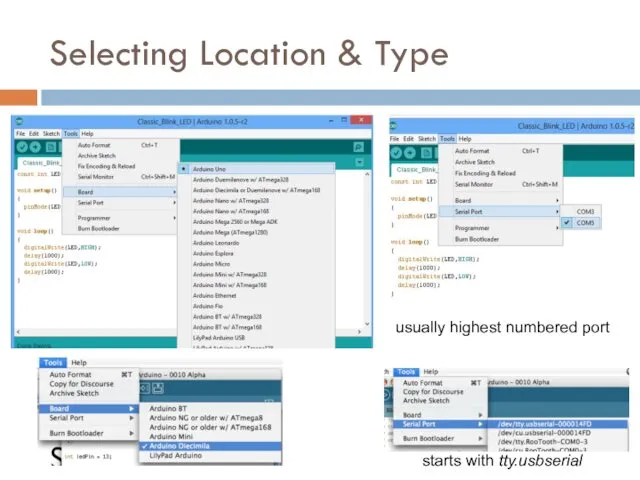
Selecting Location & Type
usually highest numbered port
starts with tty.usbserial
Selecting Location & Type
usually highest numbered port
starts with tty.usbserial
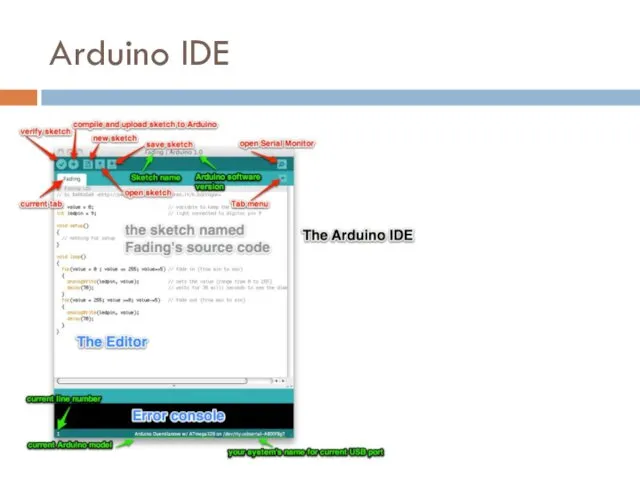
Arduino IDE
Arduino IDE
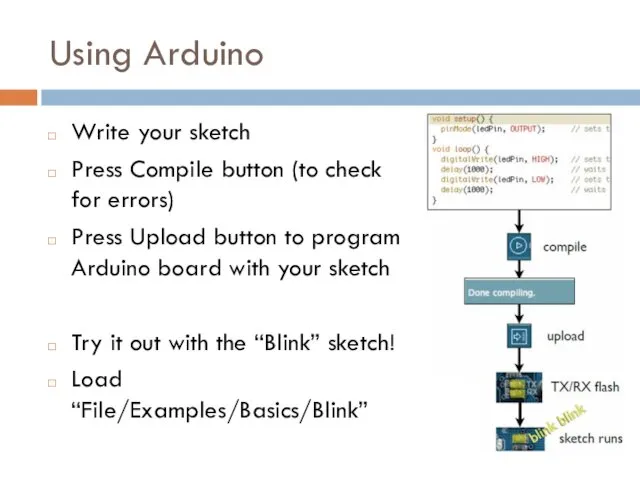
Using Arduino
Write your sketch
Press Compile button (to check for errors)
Press Upload
Using Arduino
Write your sketch
Press Compile button (to check for errors)
Press Upload
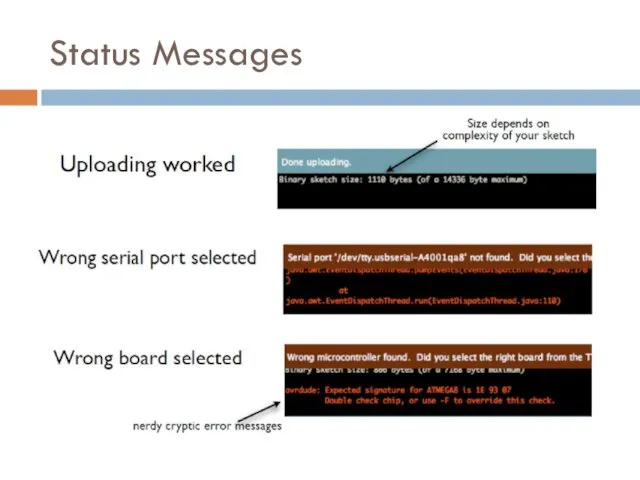
Status Messages
Status Messages
Troubleshooting
Most common problem is incorrect serial port setting
If you ever have
Troubleshooting
Most common problem is incorrect serial port setting
If you ever have
I made an LED blink, so what?
Most actuators are switched on
I made an LED blink, so what?
Most actuators are switched on
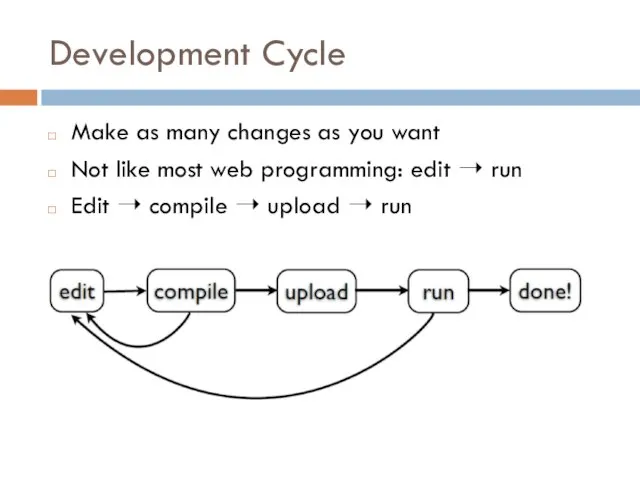
Development Cycle
Make as many changes as you want
Not like most web
Development Cycle
Make as many changes as you want
Not like most web
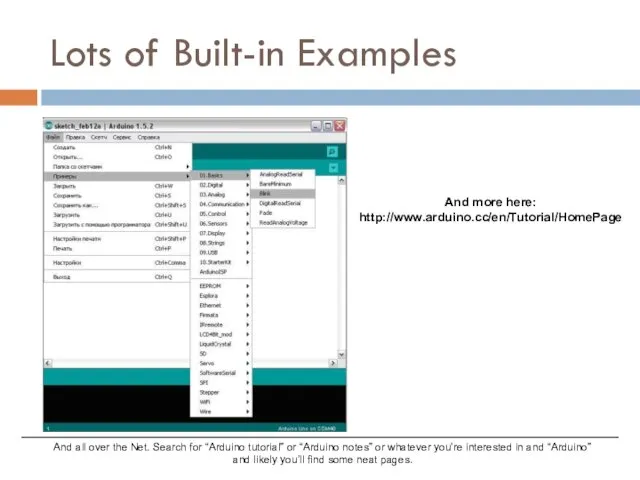
Lots of Built-in Examples
And all over the Net. Search for “Arduino
Lots of Built-in Examples
And all over the Net. Search for “Arduino
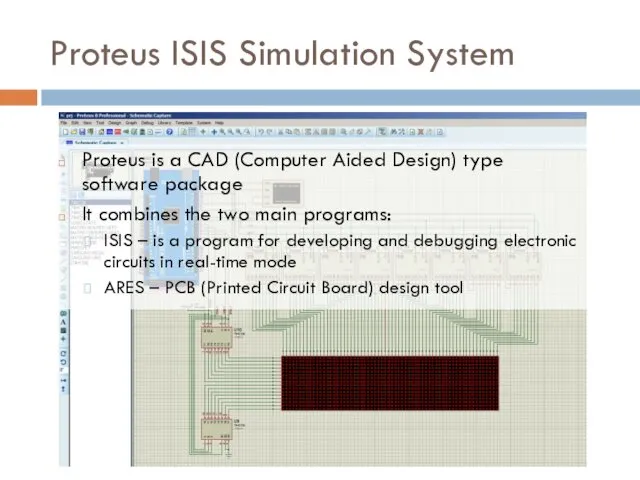
Proteus ISIS Simulation System
Proteus is a CAD (Computer Aided Design) type
Proteus ISIS Simulation System
Proteus is a CAD (Computer Aided Design) type
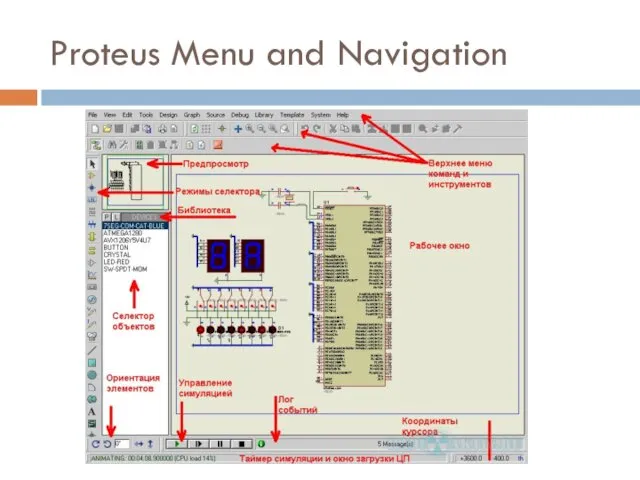
Proteus Menu and Navigation
Proteus Menu and Navigation
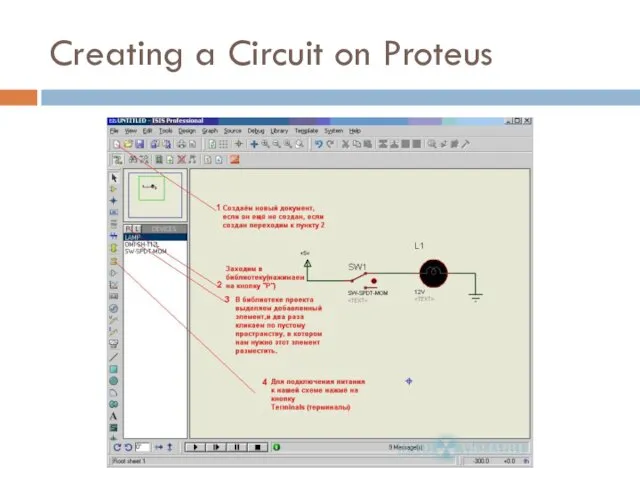
Creating a Circuit on Proteus
Creating a Circuit on Proteus
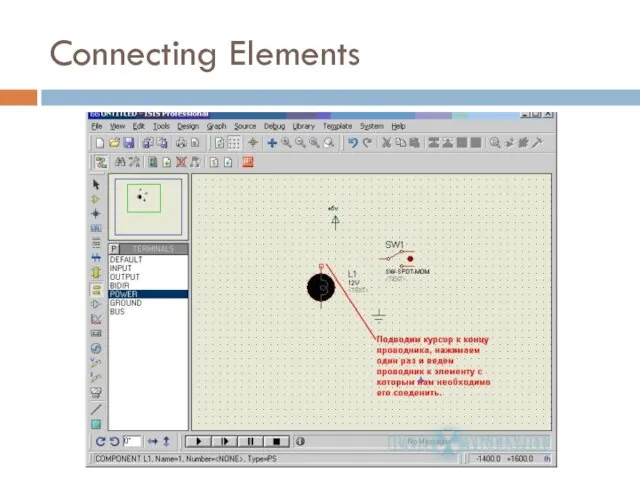
Connecting Elements
Connecting Elements
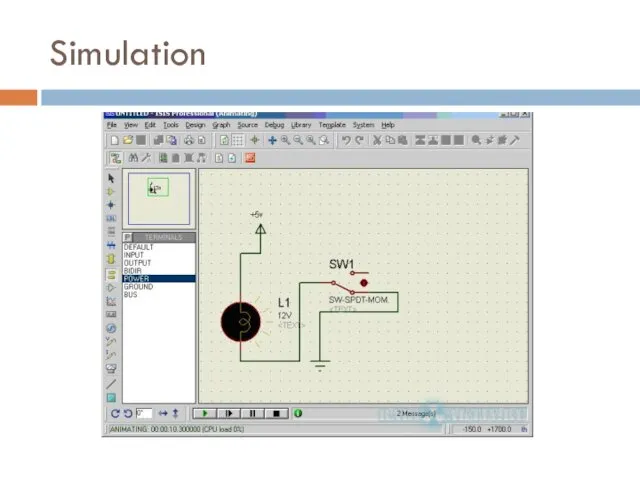
Simulation
Simulation
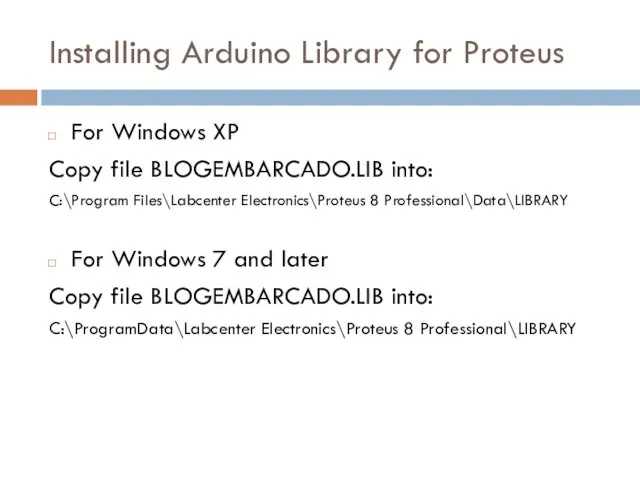
Installing Arduino Library for Proteus
For Windows XP
Copy file BLOGEMBARCADO.LIB into:
C:\Program Files\Labcenter
Installing Arduino Library for Proteus
For Windows XP
Copy file BLOGEMBARCADO.LIB into:
C:\Program Files\Labcenter
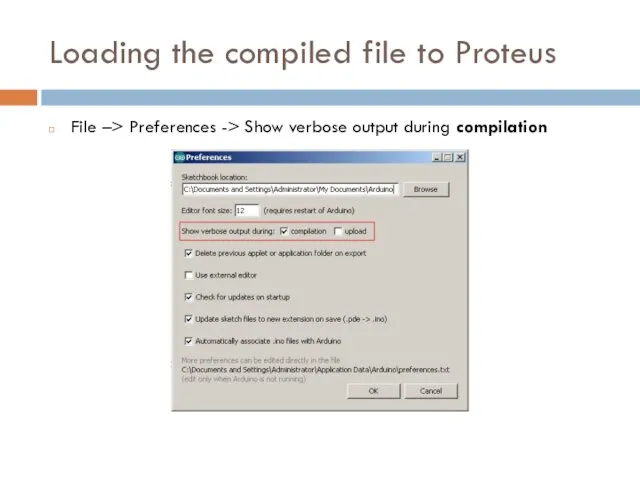
Loading the compiled file to Proteus
File –> Preferences -> Show verbose
Loading the compiled file to Proteus
File –> Preferences -> Show verbose
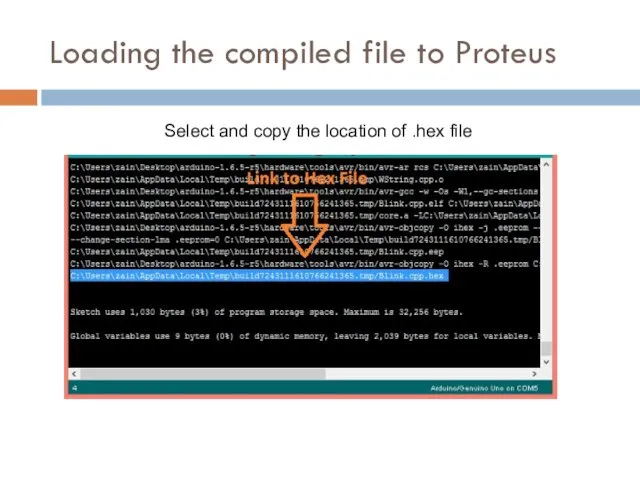
Loading the compiled file to Proteus
Select and copy the location of
Loading the compiled file to Proteus
Select and copy the location of
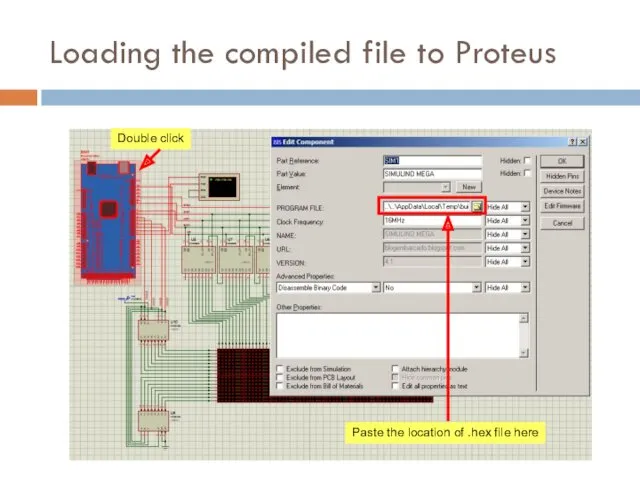
Loading the compiled file to Proteus
Paste the location of .hex file
Loading the compiled file to Proteus
Paste the location of .hex file
Useful Links
http://arduino.cc/
Official homepage. Also check out the Playground & forums
http://arduino.ru/
Lots of
Useful Links
http://arduino.cc/
Official homepage. Also check out the Playground & forums
http://arduino.ru/
Lots of
Some Common Commands
Serial.println(value);
Prints the value to the Serial Monitor on your
Some Common Commands
Serial.println(value); Prints the value to the Serial Monitor on your
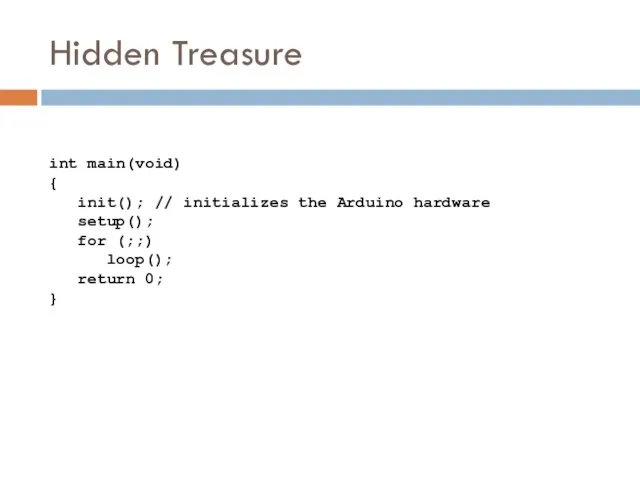
Hidden Treasure
int main(void)
{
init(); // initializes the Arduino hardware
setup();
for
Hidden Treasure
int main(void)
{
init(); // initializes the Arduino hardware
setup();
for
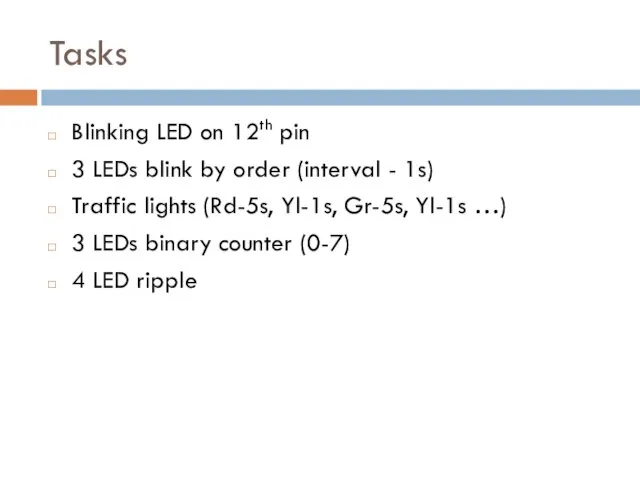
Tasks
Blinking LED on 12th pin
3 LEDs blink by order (interval -
Tasks
Blinking LED on 12th pin
3 LEDs blink by order (interval -
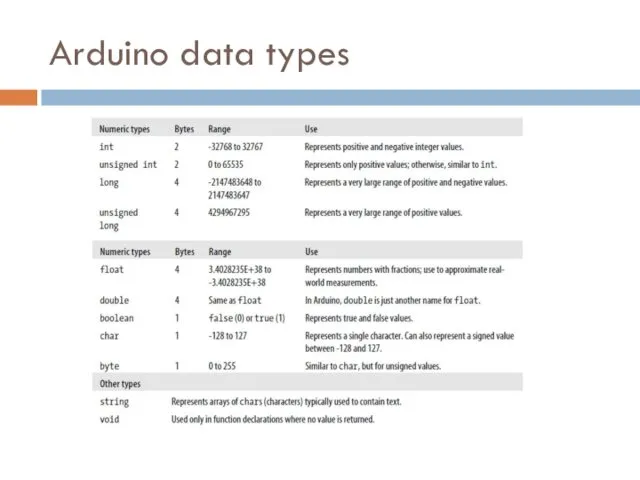
Arduino data types
Arduino data types
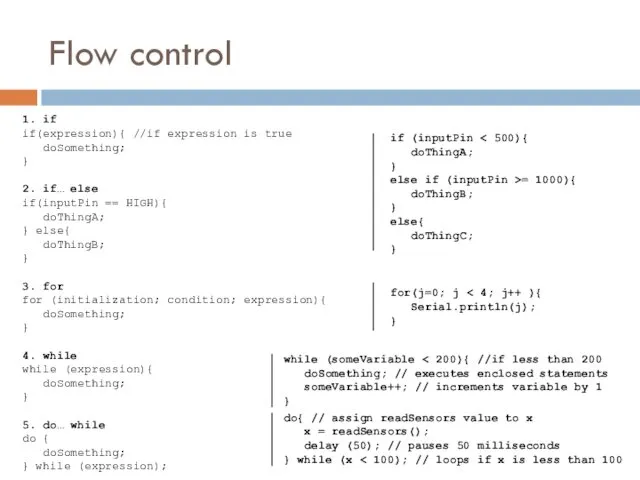
Flow control
do{ // assign readSensors value to x
x =
Flow control
do{ // assign readSensors value to x
x =
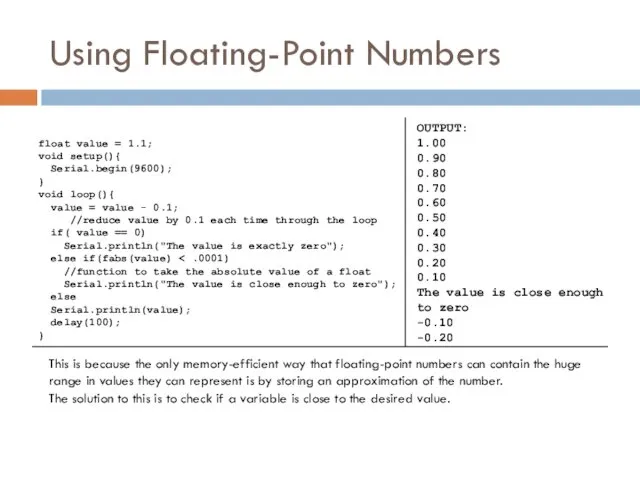
Using Floating-Point Numbers
float value = 1.1;
void setup(){
Serial.begin(9600);
}
void loop(){
value =
Using Floating-Point Numbers
float value = 1.1;
void setup(){
Serial.begin(9600);
}
void loop(){
value =
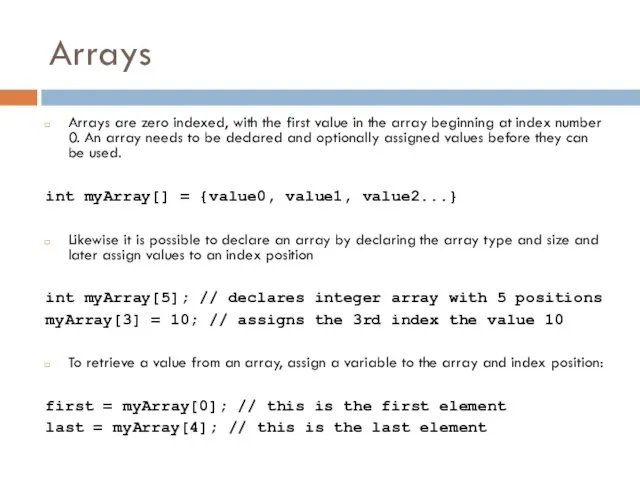
Arrays
Arrays are zero indexed, with the first value in the array
Arrays
Arrays are zero indexed, with the first value in the array
 Материалы, применяемые для изготовления горных инструментов. ТИПИ. Тема 1
 Информационные технологии в профессии. Сфера IT
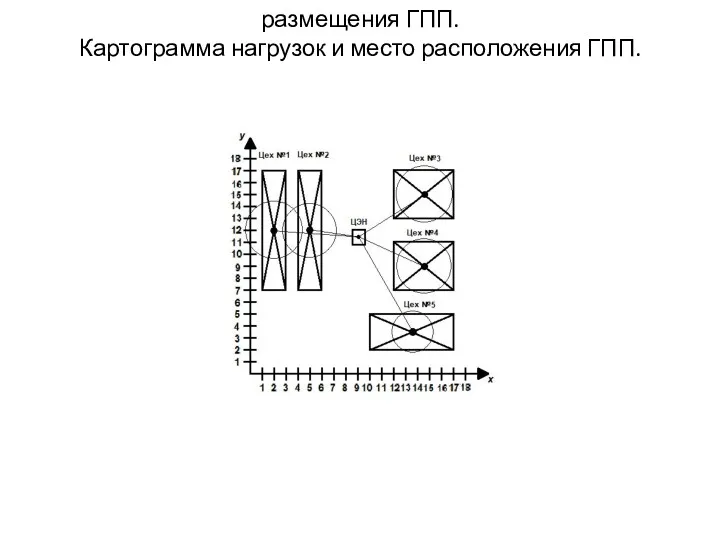 Размещения ГПП. Картограмма нагрузок и место расположения ГПП
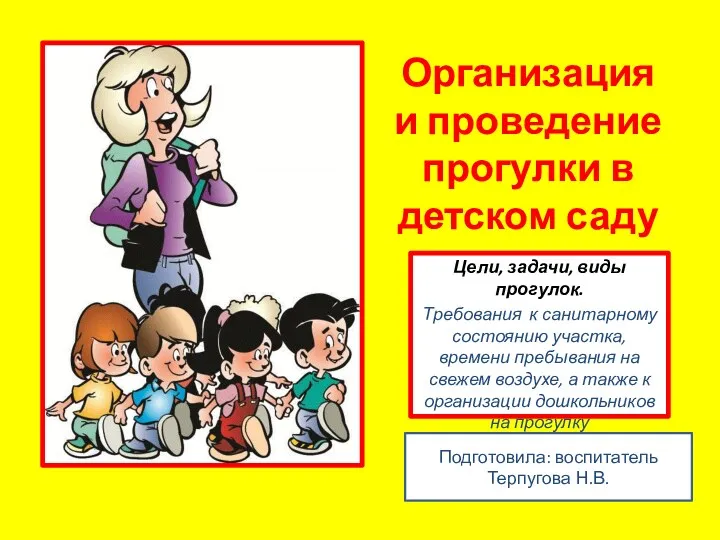 организация и проведение прогулки в детском саду
 Что такое музыка. Тест
 Газетница для хранения газет и журналов
 Наполняем ваш каталог качественными описаниями товаров
 Методическое объединение.
 Гуманитарные проблемы информационной безопасности
 Святая блаженная Матрона Московская
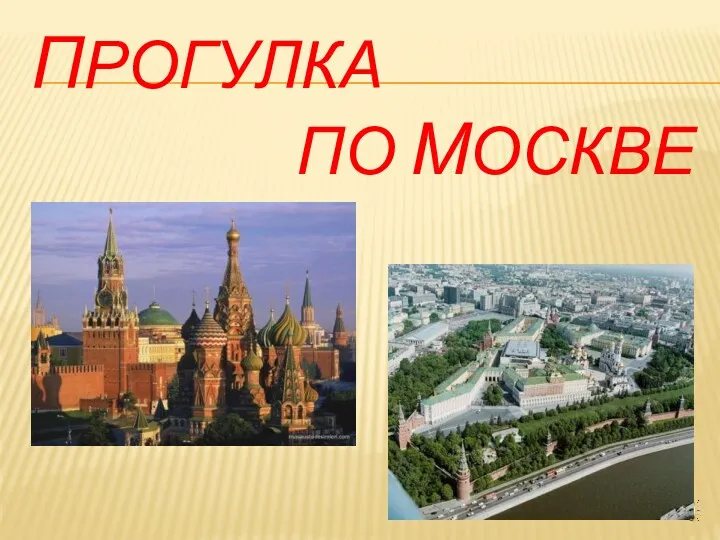 Презентация Прогулка по Москве
 Domino Effect Analysis and Assessment of Industrial Sites: A Review of Methodologies and Software Tools
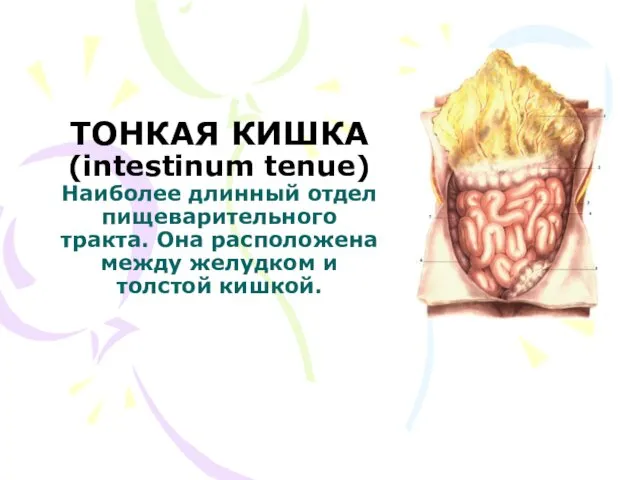 Тонкая кишка. Длина тонкой кишки у человека
 Введение в фармакологию. Основы фармакокинетики
 Презентация Праздники разных стран мира
 Опыты с веществами
 Скажи нет терроризму
 Соединения деталей
 Поделка оригами Зайчик
 Устройства электропитания УЭП-МПК
 Что же такое Qlean?
 Газобалонное оборудование второго поколения на СНГ и СПГ
 футбол роботов
 Алгоритм Беллмана – Форда
 Теория вероятностей. Решение заданий №4
 Взаимодествие детей и воспитателя в образовательной области Социально- коммуникативное развитие
 Физические методы в стоматологии
 Массовое применение кабелей с изоляцией СПЭ в странах Европы и США