- BoardDiag Test Environment & Coverage

Содержание
- 2. 2. Recommended repair process Defective samples that fail to boot up normally are recommended to undergo
- 3. 3. Qualcomm Download Mode Qualcomm main chipset’s BOOT area recovery mode When AP processor fails to
- 4. 4. How to enter Qdload(= Qualcomm Download) mode (1) BoardDiag diagnosis SW operates only in Qdload
- 5. 4. How to enter Qdload(= Qualcomm Download) mode (2) 1. Ground Boot_Config0 (or 6) switch. 2.
- 6. 5. How to use BoardDiag(1) Booting Problem Test 1. Select AP chipset 2. Select Com Port
- 7. 5. How to use BoardDiag(2) 3) Restore Device 1. Select AP chipset 2. Select Com Port
- 8. 6. BoardDiag Setting Detail(1) Image Extraction - Extracting images needed for diagnosis SW to download on
- 9. 6. BoardDiag Setting Detail(2) 2) Board Diag Test AP check - Checks out whether Qualcomm chipsets
- 10. 6. BoardDiag Setting Detail(3) 3) Restore Device Restore Boot Image - Erases the existing terminal’s boot
- 11. 6. BoardDiag Setting Detail(4) 4) Select model, port and target directory Model Name - Selects the
- 12. 6. BoardDiag Setting Detail(5) 6) Test Results The result of the test selected is displayed. Regardless
- 13. 6. BoardDiag Setting Detail(6) - Sample Test AP/EMMC(read&write)/SDRAM diagnosis testing Test completed. All Pass
- 14. 7. Repair guide based on diagnosis “Device is not in DLOAD mode.” This happens when the
- 15. 7. Repair guide based on diagnosis 2) “No response from the device. Check PMIC first and
- 16. 7. Repair guide based on diagnosis 3) AP Fail Case AP fails due to two causes
- 17. 7. Repair guide based on diagnosis 4) eMMC Fail Case (Left) eMMC read or write fails
- 18. 7. Repair guide based on diagnosis 5) SDRAM Fail Case DDR RAM test fails as on
- 19. 7. Repair guide based on diagnosis 6) PMIC test As in the figure on the right,
- 21. Скачать презентацию
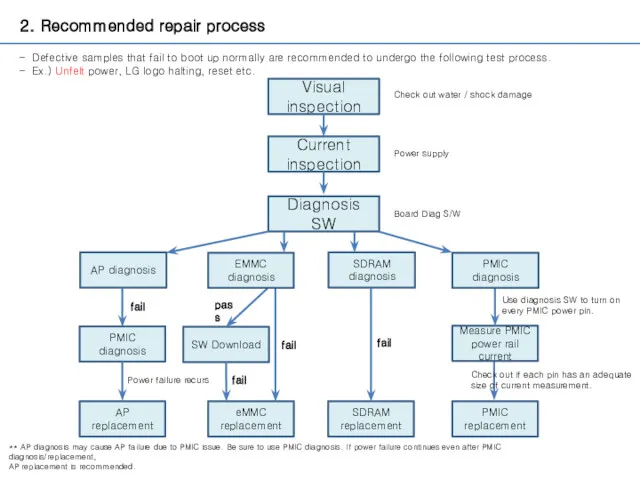
2. Recommended repair process
Defective samples that fail to boot up
2. Recommended repair process
Defective samples that fail to boot up
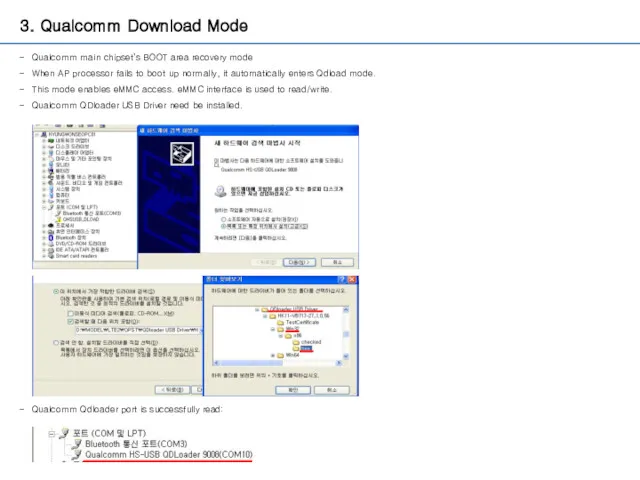
3. Qualcomm Download Mode
Qualcomm main chipset’s BOOT area recovery mode
When
3. Qualcomm Download Mode
Qualcomm main chipset’s BOOT area recovery mode
When
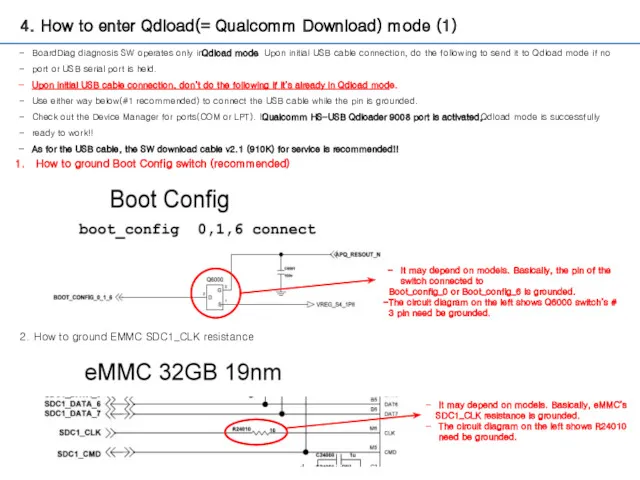
4. How to enter Qdload(= Qualcomm Download) mode (1)
BoardDiag diagnosis SW
4. How to enter Qdload(= Qualcomm Download) mode (1)
BoardDiag diagnosis SW
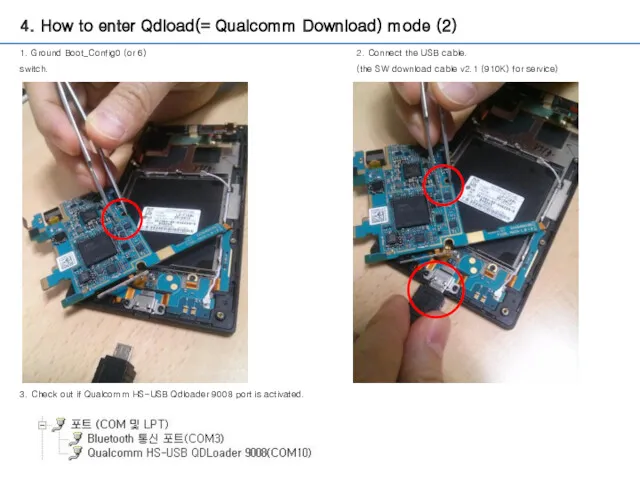
4. How to enter Qdload(= Qualcomm Download) mode (2)
1. Ground Boot_Config0
4. How to enter Qdload(= Qualcomm Download) mode (2)
1. Ground Boot_Config0
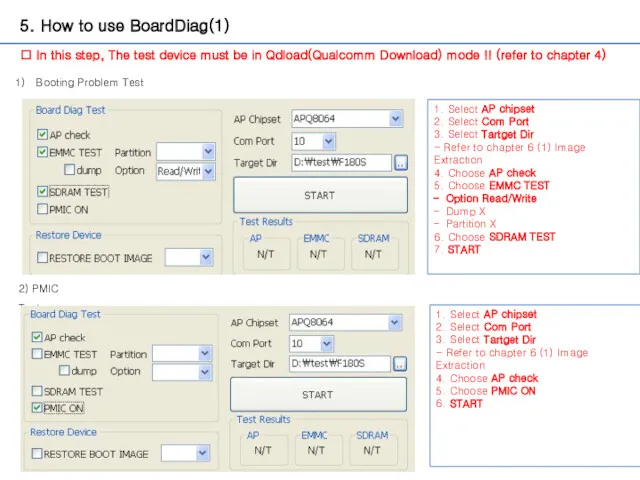
5. How to use BoardDiag(1)
Booting Problem Test
1. Select AP chipset
2. Select
5. How to use BoardDiag(1)
Booting Problem Test
1. Select AP chipset
2. Select
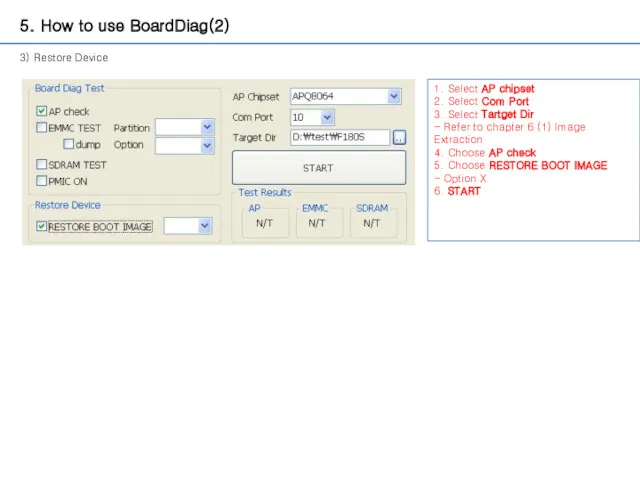
5. How to use BoardDiag(2)
3) Restore Device
1. Select AP chipset
2. Select
5. How to use BoardDiag(2)
3) Restore Device
1. Select AP chipset
2. Select
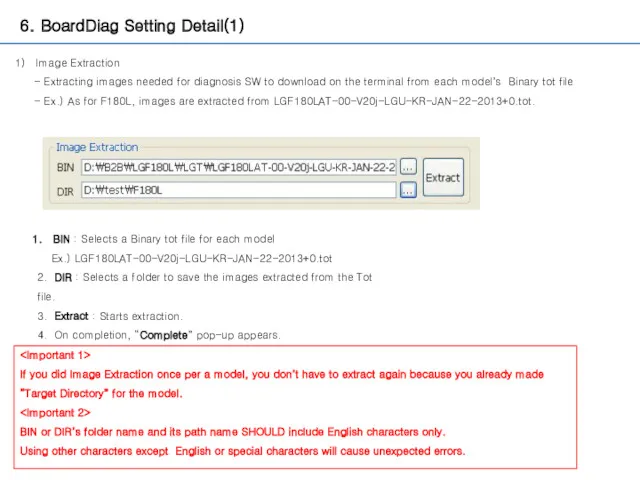
6. BoardDiag Setting Detail(1)
Image Extraction
- Extracting images needed for diagnosis
6. BoardDiag Setting Detail(1)
Image Extraction
- Extracting images needed for diagnosis
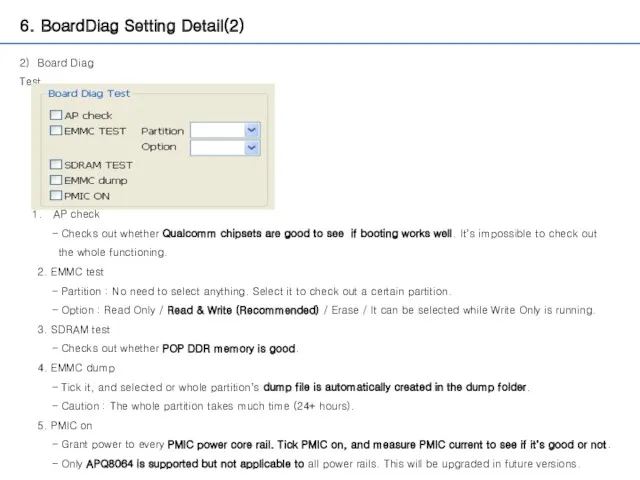
6. BoardDiag Setting Detail(2)
2) Board Diag Test
AP check
- Checks
6. BoardDiag Setting Detail(2)
2) Board Diag Test
AP check
- Checks
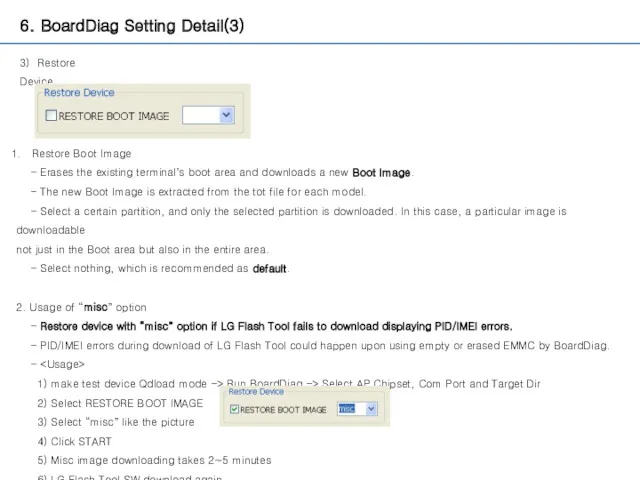
6. BoardDiag Setting Detail(3)
3) Restore Device
Restore Boot Image
- Erases the
6. BoardDiag Setting Detail(3)
3) Restore Device
Restore Boot Image
- Erases the
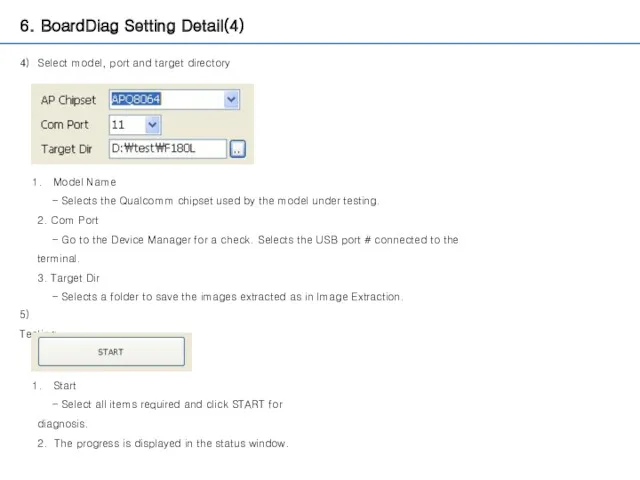
6. BoardDiag Setting Detail(4)
4) Select model, port and target directory
Model Name
6. BoardDiag Setting Detail(4)
4) Select model, port and target directory
Model Name

6. BoardDiag Setting Detail(5)
6) Test Results
The result of the test selected
6. BoardDiag Setting Detail(5)
6) Test Results
The result of the test selected
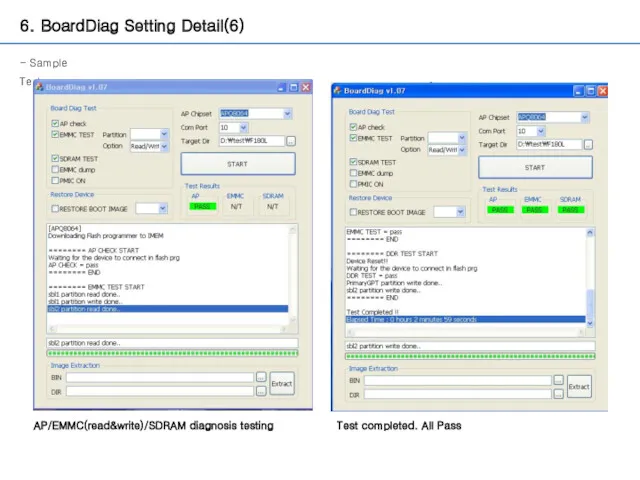
6. BoardDiag Setting Detail(6)
- Sample Test
AP/EMMC(read&write)/SDRAM diagnosis testing
Test completed. All
6. BoardDiag Setting Detail(6)
- Sample Test
AP/EMMC(read&write)/SDRAM diagnosis testing
Test completed. All
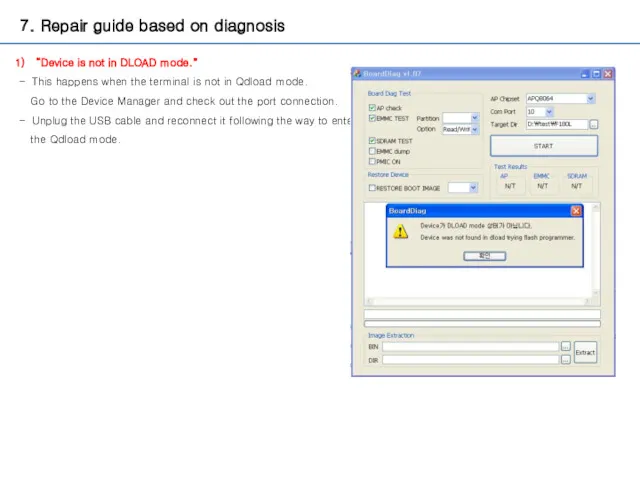
7. Repair guide based on diagnosis
“Device is not in DLOAD mode.”
This
7. Repair guide based on diagnosis
“Device is not in DLOAD mode.”
This
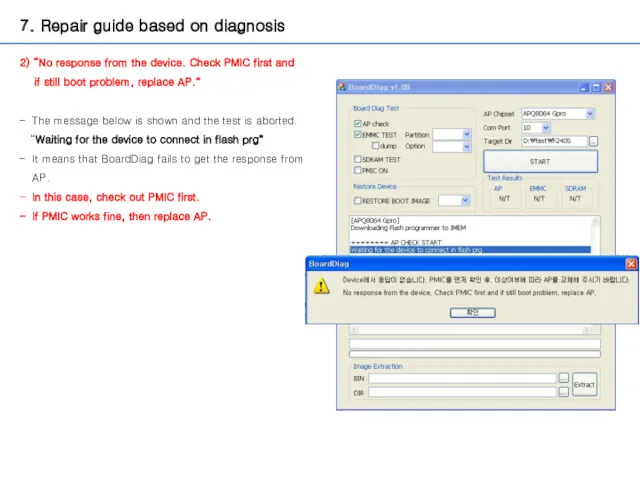
7. Repair guide based on diagnosis
2) “No response from the device.
7. Repair guide based on diagnosis
2) “No response from the device.
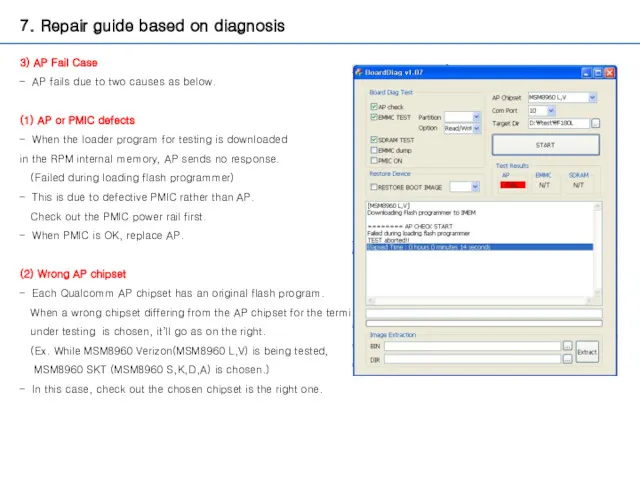
7. Repair guide based on diagnosis
3) AP Fail Case
AP fails due
7. Repair guide based on diagnosis
3) AP Fail Case
AP fails due
7. Repair guide based on diagnosis
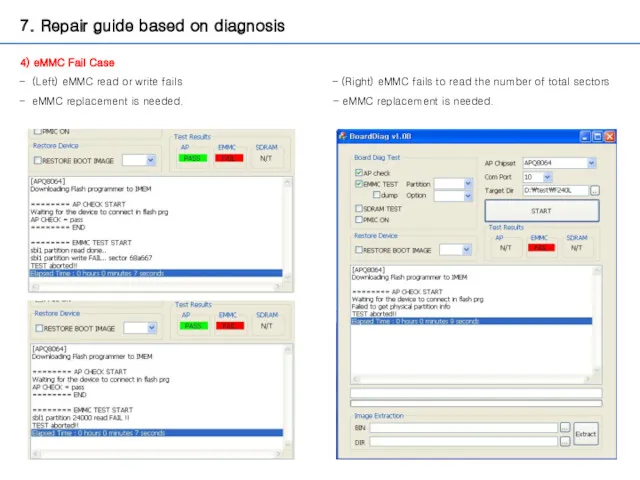
4) eMMC Fail Case
(Left) eMMC read
7. Repair guide based on diagnosis
4) eMMC Fail Case
(Left) eMMC read
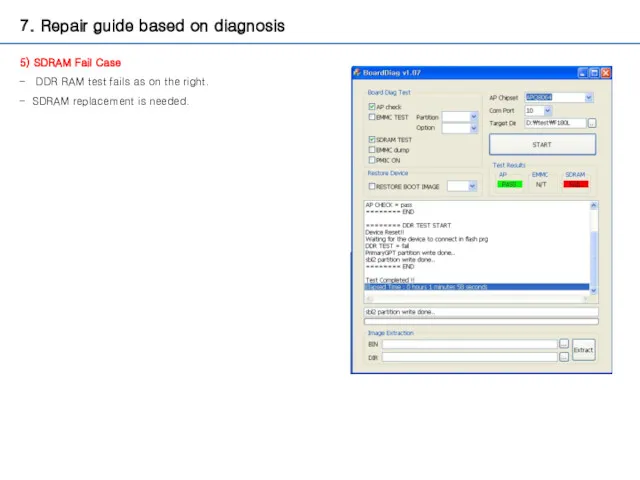
7. Repair guide based on diagnosis
5) SDRAM Fail Case
DDR RAM
7. Repair guide based on diagnosis
5) SDRAM Fail Case
DDR RAM
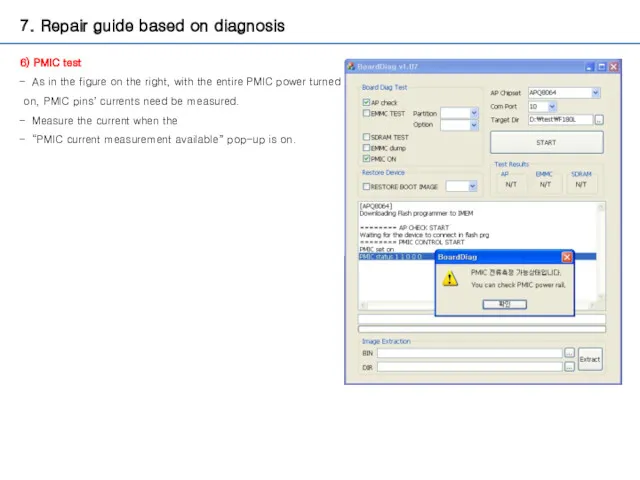
7. Repair guide based on diagnosis
6) PMIC test
As in the
7. Repair guide based on diagnosis
6) PMIC test
As in the
 Организация хирургической стоматологической помощи населению
 Общие сведения о самолёте МиГ-29 и его силовой установке
 Неблагоприятные факторы, влияющие на численность животных
 Презентация Влияние толерантности и правовой культуры на нравственное воспитание дошкольников
 20231010_prezentatsiya_k_uroku
 Дорожные знаки для пешеходов
 Города на старых водных торговых путях
 Главные праздники в различных религиях
 Текстура деформации
 Синхронные машины. Лекция №10
 Сервисные комплексы
 Подборка и анализ поселков численностью 2000 человек
 Семинар Талант и гениальность
 Человек и Бог в православии
 Урок логопеда для учащихся 3 класса по теме Звуки З и С
 Цель и задачи пропедевтики внутренних болезней. Лекция №1
 Архитектурное проектирование общественных зданий. Лекция 6
 Маркетинговые возможности спортивных сооружений
 Масленица
 Шаблоны презентаций - 14
 Урок по географии Реки России
 ЭЛОУ-АТ-6 (блок ЭЛОУ). Электродегидратор
 Ознакомительный тест Углеводы. Моносахариды
 Общие положения о договоре
 Презентация к уроку технология 4 класс с творческими проектами детей. Тема Дизайн календаря
 Основные нормы ПС
 Инженерный анализ методом конечных элементов. Работа со сборками. Задание контактов
 Природа человека. Цель и смысл жизни человека