- PBA Repair Guide [GT-S8000]
![PBA Repair Guide [GT-S8000]](/images/pdf-document.png)
Содержание
- 2. Contents 1. PBA Diagram 2. Trouble Shooting 2-1. No Power 2-2. Lockup / Reset 2-3. SIM
- 3. 1. PBA Diagram TOP GT-S8000
- 4. 1. PBA Diagram Bottom GT-S8000
- 5. 2-1. No Power Trouble shooting Power-on-current >= 100mA C330 = 1.8V C352 = 3V C333 =
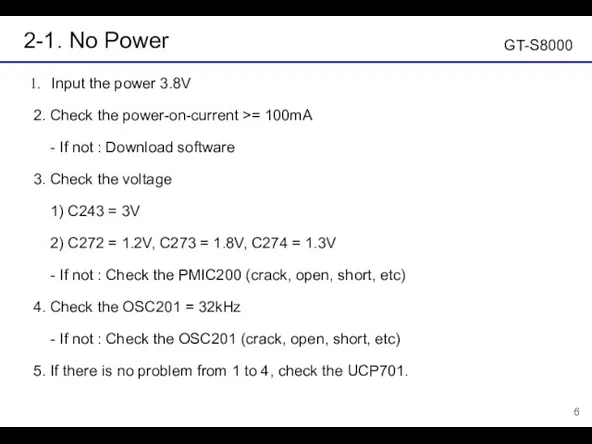
- 6. 2-1. No Power Input the power 3.8V 2. Check the power-on-current >= 100mA - If not
- 7. 2-1. No Power GT-S8000 UCP701 UCP701 C243 OSC201 C272 C273 C274 ● ● ● ● ●
- 8. 2-1. No Power GT-S8000 Scope 2-1-3 3V 1.2V
- 9. 2-1. No Power GT-S8000 Scope 2-1-3 1.8V 1.3V
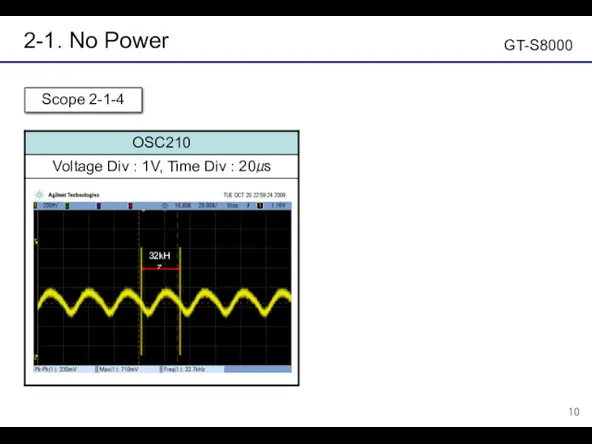
- 10. 2-1. No Power GT-S8000 Scope 2-1-4 32kHz
- 11. 2-2. Lockup / Reset Trouble shooting Download Completed Lockup or reset (Same as declared) Check UCP701
- 12. 2-2. Lockup / Reset Use a J-TAG to enable USB 2. Download the latest software -
- 13. 2-3. SIM Card Failed Trouble shooting U607 Pin 13, 9 = 3V Check the SIM socket
- 14. 2-3. SIM Card Failed Check the 6-pins of SIM socket - If there is a durst
- 15. 2-3. SIM Card Failed 6. Check the C252 = 3V - If not : Check the
- 16. 2-3. SIM Card Failed GT-S8000 UCP300 ● 1 2 3 ● PMIC200 ● ● 4 ●
- 17. 2-3. SIM Card Failed GT-S8000 Scope 2-3-4, 2-3-5 3V 3V
- 18. 2-3. SIM Card Failed GT-S8000 Scope 2-3-6, 2-3-7 3V 3V
- 19. 2-3. SIM Card Failed GT-S8000 Scope 2-3-8, 2-3-9 3V Clock 3V Clock
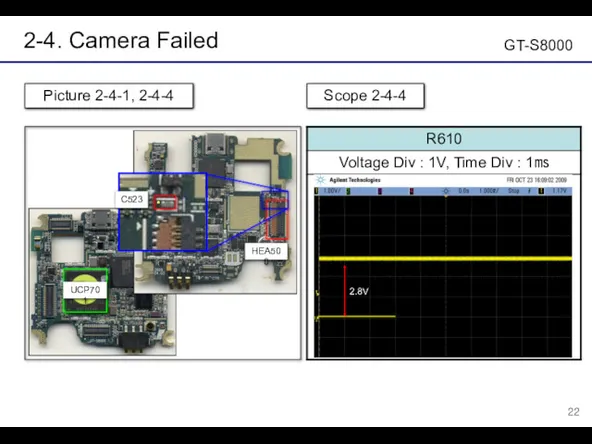
- 20. 2-4. Camera Failed Trouble shooting ※ It’s a general case. It cannot be available on the
- 21. 2-4. Camera Failed Check the HEA500 - If there is a durst or damaged : Clean
- 22. 2-4. Camera Failed GT-S8000 Picture 2-4-1, 2-4-4 Scope 2-4-4 2.8V UCP701 HEA500 C523 ●
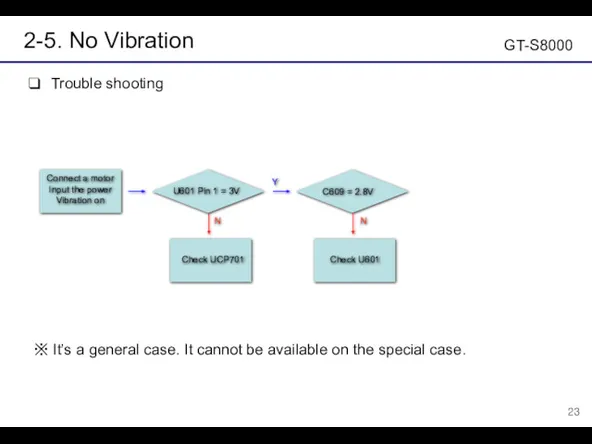
- 23. 2-5. No Vibration Trouble shooting ※ It’s a general case. It cannot be available on the
- 24. 2-5. No Vibration Connect a motor, input the power (3.8V), vibration on 2. Check the voltage
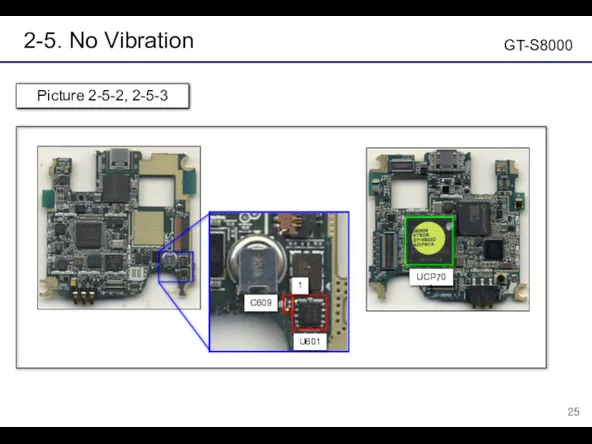
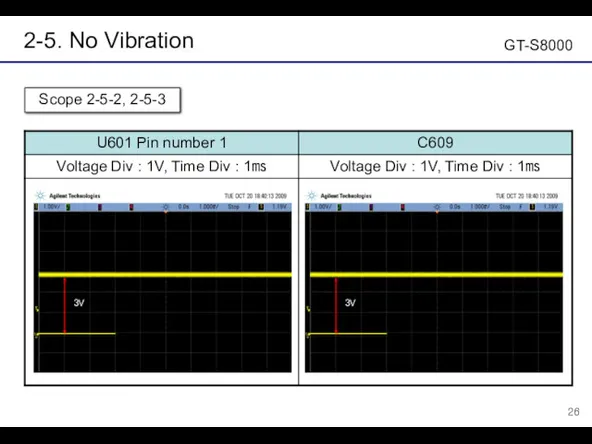
- 25. 2-5. No Vibration GT-S8000 Picture 2-5-2, 2-5-3 C609 U601 ● 1 UCP701 ●
- 26. 2-5. No Vibration GT-S8000 Scope 2-5-2, 2-5-3 3V 3V
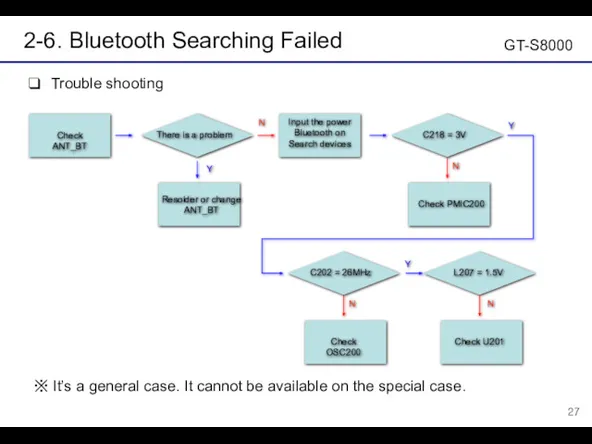
- 27. 2-6. Bluetooth Searching Failed Trouble shooting ※ It’s a general case. It cannot be available on
- 28. 2-6. Bluetooth Searching Failed Check the ANT_BT (crack, open, etc) - If there is a problem
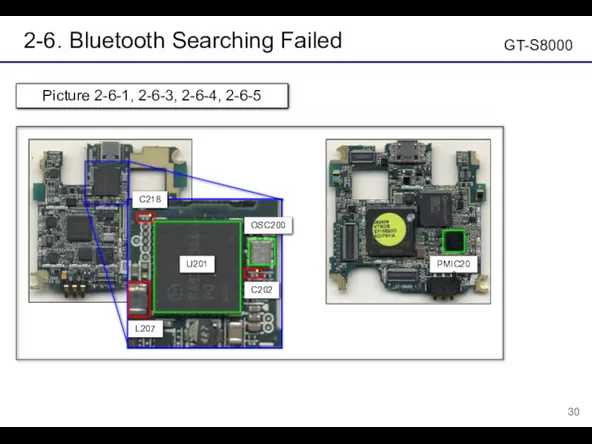
- 29. 2-6. Bluetooth Searching Failed ※ Check the voltage during searching the devices. - Sub PBA, BT
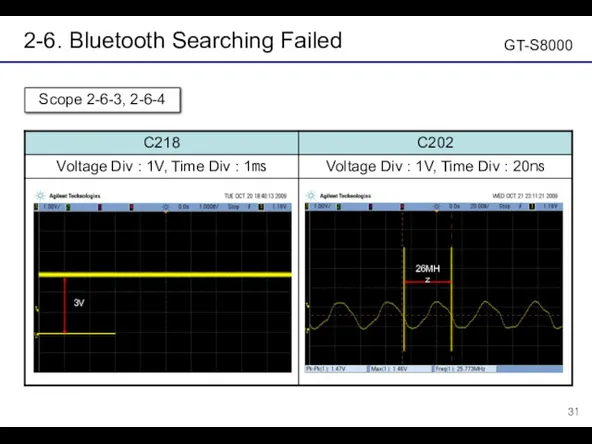
- 30. 2-6. Bluetooth Searching Failed GT-S8000 Picture 2-6-1, 2-6-3, 2-6-4, 2-6-5 U201 ● PMIC200 OSC200 C218 L207
- 31. 2-6. Bluetooth Searching Failed GT-S8000 Scope 2-6-3, 2-6-4 3V 26MHz
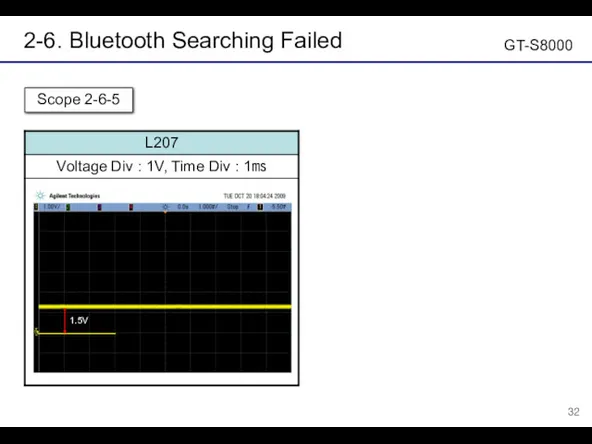
- 32. 2-6. Bluetooth Searching Failed GT-S8000 Scope 2-6-5 1.5V
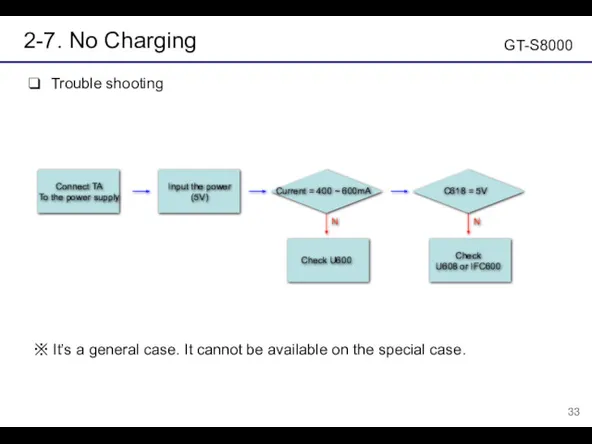
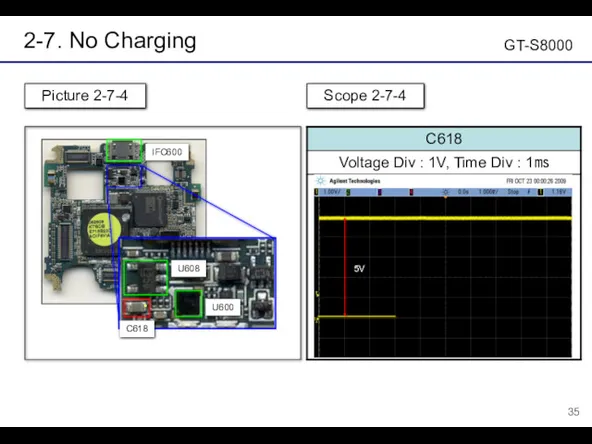
- 33. 2-7. No Charging Trouble shooting ※ It’s a general case. It cannot be available on the
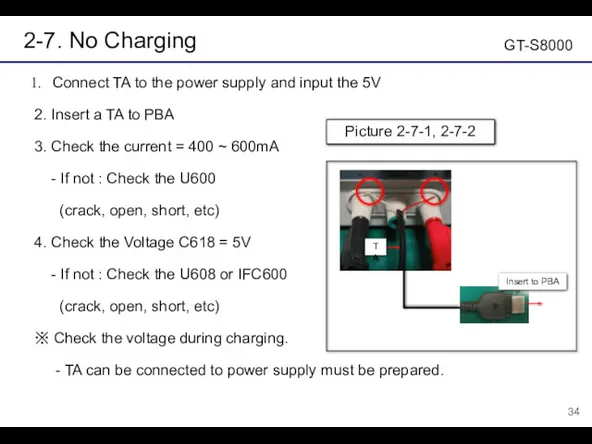
- 34. 2-7. No Charging Connect TA to the power supply and input the 5V 2. Insert a
- 35. 2-7. No Charging GT-S8000 Picture 2-7-4 Scope 2-7-4 IFC600 ● U608 C618 5V U600
- 37. Скачать презентацию
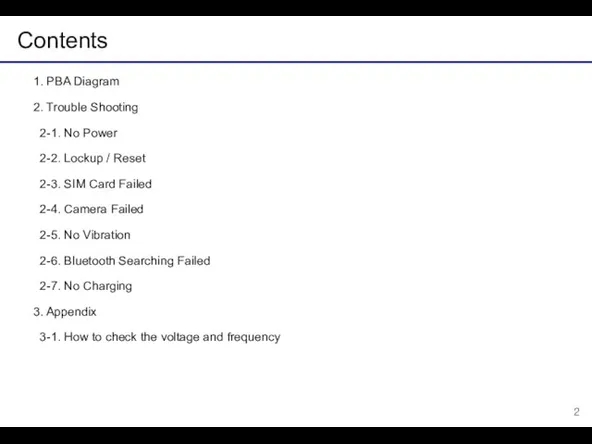
Contents
1. PBA Diagram
2. Trouble Shooting
2-1. No Power
2-2. Lockup /
Contents
1. PBA Diagram
2. Trouble Shooting
2-1. No Power
2-2. Lockup /
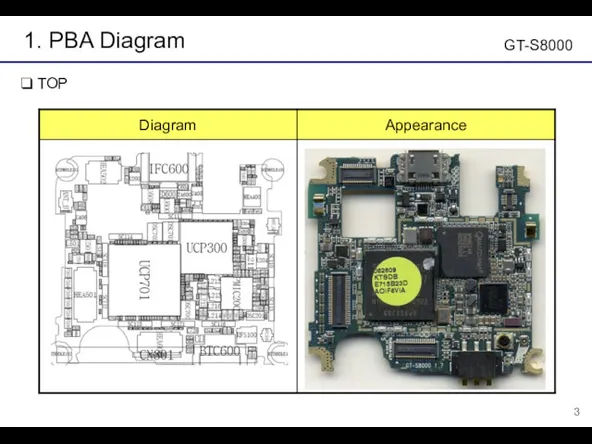
1. PBA Diagram
TOP
GT-S8000
1. PBA Diagram
TOP
GT-S8000
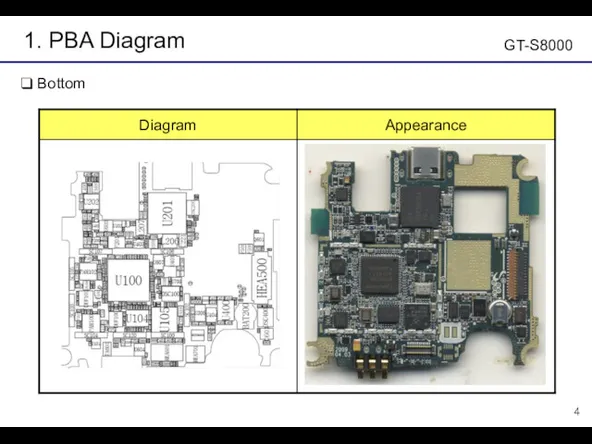
1. PBA Diagram
Bottom
GT-S8000
1. PBA Diagram
Bottom
GT-S8000
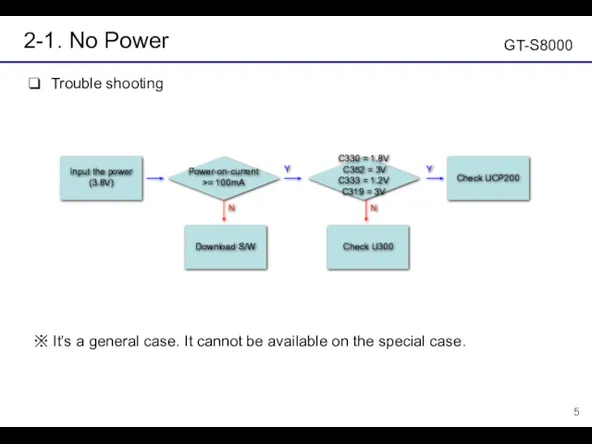
2-1. No Power
Trouble shooting
Power-on-current
>= 100mA
C330 = 1.8V
C352 =
2-1. No Power
Trouble shooting
Power-on-current
>= 100mA
C330 = 1.8V
C352 =
2-1. No Power
Input the power 3.8V
2. Check the power-on-current
2-1. No Power
Input the power 3.8V
2. Check the power-on-current
2-1. No Power
GT-S8000
UCP701
UCP701
C243
OSC201
C272
C273
C274
●
●
●
●
●
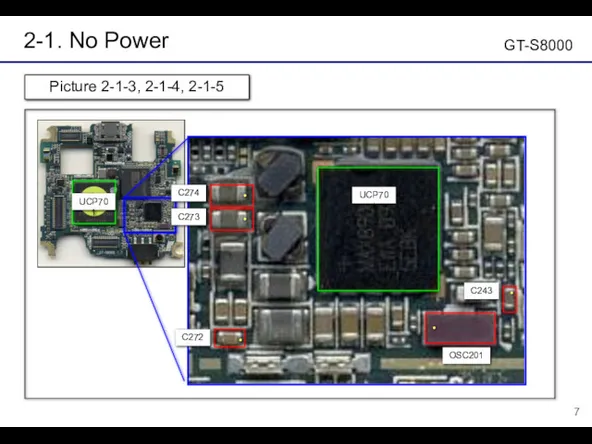
Picture 2-1-3, 2-1-4, 2-1-5
2-1. No Power
GT-S8000
UCP701
UCP701
C243
OSC201
C272
C273
C274
●
●
●
●
●
Picture 2-1-3, 2-1-4, 2-1-5
2-1. No Power
GT-S8000
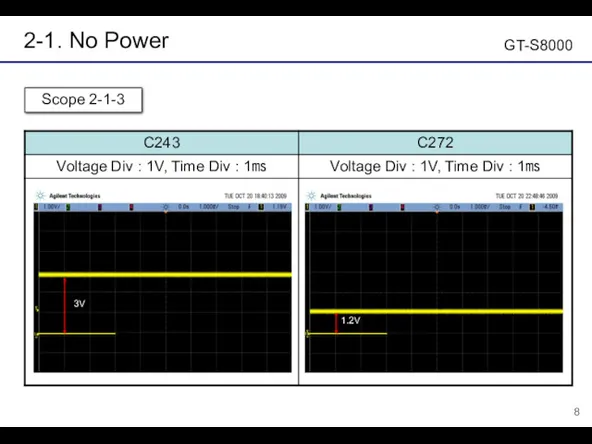
Scope 2-1-3
3V
1.2V
2-1. No Power
GT-S8000
Scope 2-1-3
3V
1.2V
2-1. No Power
GT-S8000
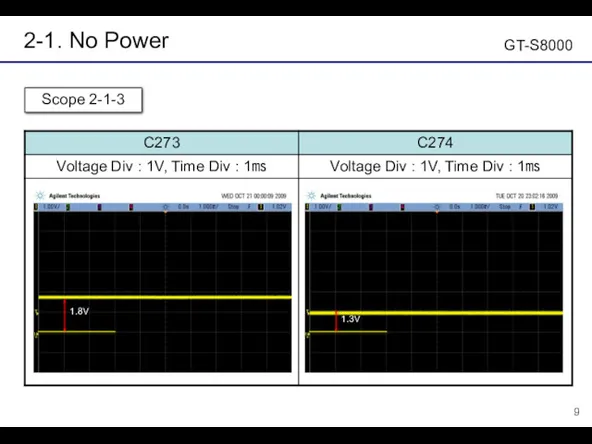
Scope 2-1-3
1.8V
1.3V
2-1. No Power
GT-S8000
Scope 2-1-3
1.8V
1.3V
2-1. No Power
GT-S8000
Scope 2-1-4
32kHz
2-1. No Power
GT-S8000
Scope 2-1-4
32kHz
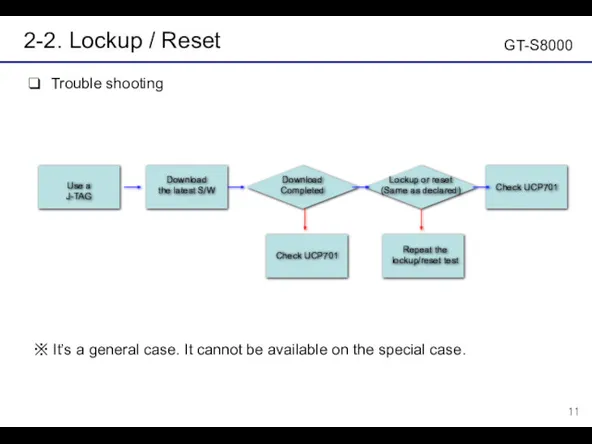
2-2. Lockup / Reset
Trouble shooting
Download
Completed
Lockup or reset
(Same as declared)
Check
2-2. Lockup / Reset
Trouble shooting
Download
Completed
Lockup or reset
(Same as declared)
Check
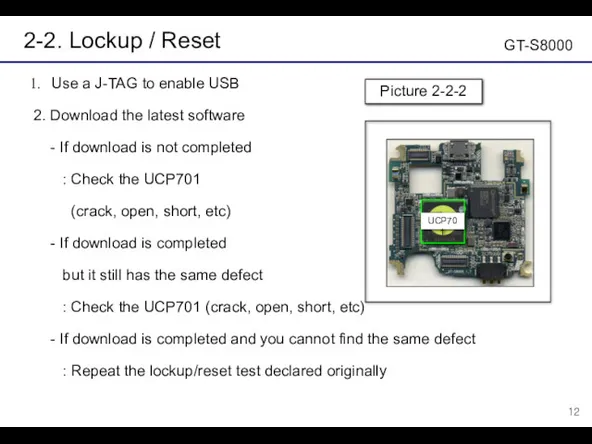
2-2. Lockup / Reset
Use a J-TAG to enable USB
2.
2-2. Lockup / Reset
Use a J-TAG to enable USB
2.
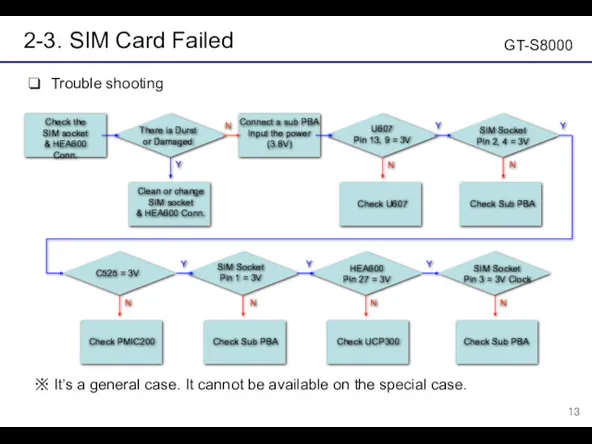
2-3. SIM Card Failed
Trouble shooting
U607
Pin 13, 9 = 3V
Check
2-3. SIM Card Failed
Trouble shooting
U607
Pin 13, 9 = 3V
Check
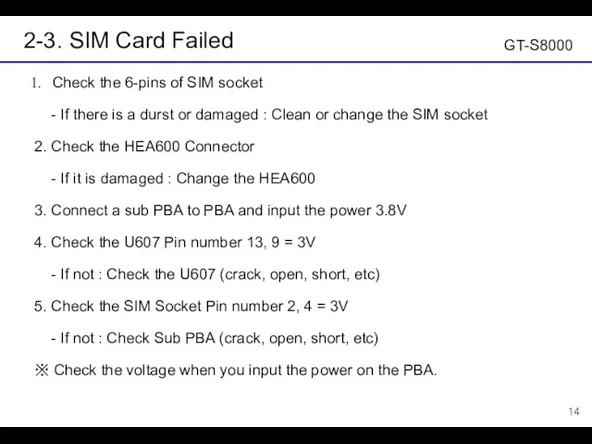
2-3. SIM Card Failed
Check the 6-pins of SIM socket
2-3. SIM Card Failed
Check the 6-pins of SIM socket
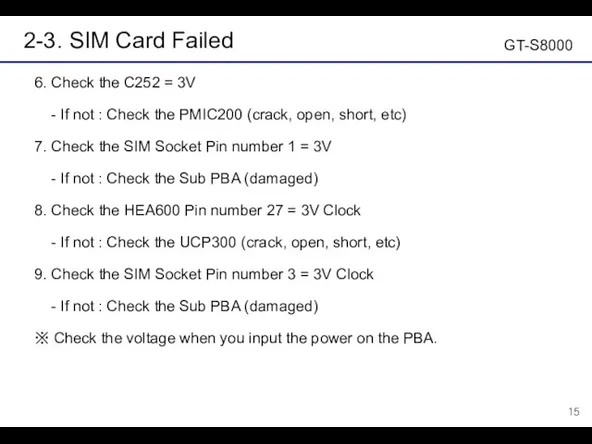
2-3. SIM Card Failed
6. Check the C252 = 3V
-
2-3. SIM Card Failed
6. Check the C252 = 3V
-
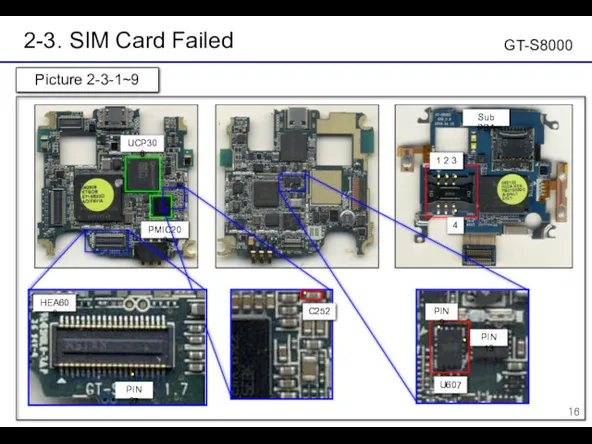
2-3. SIM Card Failed
GT-S8000
UCP300
●
1 2 3
●
PMIC200
●
●
4
●
●
U607
PIN 13
PIN 9
Sub PBA
Picture
2-3. SIM Card Failed
GT-S8000
UCP300
●
1 2 3
●
PMIC200
●
●
4
●
●
U607
PIN 13
PIN 9
Sub PBA
Picture
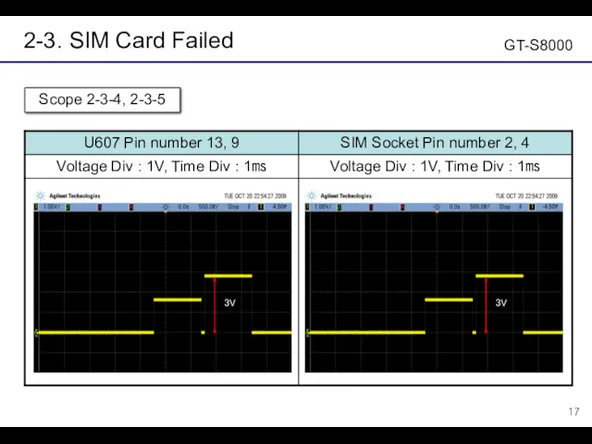
2-3. SIM Card Failed
GT-S8000
Scope 2-3-4, 2-3-5
3V
3V
2-3. SIM Card Failed
GT-S8000
Scope 2-3-4, 2-3-5
3V
3V
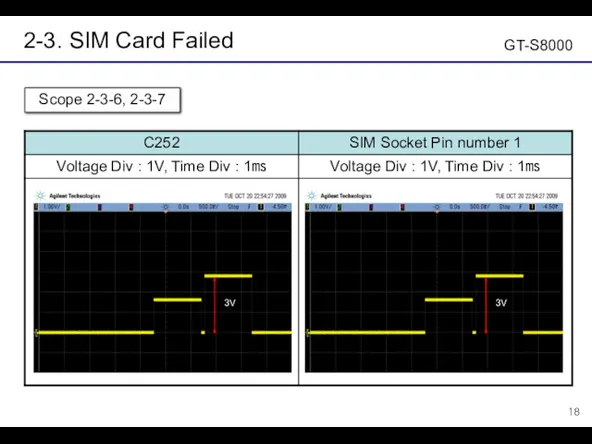
2-3. SIM Card Failed
GT-S8000
Scope 2-3-6, 2-3-7
3V
3V
2-3. SIM Card Failed
GT-S8000
Scope 2-3-6, 2-3-7
3V
3V
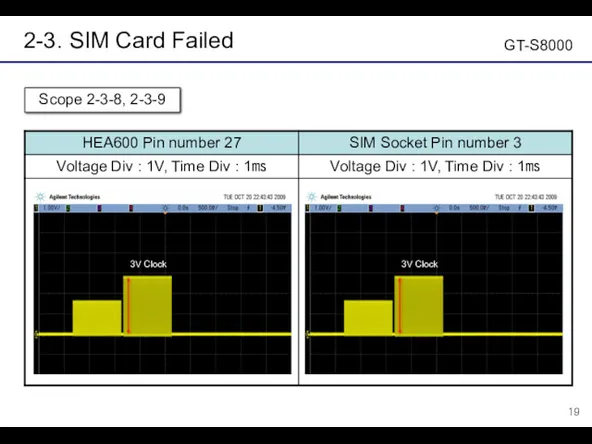
2-3. SIM Card Failed
GT-S8000
Scope 2-3-8, 2-3-9
3V Clock
3V Clock
2-3. SIM Card Failed
GT-S8000
Scope 2-3-8, 2-3-9
3V Clock
3V Clock
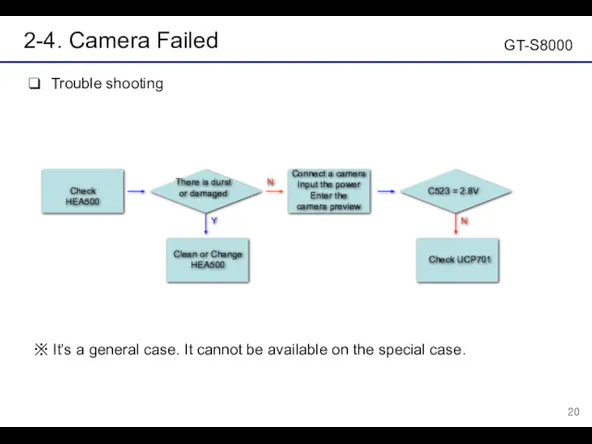
2-4. Camera Failed
Trouble shooting
※ It’s a general case. It
2-4. Camera Failed
Trouble shooting
※ It’s a general case. It
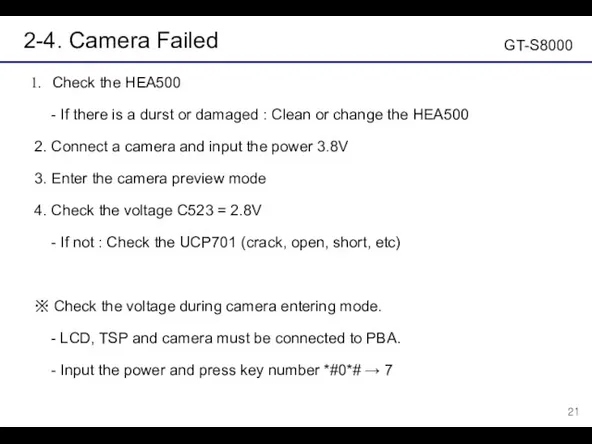
2-4. Camera Failed
Check the HEA500
- If there is
2-4. Camera Failed
Check the HEA500
- If there is
2-4. Camera Failed
GT-S8000
Picture 2-4-1, 2-4-4
Scope 2-4-4
2.8V
UCP701
HEA500
C523
●
2-4. Camera Failed
GT-S8000
Picture 2-4-1, 2-4-4
Scope 2-4-4
2.8V
UCP701
HEA500
C523
●
2-5. No Vibration
Trouble shooting
※ It’s a general case. It
2-5. No Vibration
Trouble shooting
※ It’s a general case. It
2-5. No Vibration
Connect a motor, input the power (3.8V),
2-5. No Vibration
Connect a motor, input the power (3.8V),
2-5. No Vibration
GT-S8000
Picture 2-5-2, 2-5-3
C609
U601
●
1
UCP701
●
2-5. No Vibration
GT-S8000
Picture 2-5-2, 2-5-3
C609
U601
●
1
UCP701
●
2-5. No Vibration
GT-S8000
Scope 2-5-2, 2-5-3
3V
3V
2-5. No Vibration
GT-S8000
Scope 2-5-2, 2-5-3
3V
3V
2-6. Bluetooth Searching Failed
Trouble shooting
※ It’s a general case.
2-6. Bluetooth Searching Failed
Trouble shooting
※ It’s a general case.
2-6. Bluetooth Searching Failed
Check the ANT_BT (crack, open, etc)
2-6. Bluetooth Searching Failed
Check the ANT_BT (crack, open, etc)

2-6. Bluetooth Searching Failed
※ Check the voltage during searching the
2-6. Bluetooth Searching Failed
※ Check the voltage during searching the
2-6. Bluetooth Searching Failed
GT-S8000
Picture 2-6-1, 2-6-3, 2-6-4, 2-6-5
U201
●
PMIC200
OSC200
C218
L207
C202
●
●
2-6. Bluetooth Searching Failed
GT-S8000
Picture 2-6-1, 2-6-3, 2-6-4, 2-6-5
U201
●
PMIC200
OSC200
C218
L207
C202
●
●
2-6. Bluetooth Searching Failed
GT-S8000
Scope 2-6-3, 2-6-4
3V
26MHz
2-6. Bluetooth Searching Failed
GT-S8000
Scope 2-6-3, 2-6-4
3V
26MHz
2-6. Bluetooth Searching Failed
GT-S8000
Scope 2-6-5
1.5V
2-6. Bluetooth Searching Failed
GT-S8000
Scope 2-6-5
1.5V
2-7. No Charging
Trouble shooting
※ It’s a general case. It
2-7. No Charging
Trouble shooting
※ It’s a general case. It
2-7. No Charging
Connect TA to the power supply and
2-7. No Charging
Connect TA to the power supply and
2-7. No Charging
GT-S8000
Picture 2-7-4
Scope 2-7-4
IFC600
●
U608
C618
5V
U600
2-7. No Charging
GT-S8000
Picture 2-7-4
Scope 2-7-4
IFC600
●
U608
C618
5V
U600
 Умножение десятичных дробей на натуральное число (3)
 Биназир Ермаганбетова. Поп-музыка
 Общие сведения об автоматическом управлении производственными процессами, классификация систем автоматического регулирования
 Обследование зданий и сооружений с помощью ультразвуковых методов
 Понятие и классификация инфраструктуры
 Опасность в нашем доме
 Разработка способа сварки трением с перемешиванием криволинейных поверхностей сложной формы
 Проект Зеленый лук на подоконнике
 Асинхронный двигатель
 Что такое пост. Как поститься детям
 Классный час Ценности олимпийского и паралимпийского движения
 Формулы корней квадратных уравнений
 Презентация Нам на улице не страшно
 Классификация гидротехнических сооружений
 Передачи винт-гайка
 Разработка ИТ-стратегии. (Лекция 7). Системы управления взаимоотношениями с клиентами (CRM-Client Relationship Management)
 Презентация Великая Отечественная война (2)
 Cистемы оплаты и мотивации труда персонала
 Виды стоматологических имплантов
 Методический семинар Создание персонального сайта учителя
 Мое портфолио
 Классификация строительных машин
 Написание научной статьи
 Проектирование СТО автомобилей, с разработкой поста технического обслуживания и моделированием детали автомобиля
 Древесина. Пиломатериалы и древесные материалы
 Шотландия. Известные места в Шотландии
 20230925_prezentatsiya_oshtukaturivanie_kolonnuglov_nish
 Работы по обслуживанию и ремонту общего имущества жилого многоквартирного дома