- Angular Basics

Содержание
- 2. Wiki
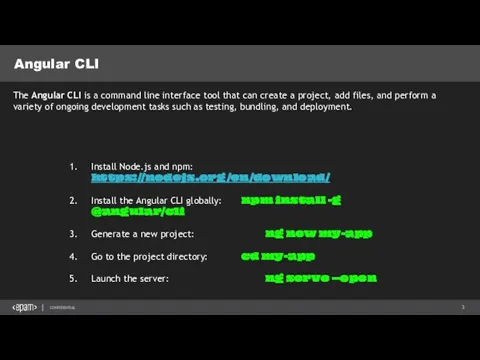
- 3. Angular CLI Install Node.js and npm: https://nodejs.org/en/download/ Install the Angular CLI globally: npm install -g @angular/cli
- 4. Angular
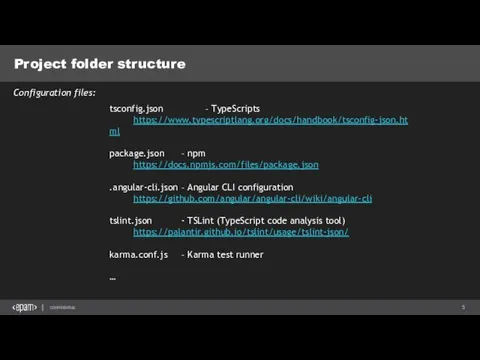
- 5. Project folder structure tsconfig.json – TypeScripts https://www.typescriptlang.org/docs/handbook/tsconfig-json.html package.json – npm https://docs.npmjs.com/files/package.json .angular-cli.json – Angular CLI configuration
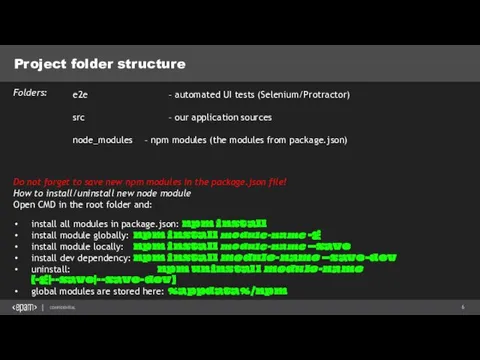
- 6. Project folder structure e2e – automated UI tests (Selenium/Protractor) src – our application sources node_modules –
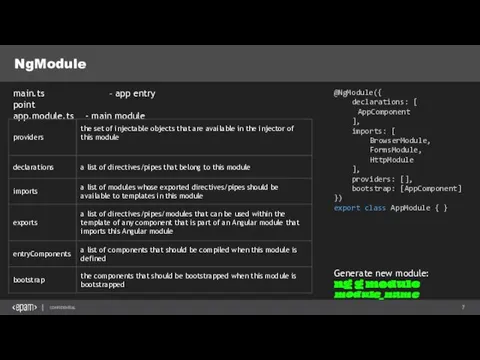
- 7. NgModule main.ts – app entry point app.module.ts - main module @NgModule({ declarations: [ AppComponent ], imports:
- 8. Component @Component({ selector: 'app-root', templateUrl: './app.component.html', styleUrls: ['./app.component.css'] }) export class AppComponent { title = 'app
- 9. Data binding interpolation property binding event binding build-in directives is the interpolated image. is the property
- 10. Event binding Increment onIncrementClick() { this.visitors++; } html: component onIncrementClick(event: MouseEvent) { console.log(`x: ${event.x}, y: ${event.y}`);
- 11. Two-way binding NgModel - a built-in directive that makes two-way binding easy. It requires FormsModule. NgModel
- 12. Binding syntax: An overview
- 13. Binding targets
- 14. Basic Routing import { RouterModule, Routes } from '@angular/router'; ng g c product-list generate components: app.module:
- 15. Build-in attribute directives: NgFor & NgIf NgFor is a repeater directive — a way to present
- 16. Lifecycle Hooks
- 17. Component Interaction: @Input decorator ng g c product generate new component: move product HTML from product-list.component
- 18. Component Interaction: @Output decorator product.component.ts @Output() deleteRequest = new EventEmitter (); onDeleteClick() { this.deleteRequest.emit(this.product); } product.component.html
- 19. Pipes ng g pipe price generate pipe: built-in pipes: date, uppercase, lowercase, currency, percent template: {{product.price
- 20. Services ng g s products generate service: products.service.ts @Injectable() export class ProductsService { constructor() { }
- 21. Dependency Injection Angular has a Hierarchical Dependency Injection system. There is actually a tree of injectors
- 22. Http getProducts(): Observable { return this.http.get('http://localhost:54145/api/products') .map(res => res.json() as Product[]); } ngOnInit() { this.productsService.getProducts().subscribe( (products:
- 23. Http + AsyncPipe product-list.component.ts: products.service.ts: search(term: string): Observable { return this.http .post(`http://localhost:54145/api/products`, { name: term })
- 25. Скачать презентацию

Wiki
Wiki
Angular CLI
Install Node.js and npm: https://nodejs.org/en/download/
Install the Angular CLI globally: npm install -g
Angular CLI
Install Node.js and npm: https://nodejs.org/en/download/
Install the Angular CLI globally: npm install -g

Angular
Angular
Project folder structure
tsconfig.json – TypeScripts
https://www.typescriptlang.org/docs/handbook/tsconfig-json.html
package.json – npm
https://docs.npmjs.com/files/package.json
.angular-cli.json – Angular CLI configuration
https://github.com/angular/angular-cli/wiki/angular-cli
tslint.json - TSLint (TypeScript code
Project folder structure
e2e – automated UI tests (Selenium/Protractor)
src – our application sources
node_modules – npm
Project folder structure
e2e – automated UI tests (Selenium/Protractor)
src – our application sources
node_modules – npm
NgModule
main.ts – app entry point
app.module.ts - main module
@NgModule({
declarations: [
AppComponent
],
imports: [
BrowserModule,
FormsModule,
HttpModule
],
providers: [],
bootstrap:
NgModule
main.ts – app entry point
app.module.ts - main module
@NgModule({
declarations: [
AppComponent
],
imports: [
BrowserModule,
FormsModule,
HttpModule
],
providers: [],
bootstrap:
![Component @Component({ selector: 'app-root', templateUrl: './app.component.html', styleUrls: ['./app.component.css'] }) export](/_ipx/f_webp&q_80&fit_contain&s_1440x1080/imagesDir/jpg/20189/slide-7.jpg)
Component
@Component({
selector: 'app-root',
templateUrl: './app.component.html',
styleUrls: ['./app.component.css']
})
export class AppComponent {
title = 'app works!';
}
A component
Component
@Component({
selector: 'app-root',
templateUrl: './app.component.html',
styleUrls: ['./app.component.css']
})
export class AppComponent {
title = 'app works!';
}
A component
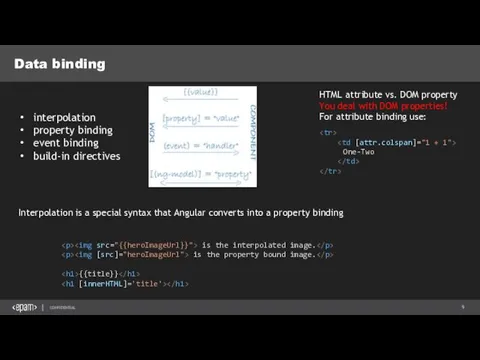
Data binding
interpolation
property binding
event binding
build-in directives
 is the interpolated image.
![]()
Data binding
interpolation
property binding
event binding
build-in directives
is the interpolated image.

Event binding
onIncrementClick() {
this.visitors++;
}
html:
component
onIncrementClick(event: MouseEvent) {
console.log(`x: ${event.x}, y: ${event.y}`);
this.visitors++;
}
$event
html:
component
Event binding
onIncrementClick() {
this.visitors++;
}
html:
component
onIncrementClick(event: MouseEvent) {
console.log(`x: ${event.x}, y: ${event.y}`);
this.visitors++;
}
$event
html:
component
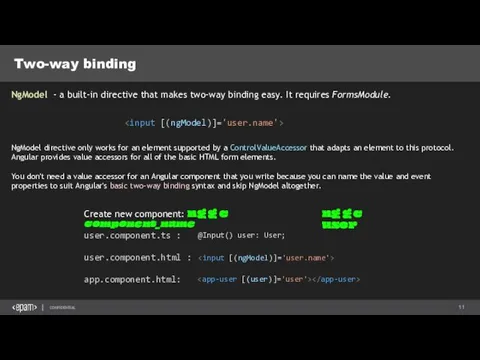
Two-way binding
NgModel - a built-in directive that makes two-way binding easy.
Two-way binding
NgModel - a built-in directive that makes two-way binding easy.
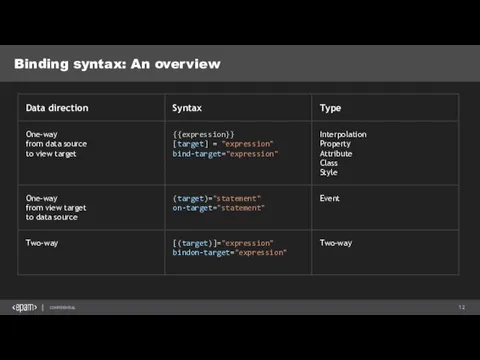
Binding syntax: An overview
Binding syntax: An overview
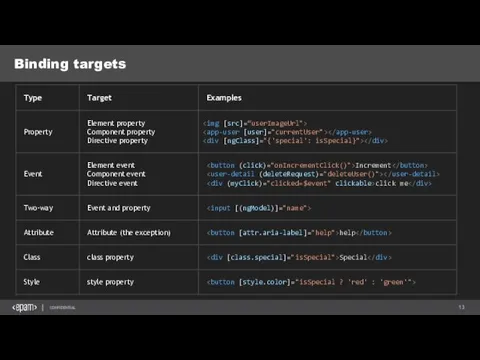
Binding targets
Binding targets
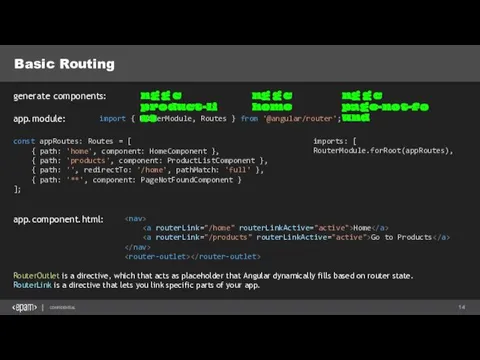
Basic Routing
import { RouterModule, Routes } from '@angular/router';
ng g c product-list
generate
Basic Routing
import { RouterModule, Routes } from '@angular/router';
ng g c product-list
generate
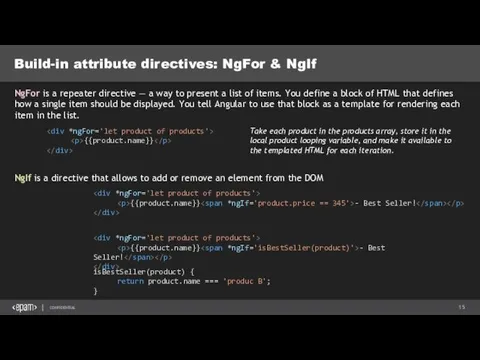
Build-in attribute directives: NgFor & NgIf
NgFor is a repeater directive —
Build-in attribute directives: NgFor & NgIf
NgFor is a repeater directive —

Lifecycle Hooks
Lifecycle Hooks

Component Interaction: @Input decorator
ng g c product
generate new component:
move product HTML
Component Interaction: @Input decorator
ng g c product
generate new component:
move product HTML
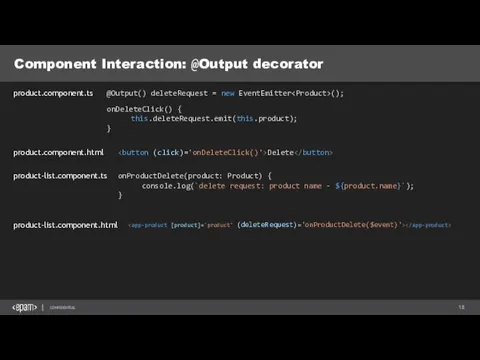
Component Interaction: @Output decorator
product.component.ts
@Output() deleteRequest = new EventEmitter();
onDeleteClick() {
this.deleteRequest.emit(this.product);
}
product.component.html
product-list.component.ts
onProductDelete(product: Product)
Component Interaction: @Output decorator
product.component.ts
@Output() deleteRequest = new EventEmitter onDeleteClick() { product.component.html product-list.component.ts onProductDelete(product: Product)
this.deleteRequest.emit(this.product);
}
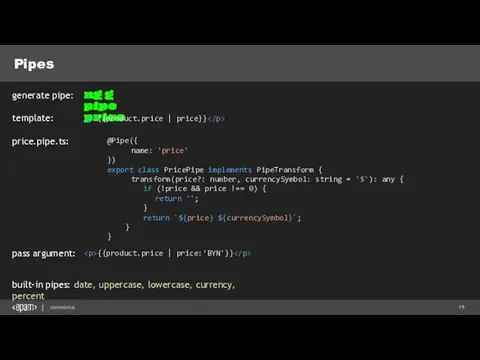
Pipes
ng g pipe price
generate pipe:
built-in pipes: date, uppercase, lowercase, currency, percent
template:
{{product.price
Pipes
ng g pipe price
generate pipe:
built-in pipes: date, uppercase, lowercase, currency, percent
template:
{{product.price
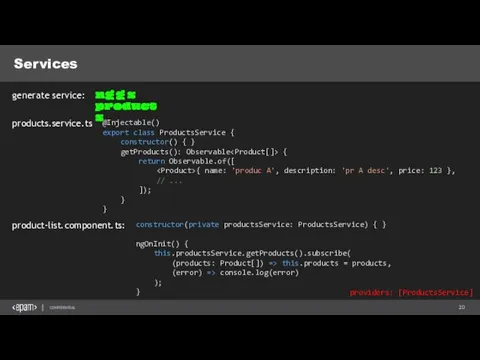
Services
ng g s products
generate service:
products.service.ts
@Injectable()
export class ProductsService {
constructor() { }
getProducts(): Observable
Services
ng g s products
generate service:
products.service.ts
@Injectable()
export class ProductsService {
constructor() { }
getProducts(): Observable
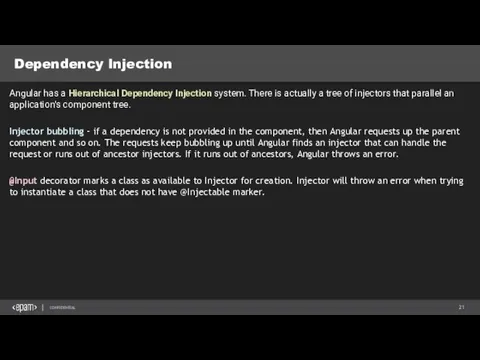
Dependency Injection
Angular has a Hierarchical Dependency Injection system. There is actually a tree
Dependency Injection
Angular has a Hierarchical Dependency Injection system. There is actually a tree
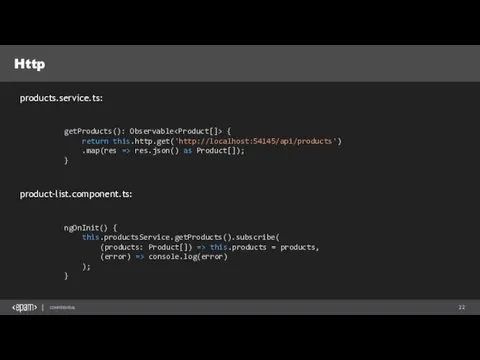
Http
getProducts(): Observable {
return this.http.get('http://localhost:54145/api/products')
.map(res => res.json() as Product[]);
}
ngOnInit() {
this.productsService.getProducts().subscribe(
(products: Product[]) =>
Http
getProducts(): Observable ngOnInit() {
return this.http.get('http://localhost:54145/api/products')
.map(res => res.json() as Product[]);
}
this.productsService.getProducts().subscribe(
(products: Product[]) =>
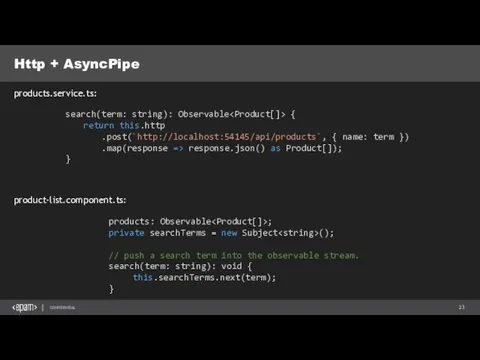
Http + AsyncPipe
product-list.component.ts:
products.service.ts:
search(term: string): Observable {
return this.http
.post(`http://localhost:54145/api/products`, { name: term })
.map(response
Http + AsyncPipe
product-list.component.ts:
products.service.ts:
search(term: string): Observable
return this.http
.post(`http://localhost:54145/api/products`, { name: term })
.map(response
 Лекция 2. Основные конструкции OpenMP
 Сетевые сервисы
 Решение задач ЕГЭ типа В9
 Компоненты образовательных ИТ-технологий
 Параллельное программирование для ресурсоёмких задач численного моделирования в физике. Лекция 2
 Repository and Unit of Work
 Лекция №7. Системы автоматизированного проектирования (САПР)
 Базы данных. Процедуры и функции
 Примеры разработки программ-функций в системе MATHCAD. Лекция 7
 Создание простой диаграммы в Excel 2010
 Установка дистрибутивов
 Threads. Выполнение инструкций потоками
 Информационные процессы и системы
 Сортировка методом пузырька
 Рекрутинг в инстаграм
 Цветовые модели компьютерной графики
 Людино-комп'ютерна взаємодія та проектування інтерфейсів користувача
 Технологии локальных сетей. (Тема 3)
 Разработка информационной системы для ТОО Fin-apps
 Технологии и средства обработки текста
 Программирование многоядерных архитектур
 Системы автоматизированного проектирования технологических процессов. Программное обеспечение САПР ТП. (Лекция 3)
 Почему классический CTF должен умереть
 Белгілі бір бағдарламаны жугізушілер қандай болуы керек
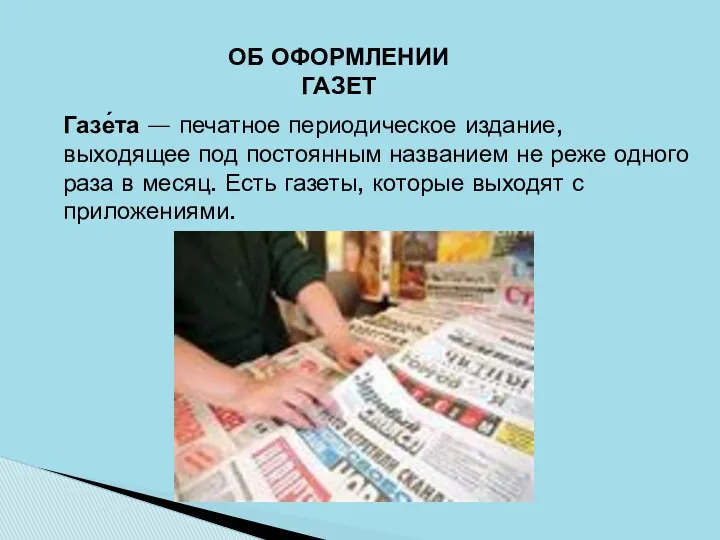 Об оформлении газет
 Этические проблемы сетевой журналистики
 Циклы в языкеПаскаль
 Школа подготовки технических администраторов. (Занятие 16)