- Handling the drive data sets

Содержание
- 2. Handling drive data sets The following subjects are discussed: Overview of the drive unit couplings Copying
- 3. USS via RS 232 / PROFIBUS PROFIBUS Coupling to the individual drive unit PROFIBUS Overview of
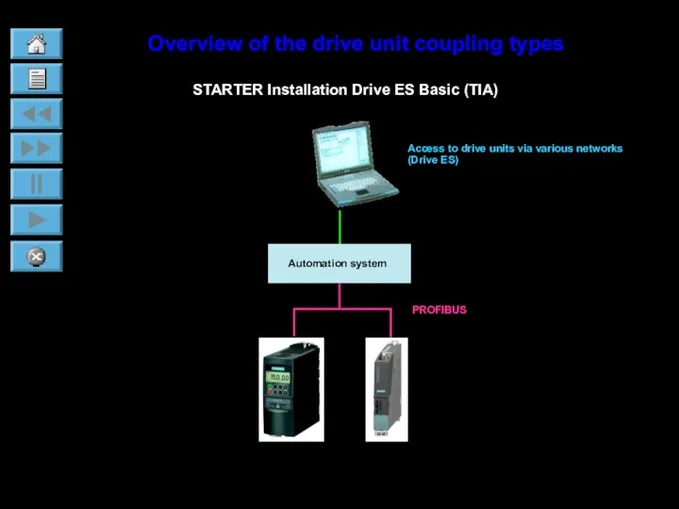
- 4. PROFIBUS Overview of the drive unit coupling types STARTER Installation Drive ES Basic (TIA)
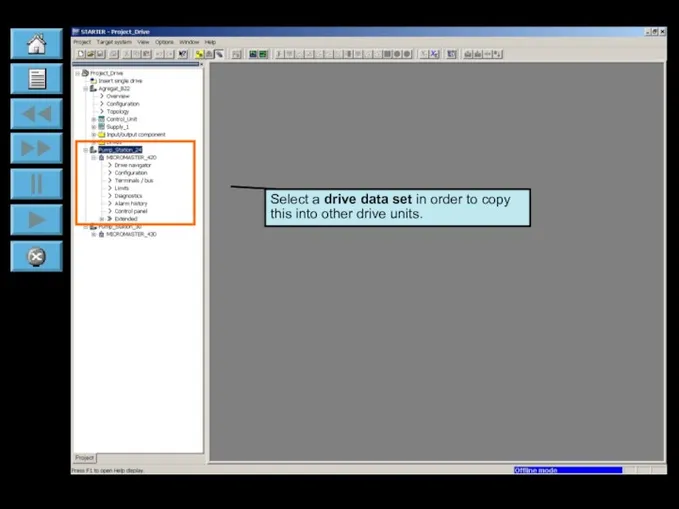
- 5. Copying data sets into drive units Carry-out the following steps: The data set required is in
- 6. Select a drive data set in order to copy this into other drive units.
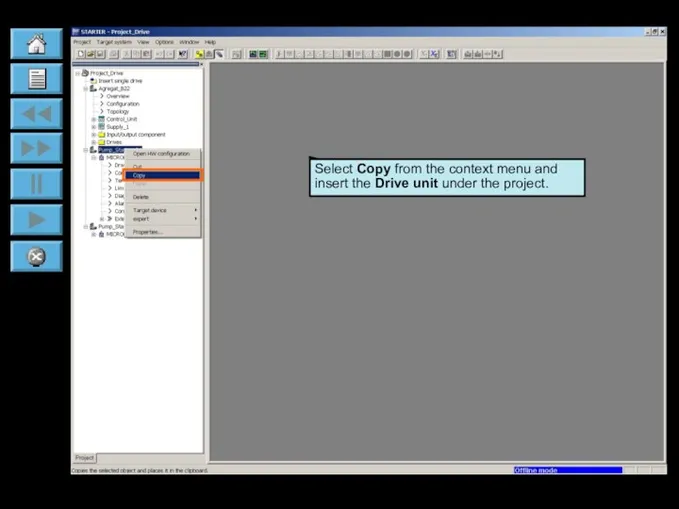
- 7. Select Copy from the context menu and insert the Drive unit under the project.
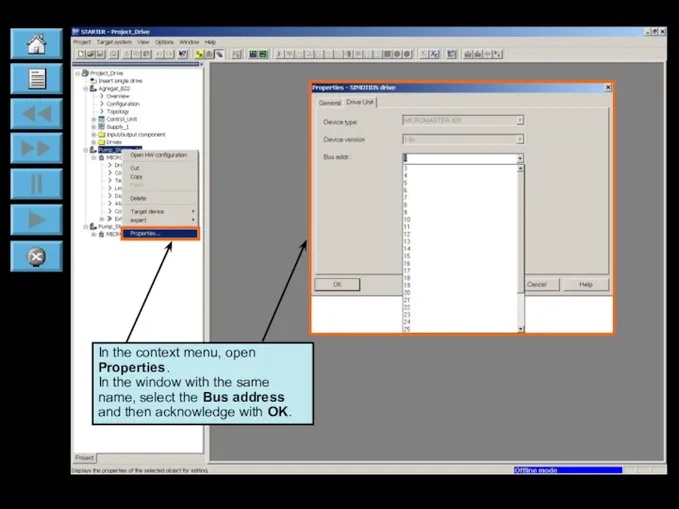
- 8. In the context menu, open Properties. In the window with the same name, select the Bus
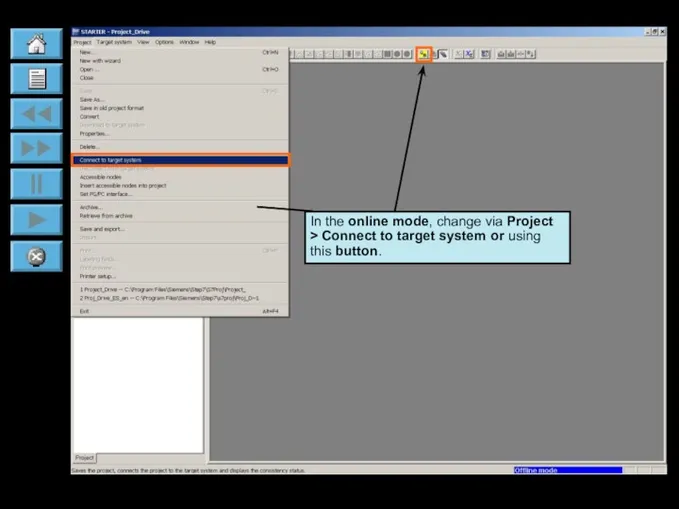
- 9. In the online mode, change via Project > Connect to target system or using this button.
- 10. In the online mode transfer using the menu command Target system > Download > To target
- 11. After data has been successfully downloaded, you will see a message that the data has been
- 12. Copying from drive units (with data) into the project In the Project Navigator, you can very
- 13. Highlight the selected drive unit. Select using the Copy context menu or press Ctrl+C.
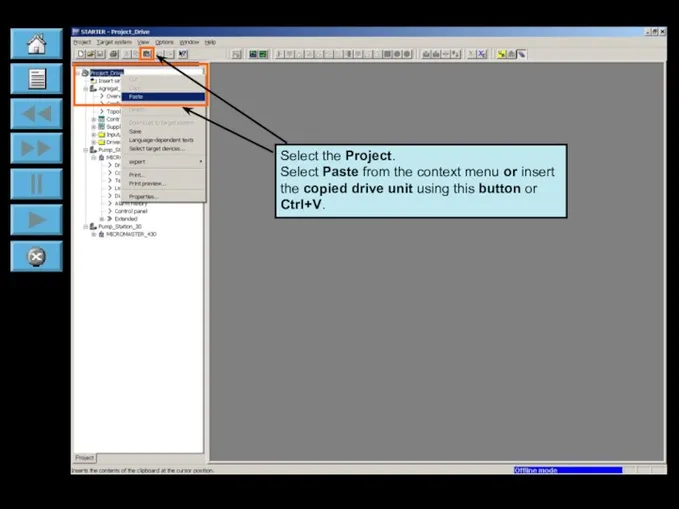
- 14. Select the Project. Select Paste from the context menu or insert the copied drive unit using
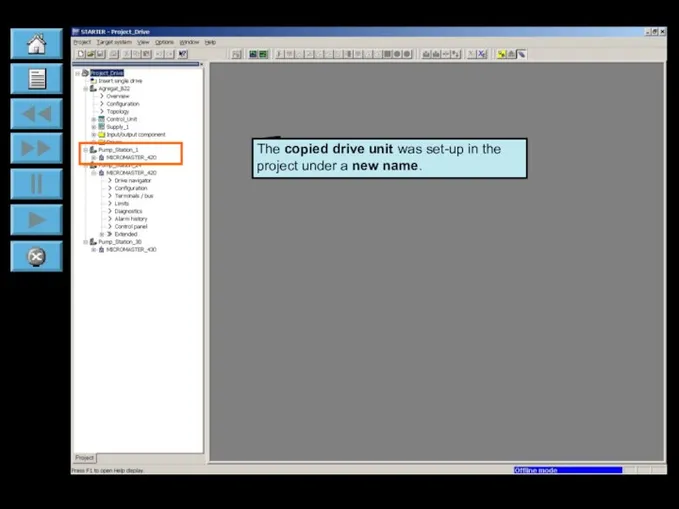
- 15. The copied drive unit was set-up in the project under a new name.
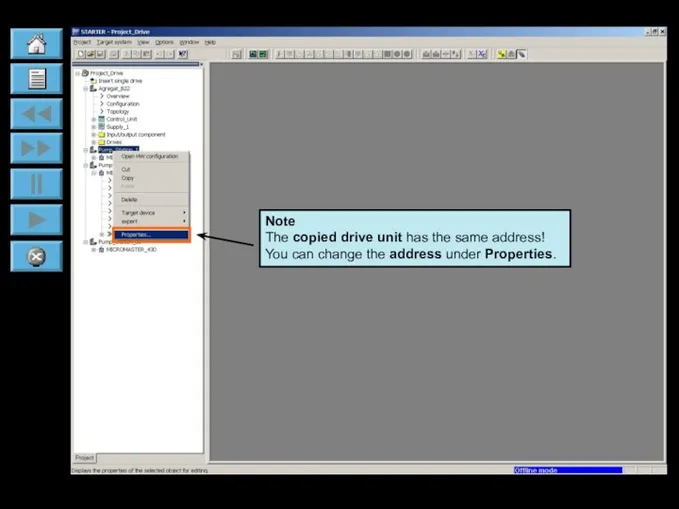
- 16. Note The copied drive unit has the same address! You can change the address under Properties.
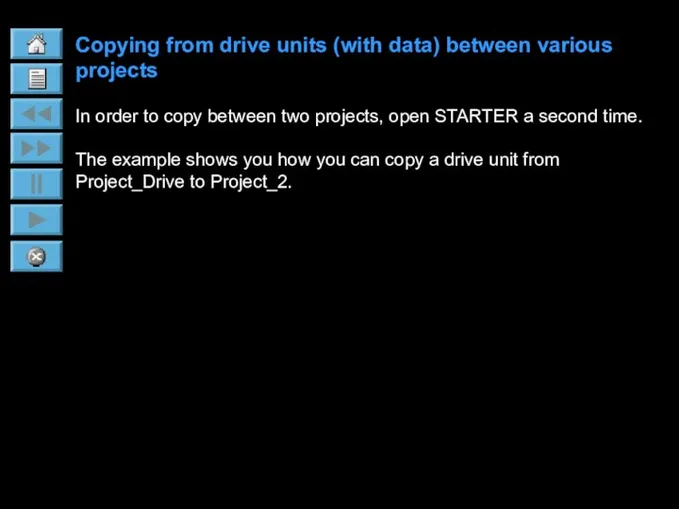
- 17. Copying from drive units (with data) between various projects In order to copy between two projects,
- 18. Start the STARTER program a second time in order to, e.g. copy a drive unit from
- 19. Highlight the selected drive unit. Copy this using the context menu or press Ctrl+C.
- 20. Select Project_2. Insert the drive unit using the context menu, this button or Ctrl+V.
- 21. Pump_station_24 is now located in both projects. Note The bus address is identical in both drive
- 22. Copying drive data sets into the project (XML export/import) The settings of the Pump_Station_24 are exported
- 23. In order to export the settings: Highlight the drive unit and select using the context menu
- 24. Define where you wish to save the data. Acknowledge with OK.
- 25. The status of the export is indicated in the Detail view window.
- 26. To accept data of the drive unit: Select the drive object. Select expert > Import object.
- 27. The Import device window opens. With Search, you can define the source path and the source
- 28. Then acknowledge the transfer of the drive unit data with OK.
- 29. Carefully observe the text note and acknowledge with OK.
- 30. You can see that the drive data was successfully transferred in the Detail view. Note The
- 31. Copying from drive projects (XML export/import)
- 32. Select the project export function using Project > Save and export or directly using this button.
- 33. The project with all of the associated drive units was exported.
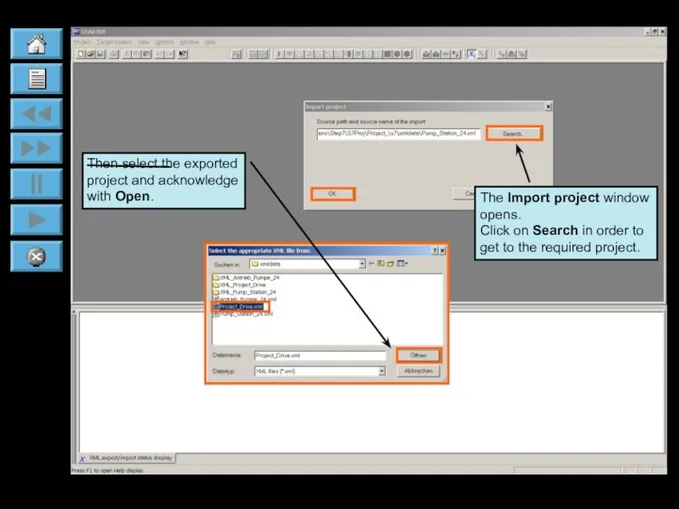
- 34. If a project is not opened then you can import the saved project using this button
- 35. The Import project window opens. Click on Search in order to get to the required project.
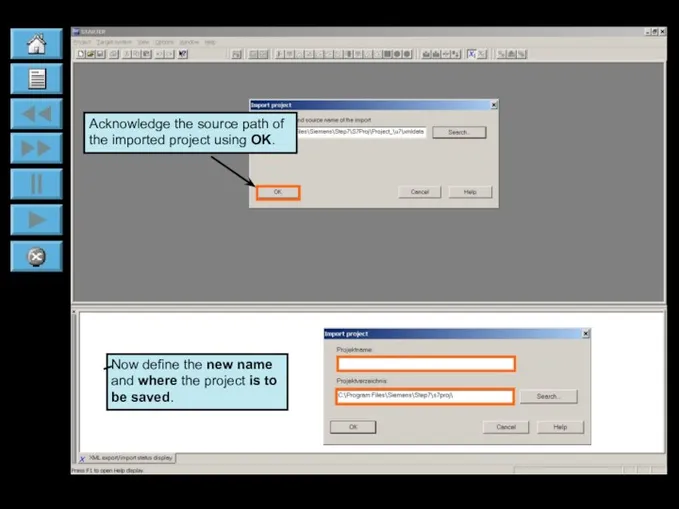
- 36. Acknowledge the source path of the imported project using OK. Now define the new name and
- 38. Скачать презентацию
Handling drive data sets
The following subjects are discussed:
Overview of the
Handling drive data sets
The following subjects are discussed:
Overview of the
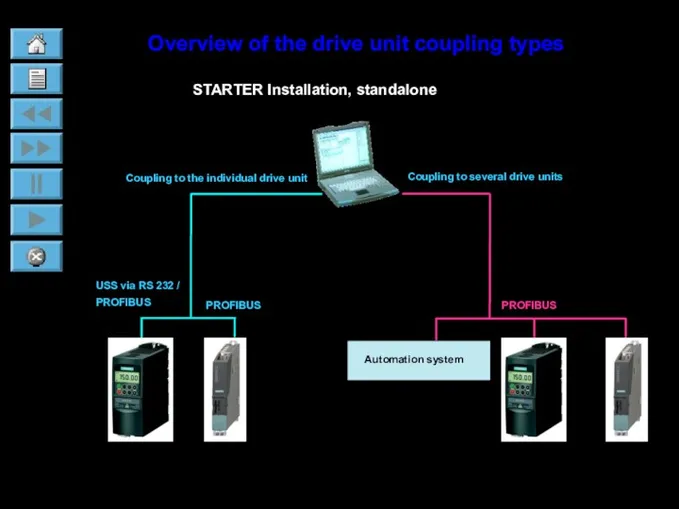
USS via RS 232 /
PROFIBUS
PROFIBUS
Coupling to the individual drive unit
PROFIBUS
Overview of
USS via RS 232 /
PROFIBUS
PROFIBUS
Coupling to the individual drive unit
PROFIBUS
Overview of
PROFIBUS
Overview of the drive unit coupling types
STARTER Installation Drive ES Basic
PROFIBUS
Overview of the drive unit coupling types
STARTER Installation Drive ES Basic
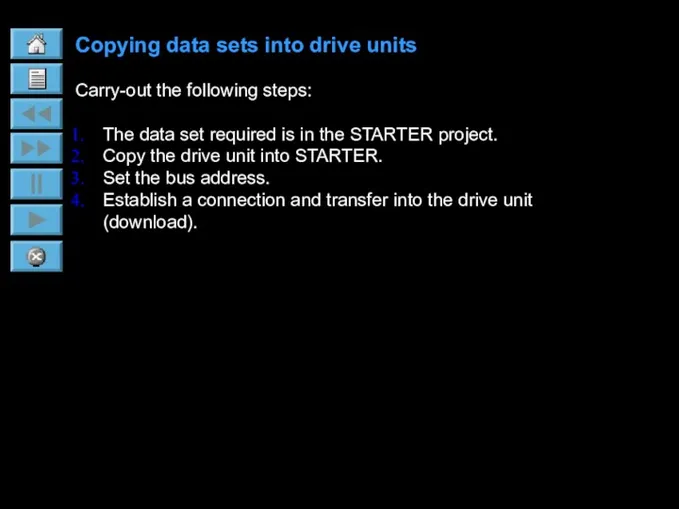
Copying data sets into drive units
Carry-out the following steps:
The data set
Copying data sets into drive units
Carry-out the following steps:
The data set
Select a drive data set in order to copy this into
Select a drive data set in order to copy this into
Select Copy from the context menu and insert the Drive unit
Select Copy from the context menu and insert the Drive unit
In the context menu, open Properties.
In the window with the same
In the context menu, open Properties. In the window with the same
In the online mode, change via Project > Connect to target
In the online mode, change via Project > Connect to target
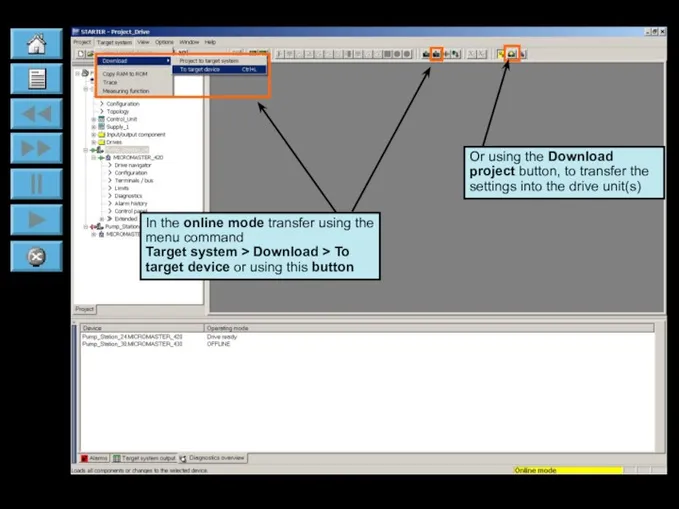
In the online mode transfer using the menu command
Target system
In the online mode transfer using the menu command
Target system
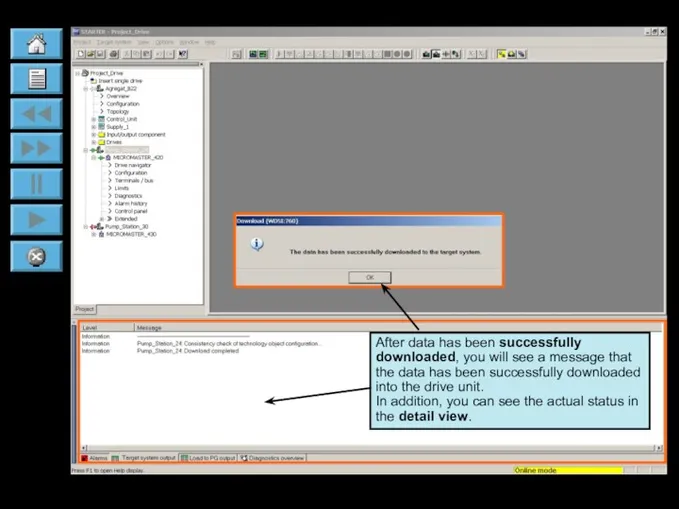
After data has been successfully downloaded, you will see a message
After data has been successfully downloaded, you will see a message
Copying from drive units (with data) into the project
In the Project
Copying from drive units (with data) into the project
In the Project
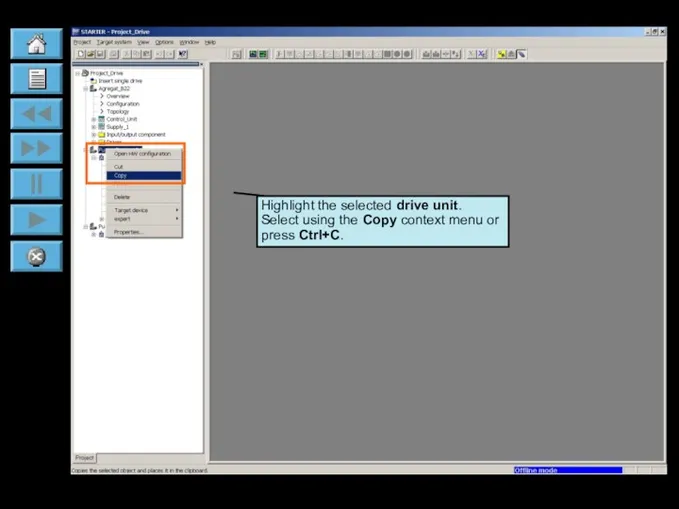
Highlight the selected drive unit.
Select using the Copy context menu
Highlight the selected drive unit.
Select using the Copy context menu
Select the Project.
Select Paste from the context menu or insert
Select the Project. Select Paste from the context menu or insert
The copied drive unit was set-up in the project under a
The copied drive unit was set-up in the project under a
Note
The copied drive unit has the same address!
You can change the
Note
The copied drive unit has the same address!
You can change the
Copying from drive units (with data) between various projects
In order to
Copying from drive units (with data) between various projects
In order to
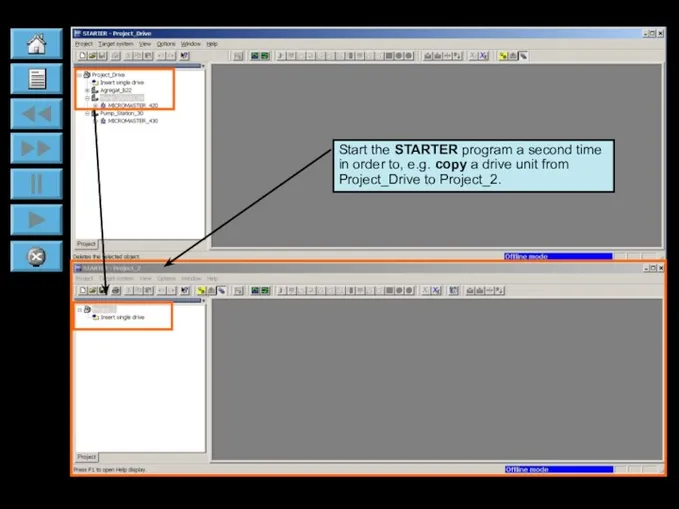
Start the STARTER program a second time in order to, e.g.
Start the STARTER program a second time in order to, e.g.

Highlight the selected drive unit.
Copy this using the context menu
Highlight the selected drive unit.
Copy this using the context menu
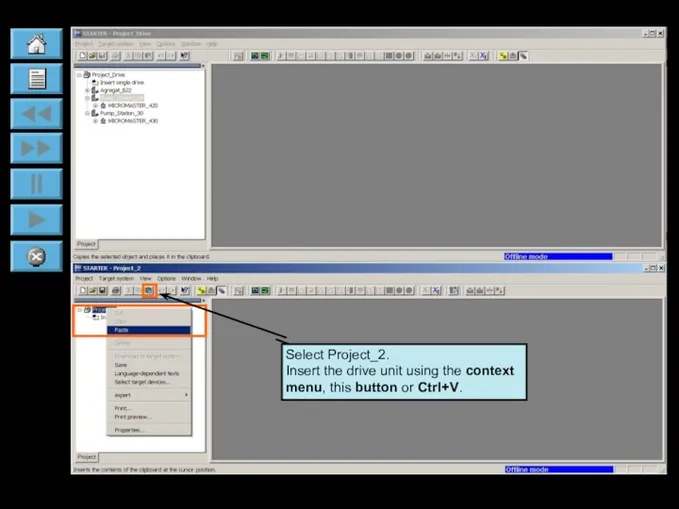
Select Project_2.
Insert the drive unit using the context menu, this button
Select Project_2. Insert the drive unit using the context menu, this button
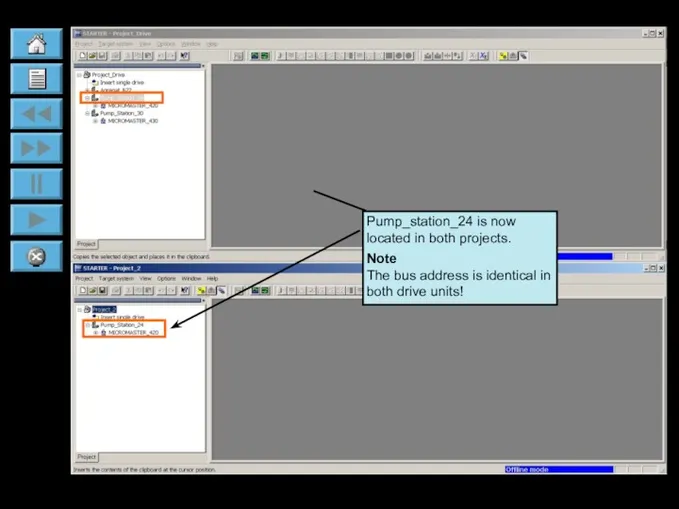
Pump_station_24 is now located in both projects.
Note
The bus address is
Pump_station_24 is now located in both projects.
Note
The bus address is
Copying drive data sets into the project
(XML export/import)
The settings of
Copying drive data sets into the project
(XML export/import)
The settings of
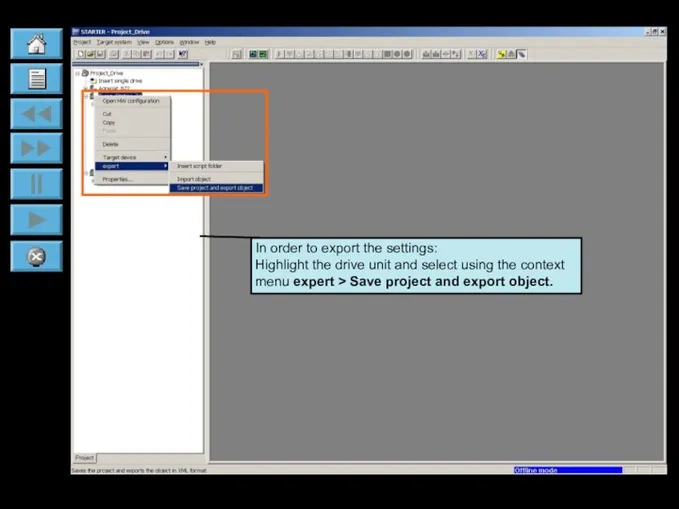
In order to export the settings:
Highlight the drive unit and select
In order to export the settings: Highlight the drive unit and select
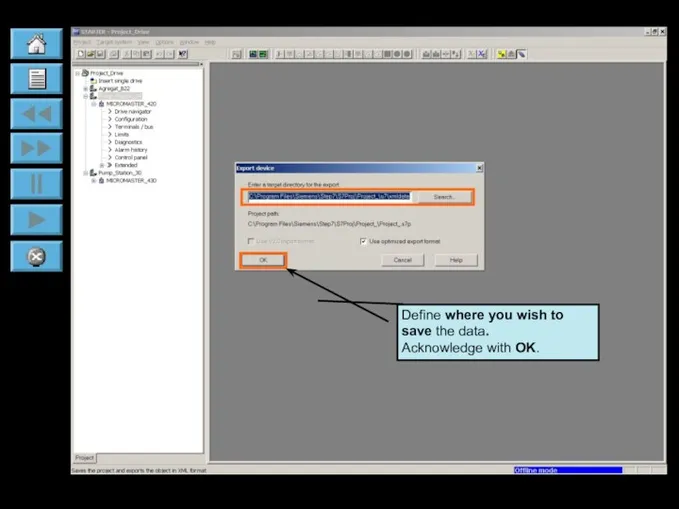
Define where you wish to save the data.
Acknowledge with OK.
Define where you wish to save the data.
Acknowledge with OK.
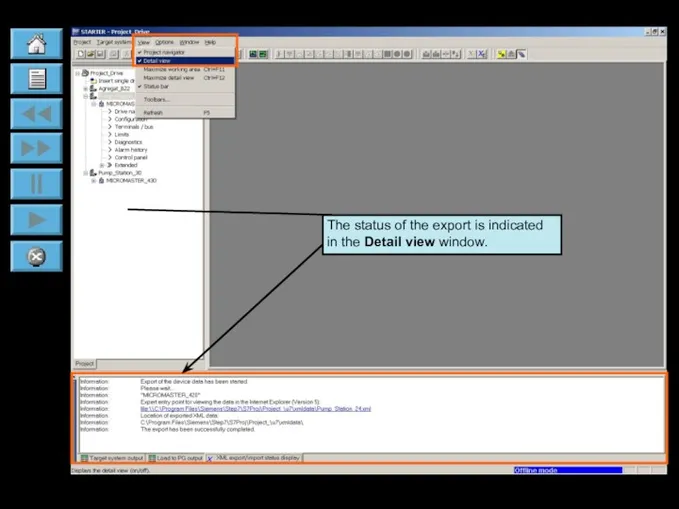
The status of the export is indicated in the Detail view
The status of the export is indicated in the Detail view
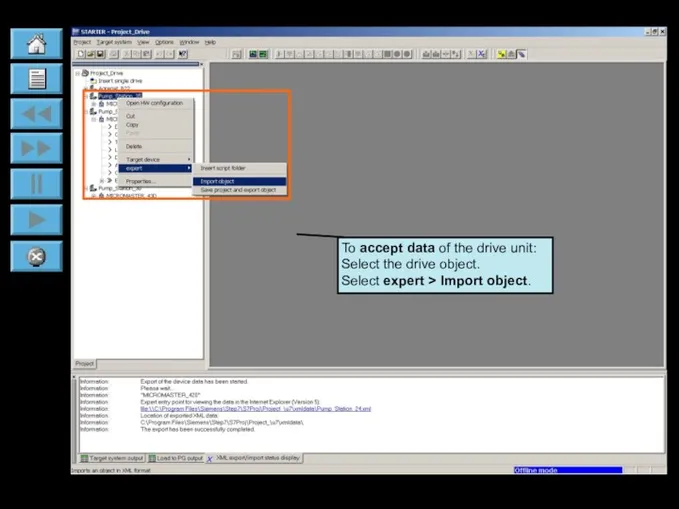
To accept data of the drive unit:
Select the drive object.
Select expert
To accept data of the drive unit: Select the drive object. Select expert
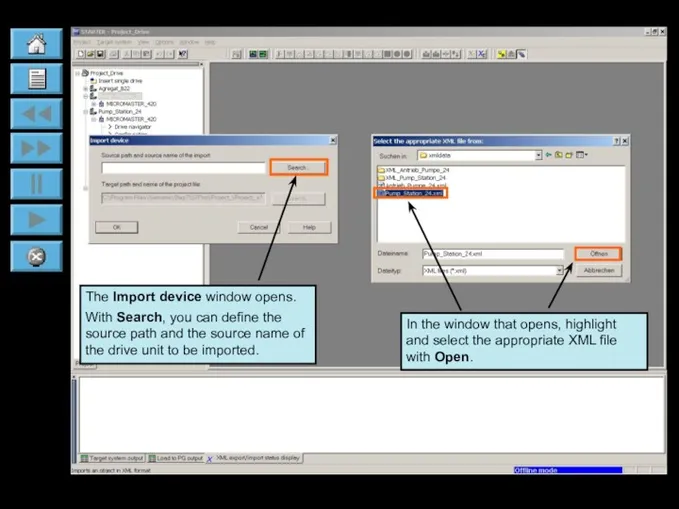
The Import device window opens.
With Search, you can define the source
The Import device window opens.
With Search, you can define the source
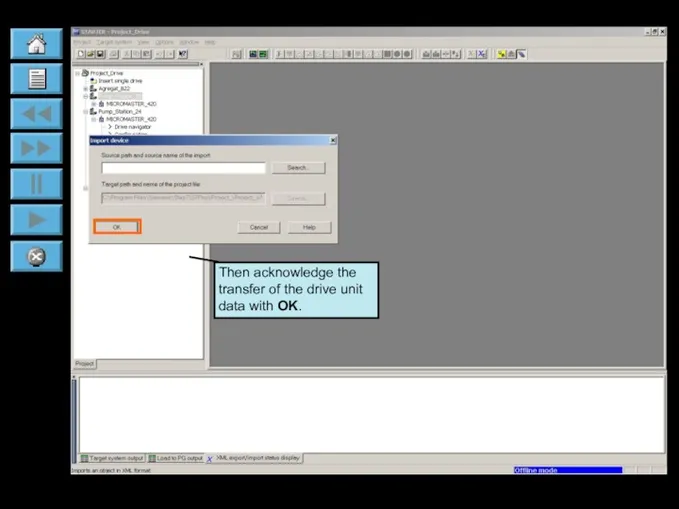
Then acknowledge the transfer of the drive unit data with OK.
Then acknowledge the transfer of the drive unit data with OK.
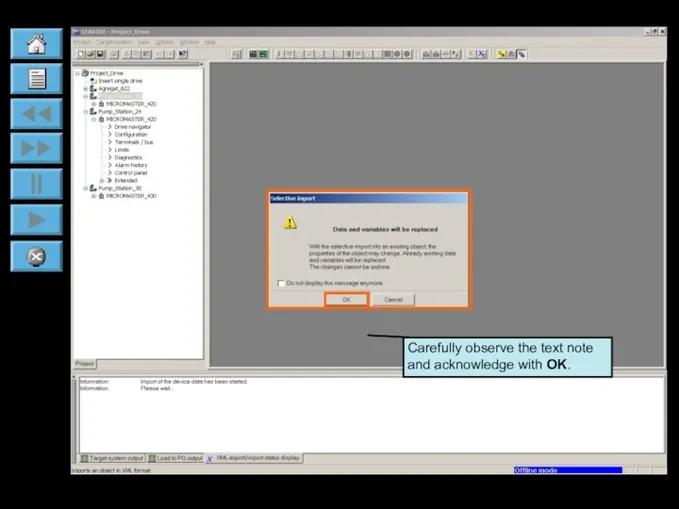
Carefully observe the text note and acknowledge with OK.
Carefully observe the text note and acknowledge with OK.
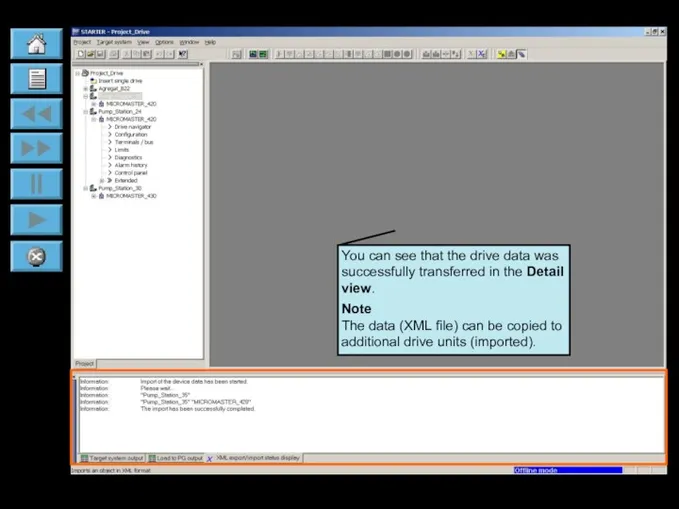
You can see that the drive data was successfully transferred in
You can see that the drive data was successfully transferred in
Copying from drive projects (XML export/import)
Copying from drive projects (XML export/import)
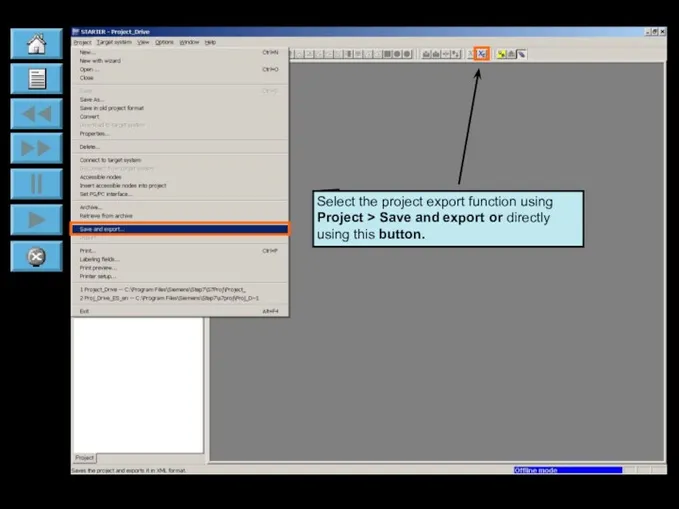
Select the project export function using Project > Save and export
Select the project export function using Project > Save and export
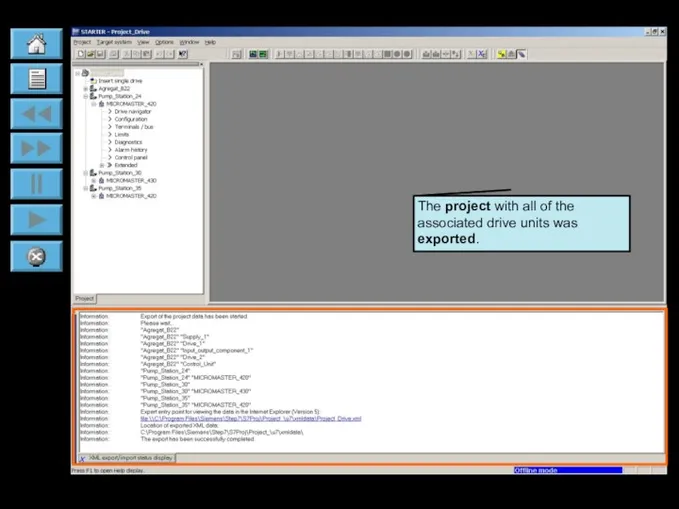
The project with all of the associated drive units was exported.
The project with all of the associated drive units was exported.
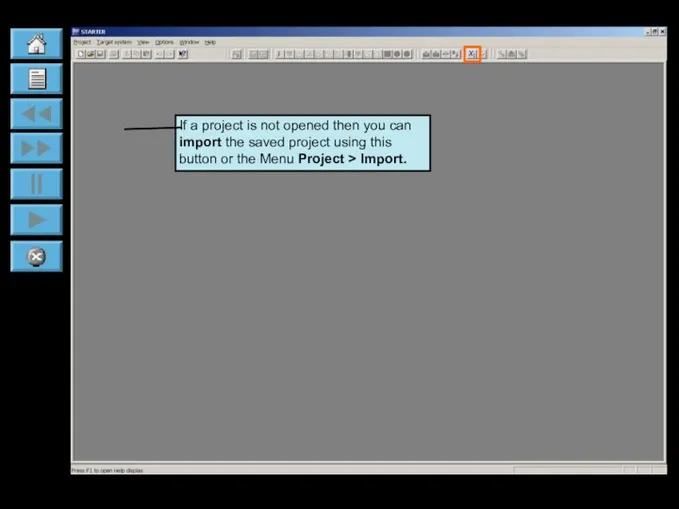
If a project is not opened then you can import the
If a project is not opened then you can import the
The Import project window opens.
Click on Search in order to get
The Import project window opens. Click on Search in order to get
Acknowledge the source path of the imported project using OK.
Now define
Acknowledge the source path of the imported project using OK.
Now define
 ФАЙЛОВАЯ СИСТЕМА – хаос или порядок?
 Электронная почта. История создания
 Word 2007: спецкурс
 Дискретный анализ. Лекция 1
 Компьютер и здоровье
 Web - cайт: создание гиперссылки, списков, таблиц, изображений
 ФГИС ЕГРН. ПКУРП
 Анимированный кроссворд
 Система сбора и анализа сведений о преподавателях
 Объект и его имя
 Компьютерлік модельдеу түсінігі
 Безопасность общения в социальных сетях
 Система учета ремонтных событий – инструкция по работе с программой GSIS
 Отчет по технической службе B2C, подключение
 Автоматизированные информационные системы
 Элементы алгебры логики. Упрощение логических выражений
 Общие сведения о языке программирования Паскаль. Начала программирования. (9 класс)
 Mobile Growth Powered by AI Technology
 Какими я вижу компьютеры будущего
 Функциональное программирование
 Инструкция по запуску дистанционных курсов
 Технологии разработки интернет-систем
 Технологии компьютерной анимации
 Криптография с открытым ключом. Лекция 5
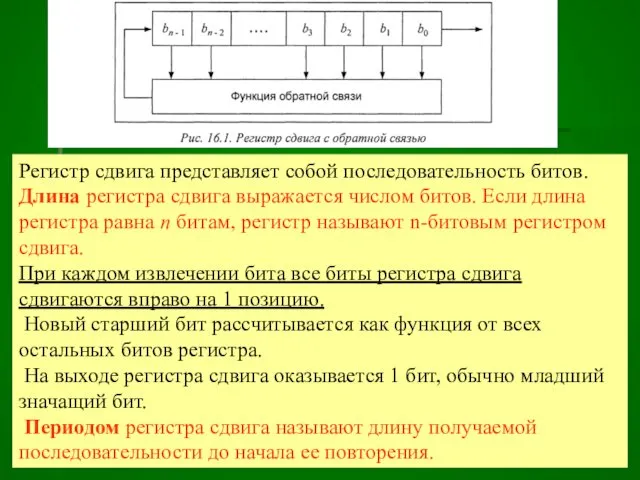 Регистр сдвига
 Текстовый редактор. Правила набора текста. Информатика. 5 класс
 Математические модели потоков телефонных вызовов
 Как устроена компьютерная сеть