- ProfiNet

Содержание
- 2. Inhaltsfolie Overview
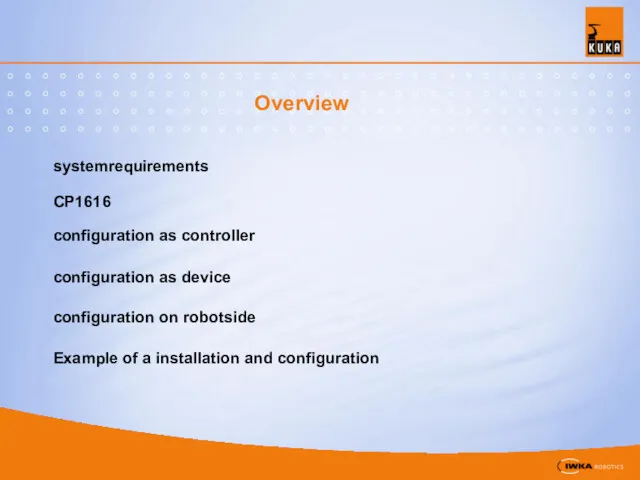
- 3. Overview systemrequirements CP1616 configuration as controller configuration as device Example of a installation and configuration configuration
- 4. system requirements For using the new fieldbus ProfiNet you need the following system components KRC Edition
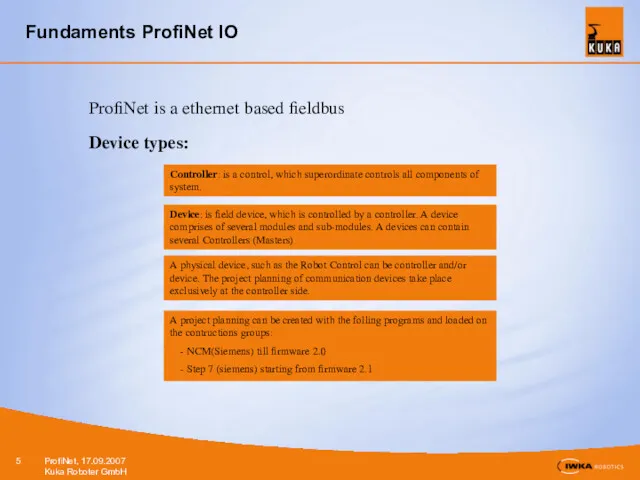
- 5. Fundaments ProfiNet IO ProfiNet is a ethernet based fieldbus Device types: Controller: is a control, which
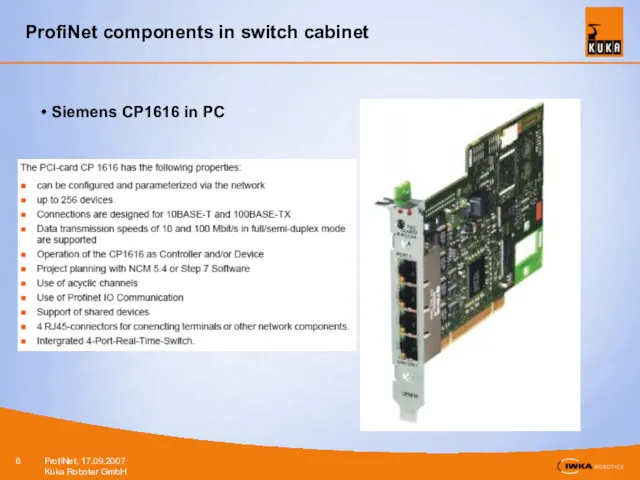
- 6. ProfiNet components in switch cabinet Siemens CP1616 in PC
- 7. placement for CP1616 in PC
- 8. standard assembly in a roboter-cell switch plant network cell plc robots Controller
- 9. standard BMW-switch cabinet switch plant network cell plc Controller device from plc device from plc device
- 10. ProfiNet installation shutdown Pc plug in CP1616 start pc and stop startup in windows start setup.exe
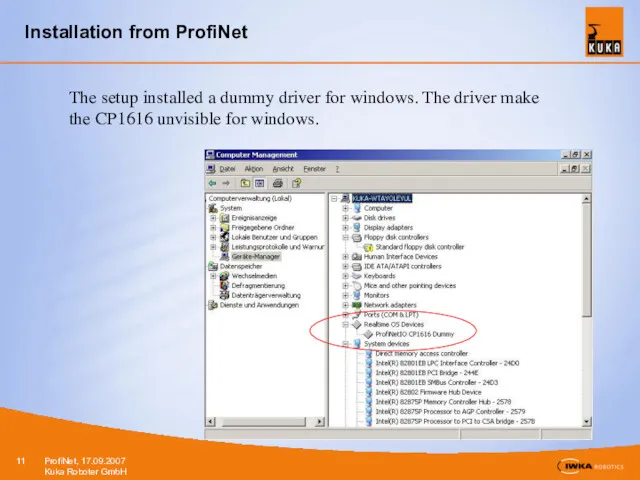
- 11. Installation from ProfiNet The setup installed a dummy driver for windows. The driver make the CP1616
- 12. configuration roboter as contoller in Step7/NCM-Manager
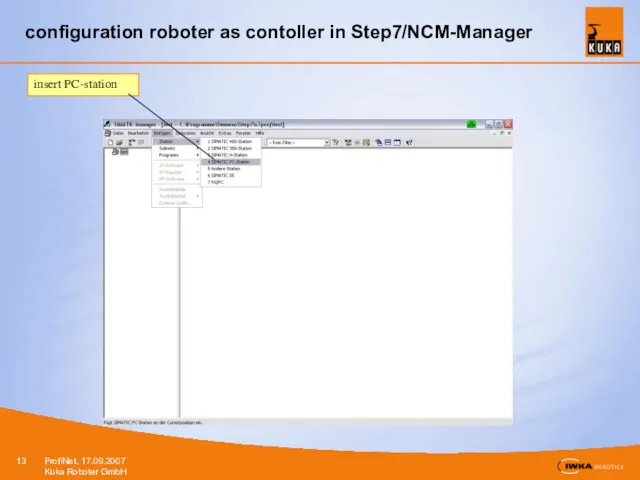
- 13. configuration roboter as contoller in Step7/NCM-Manager insert PC-station
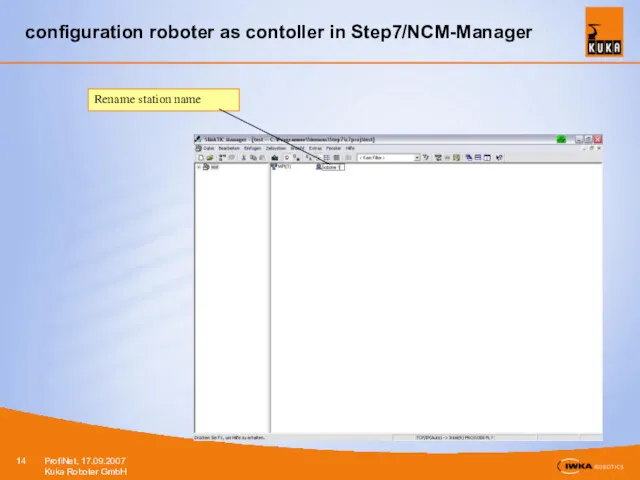
- 14. configuration roboter as contoller in Step7/NCM-Manager Rename station name
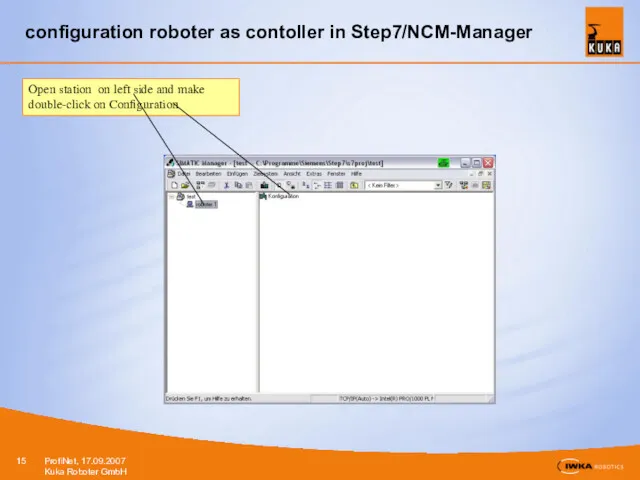
- 15. configuration roboter as contoller in Step7/NCM-Manager Open station on left side and make double-click on Configuration
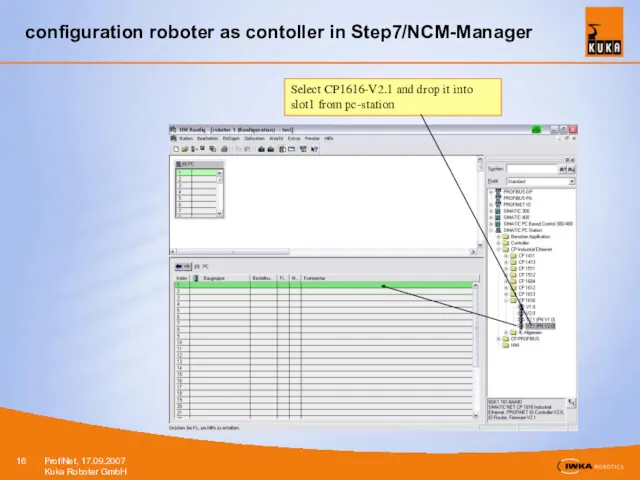
- 16. configuration roboter as contoller in Step7/NCM-Manager Select CP1616-V2.1 and drop it into slot1 from pc-station
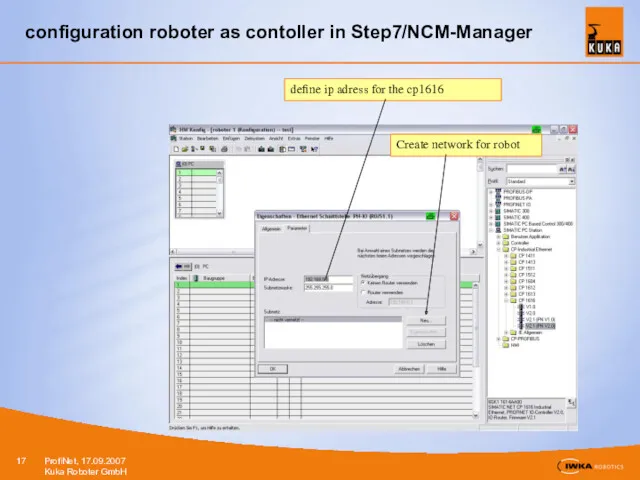
- 17. configuration roboter as contoller in Step7/NCM-Manager define ip adress for the cp1616 Create network for robot
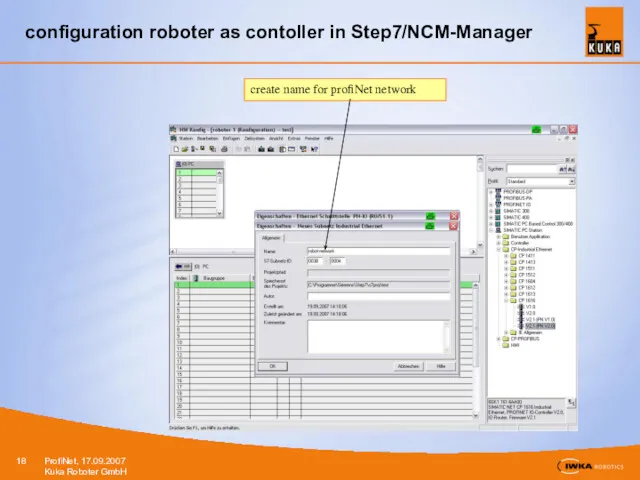
- 18. configuration roboter as contoller in Step7/NCM-Manager create name for profiNet network
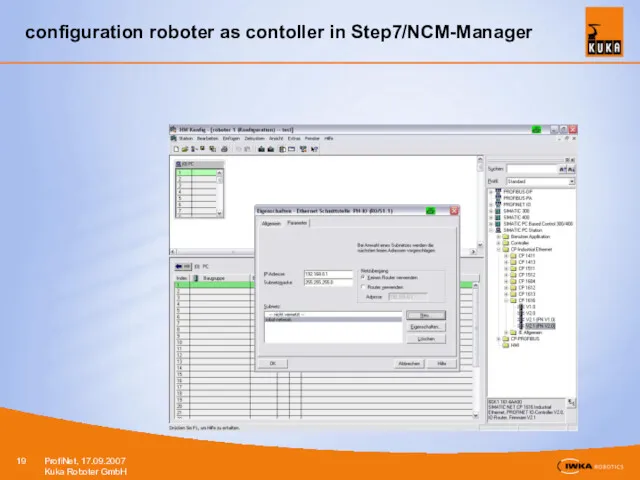
- 19. configuration roboter as contoller in Step7/NCM-Manager
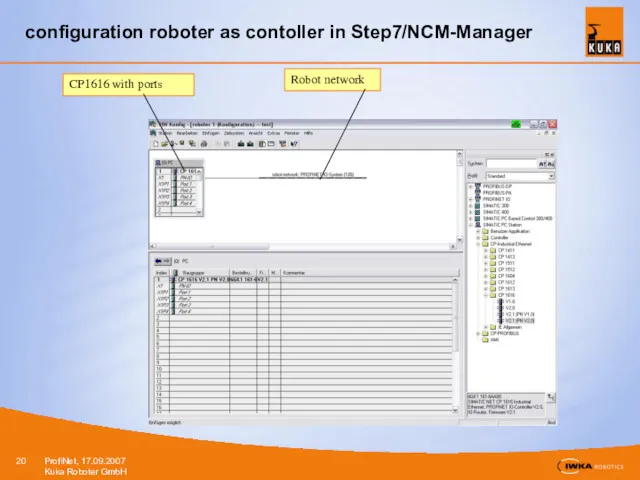
- 20. configuration roboter as contoller in Step7/NCM-Manager
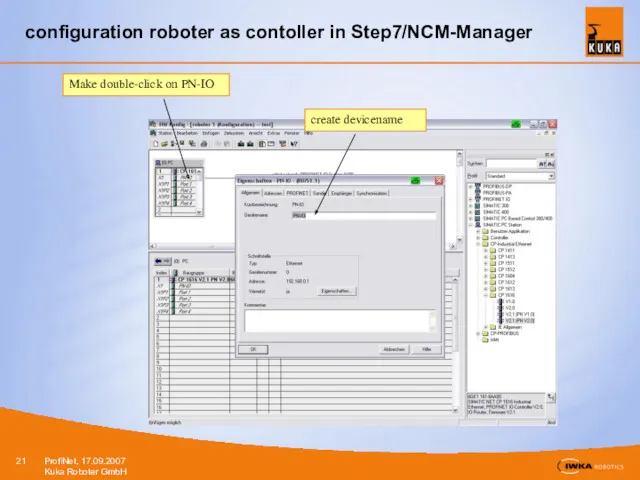
- 21. configuration roboter as contoller in Step7/NCM-Manager
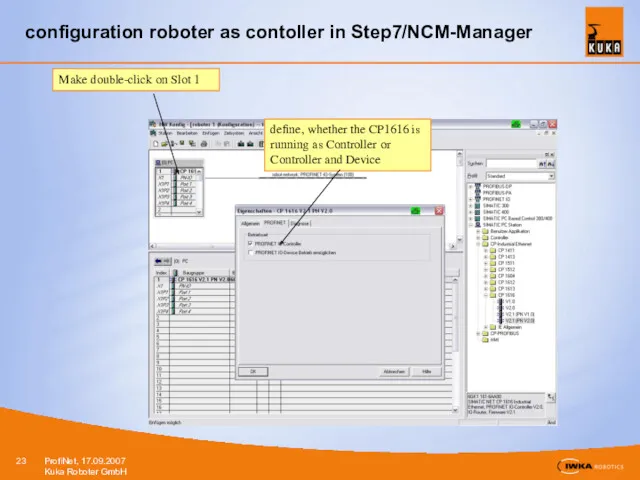
- 22. configuration roboter as contoller in Step7/NCM-Manager very important For all devices on bus you must define
- 23. configuration roboter as contoller in Step7/NCM-Manager
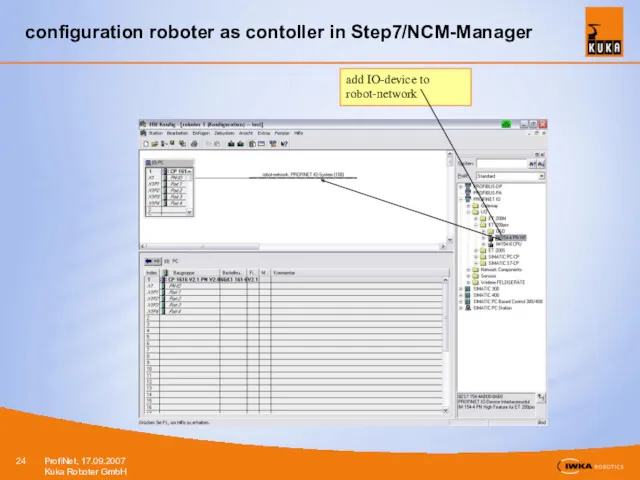
- 24. configuration roboter as contoller in Step7/NCM-Manager add IO-device to robot-network
- 25. configuration roboter as contoller in Step7/NCM-Manager add IO-device to robot-network
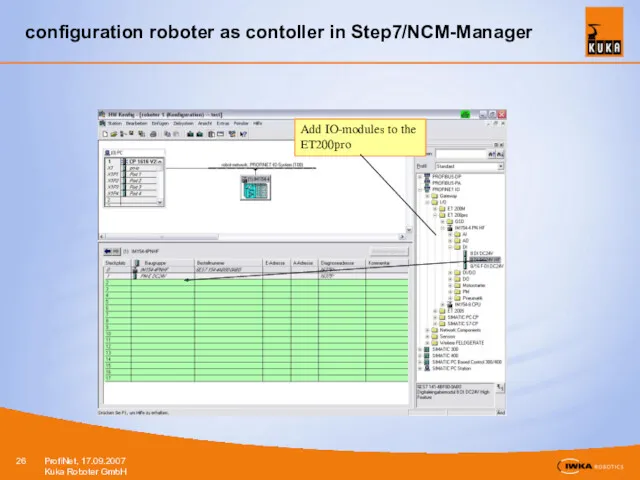
- 26. configuration roboter as contoller in Step7/NCM-Manager Add IO-modules to the ET200pro
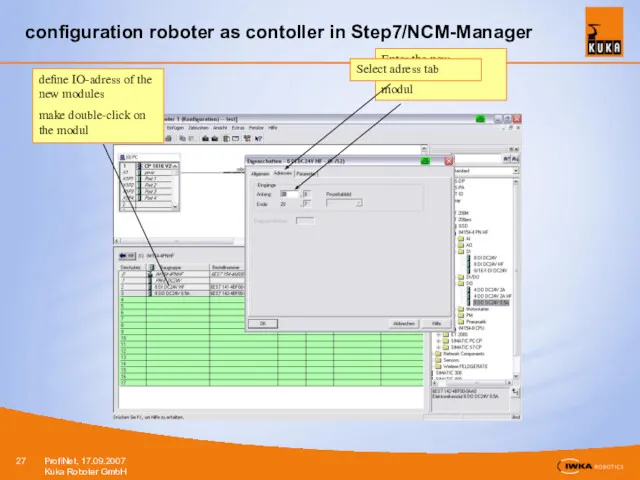
- 27. configuration roboter as contoller in Step7/NCM-Manager define IO-adress of the new modules make double-click on the
- 28. configuration roboter as contoller in Step7/NCM-Manager Save und compile the configuration at the end.
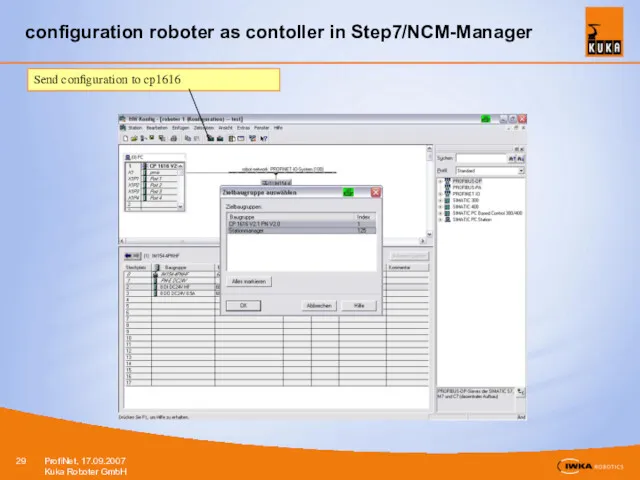
- 29. configuration roboter as contoller in Step7/NCM-Manager Send configuration to cp1616
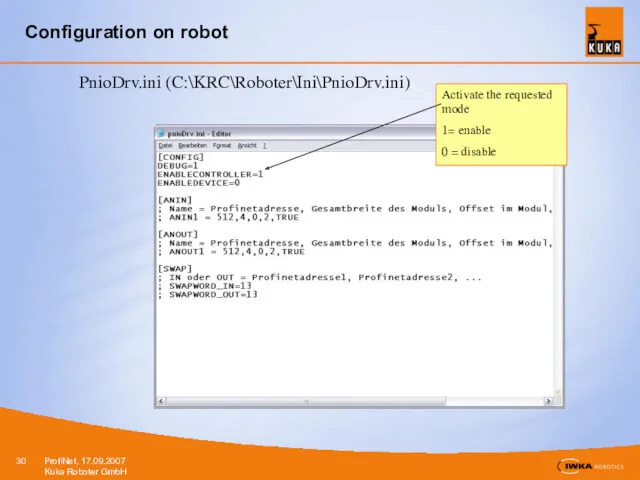
- 30. Configuration on robot PnioDrv.ini (C:\KRC\Roboter\Ini\PnioDrv.ini)
- 31. Configuration on robot – IOSYS.INI
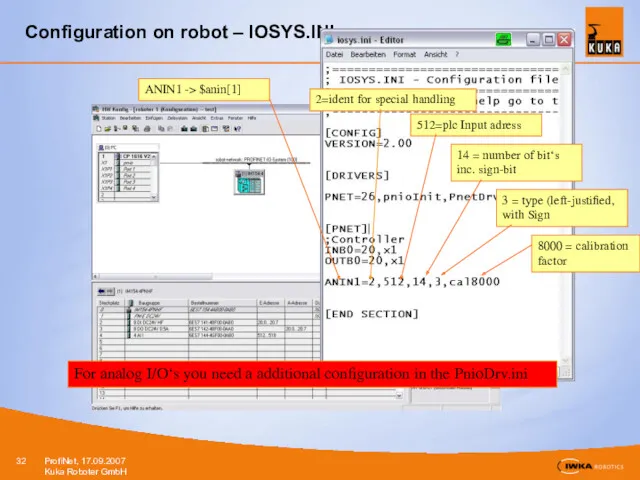
- 32. Configuration on robot – IOSYS.INI For analog I/O‘s you need a additional configuration in the PnioDrv.ini
- 33. Configuration on robot PnioDrv.ini (C:\KRC\Roboter\Ini\PnioDrv.ini)
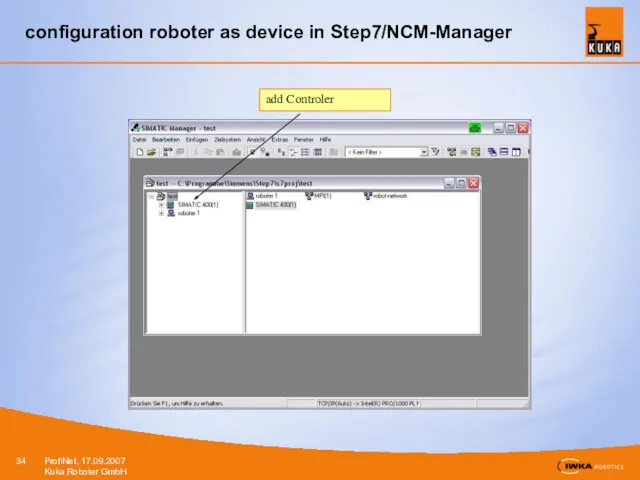
- 34. configuration roboter as device in Step7/NCM-Manager
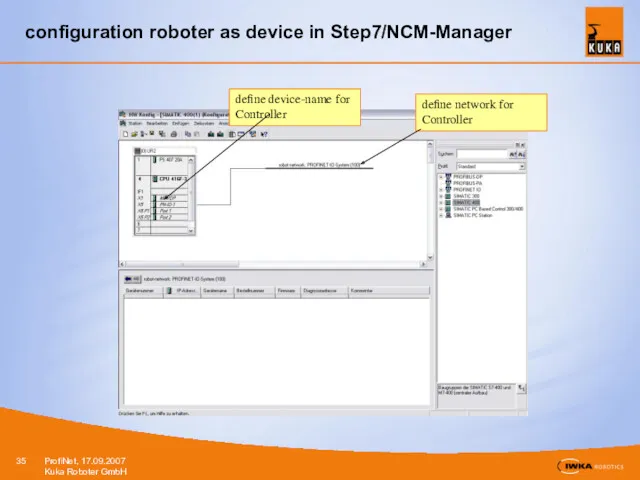
- 35. configuration roboter as device in Step7/NCM-Manager define network for Controller
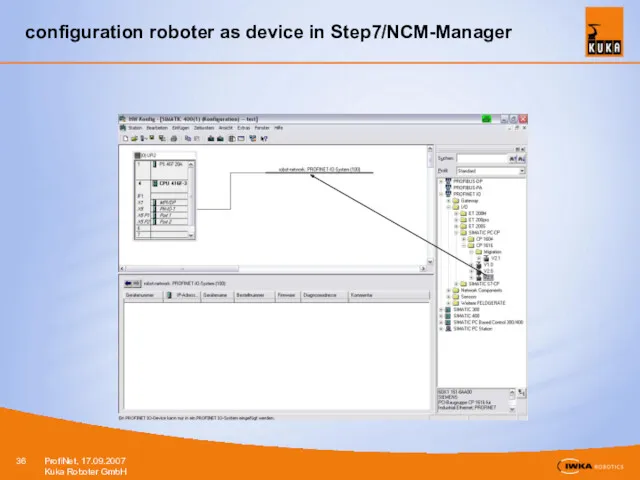
- 36. configuration roboter as device in Step7/NCM-Manager
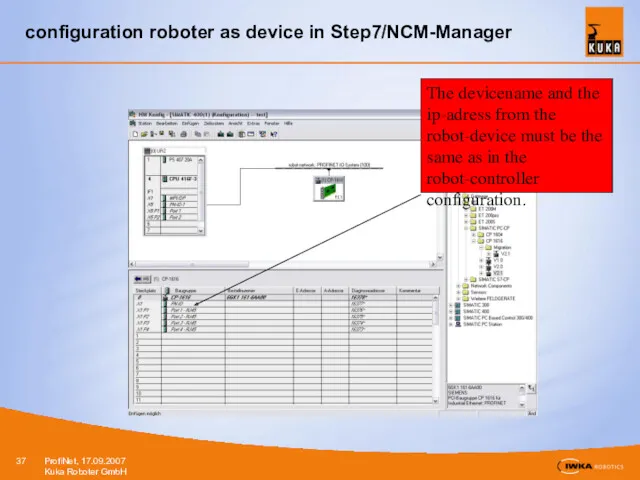
- 37. configuration roboter as device in Step7/NCM-Manager
- 38. configuration roboter as device in Step7/NCM-Manager
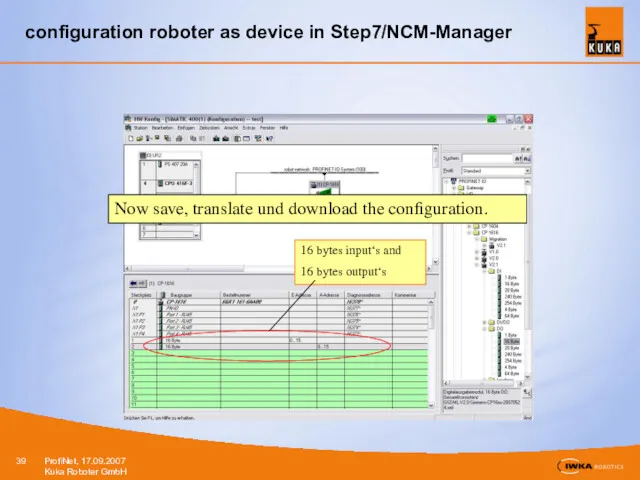
- 39. configuration roboter as device in Step7/NCM-Manager Now save, translate und download the configuration.
- 41. Скачать презентацию
Inhaltsfolie
Overview
Inhaltsfolie
Overview
Overview
systemrequirements
CP1616
configuration as controller
configuration as device
Example of a installation and configuration
configuration on
Overview
systemrequirements
CP1616
configuration as controller
configuration as device
Example of a installation and configuration
configuration on

system requirements
For using the new fieldbus ProfiNet you need the
system requirements
For using the new fieldbus ProfiNet you need the
Fundaments ProfiNet IO
ProfiNet is a ethernet based fieldbus
Device types:
Controller: is a
Fundaments ProfiNet IO
ProfiNet is a ethernet based fieldbus
Device types:
Controller: is a
ProfiNet components in switch cabinet
Siemens CP1616 in PC
ProfiNet components in switch cabinet
Siemens CP1616 in PC
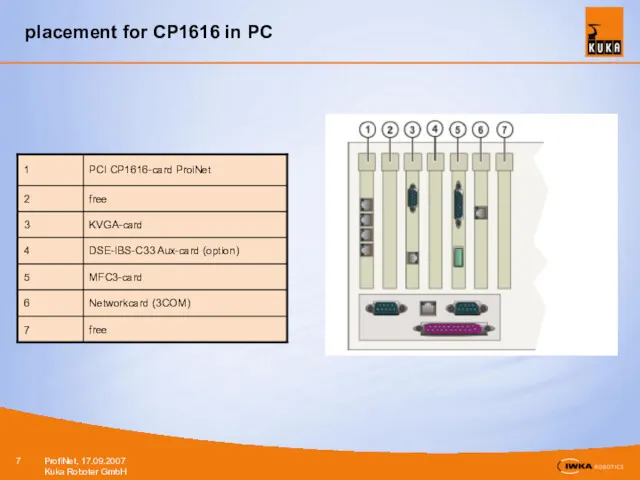
placement for CP1616 in PC
placement for CP1616 in PC
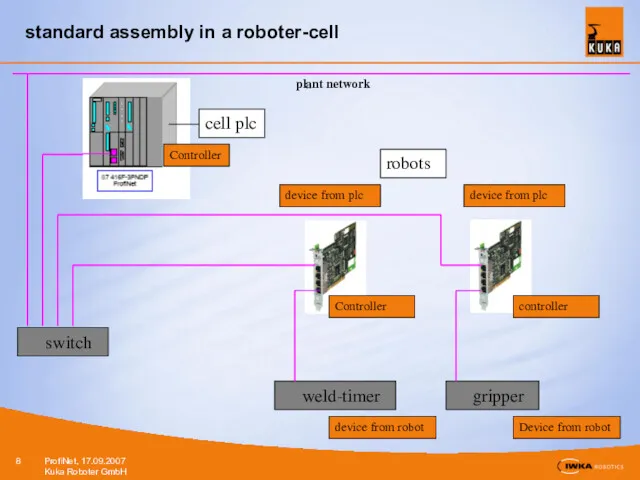
standard assembly in a roboter-cell
switch
plant network
cell plc
robots
Controller
standard assembly in a roboter-cell
switch
plant network
cell plc
robots
Controller
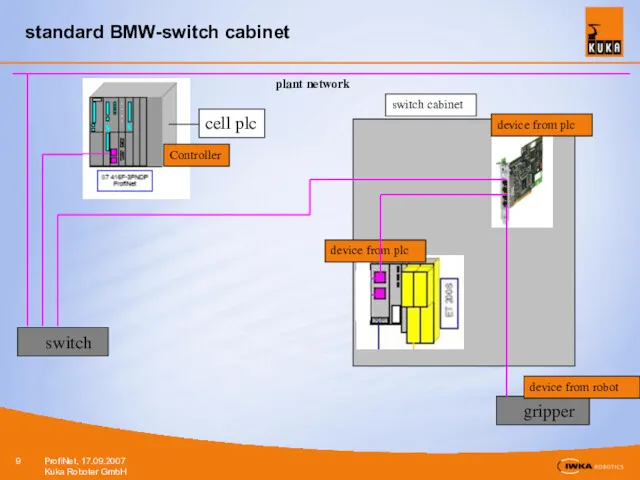
standard BMW-switch cabinet
switch
plant network
cell plc
Controller
device from plc
device from plc
device from
standard BMW-switch cabinet
switch
plant network
cell plc
Controller
device from plc
device from plc
device from
ProfiNet installation
shutdown Pc
plug in CP1616
start pc and stop
ProfiNet installation
shutdown Pc
plug in CP1616
start pc and stop
Installation from ProfiNet
The setup installed a dummy driver for windows. The
Installation from ProfiNet
The setup installed a dummy driver for windows. The
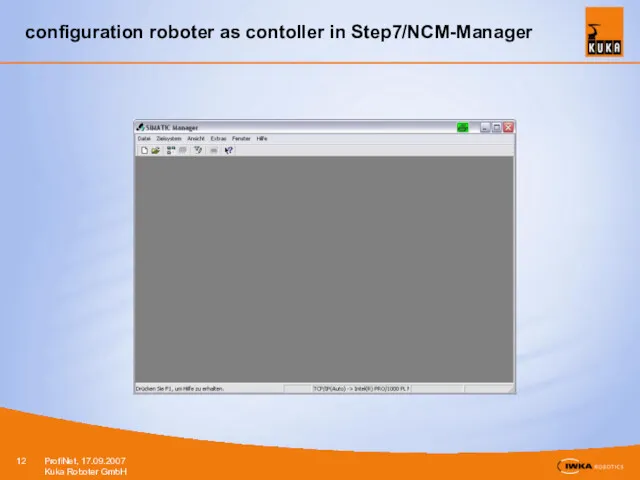
configuration roboter as contoller in Step7/NCM-Manager
configuration roboter as contoller in Step7/NCM-Manager
configuration roboter as contoller in Step7/NCM-Manager
insert PC-station
configuration roboter as contoller in Step7/NCM-Manager
insert PC-station
configuration roboter as contoller in Step7/NCM-Manager
Rename station name
configuration roboter as contoller in Step7/NCM-Manager
Rename station name
configuration roboter as contoller in Step7/NCM-Manager
Open station on left side and
configuration roboter as contoller in Step7/NCM-Manager
Open station on left side and
configuration roboter as contoller in Step7/NCM-Manager
Select CP1616-V2.1 and drop it into
configuration roboter as contoller in Step7/NCM-Manager
Select CP1616-V2.1 and drop it into
configuration roboter as contoller in Step7/NCM-Manager
define ip adress for the cp1616
Create
configuration roboter as contoller in Step7/NCM-Manager
define ip adress for the cp1616
Create
configuration roboter as contoller in Step7/NCM-Manager
create name for profiNet network
configuration roboter as contoller in Step7/NCM-Manager
create name for profiNet network
configuration roboter as contoller in Step7/NCM-Manager
configuration roboter as contoller in Step7/NCM-Manager
configuration roboter as contoller in Step7/NCM-Manager
configuration roboter as contoller in Step7/NCM-Manager
configuration roboter as contoller in Step7/NCM-Manager
configuration roboter as contoller in Step7/NCM-Manager
configuration roboter as contoller in Step7/NCM-Manager
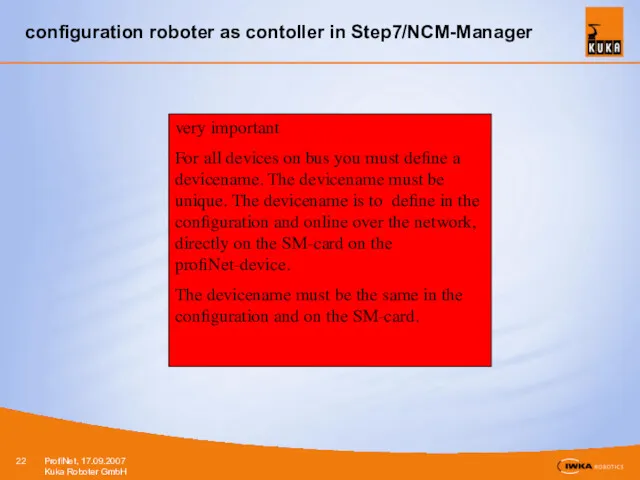
very important
For all devices on bus
configuration roboter as contoller in Step7/NCM-Manager
very important
For all devices on bus
configuration roboter as contoller in Step7/NCM-Manager
configuration roboter as contoller in Step7/NCM-Manager
configuration roboter as contoller in Step7/NCM-Manager
add IO-device to robot-network
configuration roboter as contoller in Step7/NCM-Manager
add IO-device to robot-network

configuration roboter as contoller in Step7/NCM-Manager
add IO-device to robot-network
configuration roboter as contoller in Step7/NCM-Manager
add IO-device to robot-network
configuration roboter as contoller in Step7/NCM-Manager
Add IO-modules to the ET200pro
configuration roboter as contoller in Step7/NCM-Manager
Add IO-modules to the ET200pro
configuration roboter as contoller in Step7/NCM-Manager
define IO-adress of the new modules
make
configuration roboter as contoller in Step7/NCM-Manager
define IO-adress of the new modules
make

configuration roboter as contoller in Step7/NCM-Manager
Save und compile the configuration at
configuration roboter as contoller in Step7/NCM-Manager
Save und compile the configuration at
configuration roboter as contoller in Step7/NCM-Manager
Send configuration to cp1616
configuration roboter as contoller in Step7/NCM-Manager
Send configuration to cp1616
Configuration on robot
PnioDrv.ini (C:\KRC\Roboter\Ini\PnioDrv.ini)
Configuration on robot
PnioDrv.ini (C:\KRC\Roboter\Ini\PnioDrv.ini)
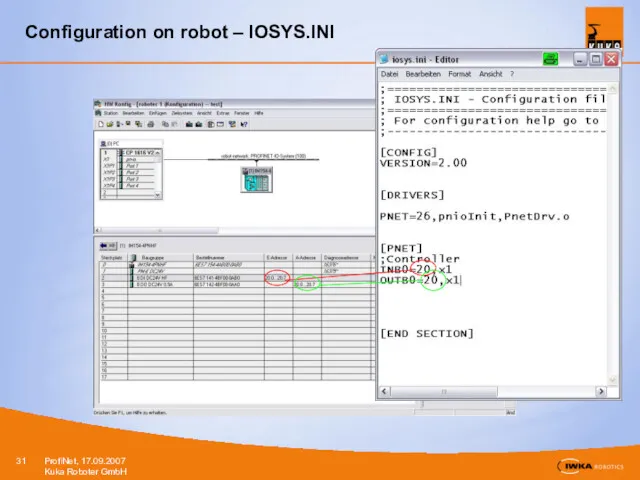
Configuration on robot – IOSYS.INI
Configuration on robot – IOSYS.INI
Configuration on robot – IOSYS.INI
For analog I/O‘s you need a additional
Configuration on robot – IOSYS.INI
For analog I/O‘s you need a additional
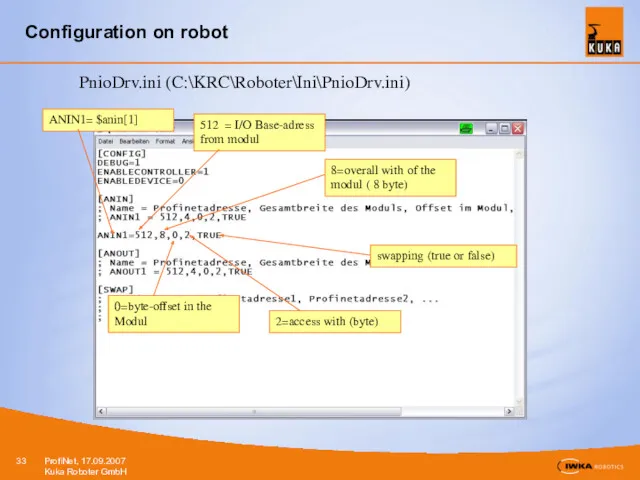
Configuration on robot
PnioDrv.ini (C:\KRC\Roboter\Ini\PnioDrv.ini)
Configuration on robot
PnioDrv.ini (C:\KRC\Roboter\Ini\PnioDrv.ini)
configuration roboter as device in Step7/NCM-Manager
configuration roboter as device in Step7/NCM-Manager
configuration roboter as device in Step7/NCM-Manager
define network for Controller
configuration roboter as device in Step7/NCM-Manager
define network for Controller
configuration roboter as device in Step7/NCM-Manager
configuration roboter as device in Step7/NCM-Manager
configuration roboter as device in Step7/NCM-Manager
configuration roboter as device in Step7/NCM-Manager
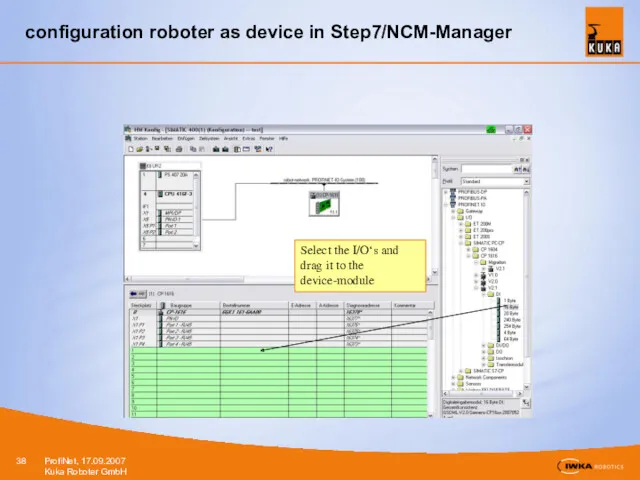
configuration roboter as device in Step7/NCM-Manager
configuration roboter as device in Step7/NCM-Manager
configuration roboter as device in Step7/NCM-Manager
Now save, translate und download the
configuration roboter as device in Step7/NCM-Manager
Now save, translate und download the
 Презентация Творческий потенциал учащихся
 Архитектура ОС MS Windows 2000+. Реестр
 ЭУП Архитектура ЭВМ
 Угроза доступа к локальным файлам сервера при помощи URL
 Операторы цикла в языке Python
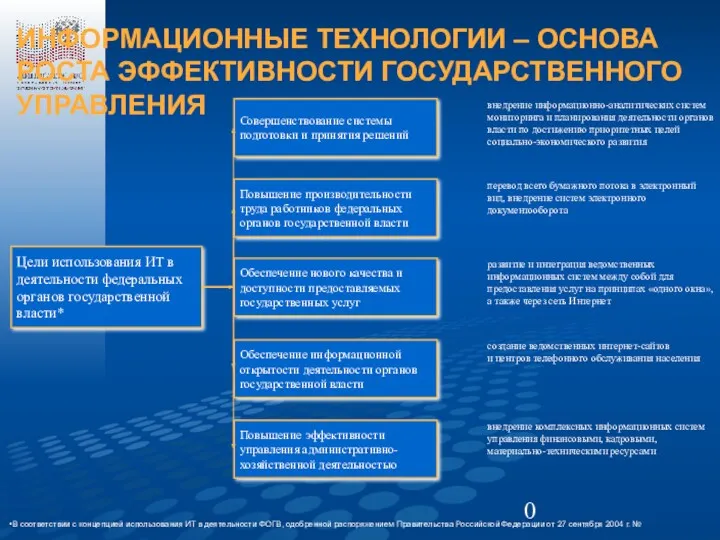 Информационные технологии – основа роста эффективности государственного управления
 Преимущества и недостатки микро и макро ядерной архитектуры
 1С:Предприятие 8. Управление сервисным центром
 Базовые технологии локальных сетей. Ethernet и Token Ring
 Как устроен компьютер. Знакомство с компьютером
 Моделирование. Лекция №8
 Организация вычислений в электронных таблицах. Обработка числовой информации в электронных таблицах
 Хранение данных и доступ к ним
 Возврат не день в день. Розница. Карта
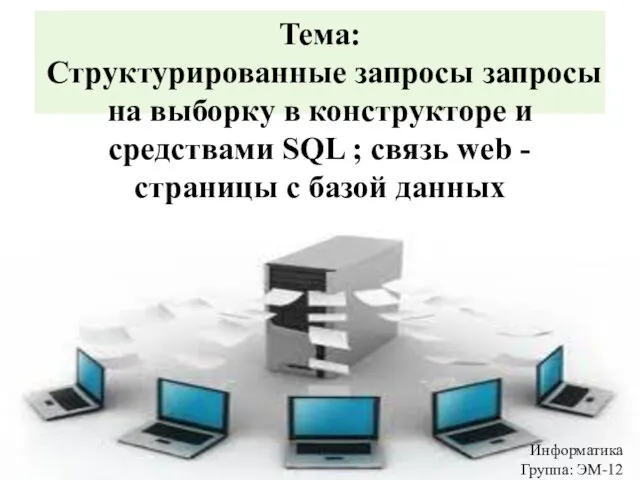 Структурированные запросы, запросы на выборку в конструкторе и средствами SQL
 Програмний комплекс оцінювання наслідків витоку службової інформації у сфері оборони
 Основні види графічних зображень статистичних показників та їх використання в статистичному аналізі
 Компоненты в React. Урок №1
 Понятие об информации. Представление информации. Информационная деятельность человека.
 Anatomy Lesson for Middle School Internal Organs of the Human Body
 Бірөлшемді массив. 9 класс
 15 простых приемов для эффективной работы в Word
 9 класс. Основы программирования
 Виды современных компьютеров (от мощных компьютерных систем, до мини-компьютеров)
 Рисование в текстовом редакторе
 Файловые менеджеры
 Простой вариант без выбора
 Хранение однотипных данных. Массивы