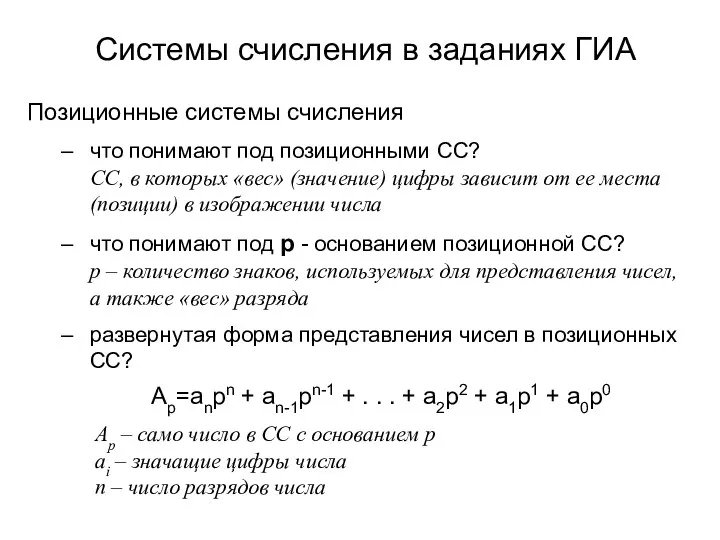
Move, copy, rotate, align, snap
Rotate tool This is a Rotate tool with some more control compared to the basic rotate tool that comes with the Move tool. The tool works exactly as in Sketchup. Once you select the tool, moving over an object auto-selects it. This way, many objects can be rotated quickly without having to go away from the tool and selecting the object, then pick the rotate tool again. But if two objects share a vertex and this vertex is to be used as the base point, it may be necessary to select the object first before rotation. You select a base point, then another point to define the start angle of rotation (base line) and then you start to rotate. While rotating, the handle can be pulled far away from the object so that the end angle can be set by snapping on to some object far away. Clicking Rotate tool changes mouse pointer to Rotate tool Select another point to set the base line of rotation Move tool over object to rotate and object is auto-selected (or select first before clicking rotate tool). Click on a point on the object to set the base point of rotation. Handle is elastic and can be snapped to far away objects Once an object has been rotated, the rotate tool pointer is ready to auto-select and rotate the next object. This allows many objects to be rotated quickly one after the other. All point selection should have snap available (end point, mid point, nearest, perpendicular etc). Now an infinitely stretchable handle line appears and you start rotating it. Align Tool The Align tool moves and rotates an object at the same time, basically aligning an object to another. It can also scale the object at the same time if necessary. Align is useful when we want to copy a window and then move it to a wall of a house and align it such that the window sits flush with the wall. Align will use 4 points. Two points on the object to be aligned and the corresponding two points on the object to be aligned to. Once the tool is activated, move the tool pointer close to the object and it auto-selects (or select the object first if necessary). The cursor displays a tool icon (a + is enough?) and a number 1A next to it. This means select point 1 on the object (1st source point). Once selected, the cursor displays the 1B. This means select the corresponding point this point should move to (1st destination point). Now cursor displays 2A. Select the next point on the object (second source point). Once this is picked, cursor displays 2B. Pick the 2nd destination point. This moves the object in such a way that 1A is moved to 1B and 2A is moved to line up with 2B. Note that the object is just aligned, not scaled this time. But while selecting 2B, if CNTRL is also pressed, the object is also scaled (in X and Y). If SHIFT is pressed, the object is scaled in XY and Z using the same XY scale factor. 1A 1B 2B 2A Align without CNTRL key (no scaling) 1A 1B 2B 2A Align + CNTRL key (object is scaled as well in XY) Align + Shift key (object is scaled in XY and Z)