- eVerge™ Programming Workshop

Содержание
- 2. How To Program EVX-530 Radios Prerequisites Preface Call Addressing Channel Configuration Other Privacy Features Emergency Function
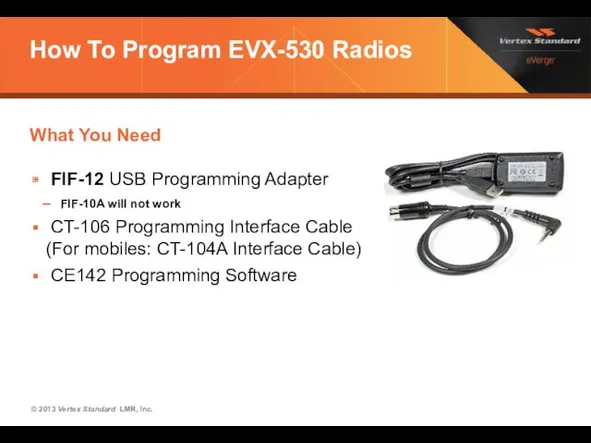
- 3. How To Program EVX-530 Radios What You Need FIF-12 USB Programming Adapter FIF-10A will not work
- 4. How To Program EVX-530 Radios Configuration of DIGITAL Channels & Functions - Some Theory first -
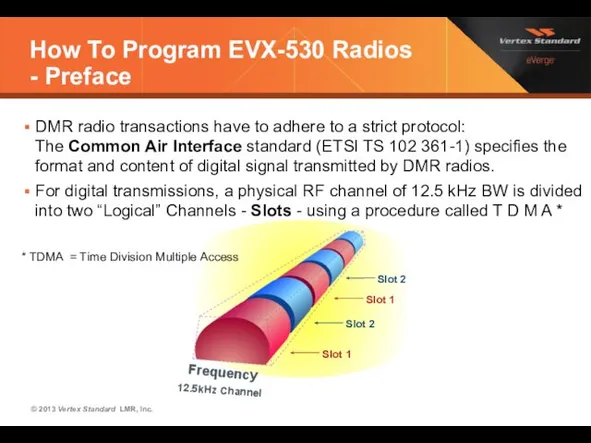
- 5. How To Program EVX-530 Radios - Preface DMR radio transactions have to adhere to a strict
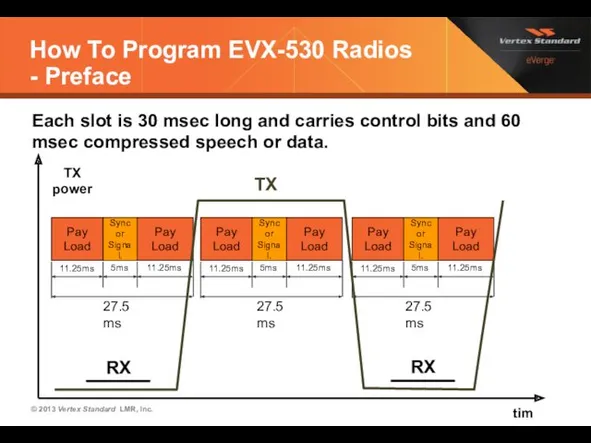
- 6. How To Program EVX-530 Radios - Preface Each slot is 30 msec long and carries control
- 7. How To Program EVX-530 Radios - Preface Amongst others, the DMR standard requires that every message
- 8. How To Program EVX-530 Radios - Preface To establish the communication link, each radio must have:
- 9. How To Program EVX-530 Radios - Preface Repeaters are more important than on analogue radio systems.
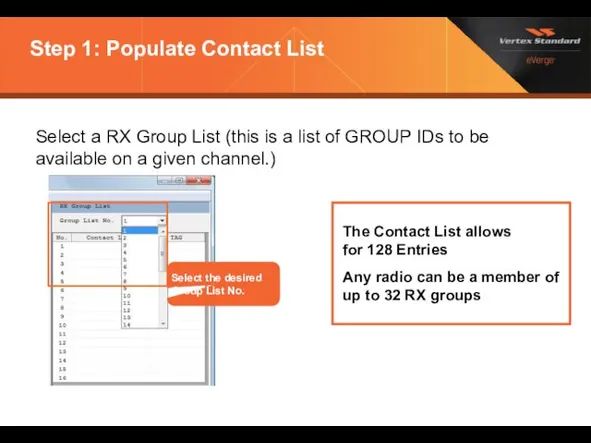
- 10. Step 1: Populate Contact List Open the Contact List setting dialogue Different ways to open the
- 11. Step 1: Populate Contact List, Call Type 3 Different “Call Types” can be used: Group Call:
- 12. Step 1: Populate Contact List, Call Type Select TX ID type Group: Group Call Private: Private
- 13. Step 1: Populate Contact List Set the Call ID Enter the Call IDs. Input range: 1
- 14. Step 1: Populate Contact List The Contact List allows for 128 Entries Any radio can be
- 15. Step 1: Populate Contact List Edit the RX Group List The Contact List shown here can
- 16. Step 2: Configure Common Settings Open the Digital Common dialog box Open this menu.
- 17. Step 2: Configure Common Settings Assign the Radio ID (Reminder: Each radio must have its own
- 18. Step 2: Configure Common Settings Enable / Disable Private Call Check mark enables Private Call
- 19. Step 3: Configure Operating Channels Double click here or press the space bar.
- 20. Step 3: Configure Operating Channels Choose operational mode: D = Digital
- 21. Step 3: Configure Operating Channels Enter the desired frequencies here Enter Frequencies
- 22. Step 3: Configure Operating Channels Range: 1 or 2 Set the Repeater Slot
- 23. Step 3: Configure Operating Channels Choose the appropriate Color Code A ‘Color Code‘ is a ‘System
- 24. Step 3: Configure Operating Channels Enable the correct Group List for this channel. The radio will
- 25. Step 3: Configure Operating Channels Select the DESTINATION ADDRESS (Contact) for a call on this channel.
- 26. Step 3: Configure Operating Channels Optional: Configure Private Calls as “Confirmed”. If enabled, the radio will
- 27. Step 3: Configure Operating Channels - Register Channel in Group List Enter the Channel # from
- 28. Step 4: Optional Settings Configuration of Optional Functions Privacy Emergency Call Text Messaging VOX Operation
- 29. Step 4: Option Privacy 2 Privacy Options are available: BASIC and ENHANCED *) Settings located under
- 30. Step 4: Optional Settings - BASIC Privacy Configuration The BASIC Privacy function uses a non-cryptographic algorithm
- 31. Step 4: Optional Settings - ENHANCED Privacy Feature The ENHANCED Privacy feature uses a cryptographic algorithm
- 32. Step 4: Optional Settings - ENHANCED Privacy Configuration 16 codes available; display radio users can change
- 33. Step 4: Optional Settings – Privacy, assign to programmable Button Open the Key Function Menu Open
- 34. Step 4: Optional Settings – Privacy, assign to programmable button. Key Settings Select this item.
- 35. Step 4: Optional Settings - Privacy, Activate on Channel Return to the Main screen. Add Privacy
- 36. Step 4: Optional Settings - Emergency Function (Digital Mode) Open the Emergency Function Dialog Window Open
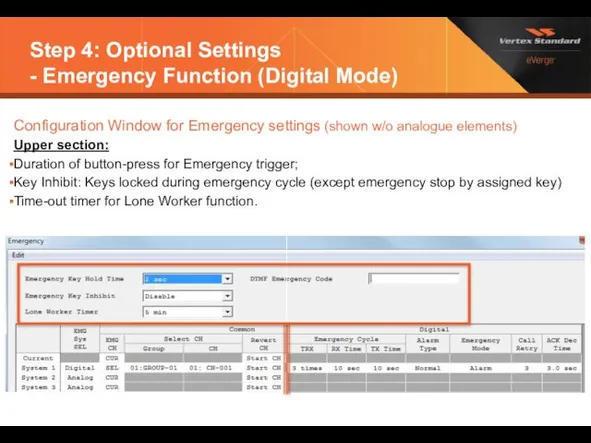
- 37. Step 4: Optional Settings - Emergency Function (Digital Mode) Configuration Window for Emergency settings (shown w/o
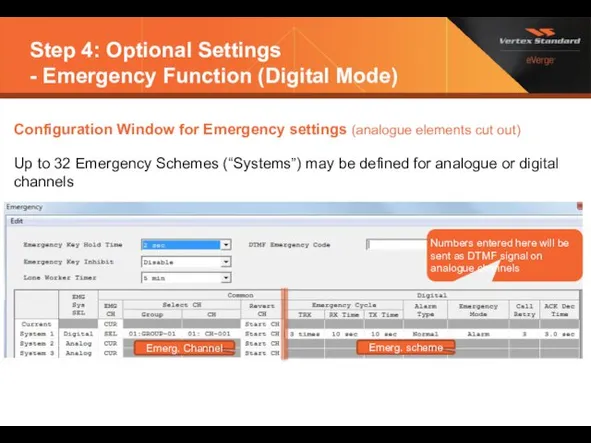
- 38. Step 4: Optional Settings - Emergency Function (Digital Mode) Configuration Window for Emergency settings (analogue elements
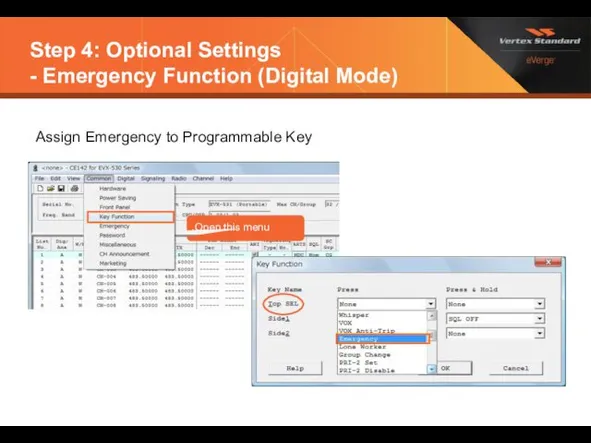
- 39. Step 4: Optional Settings - Emergency Function (Digital Mode) Assign Emergency to Programmable Key Open this
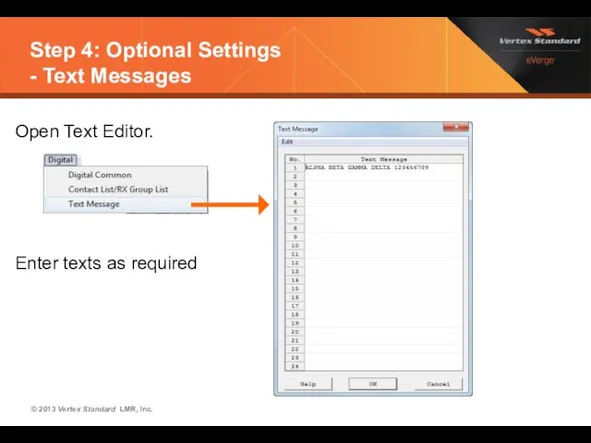
- 40. Step 4: Optional Settings - Text Messages The Text Messaging Feature is available as of F/W
- 41. Step 4: Optional Settings - Text Messages Open Text Editor. Enter texts as required
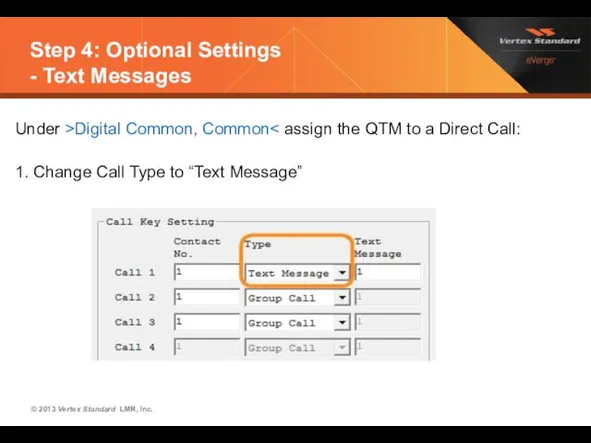
- 42. Step 4: Optional Settings - Text Messages Under >Digital Common, Common 1. Change Call Type to
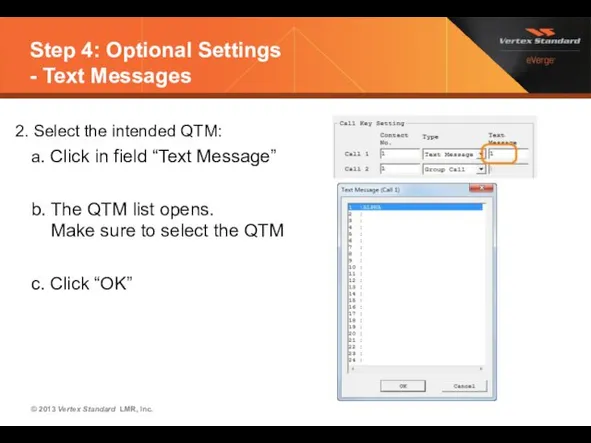
- 43. Step 4: Optional Settings - Text Messages 2. Select the intended QTM: a. Click in field
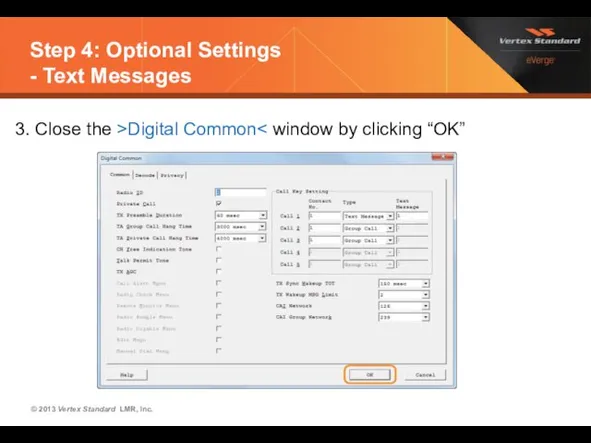
- 44. Step 4: Optional Settings - Text Messages 3. Close the >Digital Common
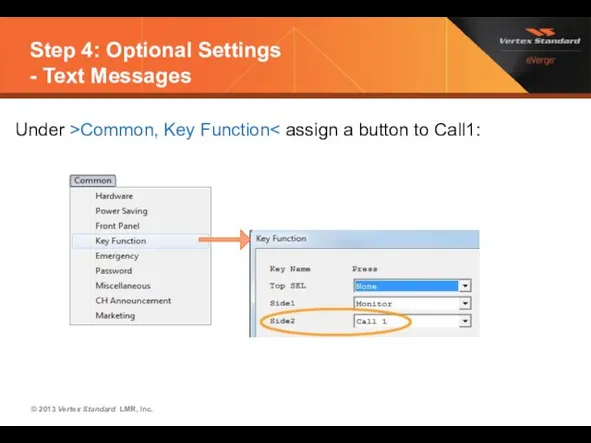
- 45. Step 4: Optional Settings - Text Messages Under >Common, Key Function
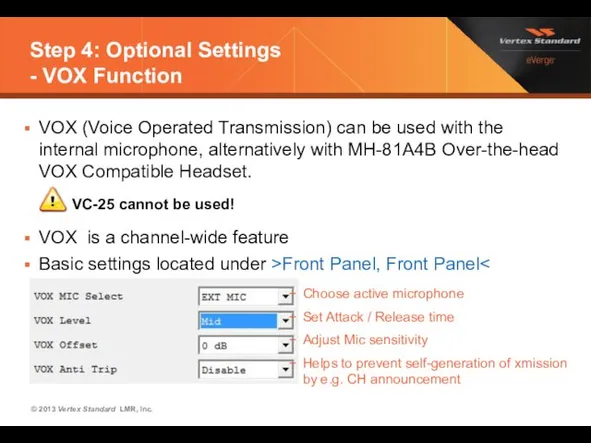
- 46. Step 4: Optional Settings - VOX Function VOX (Voice Operated Transmission) can be used with the
- 47. Step 4: Optional Settings - VOX Function In main window, active VOX on desired channel. Double
- 48. EVX-534/539 Display Radios Menu-guided Operation
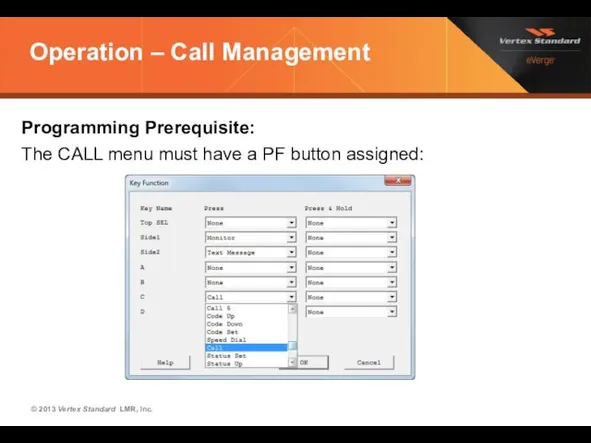
- 49. Operation – Call Management Programming Prerequisite: The CALL menu must have a PF button assigned:
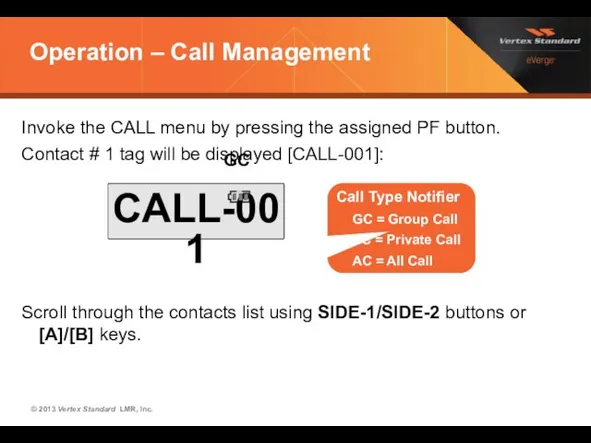
- 50. Operation – Call Management Invoke the CALL menu by pressing the assigned PF button. Contact #
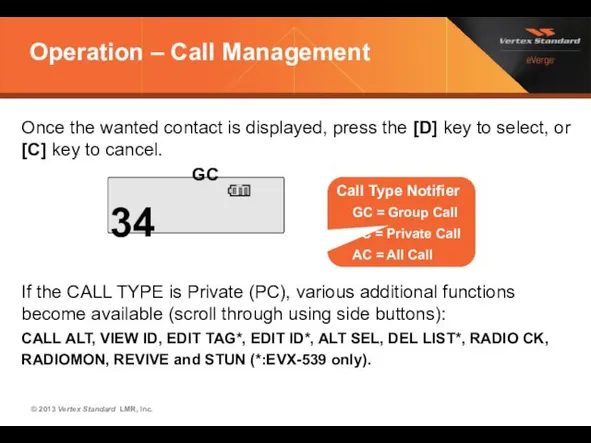
- 51. Operation – Call Management Once the wanted contact is displayed, press the [D] key to select,
- 53. Скачать презентацию
How To Program EVX-530 Radios
Prerequisites
Preface
Call Addressing
Channel Configuration
How To Program EVX-530 Radios
Prerequisites
Preface
Call Addressing
Channel Configuration
How To Program EVX-530 Radios
What You Need
FIF-12 USB Programming Adapter
FIF-10A
How To Program EVX-530 Radios
What You Need
FIF-12 USB Programming Adapter
FIF-10A
How To Program EVX-530 Radios
Configuration of
DIGITAL
Channels & Functions
- Some
How To Program EVX-530 Radios
Configuration of
DIGITAL
Channels & Functions
- Some
How To Program EVX-530 Radios
- Preface
DMR radio transactions have to adhere
How To Program EVX-530 Radios
- Preface
DMR radio transactions have to adhere
How To Program EVX-530 Radios
- Preface
Each slot is 30 msec long
How To Program EVX-530 Radios
- Preface
Each slot is 30 msec long
How To Program EVX-530 Radios
- Preface
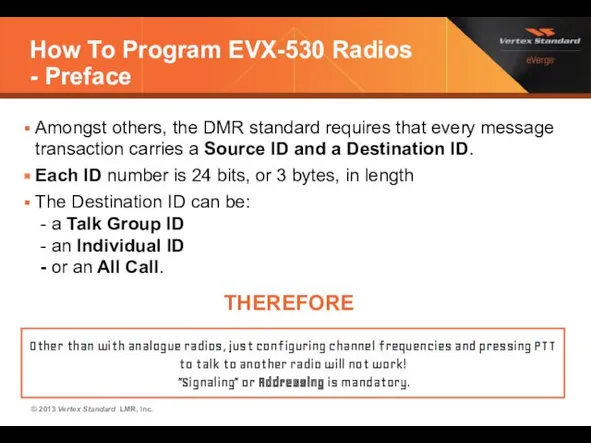
Amongst others, the DMR standard requires
How To Program EVX-530 Radios
- Preface
Amongst others, the DMR standard requires
How To Program EVX-530 Radios
- Preface
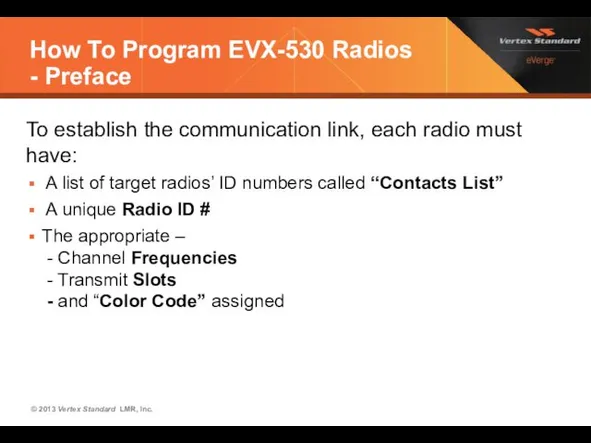
To establish the communication link, each
How To Program EVX-530 Radios
- Preface
To establish the communication link, each
How To Program EVX-530 Radios
- Preface
Repeaters are more important than on
How To Program EVX-530 Radios
- Preface
Repeaters are more important than on
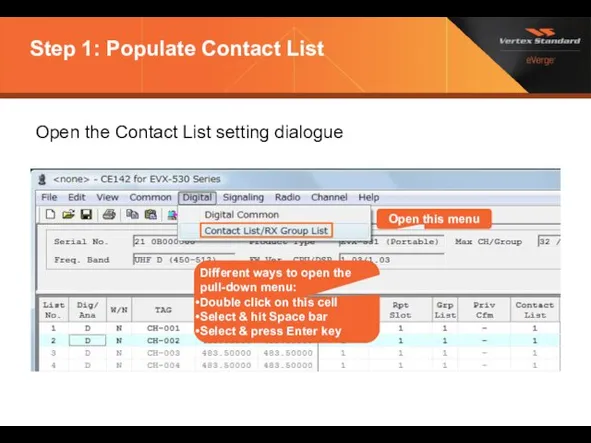
Step 1: Populate Contact List
Open the Contact List setting dialogue
Different ways
Step 1: Populate Contact List
Open the Contact List setting dialogue
Different ways
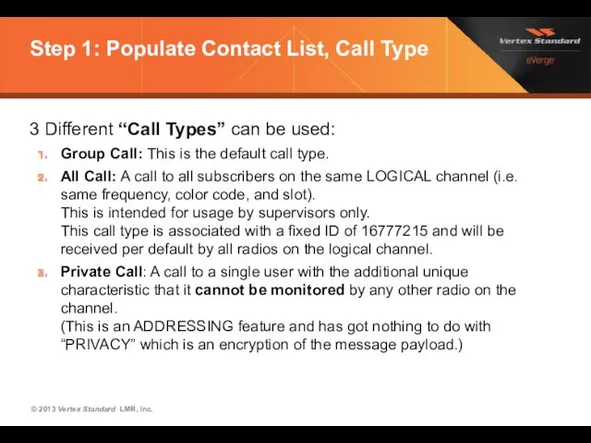
Step 1: Populate Contact List, Call Type
3 Different “Call Types” can
Step 1: Populate Contact List, Call Type
3 Different “Call Types” can
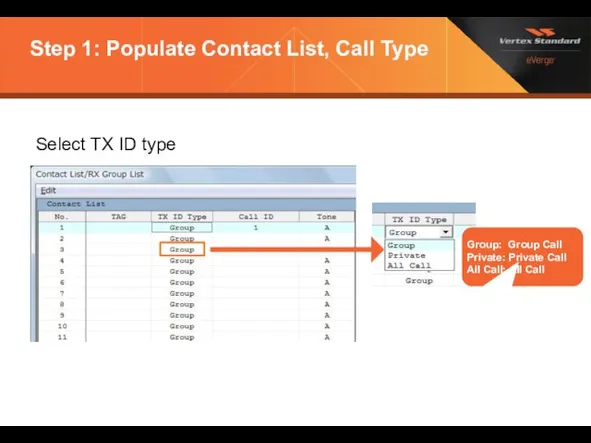
Step 1: Populate Contact List, Call Type
Select TX ID type
Group: Group
Step 1: Populate Contact List, Call Type
Select TX ID type
Group: Group
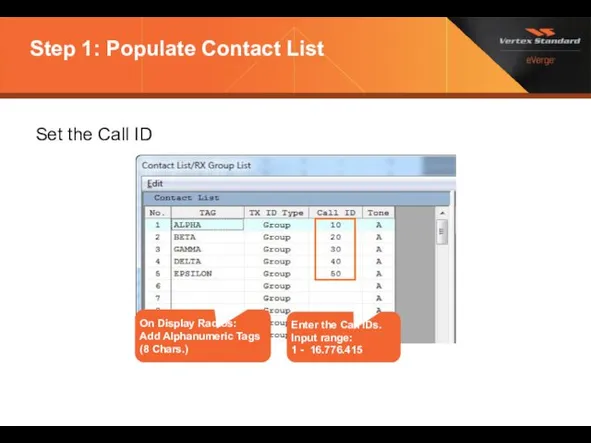
Step 1: Populate Contact List
Set the Call ID
Enter the Call IDs.
Input
Step 1: Populate Contact List
Set the Call ID
Enter the Call IDs.
Input
Step 1: Populate Contact List
The Contact List allows
for 128 Entries
Any
Step 1: Populate Contact List
The Contact List allows
for 128 Entries
Any
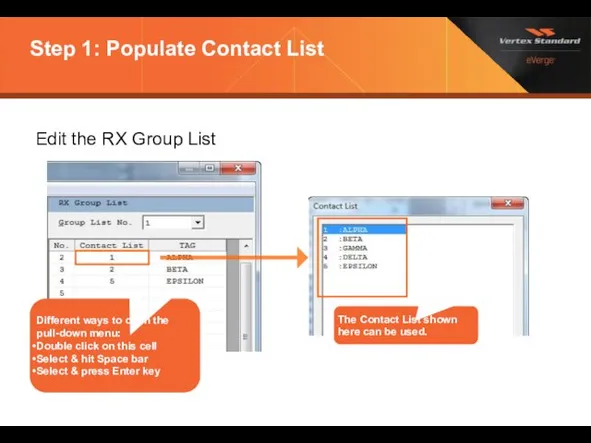
Step 1: Populate Contact List
Edit the RX Group List
The Contact List
Step 1: Populate Contact List
Edit the RX Group List
The Contact List
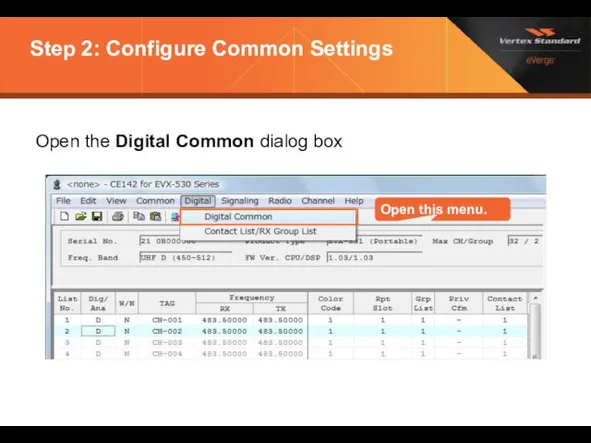
Step 2: Configure Common Settings
Open the Digital Common dialog box
Open this
Step 2: Configure Common Settings
Open the Digital Common dialog box
Open this
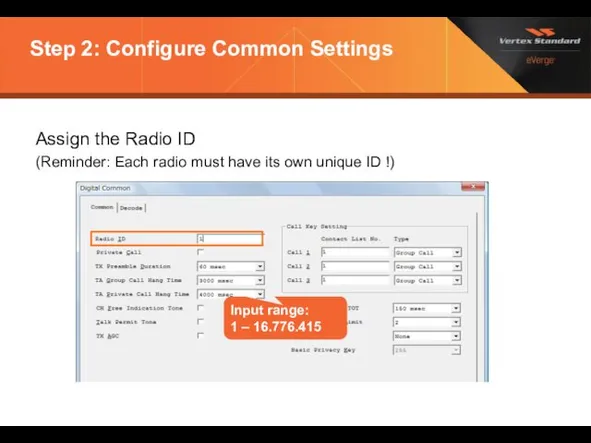
Step 2: Configure Common Settings
Assign the Radio ID
(Reminder: Each radio must
Step 2: Configure Common Settings
Assign the Radio ID
(Reminder: Each radio must
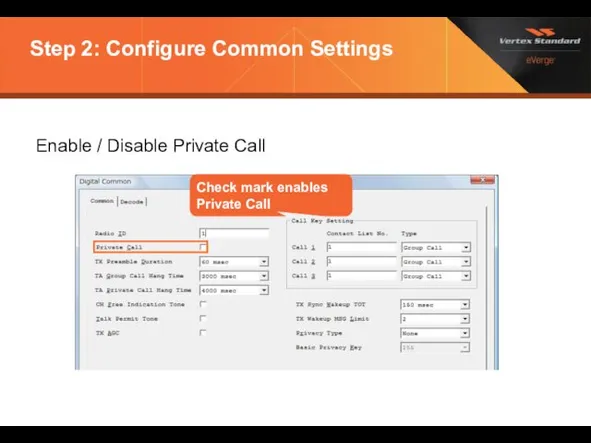
Step 2: Configure Common Settings
Enable / Disable Private Call
Check mark enables
Step 2: Configure Common Settings
Enable / Disable Private Call
Check mark enables
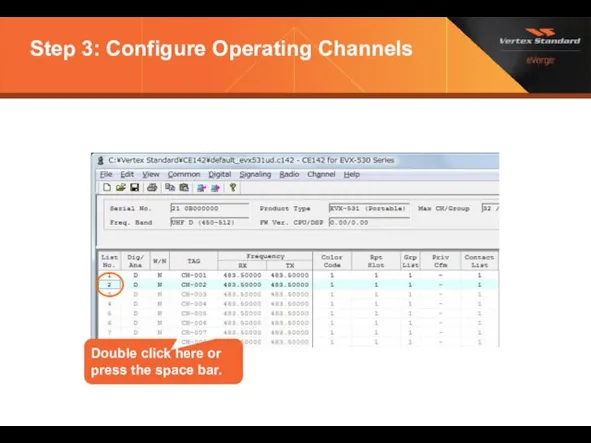
Step 3: Configure Operating Channels
Double click here or press the space
Step 3: Configure Operating Channels
Double click here or press the space
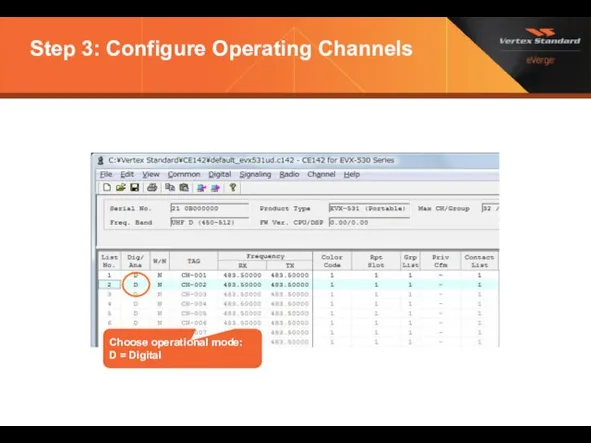
Step 3: Configure Operating Channels
Choose operational mode:
D = Digital
Step 3: Configure Operating Channels
Choose operational mode:
D = Digital
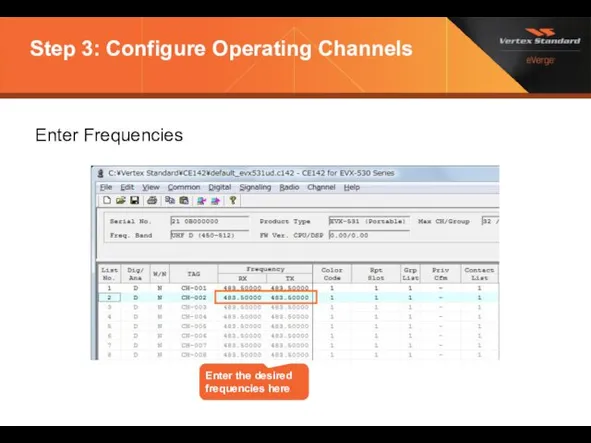
Step 3: Configure Operating Channels
Enter the desired frequencies here
Enter Frequencies
Step 3: Configure Operating Channels
Enter the desired frequencies here
Enter Frequencies
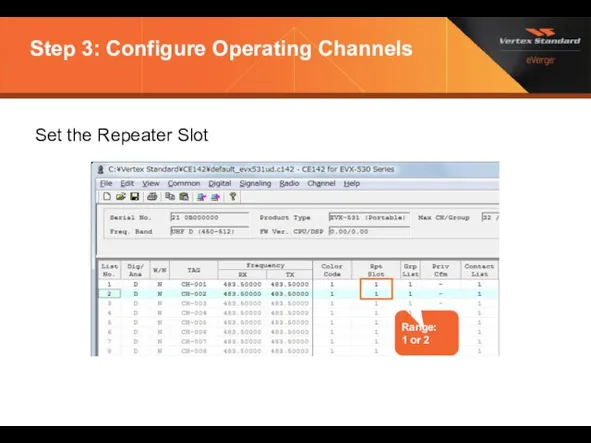
Step 3: Configure Operating Channels
Range:
1 or 2
Set the Repeater Slot
Step 3: Configure Operating Channels
Range:
1 or 2
Set the Repeater Slot
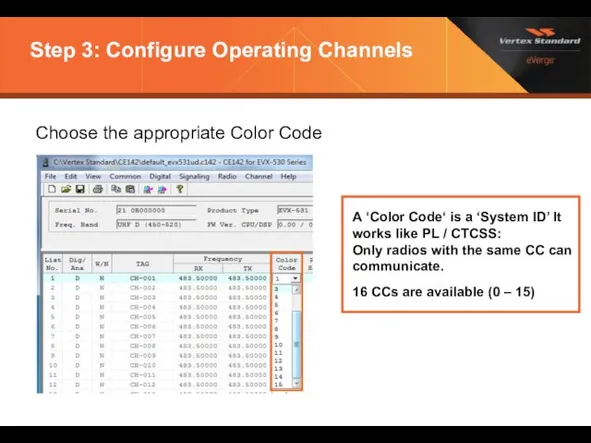
Step 3: Configure Operating Channels
Choose the appropriate Color Code
A ‘Color Code‘
Step 3: Configure Operating Channels
Choose the appropriate Color Code
A ‘Color Code‘
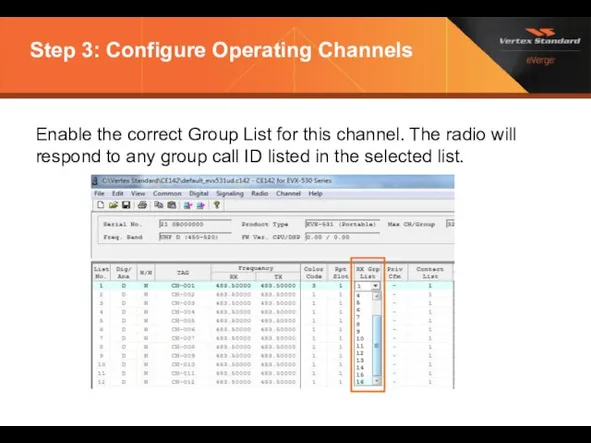
Step 3: Configure Operating Channels
Enable the correct Group List for this
Step 3: Configure Operating Channels
Enable the correct Group List for this

Step 3: Configure Operating Channels
Select the DESTINATION ADDRESS (Contact) for a
Step 3: Configure Operating Channels
Select the DESTINATION ADDRESS (Contact) for a
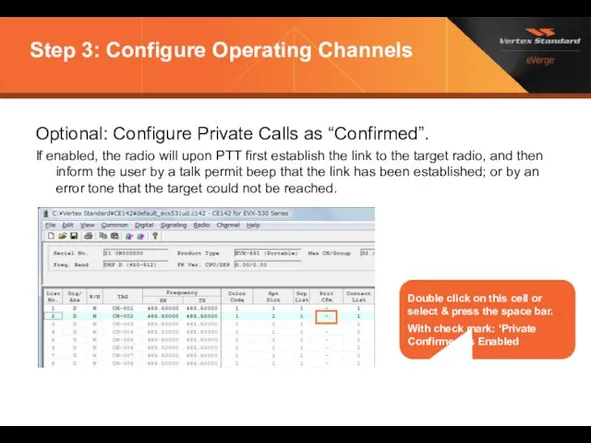
Step 3: Configure Operating Channels
Optional: Configure Private Calls as “Confirmed”.
If enabled,
Step 3: Configure Operating Channels
Optional: Configure Private Calls as “Confirmed”.
If enabled,

Step 3: Configure Operating Channels
- Register Channel in Group List
Enter the
Step 3: Configure Operating Channels
- Register Channel in Group List
Enter the
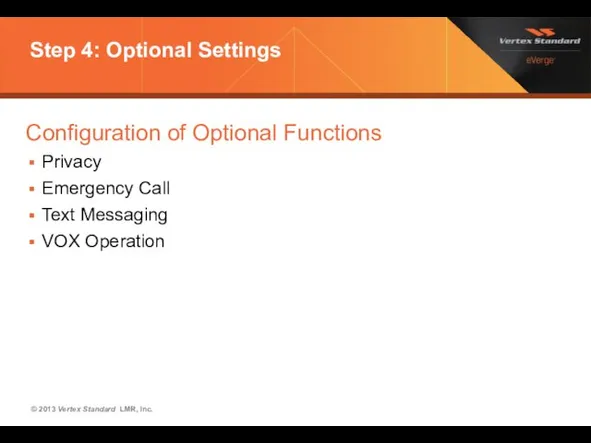
Step 4: Optional Settings
Configuration of Optional Functions
Privacy
Emergency Call
Text Messaging
VOX Operation
Step 4: Optional Settings
Configuration of Optional Functions
Privacy
Emergency Call
Text Messaging
VOX Operation
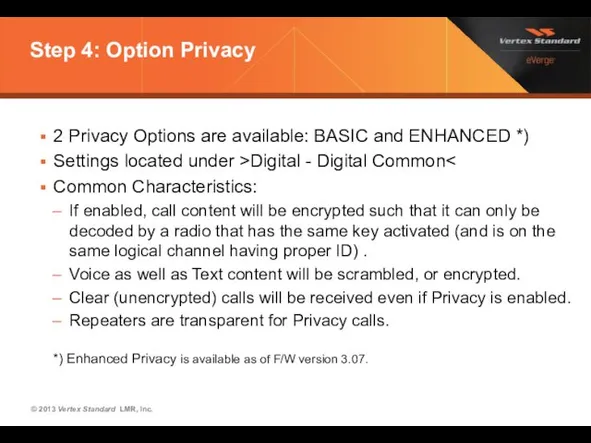
Step 4: Option Privacy
2 Privacy Options are available: BASIC and ENHANCED
Step 4: Option Privacy
2 Privacy Options are available: BASIC and ENHANCED
Step 4: Optional Settings
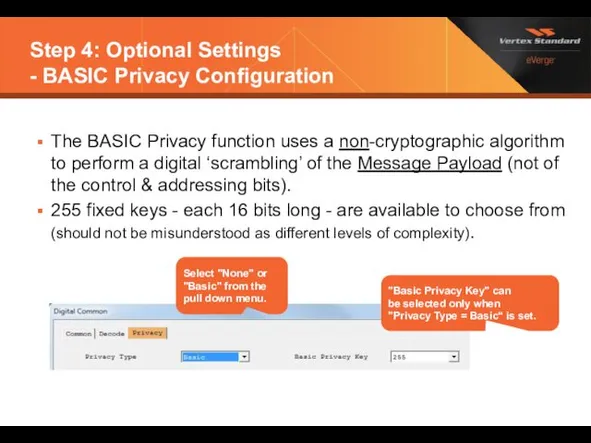
- BASIC Privacy Configuration
The BASIC Privacy function uses
Step 4: Optional Settings
- BASIC Privacy Configuration
The BASIC Privacy function uses
Step 4: Optional Settings
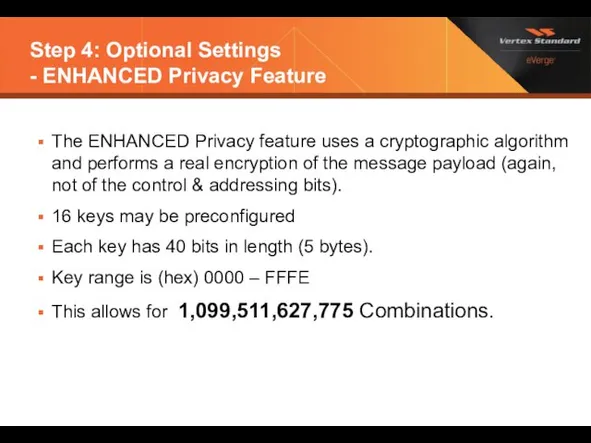
- ENHANCED Privacy Feature
The ENHANCED Privacy feature
Step 4: Optional Settings
- ENHANCED Privacy Feature
The ENHANCED Privacy feature
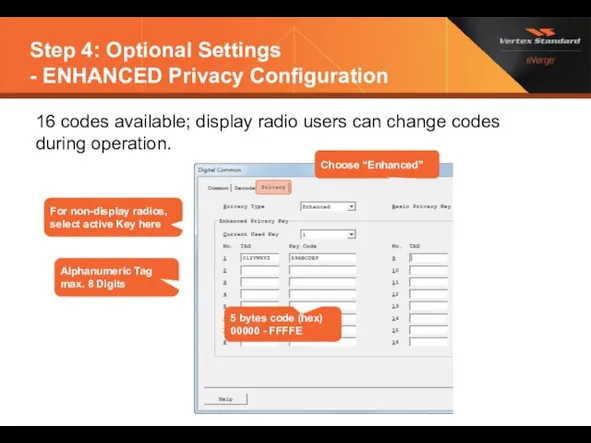
Step 4: Optional Settings
- ENHANCED Privacy Configuration
16 codes available; display radio
Step 4: Optional Settings
- ENHANCED Privacy Configuration
16 codes available; display radio
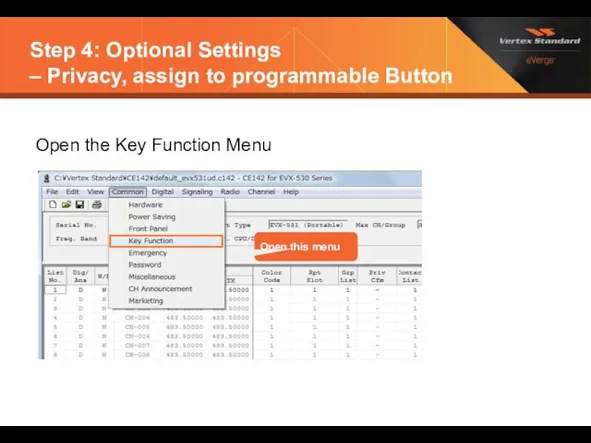
Step 4: Optional Settings
– Privacy, assign to programmable Button
Open the
Step 4: Optional Settings
– Privacy, assign to programmable Button
Open the
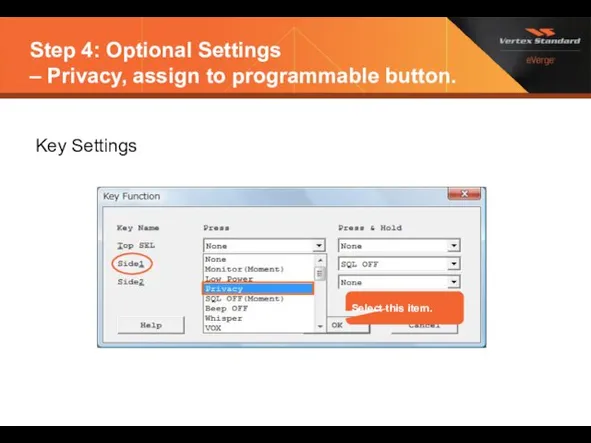
Step 4: Optional Settings
– Privacy, assign to programmable button.
Key Settings
Select
Step 4: Optional Settings
– Privacy, assign to programmable button.
Key Settings
Select
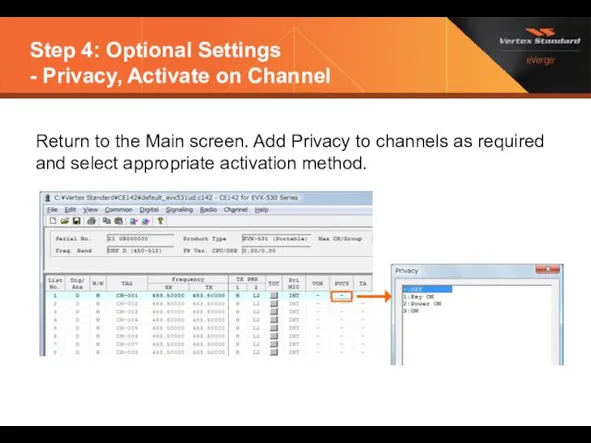
Step 4: Optional Settings
- Privacy, Activate on Channel
Return to the
Step 4: Optional Settings
- Privacy, Activate on Channel
Return to the

Step 4: Optional Settings
- Emergency Function (Digital Mode)
Open the Emergency
Step 4: Optional Settings
- Emergency Function (Digital Mode)
Open the Emergency
Step 4: Optional Settings
- Emergency Function (Digital Mode)
Configuration Window for
Step 4: Optional Settings
- Emergency Function (Digital Mode)
Configuration Window for
Step 4: Optional Settings
- Emergency Function (Digital Mode)
Configuration Window for
Step 4: Optional Settings
- Emergency Function (Digital Mode)
Configuration Window for
Step 4: Optional Settings
- Emergency Function (Digital Mode)
Assign Emergency to
Step 4: Optional Settings
- Emergency Function (Digital Mode)
Assign Emergency to
Step 4: Optional Settings
- Text Messages
The Text Messaging Feature is
Step 4: Optional Settings
- Text Messages
The Text Messaging Feature is
Step 4: Optional Settings
- Text Messages
Open Text Editor.
Enter texts as
Step 4: Optional Settings
- Text Messages
Open Text Editor.
Enter texts as
Step 4: Optional Settings
- Text Messages
Under >Digital Common, Common< assign
Step 4: Optional Settings
- Text Messages
Under >Digital Common, Common< assign
Step 4: Optional Settings
- Text Messages
2. Select the intended QTM:
a.
Step 4: Optional Settings
- Text Messages
2. Select the intended QTM:
a.
Step 4: Optional Settings
- Text Messages
3. Close the >Digital Common<
Step 4: Optional Settings
- Text Messages
3. Close the >Digital Common<
Step 4: Optional Settings
- Text Messages
Under >Common, Key Function< assign
Step 4: Optional Settings
- Text Messages
Under >Common, Key Function< assign
Step 4: Optional Settings
- VOX Function
VOX (Voice Operated Transmission) can
Step 4: Optional Settings
- VOX Function
VOX (Voice Operated Transmission) can

Step 4: Optional Settings
- VOX Function
In main window, active VOX
Step 4: Optional Settings
- VOX Function
In main window, active VOX
EVX-534/539
Display Radios
Menu-guided Operation
EVX-534/539
Display Radios
Menu-guided Operation
Operation – Call Management
Programming Prerequisite:
The CALL menu must have a PF
Operation – Call Management
Programming Prerequisite:
The CALL menu must have a PF
Operation – Call Management
Invoke the CALL menu by pressing the assigned
Operation – Call Management
Invoke the CALL menu by pressing the assigned
Operation – Call Management
Once the wanted contact is displayed, press the
Operation – Call Management
Once the wanted contact is displayed, press the
 Корректировки по сайту NLS Kazakhtan
 Алфавитный подход к определению количества информации
 Основные компоненты компьютера и их функции
 Библиографическое описание источников информации
 Правила составления списка литературы
 Database management systems. Relational algebra
 Эксплуатация подсистем безопасности АС. Криптографическое преобразование информации в АС. (Тема 7)
 Информатика, медицинская информатика и статистика
 Разработка консольного приложения с элементами ООП. Интернет магазин продуктов
 Компьютерная графика
 Расчетные методики ПП ЭкоСфера-предприятие. Расчет выбросов при растаривании химреагентов
 Файловые системы
 Сайт andreevats.ru
 Менеджер блогера
 Как попасть на обучение
 Урок Модели и моделирование
 Рекомендации по оформлению мультимедийной презентации
 Электронная библиотека БГУ
 Режимы и способы обработки данных
 Поиск информации в Интернет отличная презентация
 Системный анализ и моделирование процессов в промышленной безопасности
 Комп’ютерна графіка
 Firewall
 Информатизация общества. Основы классификации и структурирования информации
 Выполнение интеграционного тестирования программы
 Разработка приложения для файлового обмена (WEB)
 Основные понятия баз данных. Лекция 1
 Символьные строки